Real-time Draft Saving for Forms
Demo Project
https://editor.momen.app/tool/QP7kZReRLgM/WEB?code=O66W2KjDbfKyB&ref=0562398
Introduction
- Goal: Build a form system that prevents data loss by saving user inputs in real time, eliminating the need for manual save actions.
- Use Cases: Long-text editing, multi-step government applications, online examinations, and any scenario where users are at high risk of losing data due to accidental page closure or network interruptions.
- Core Logic: When users click “Create”, the system checks for an existing blank draft. If none exists, it inserts a new record; if one exists, it reuses that ID. When input fields lose focus (
On blur), the system automatically updates the record and changes its status fromBlank DrafttoFilled Draft. A dedicated list panel displays all historical drafts for easy recovery.
Steps
This tutorial uses pre-styled layout blocks from the “Common UI Presets ” template page. These preset elements provide basic styling and layout only; they contain no conditional logic, data bindings, or Actionflows. You can copy them directly to skip manual styling and focus on the core logic.
Data Model
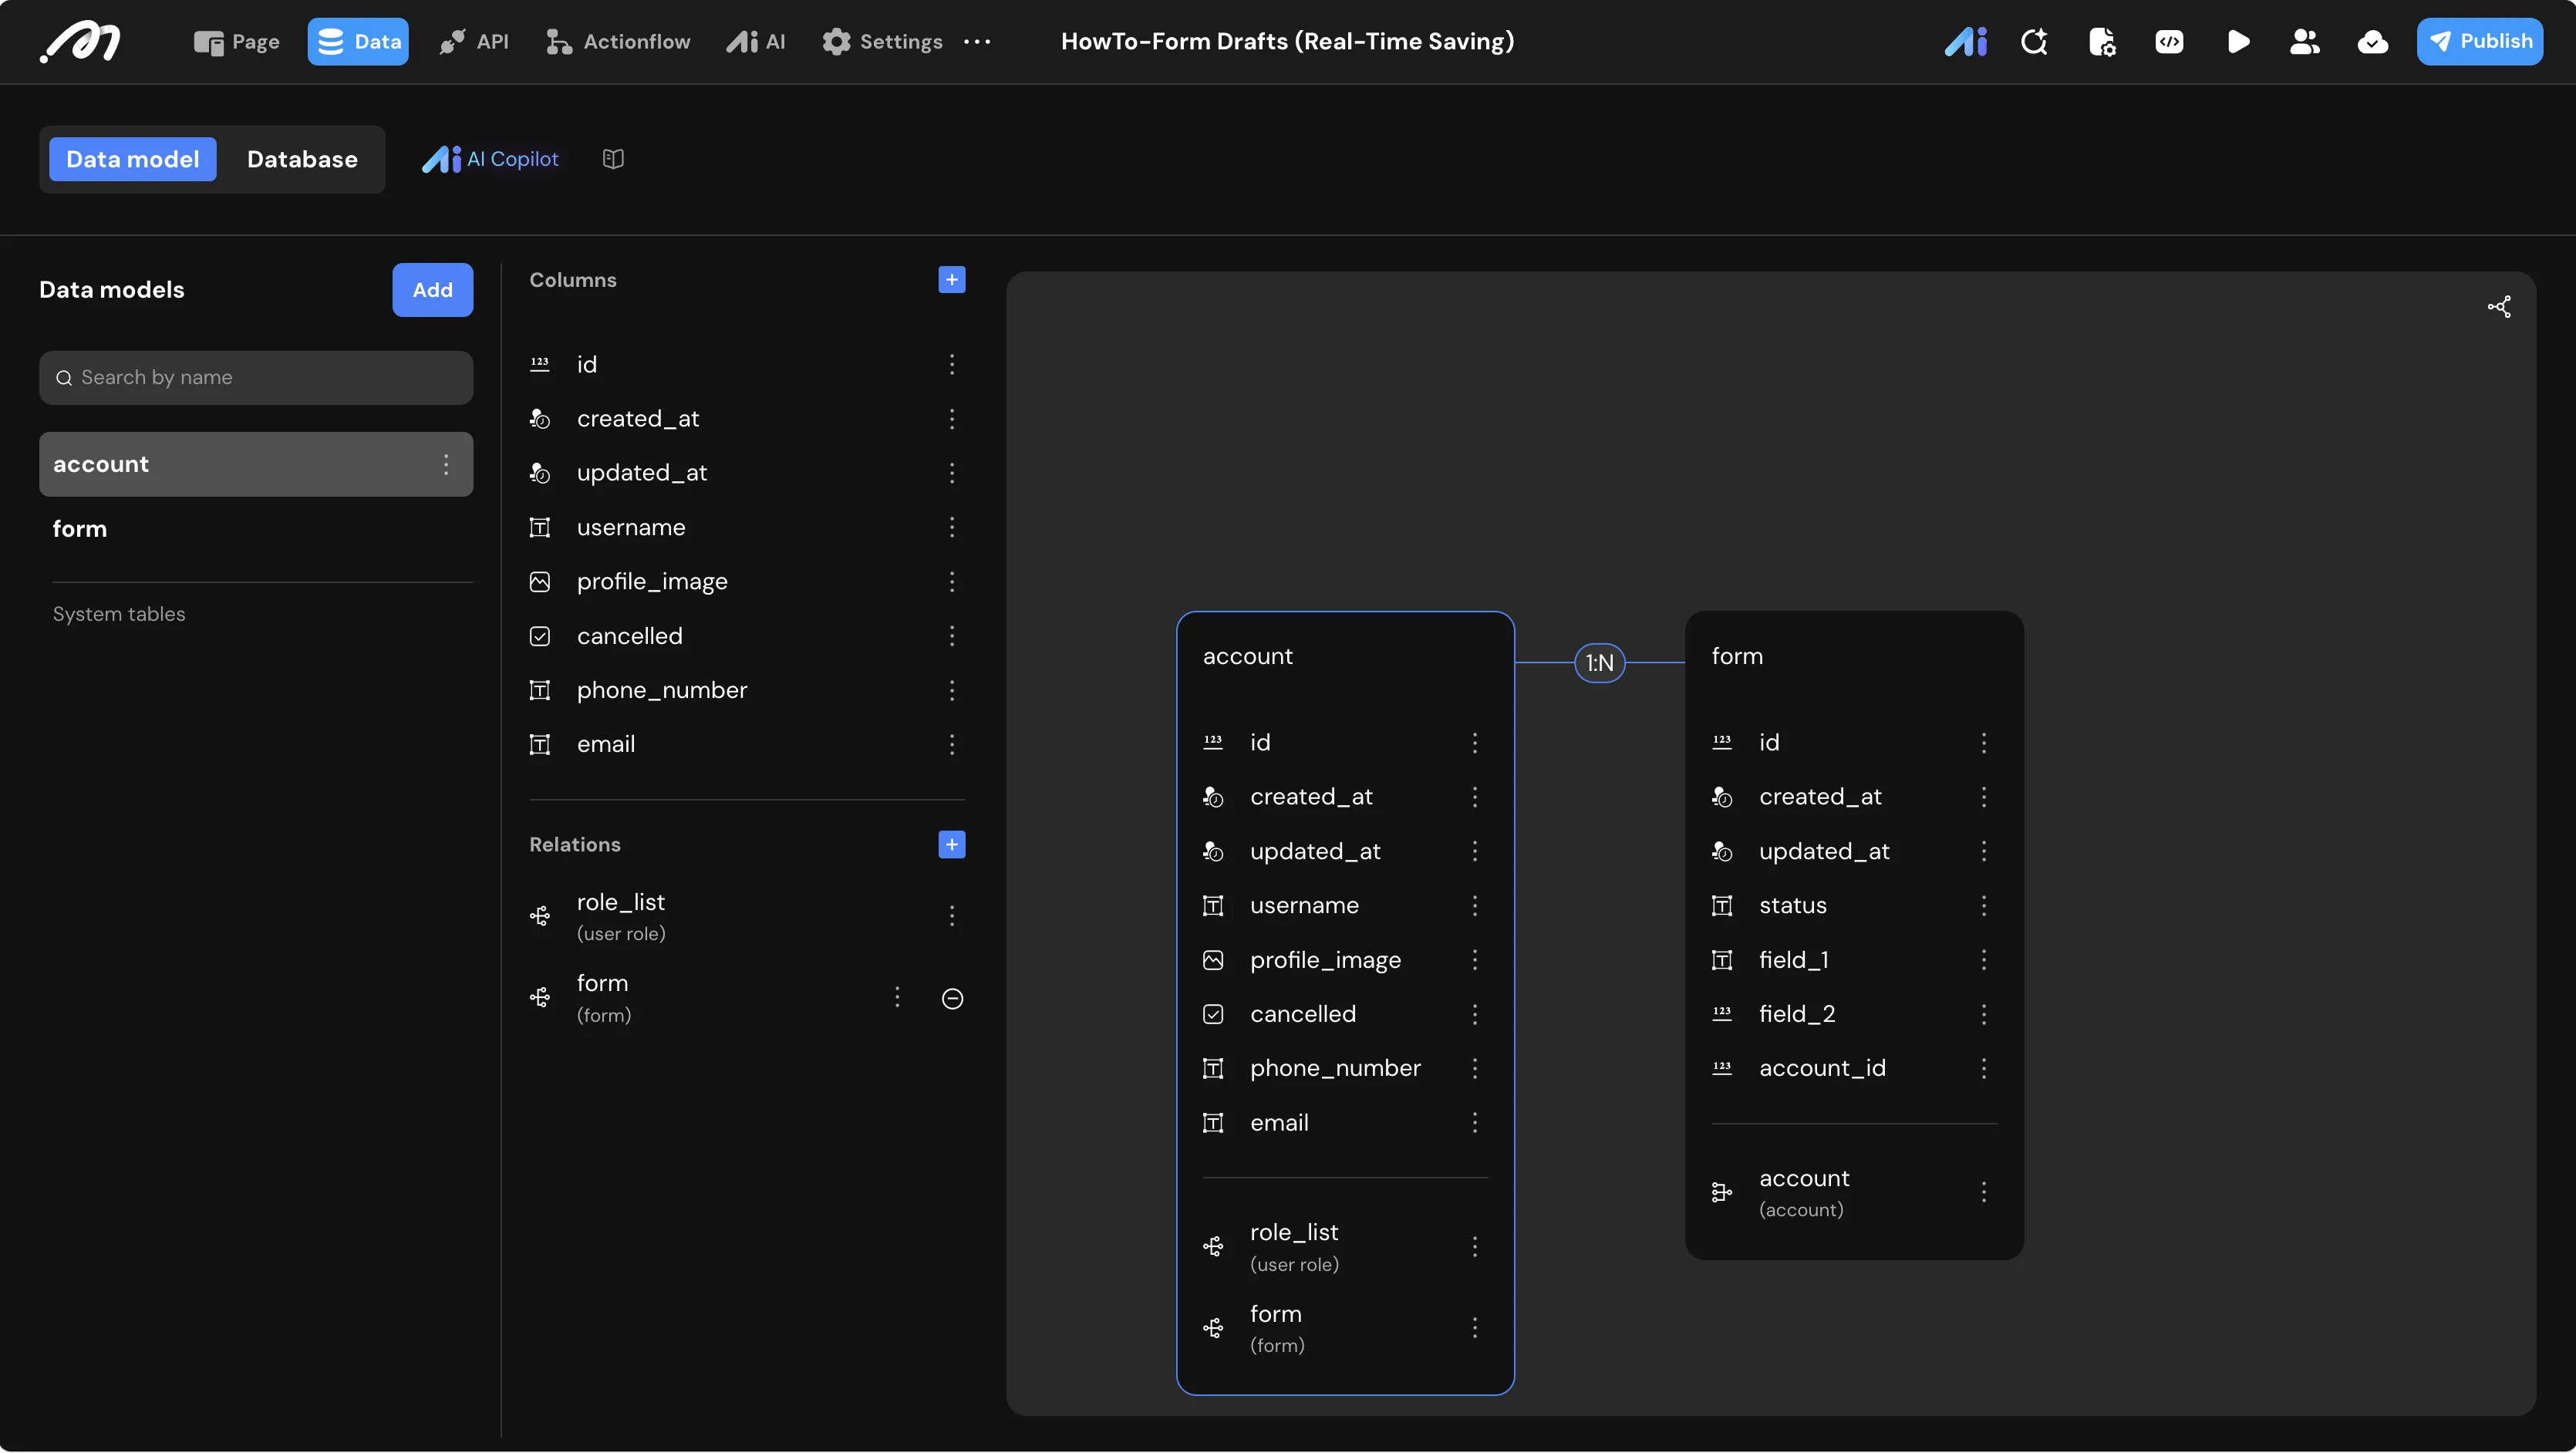
To implement the draft system, create a table in the database to store user progress and track status.
Table Name: form
Navigate to the Data tab in the Top Navigation Bar to configure this table.
| Field Name | Type | Note |
|---|---|---|
id | Bigint | Auto-generated, unique identifier |
status | Text | Enumerated values: Blank Draft, Filled Draft, Submitted, Deleted |
field_1 | Text | Business input field 1 |
field_2 | Bigint | Business input field 2 |
account_id | Bigint | Foreign key referencing id in the account table |
Relationship Mapping: The account table and form table have a One-to-Many relationship (one account owns multiple form/draft records).
Status Flow:The status field governs the entire lifecycle of a record:
Blank Draft: A placeholder created when the user opens the modal for the first time.Filled Draft: The user has filled in at least one field and the draft has been auto-saved.Submitted: The form has been officially submitted. It no longer appears in the draft list.Deleted: The draft has been soft-deleted. It no longer appears in the draft list.
Page-Level Data Source
Configure a data source at the Page Form Drafts level to check in real time whether a blank draft already exists for the current logged-in user.
- Open the Data panel on the left sidebar and click + next to Data Sources.
- Set Name to
source_form_empty_draft. - Target Table: Select
form. - Request Type:
Query. - Limit:
1. - Query Criteria (combined with
And):account_idEqual toLogged in user/idstatusEqual to"Blank Draft"
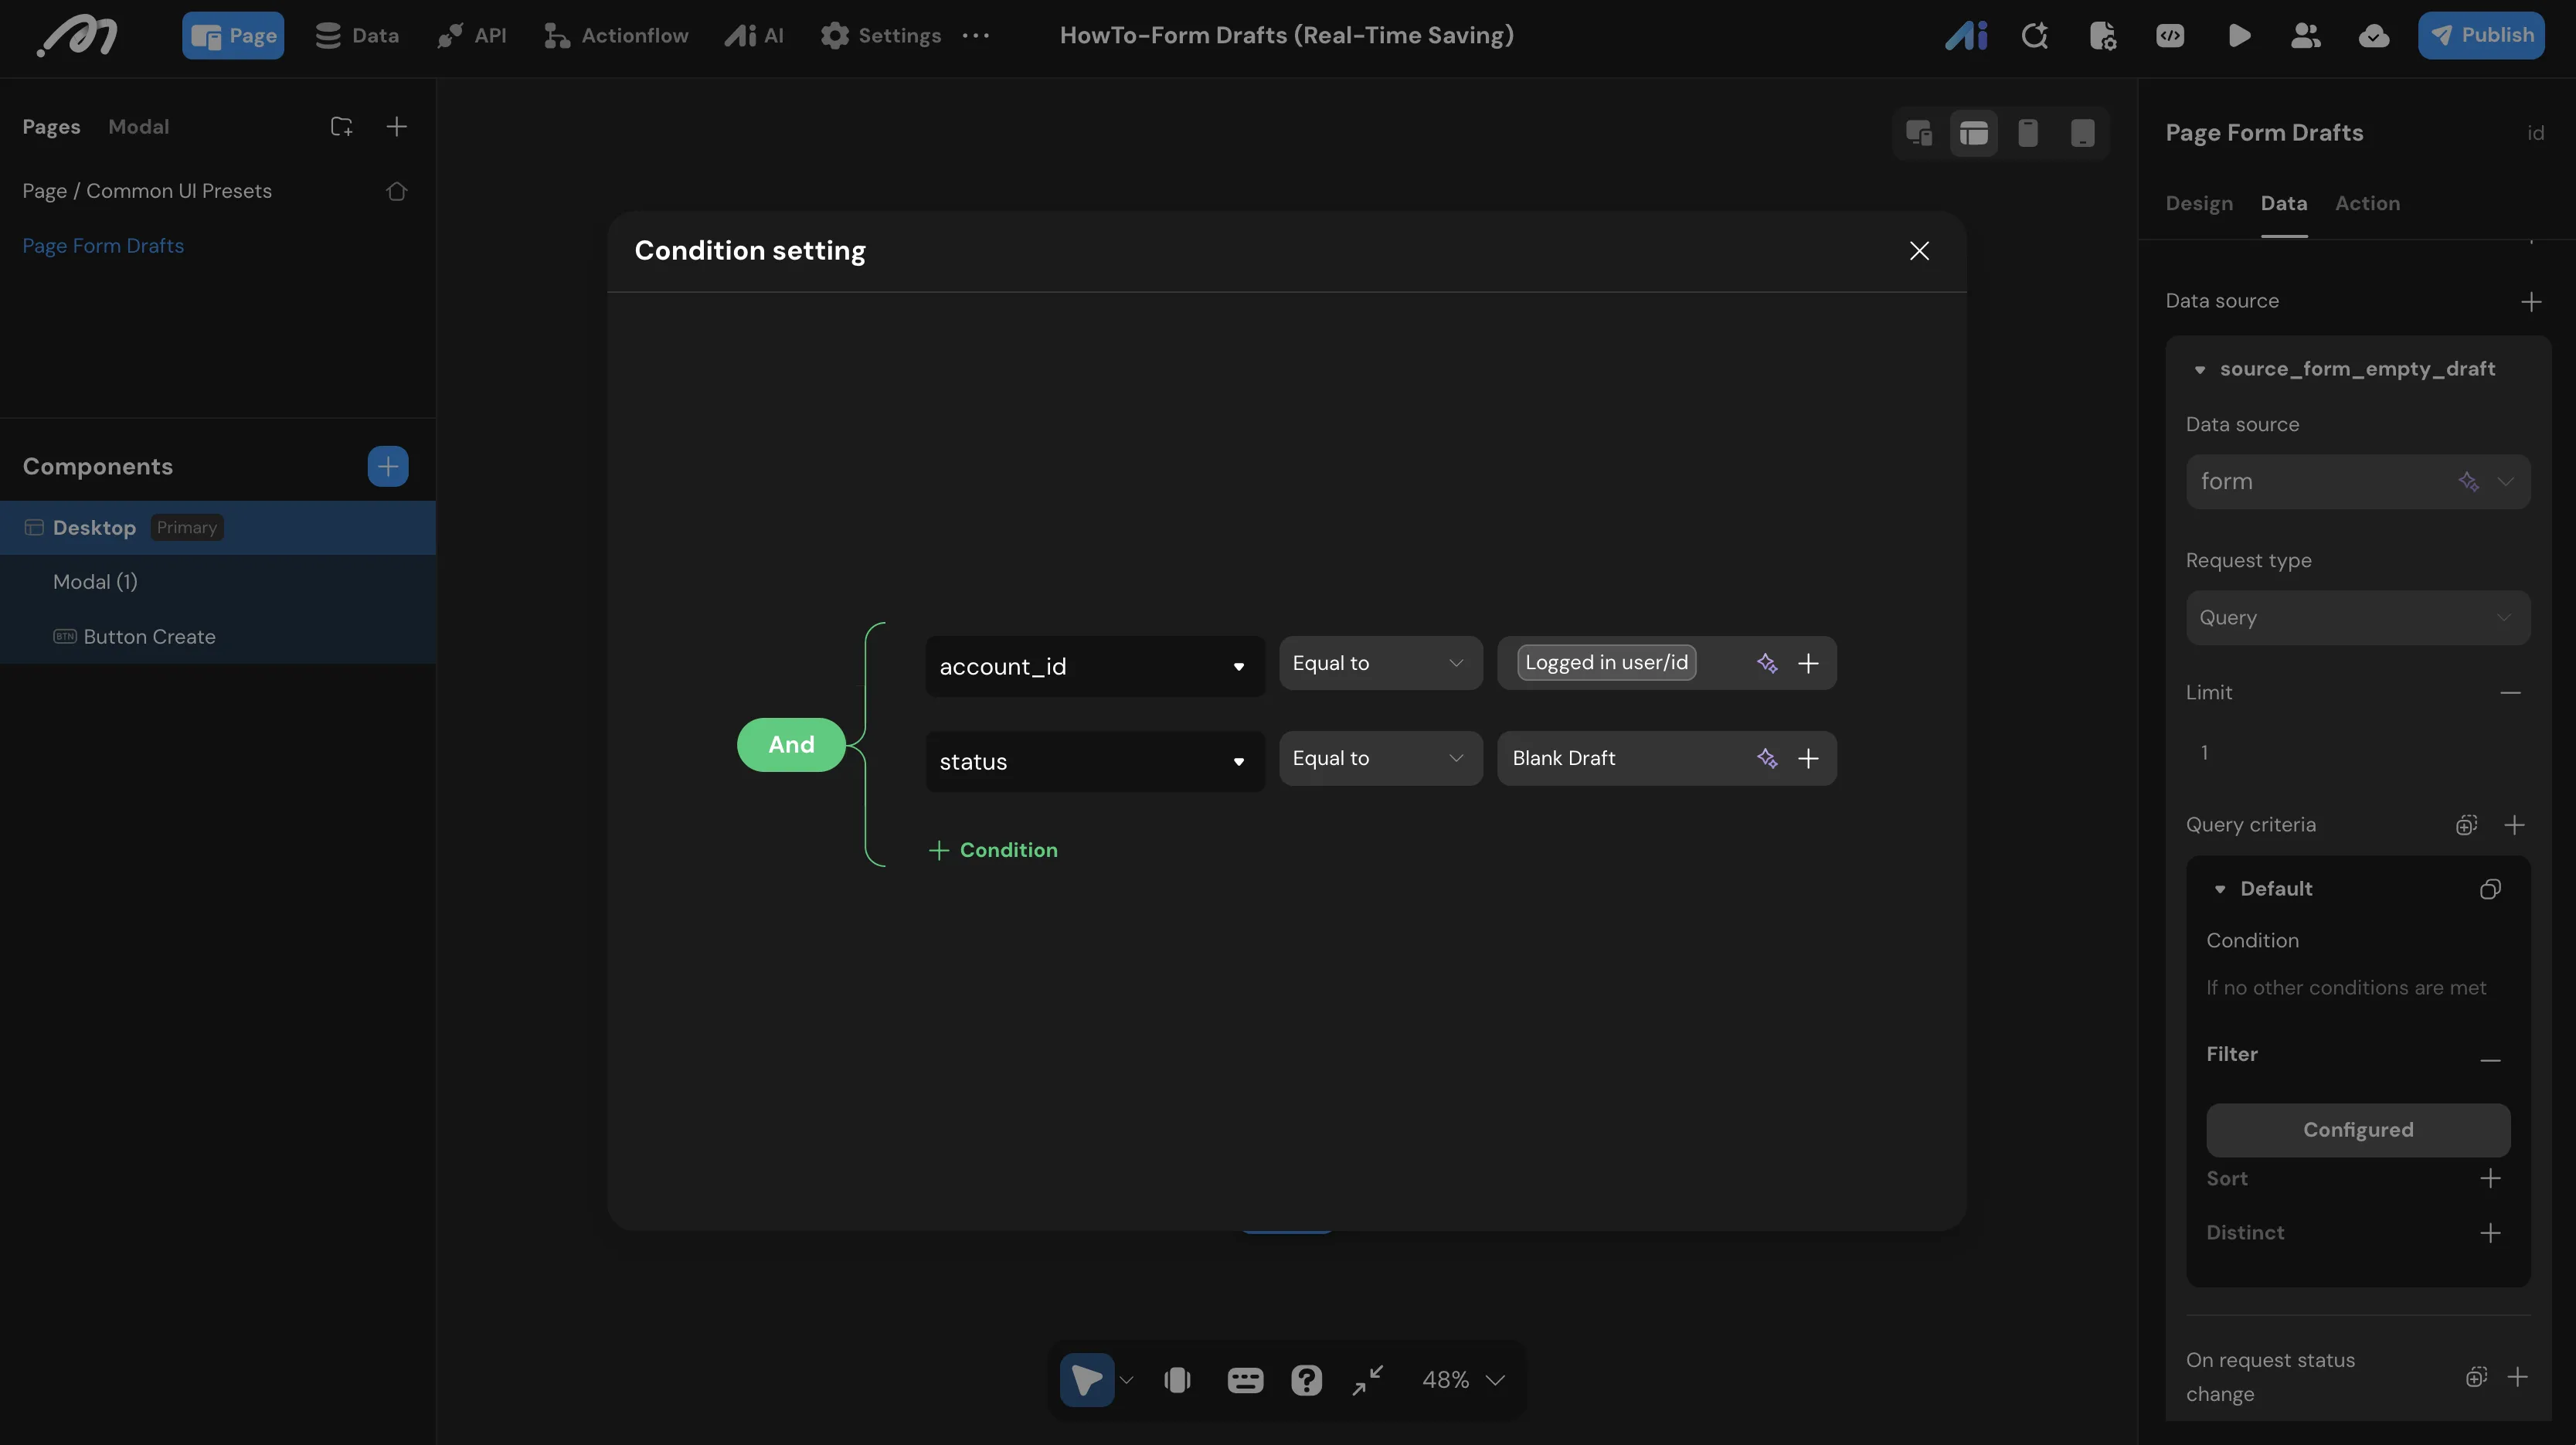
Reusing Blank Drafts:This logic ensures that each logged-in user has at most one Blank Draft record at any given time. When the user clicks Create again, the system simply reuses the existing blank record instead of generating useless empty entries.
Create Button Actionflow
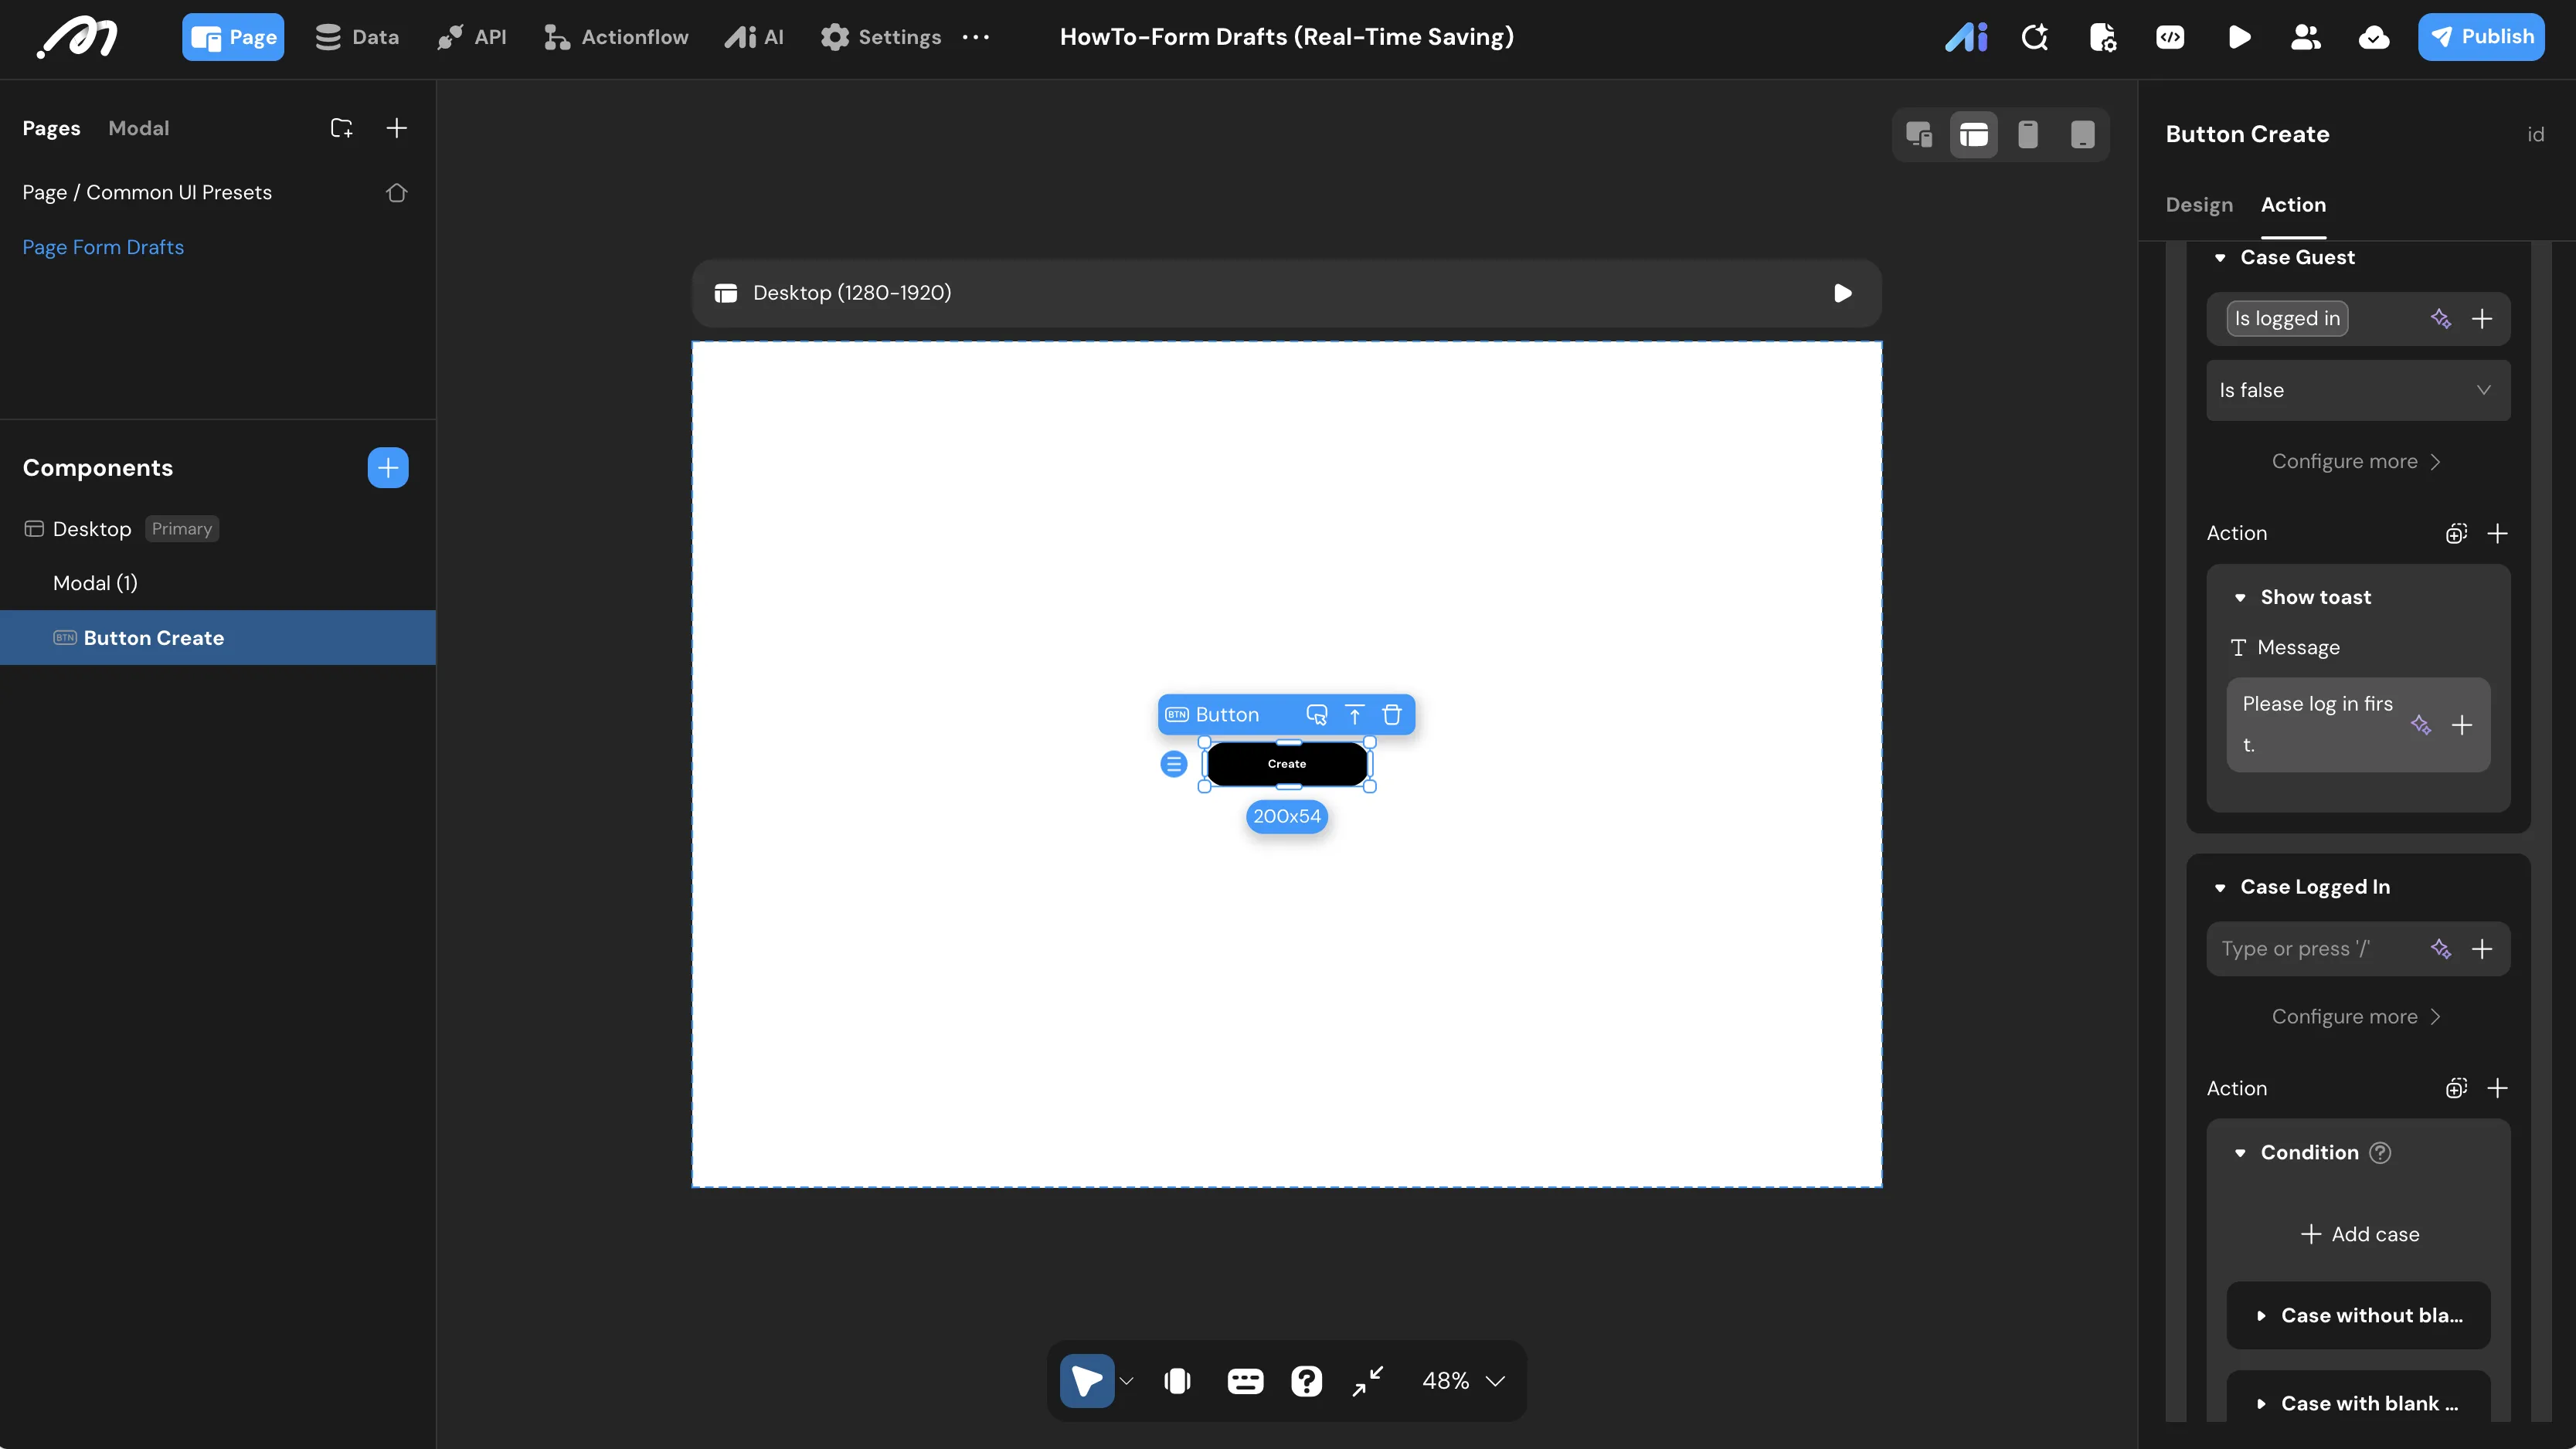
Select Button Create on the main page and configure its OnClick event. This actionflow handles login validation and blank draft deduplication.
-
Login Check: Add a Condition node.
- Name the branch
Case: Guest. - Condition:
getIsLoggedInisfalse. - Action: Add a Show toast node with the message
Please log in first.
- Name the branch
-
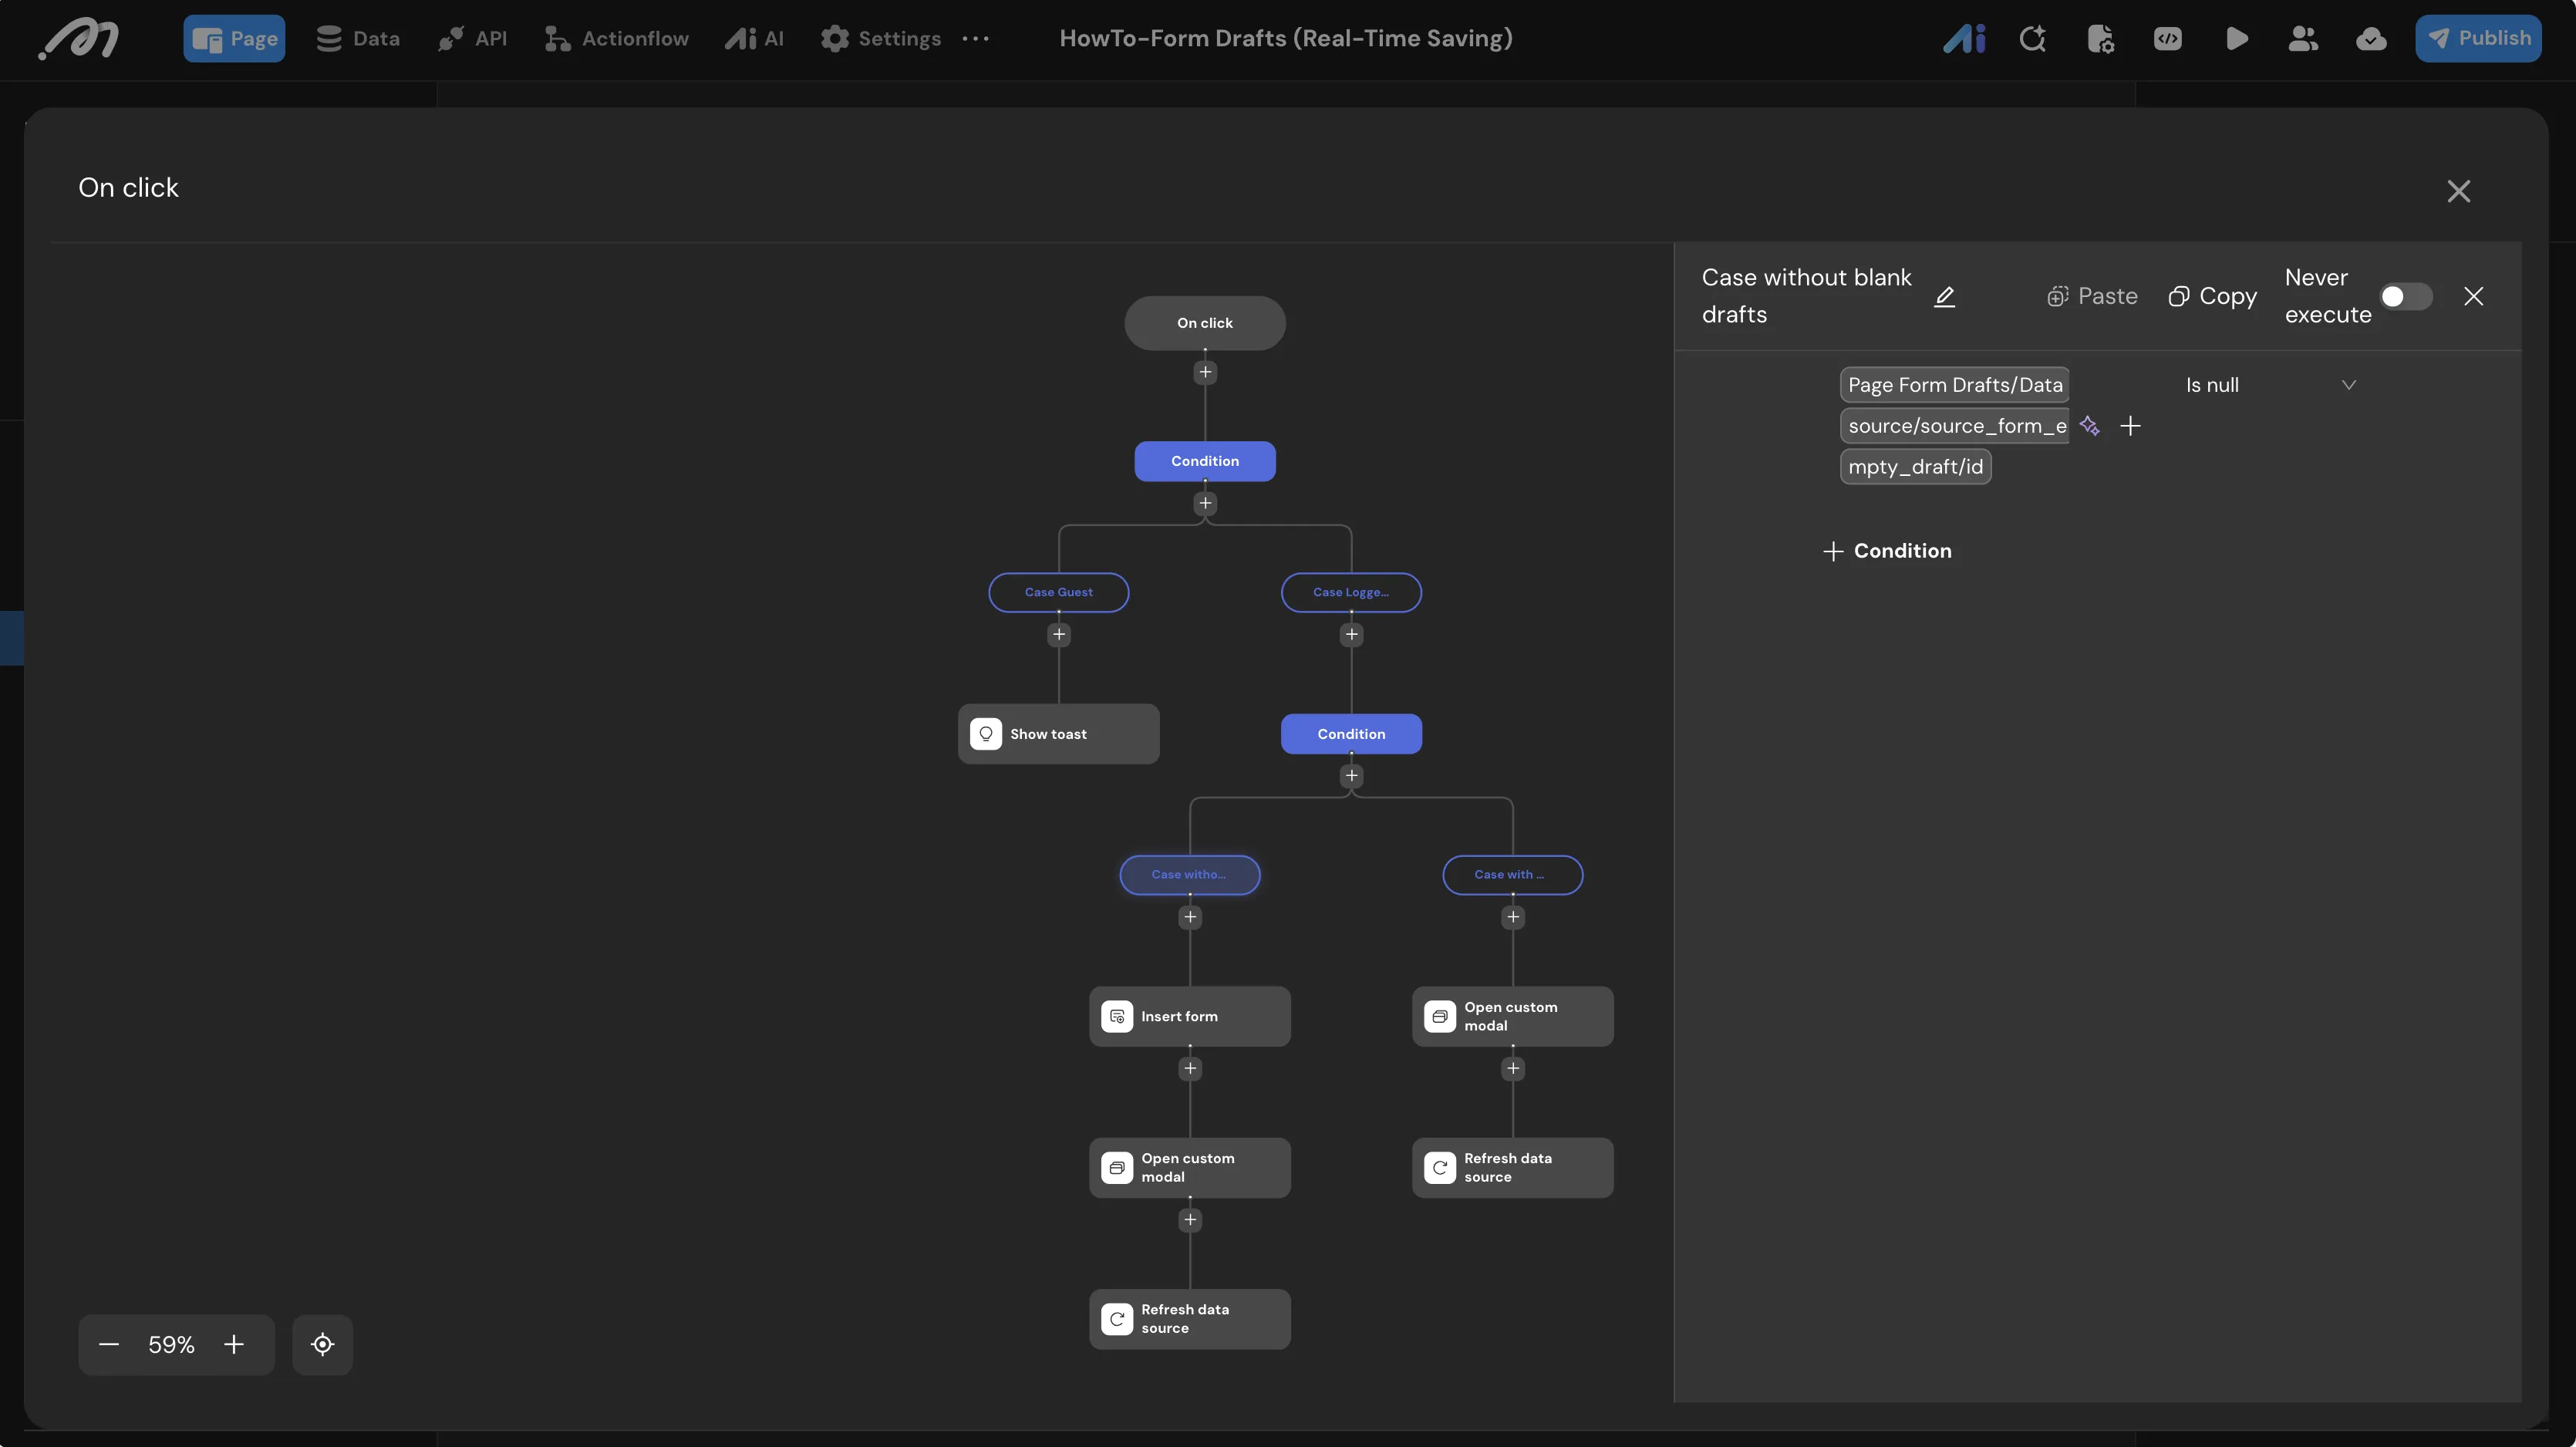
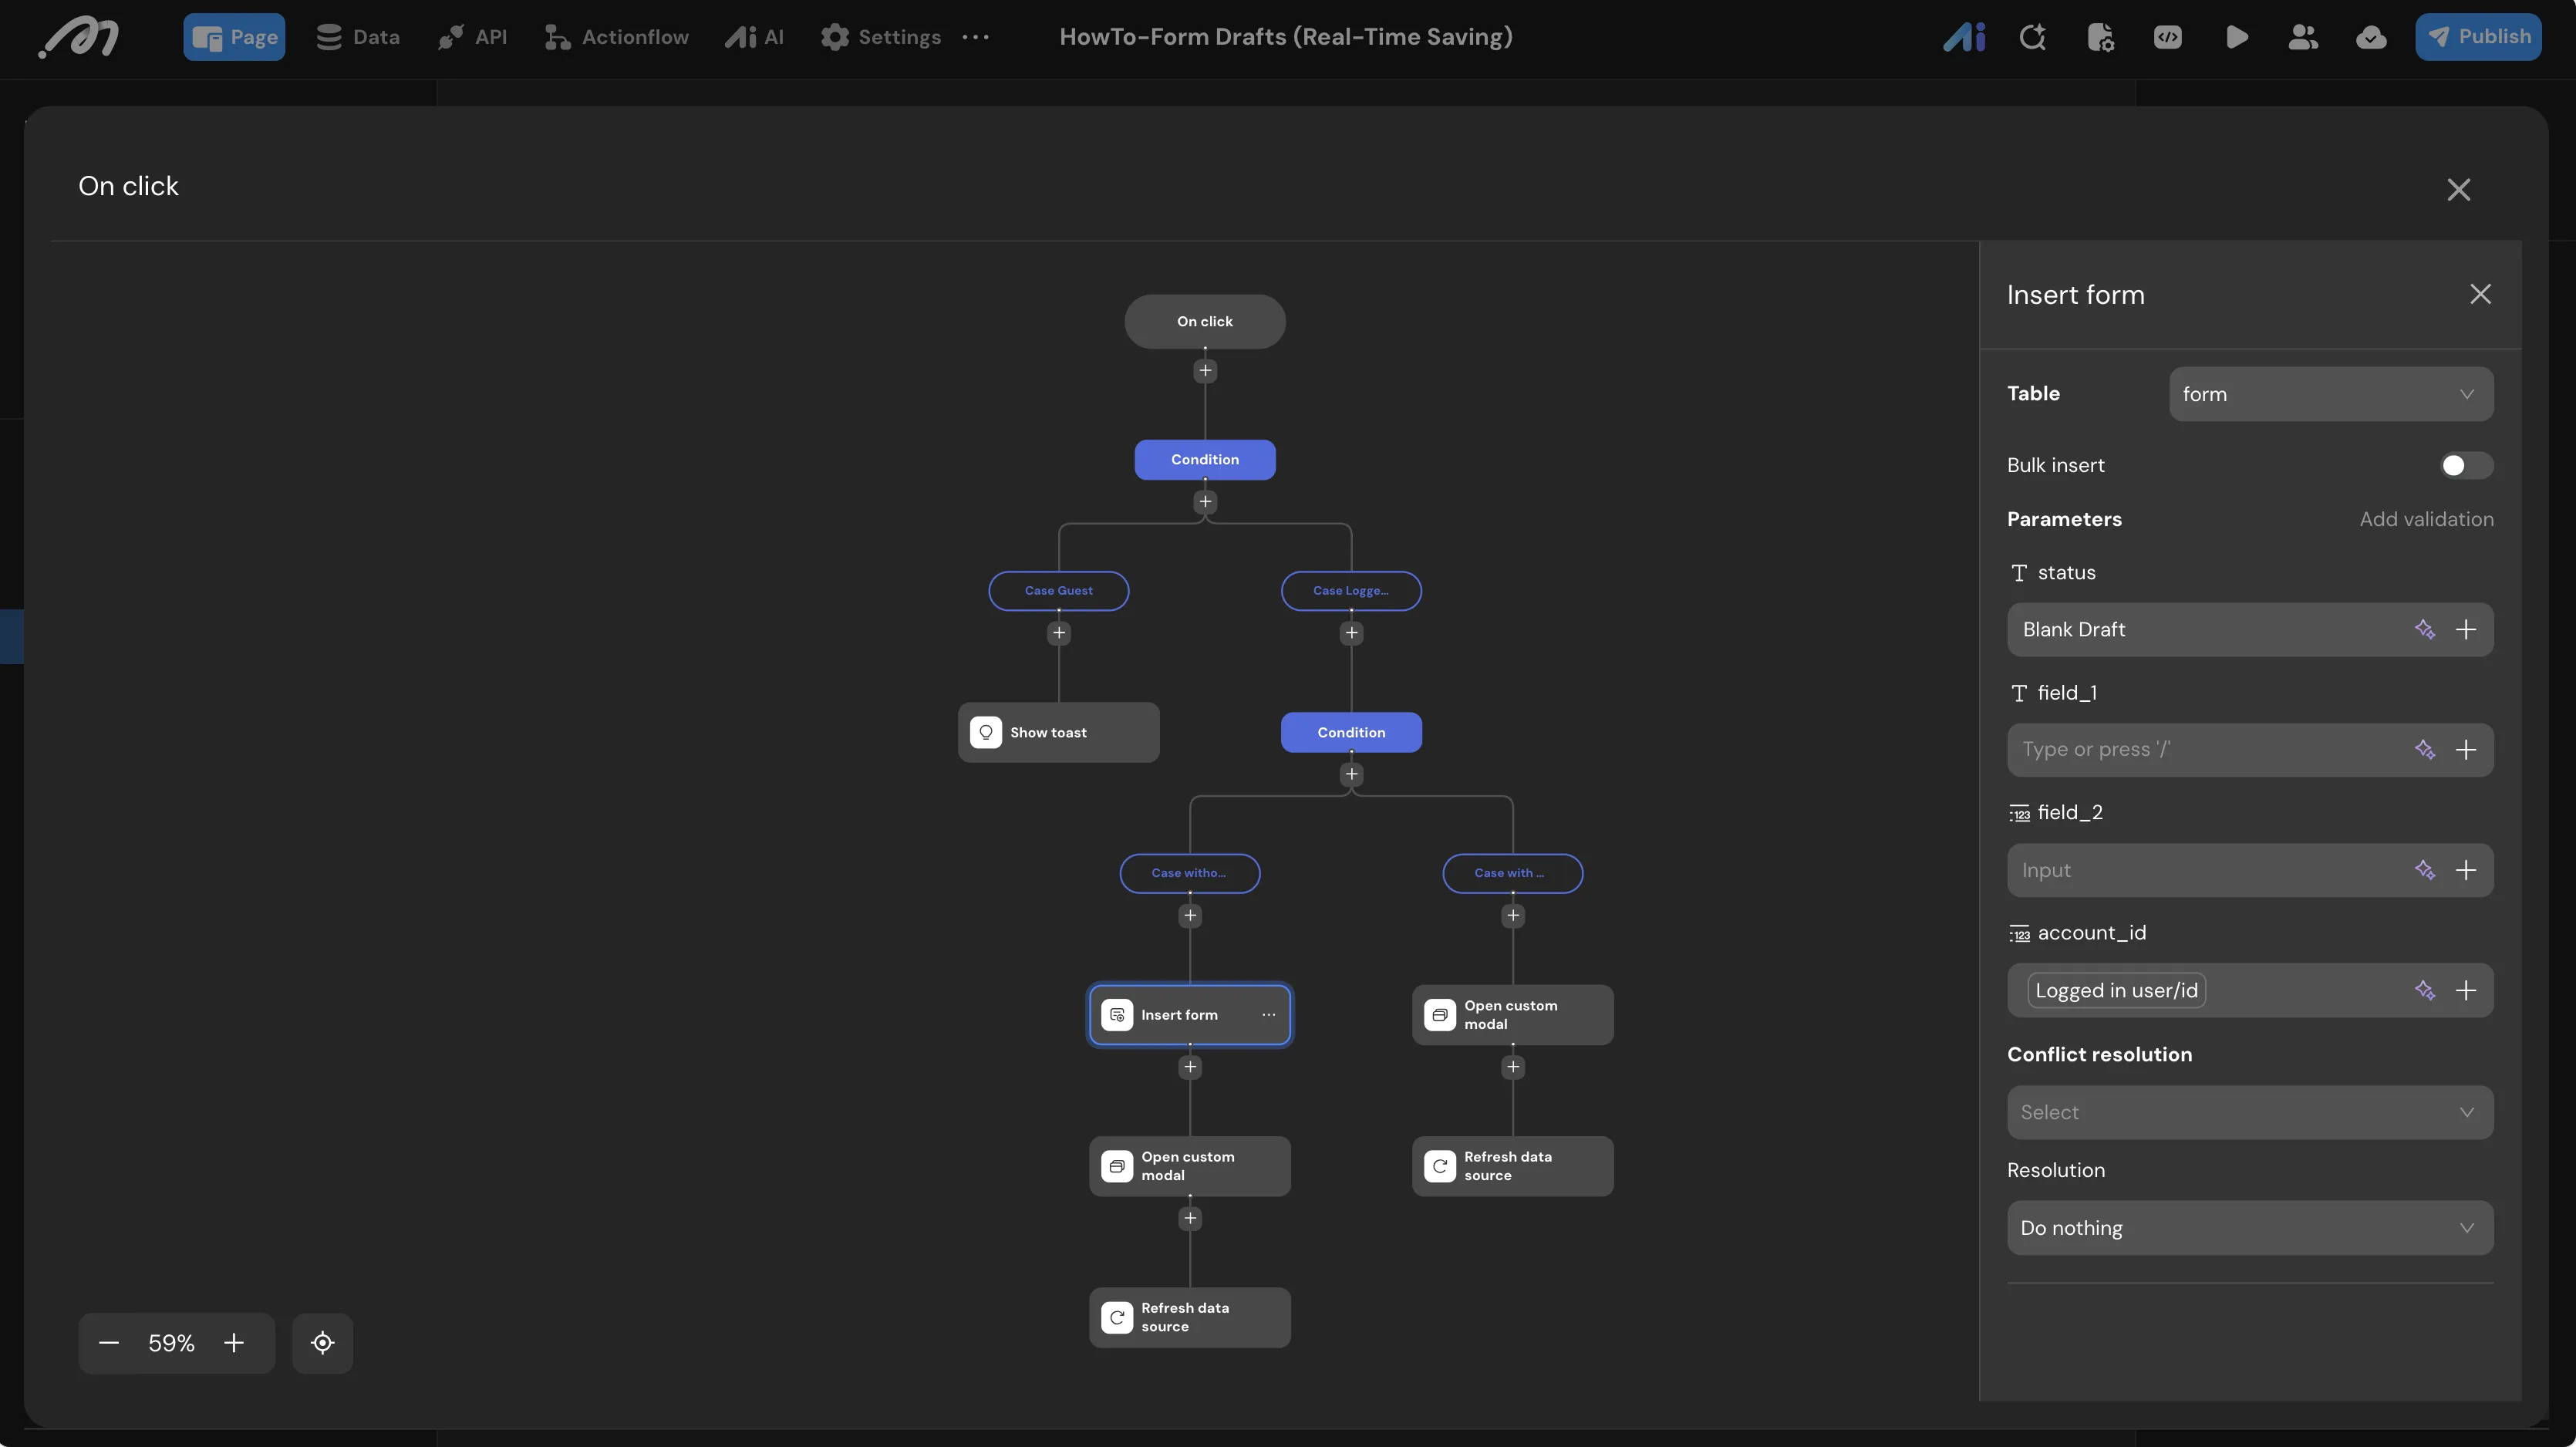
Blank Draft Check: Under the
Case: Logged Inbranch, add another nested Condition node.- Path 1 - No Blank Draft: Set the condition to
source_form_empty_draft/idisnull.- Insert Data: Target table
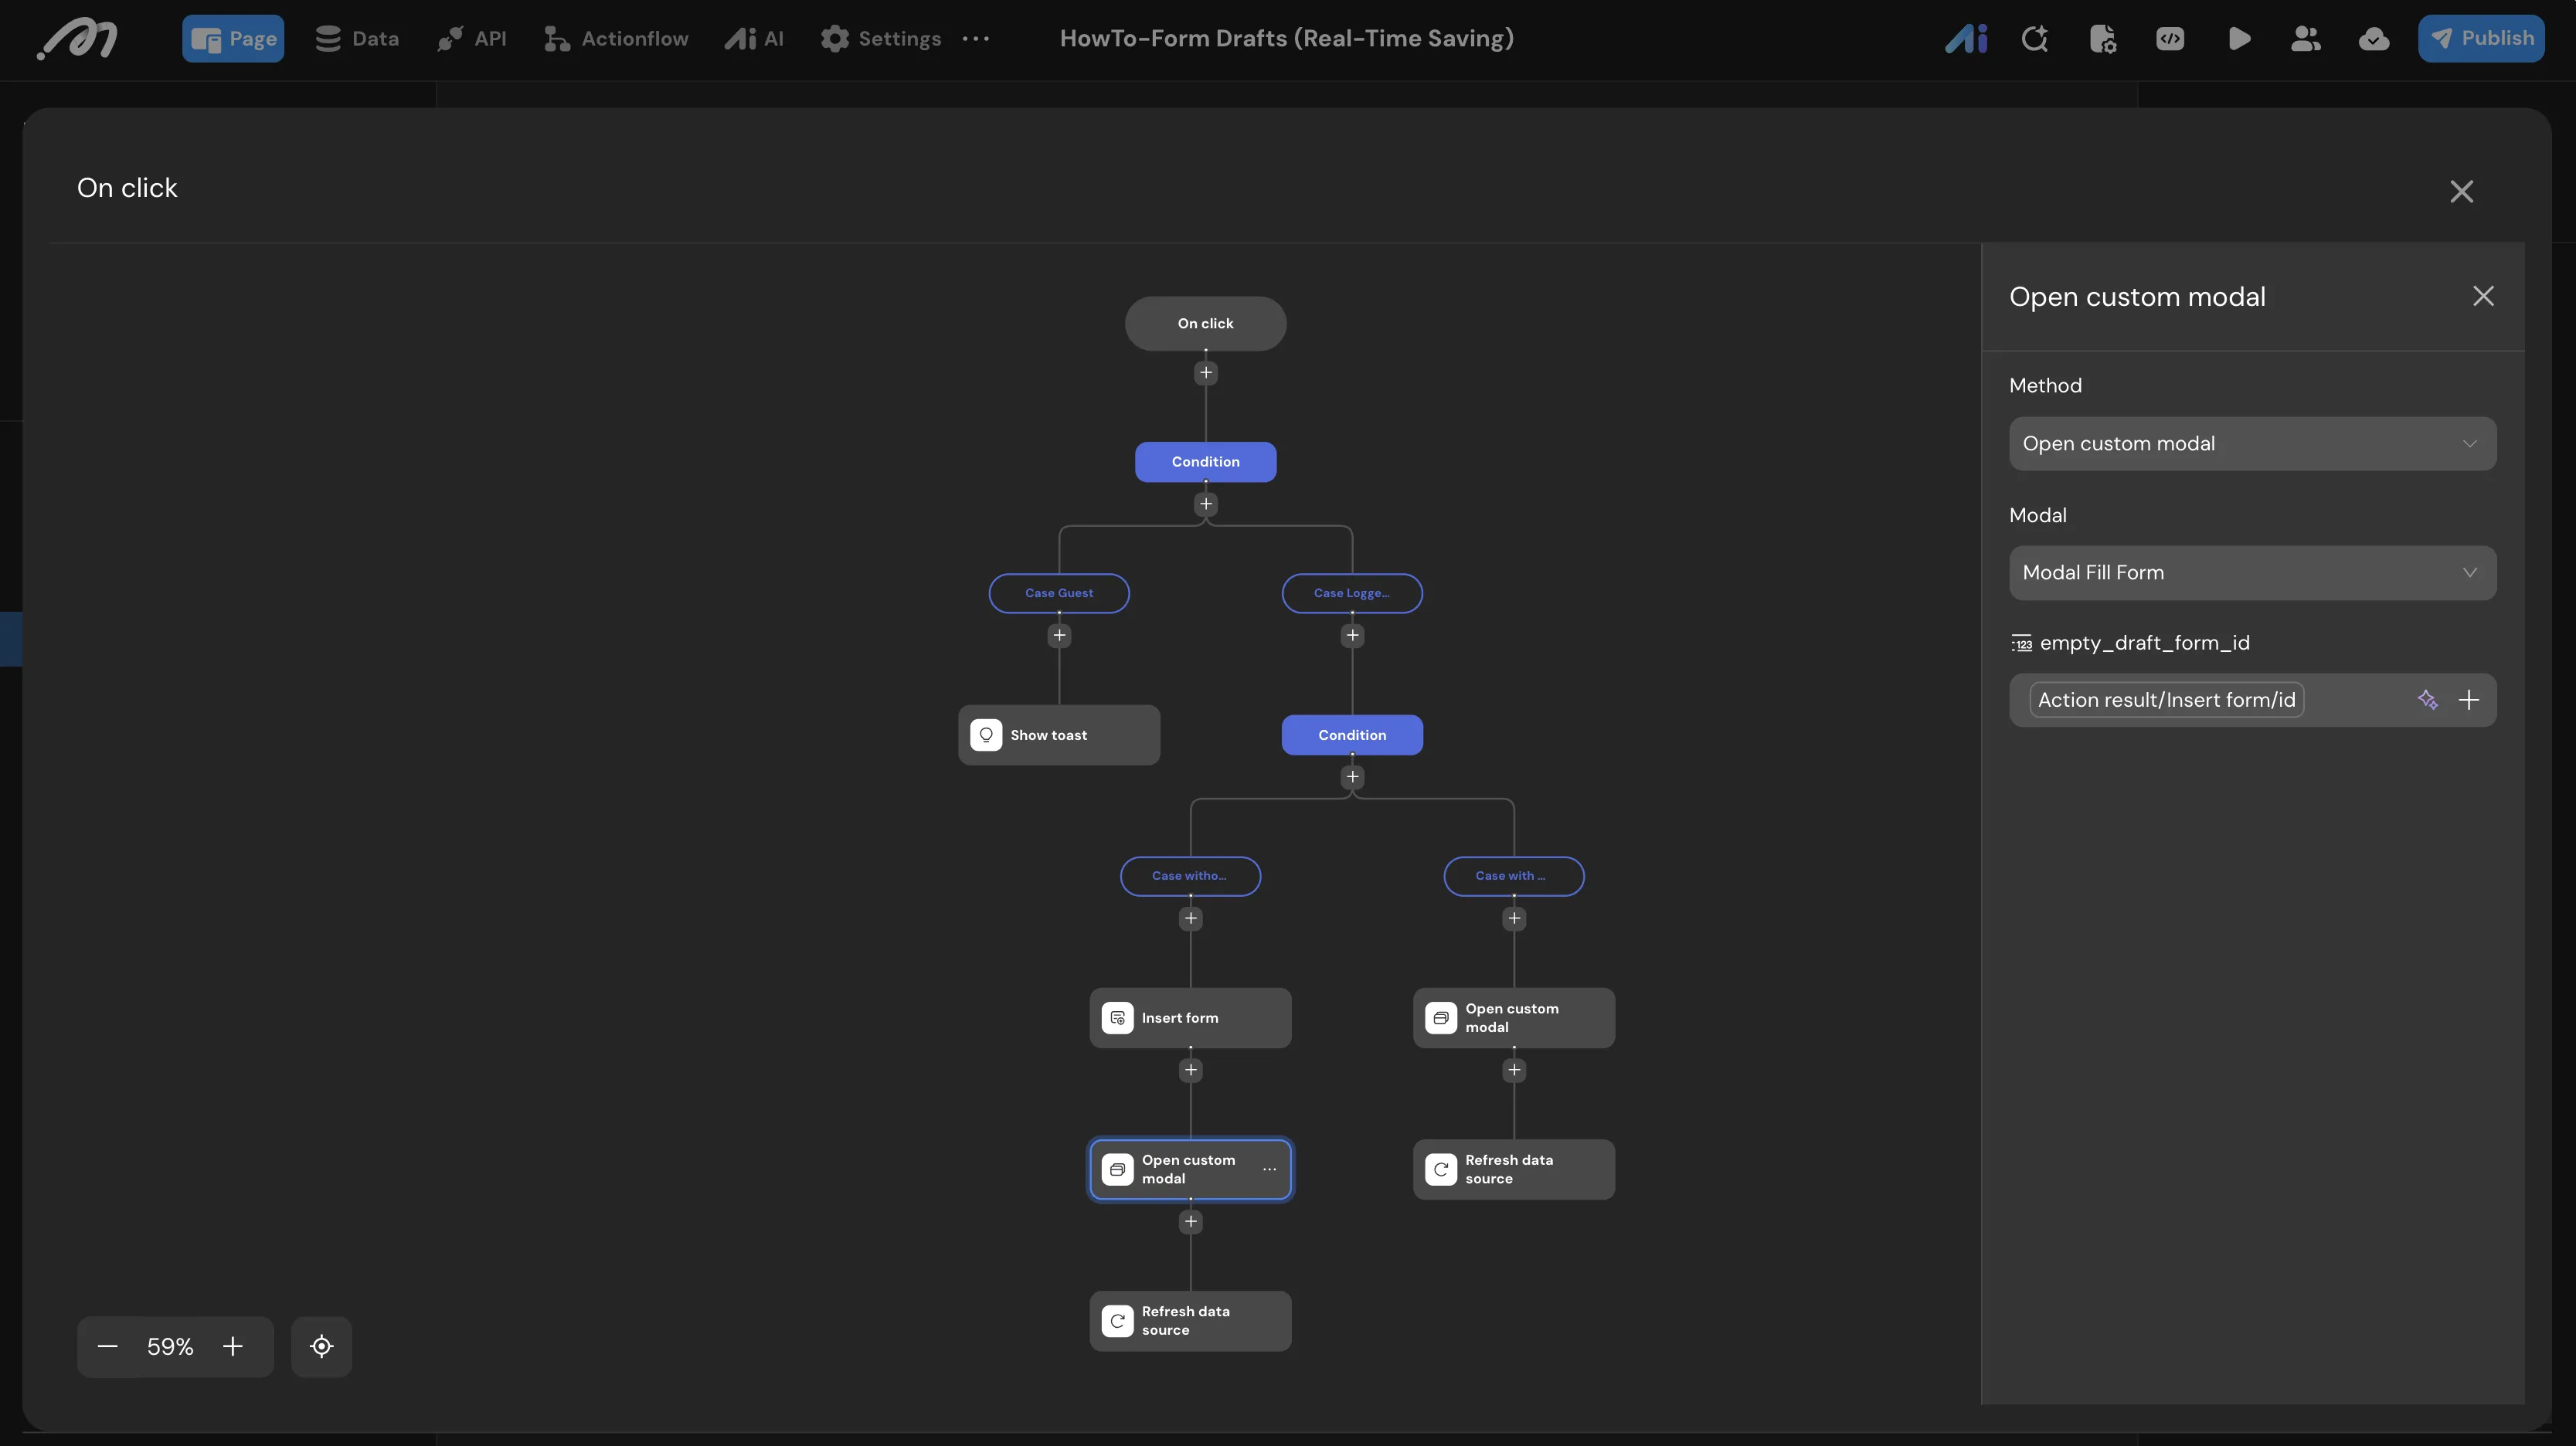
form. Setstatusto"Blank Draft"and bindaccount_idtoLogged in user/id. - Open Custom Modal: Select
Modal Fill Form. Bind the input parameterempty_draft_form_idto theidreturned by the previous Insert action. - Refresh Data Source: Target the page-level data source
source_form_empty_draft.
- Insert Data: Target table
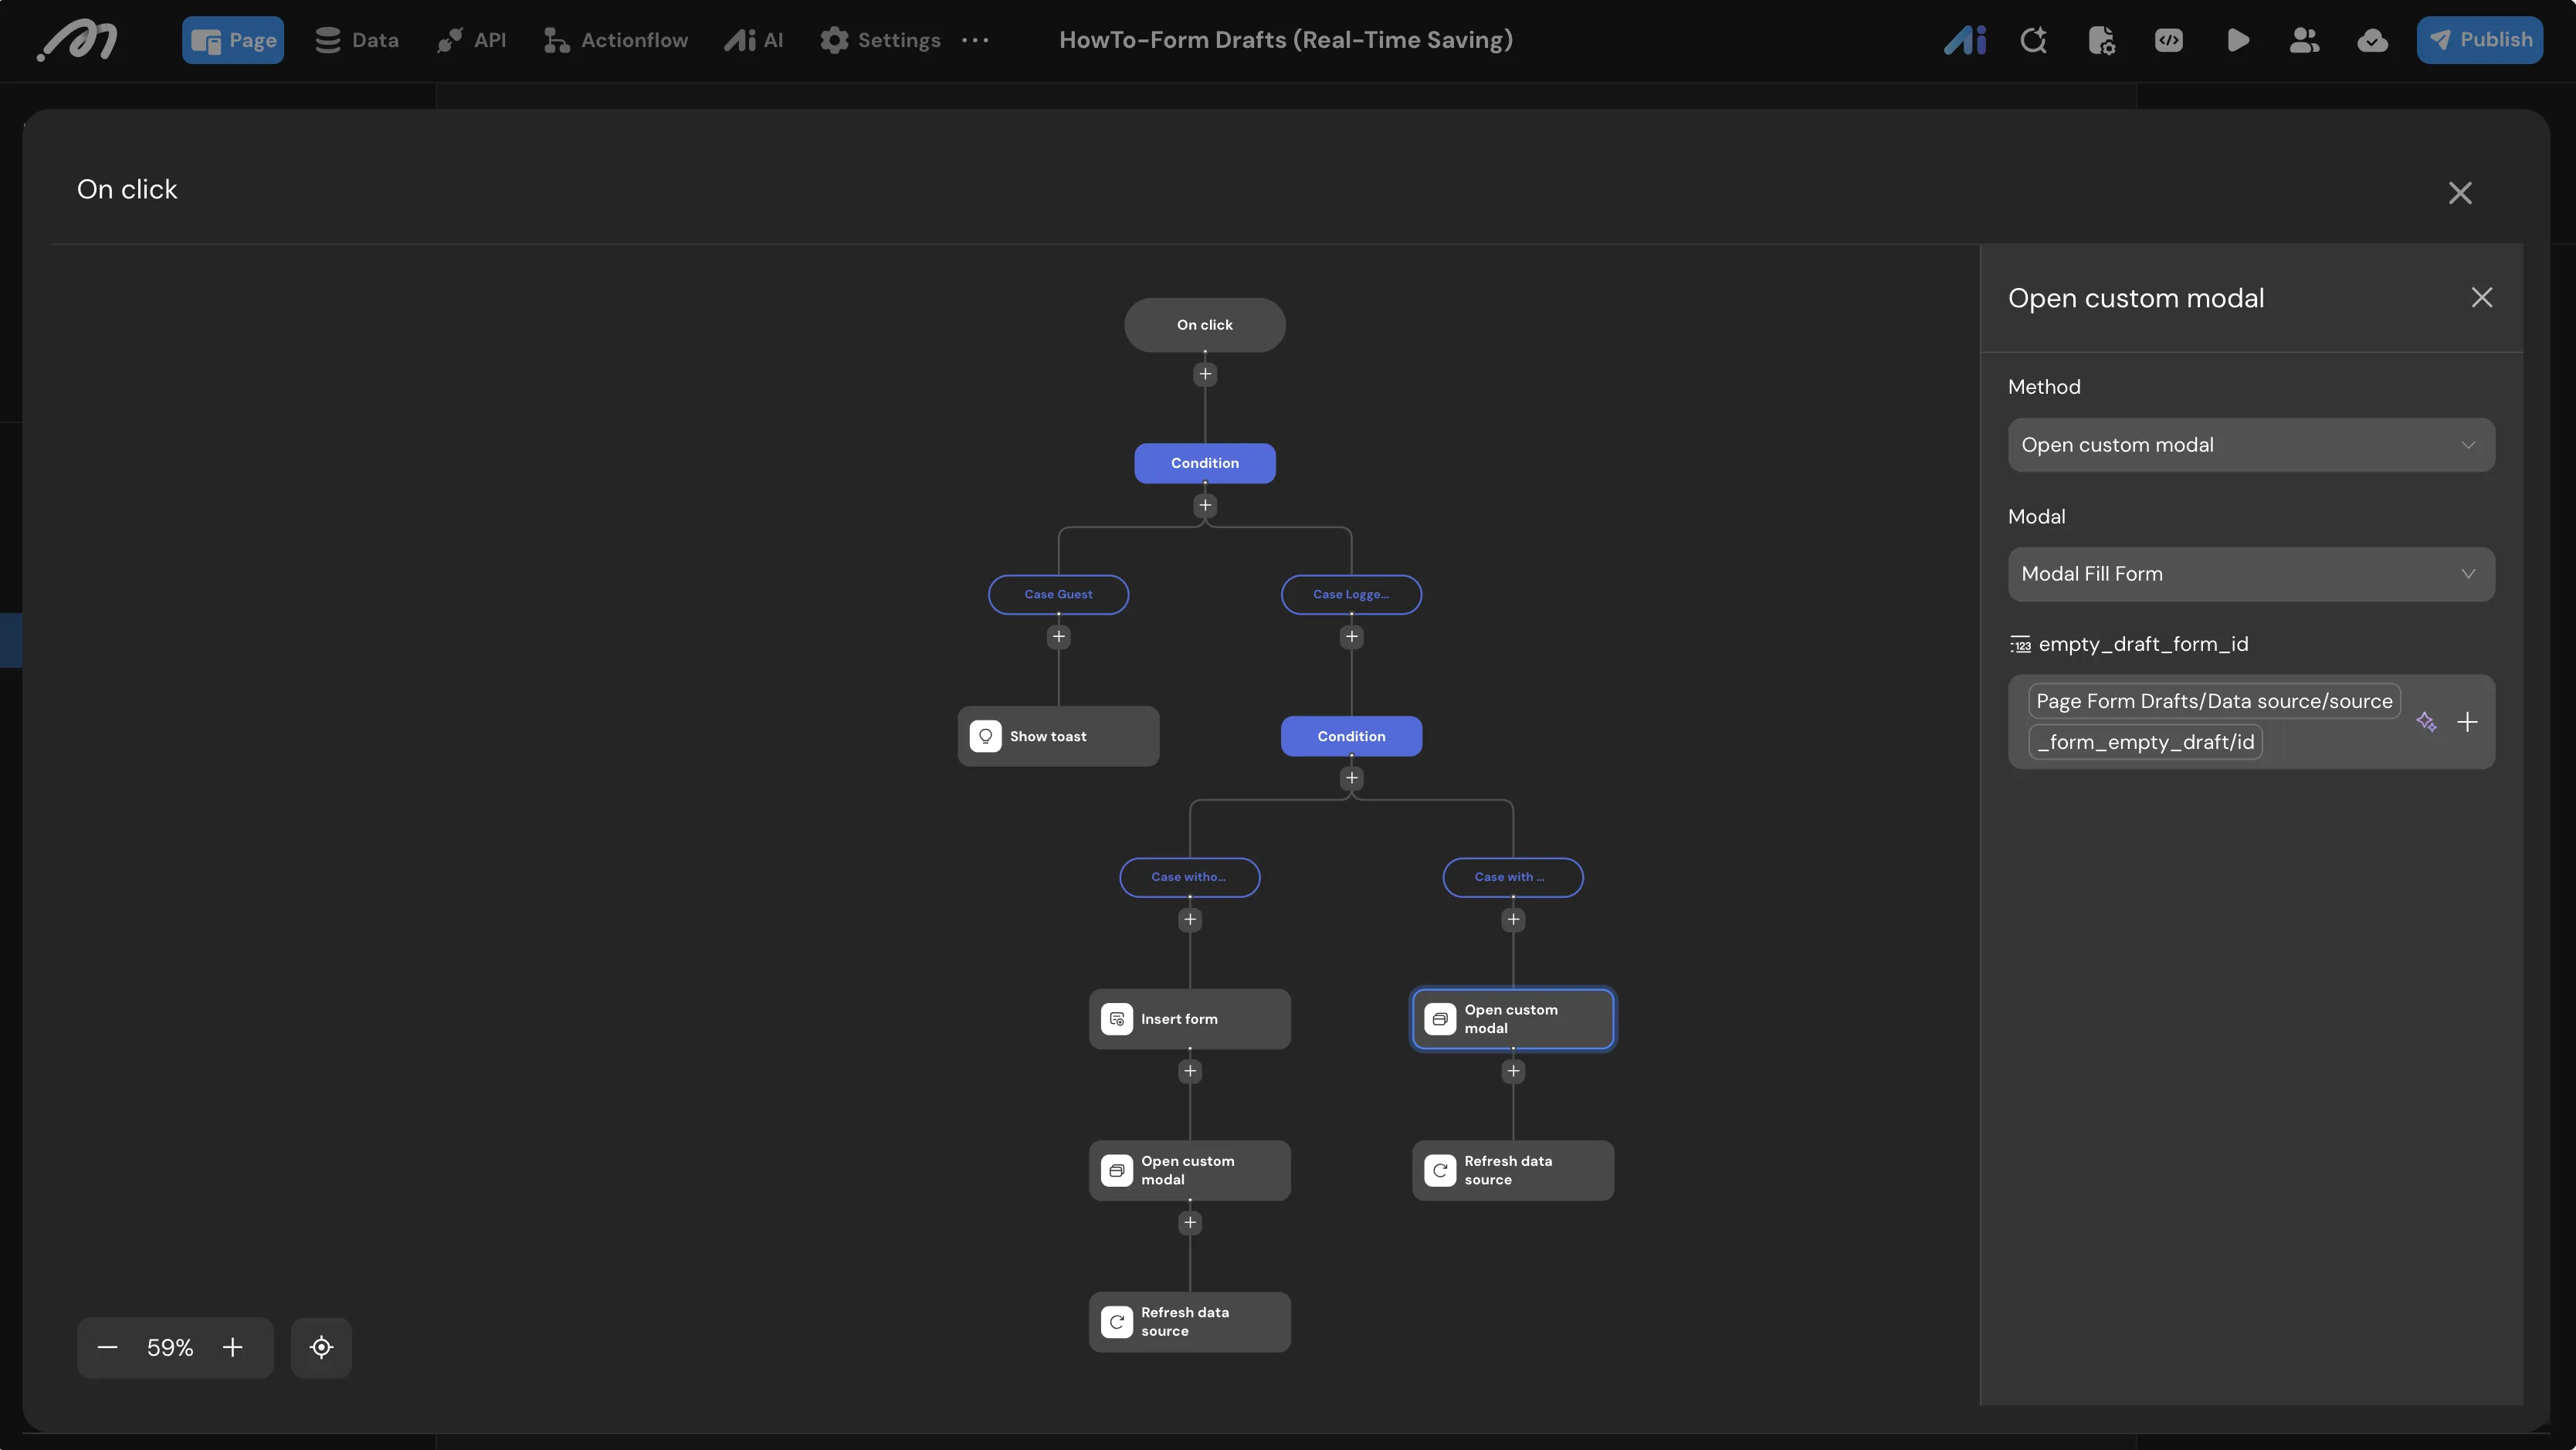
- Path 2 - Blank Draft Exists: Set the condition to
always(default branch).- Open Custom Modal: Select
Modal Fill Form. Bind the input parameterempty_draft_form_iddirectly tosource_form_empty_draft/id. - Refresh Data Source: Target the page-level data source
source_form_empty_draft.
- Open Custom Modal: Select
- Path 1 - No Blank Draft: Set the condition to
Modal State Management
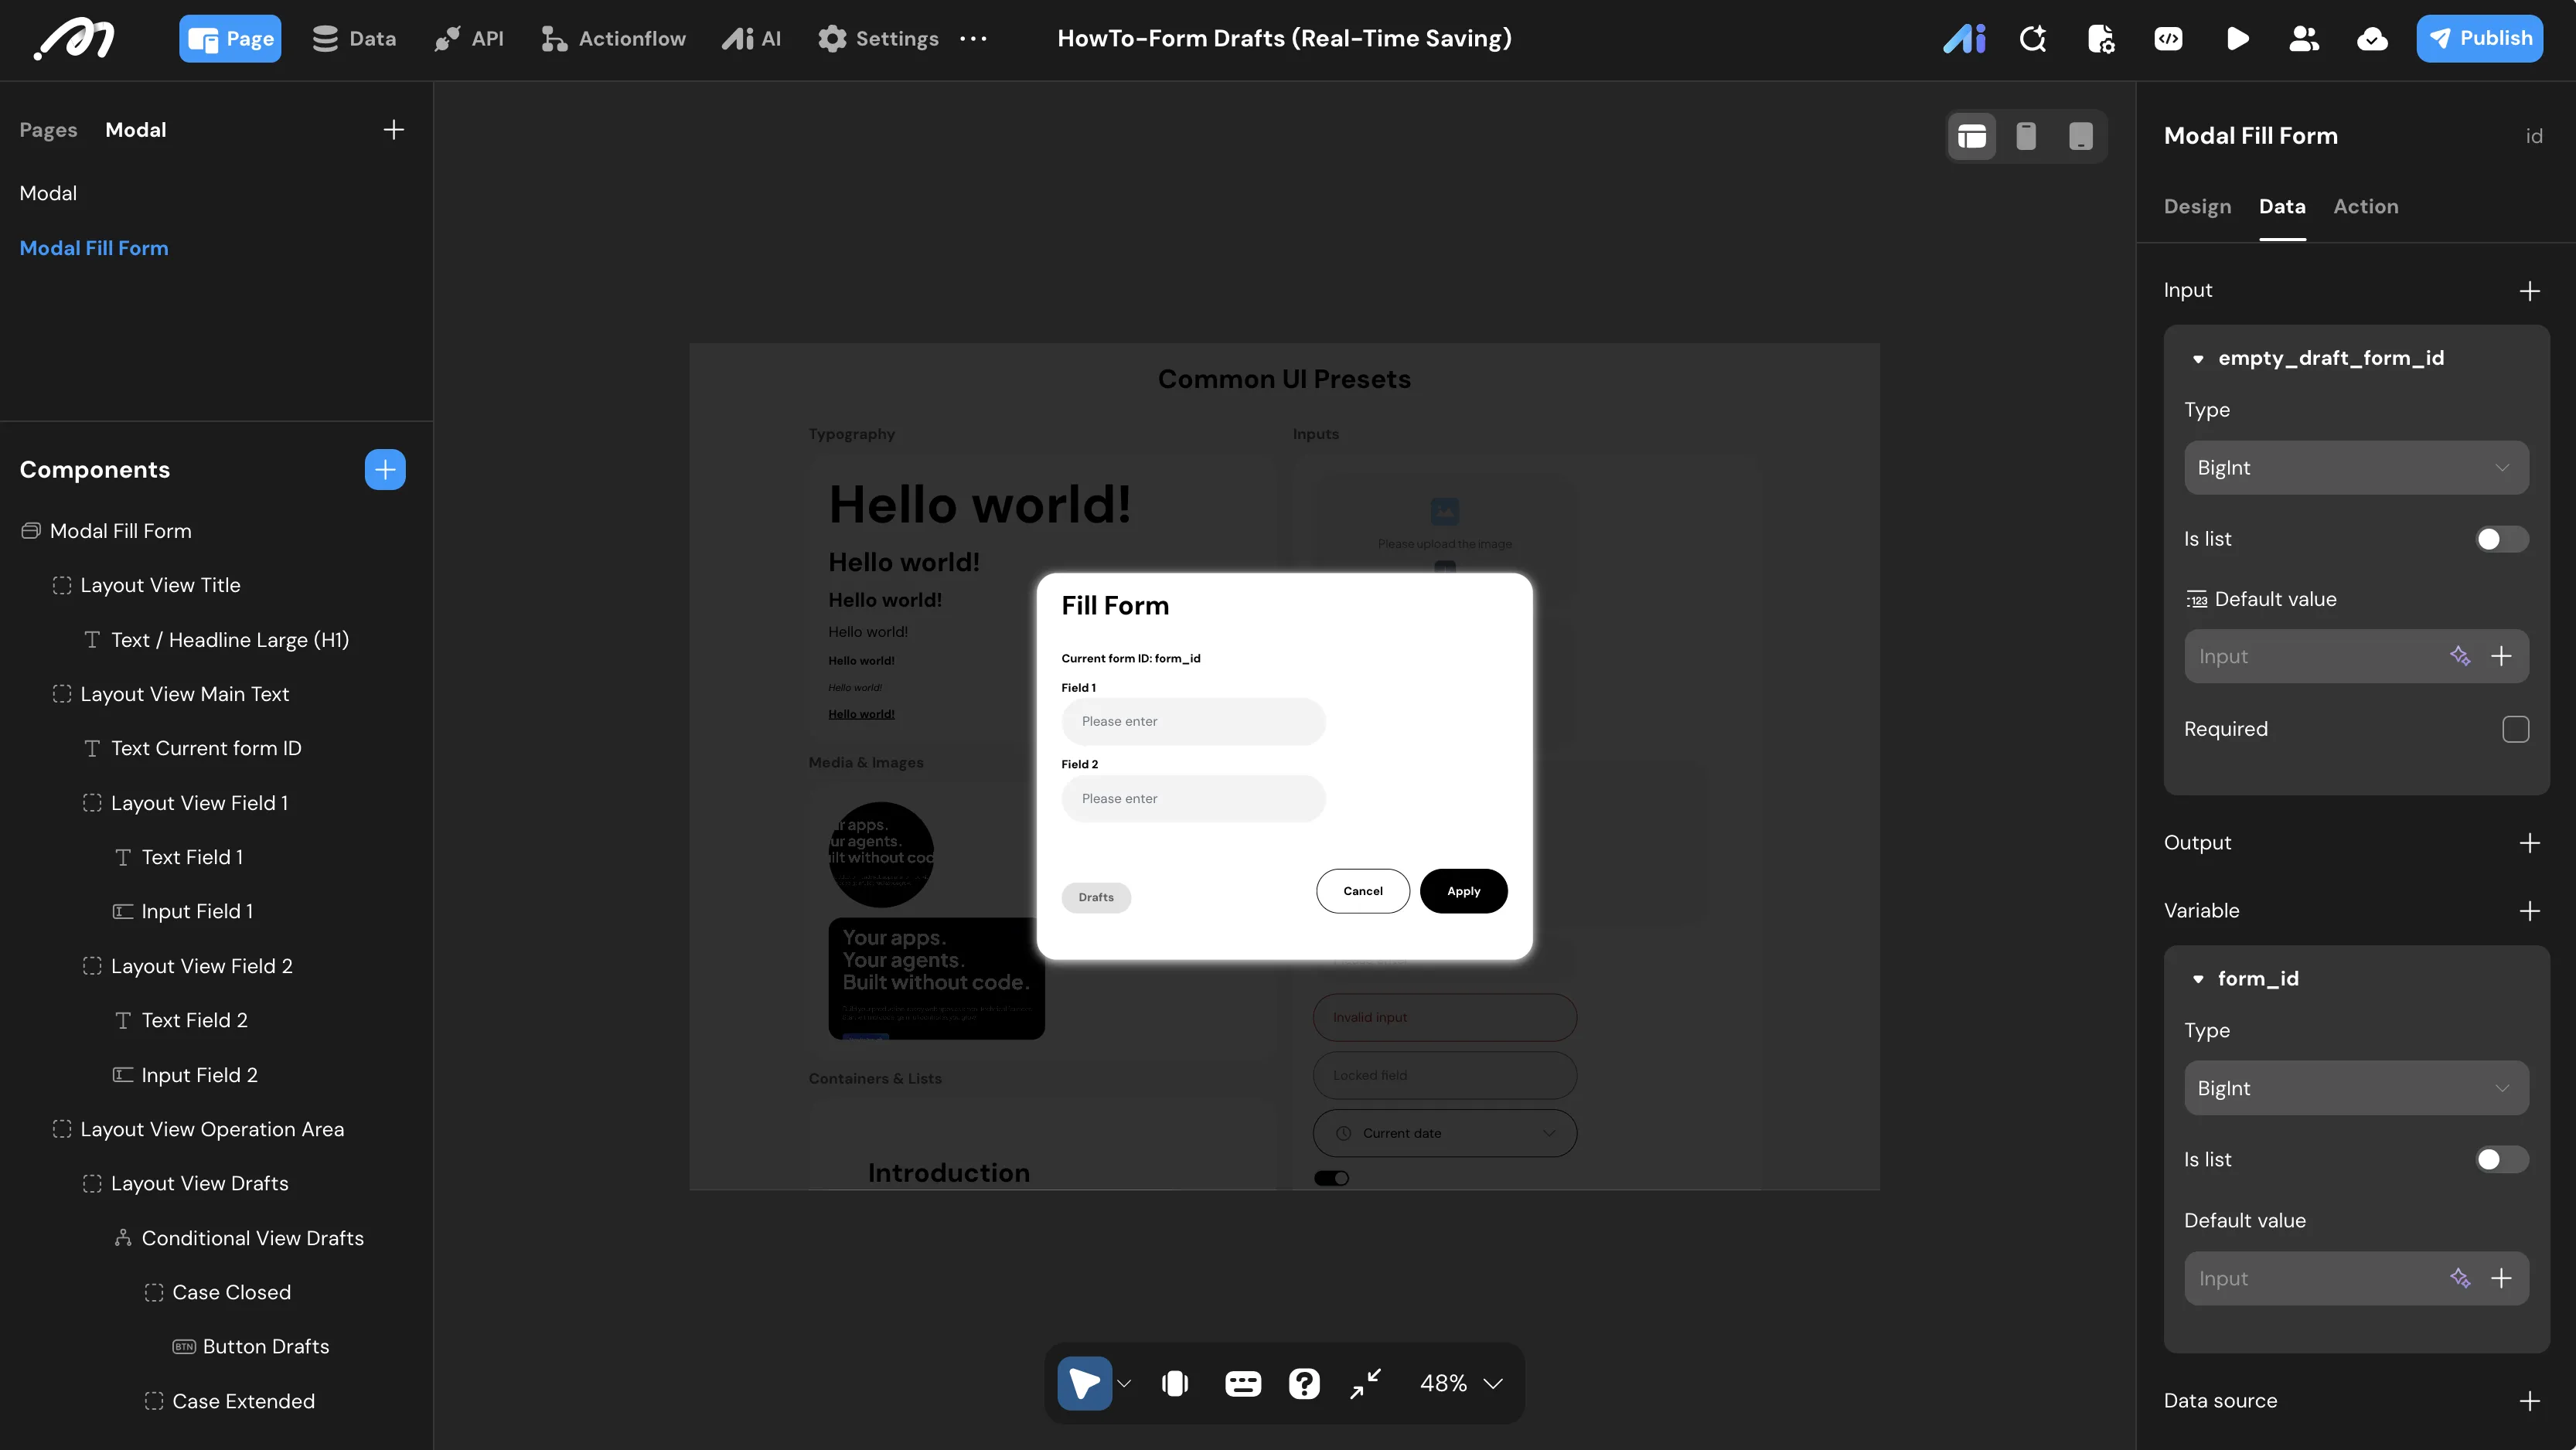
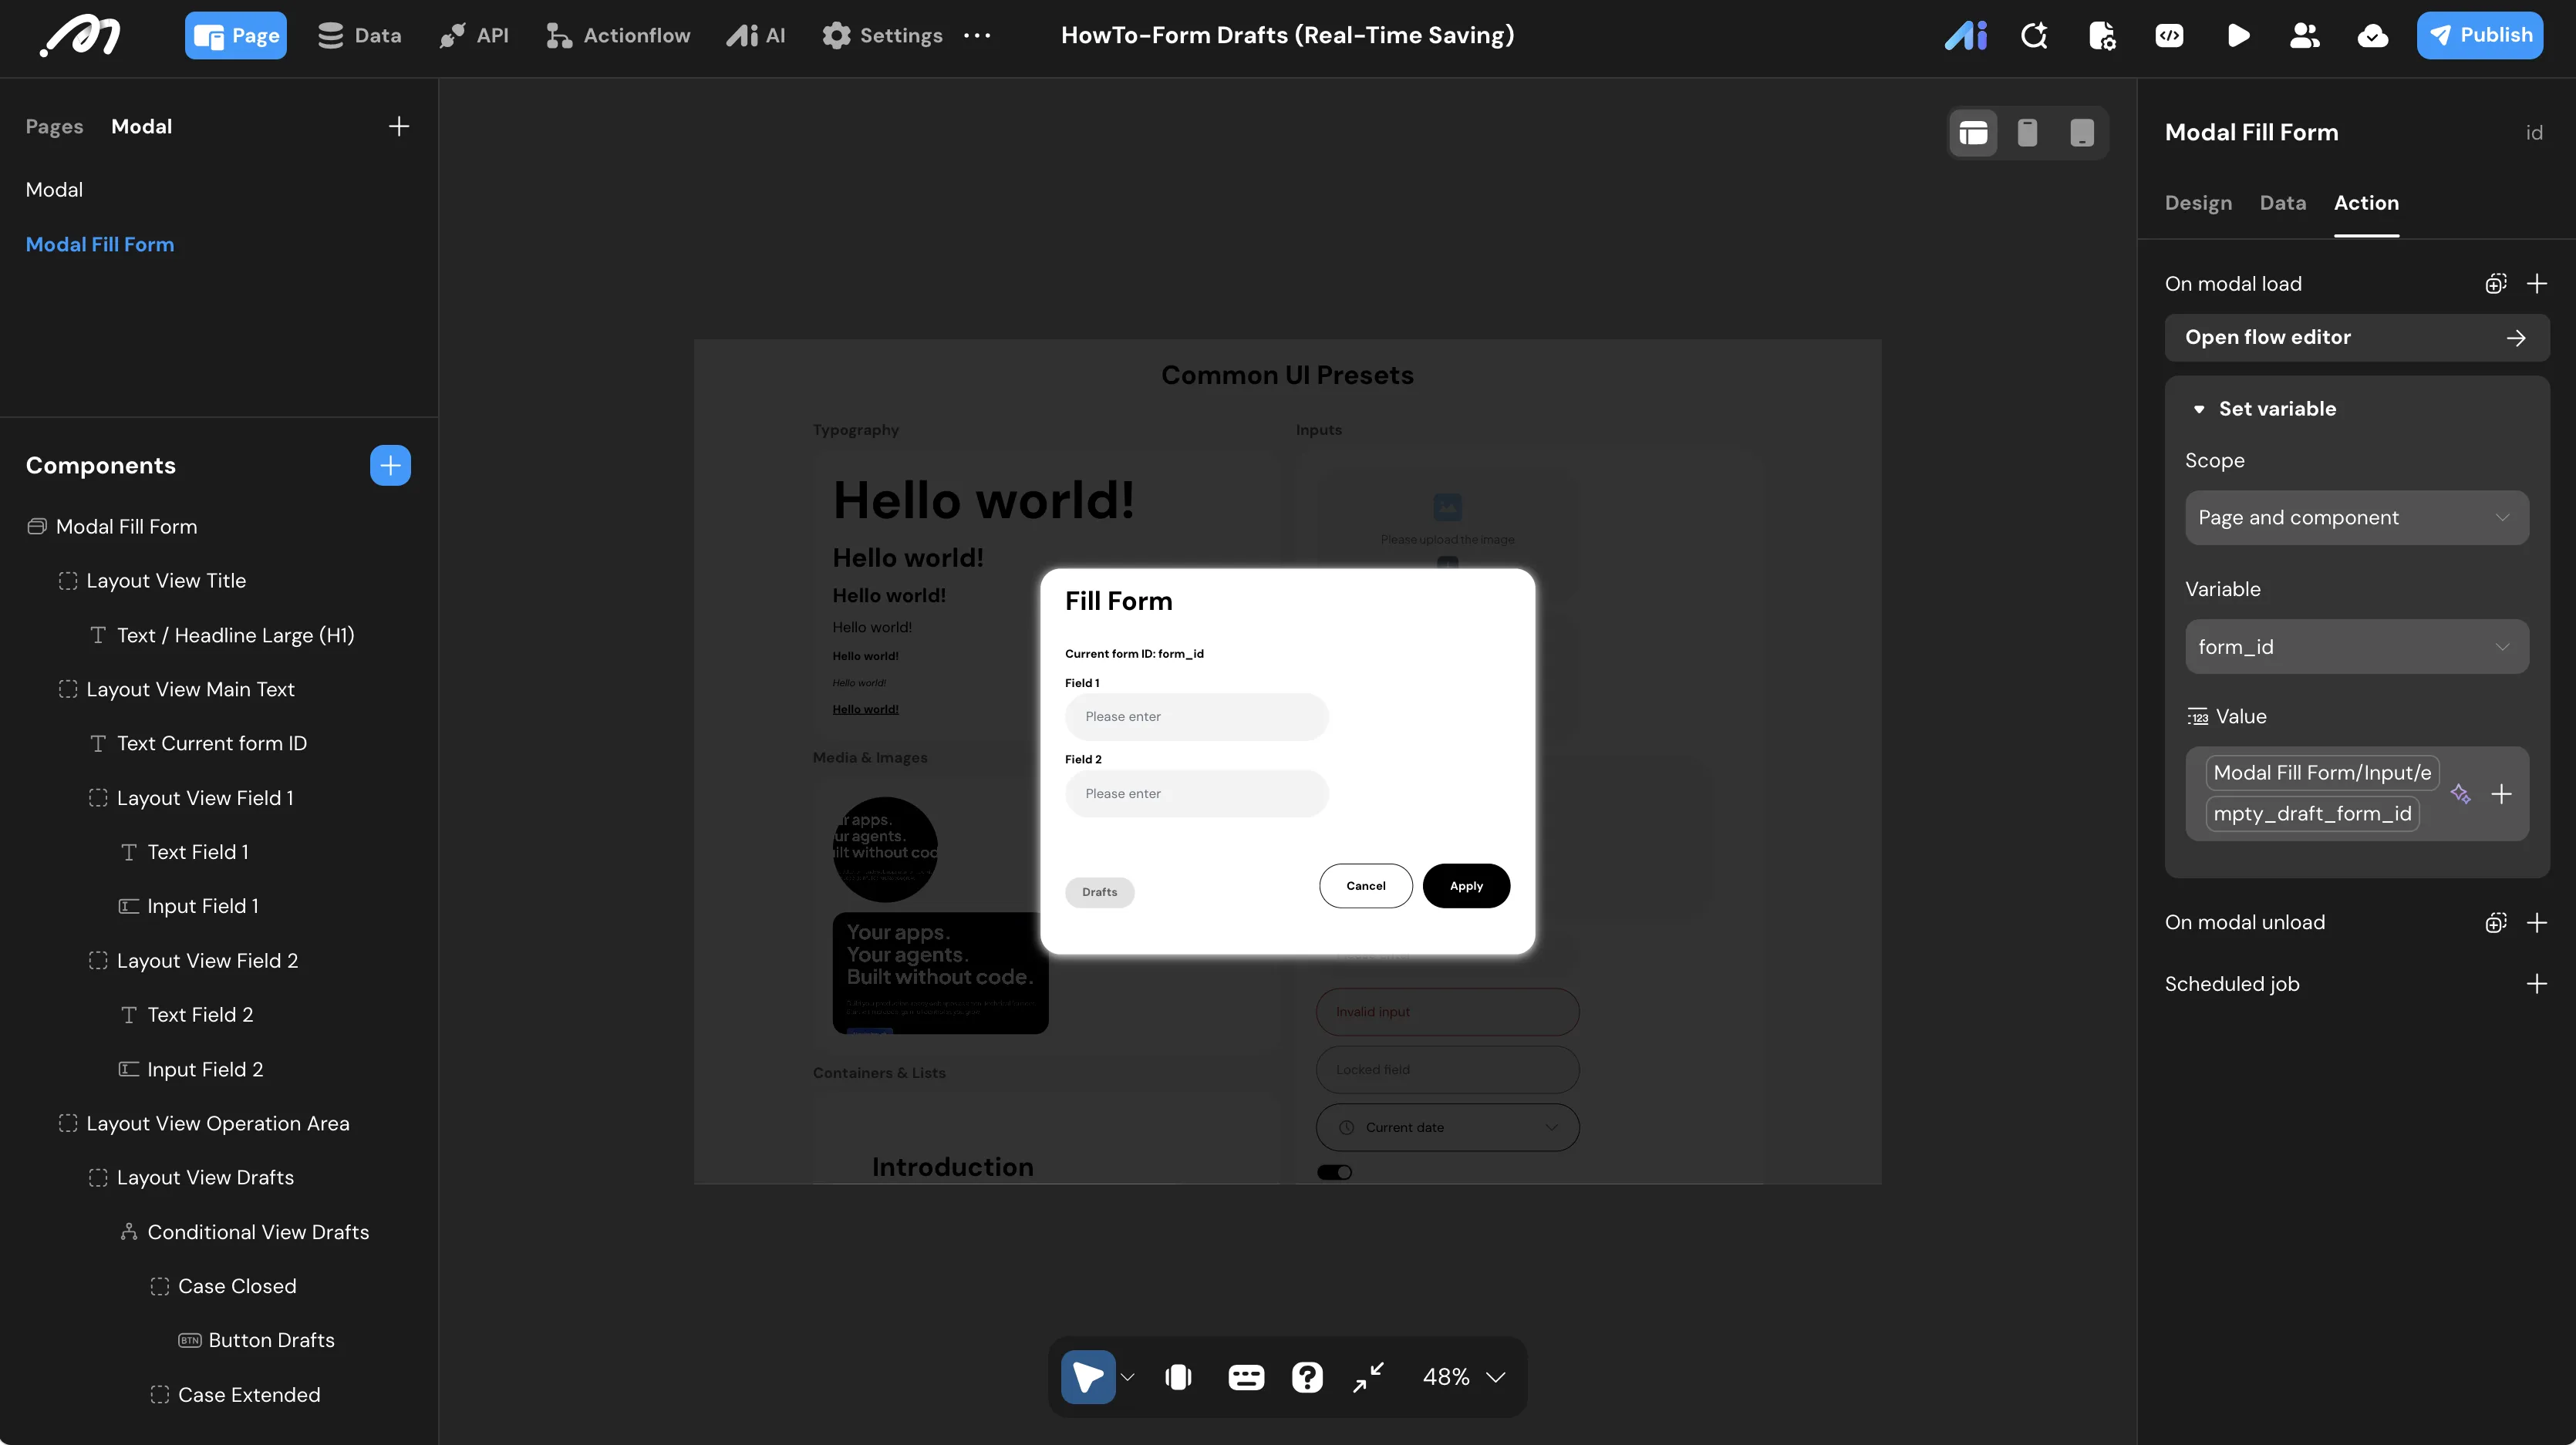
The modal needs to receive and store the draft ID passed from the main page.
-
Input Parameter: Select the root of
Modal Fill Form. Go to the Data tab in the right sidebar.- Click + next to Input.
- Set Name to
empty_draft_form_idand Type toBigint.
-
Local Variable: Still in the Data tab, click + next to Variable.
- Set Name to
form_idand Type toBigint. (Default value can be left empty.)
- Set Name to
-
On Page Load:
- Add a Set variable action.
- Target:
form_id. - Value: Bind to
Input/empty_draft_form_id.
Input Components and Real-time Saving
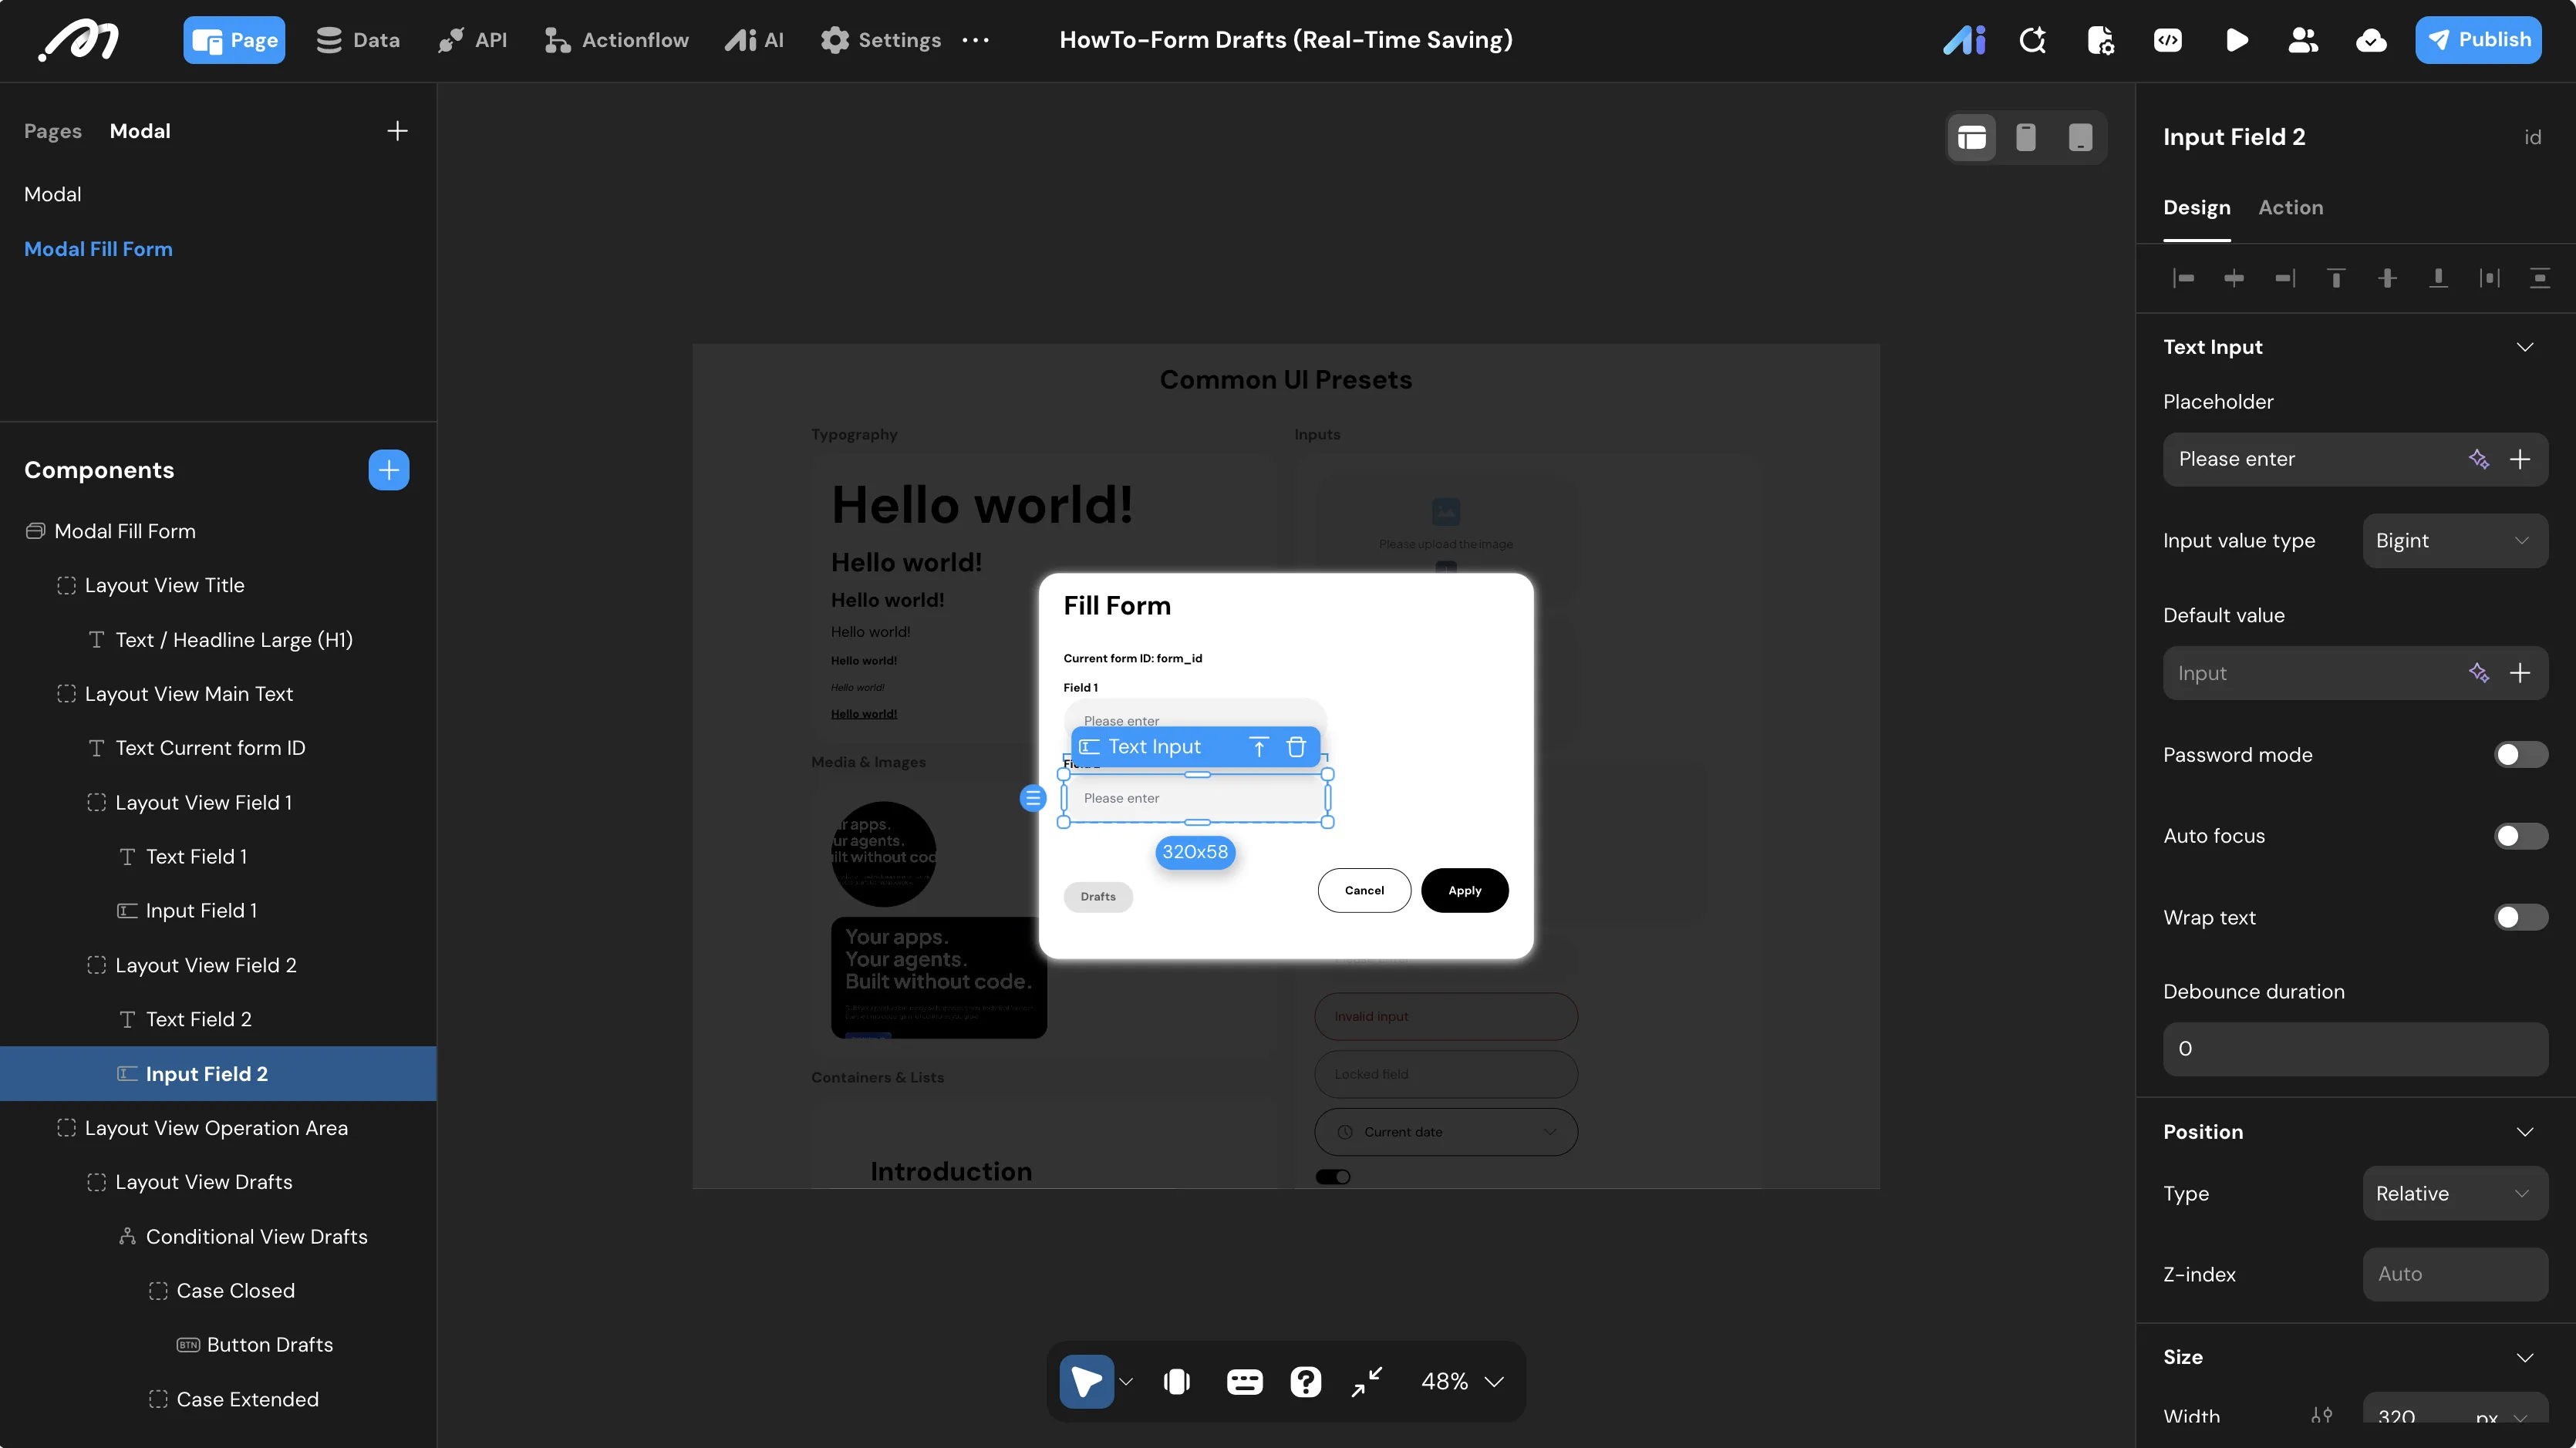
Configure the two input fields inside the modal. When users finish typing and move away (blur event), the data is saved automatically.
- Input Field 1: Select the text input component. Keep Input value type as
Text. - Input Field 2: Select the text input component. Switch Input value type to
Bigint.
-
Configure Auto-Save on Blur for Field 1:
- Select
Input Field 1and add an event underOn blur. - Add a Condition node.
- Path 1 - Input is Empty: Set the condition to:
Input Field 1/ValueIs nullANDInput Field 2/ValueIs null.- Action: Show toast with message
Please fill in at least one field.
- Action: Show toast with message
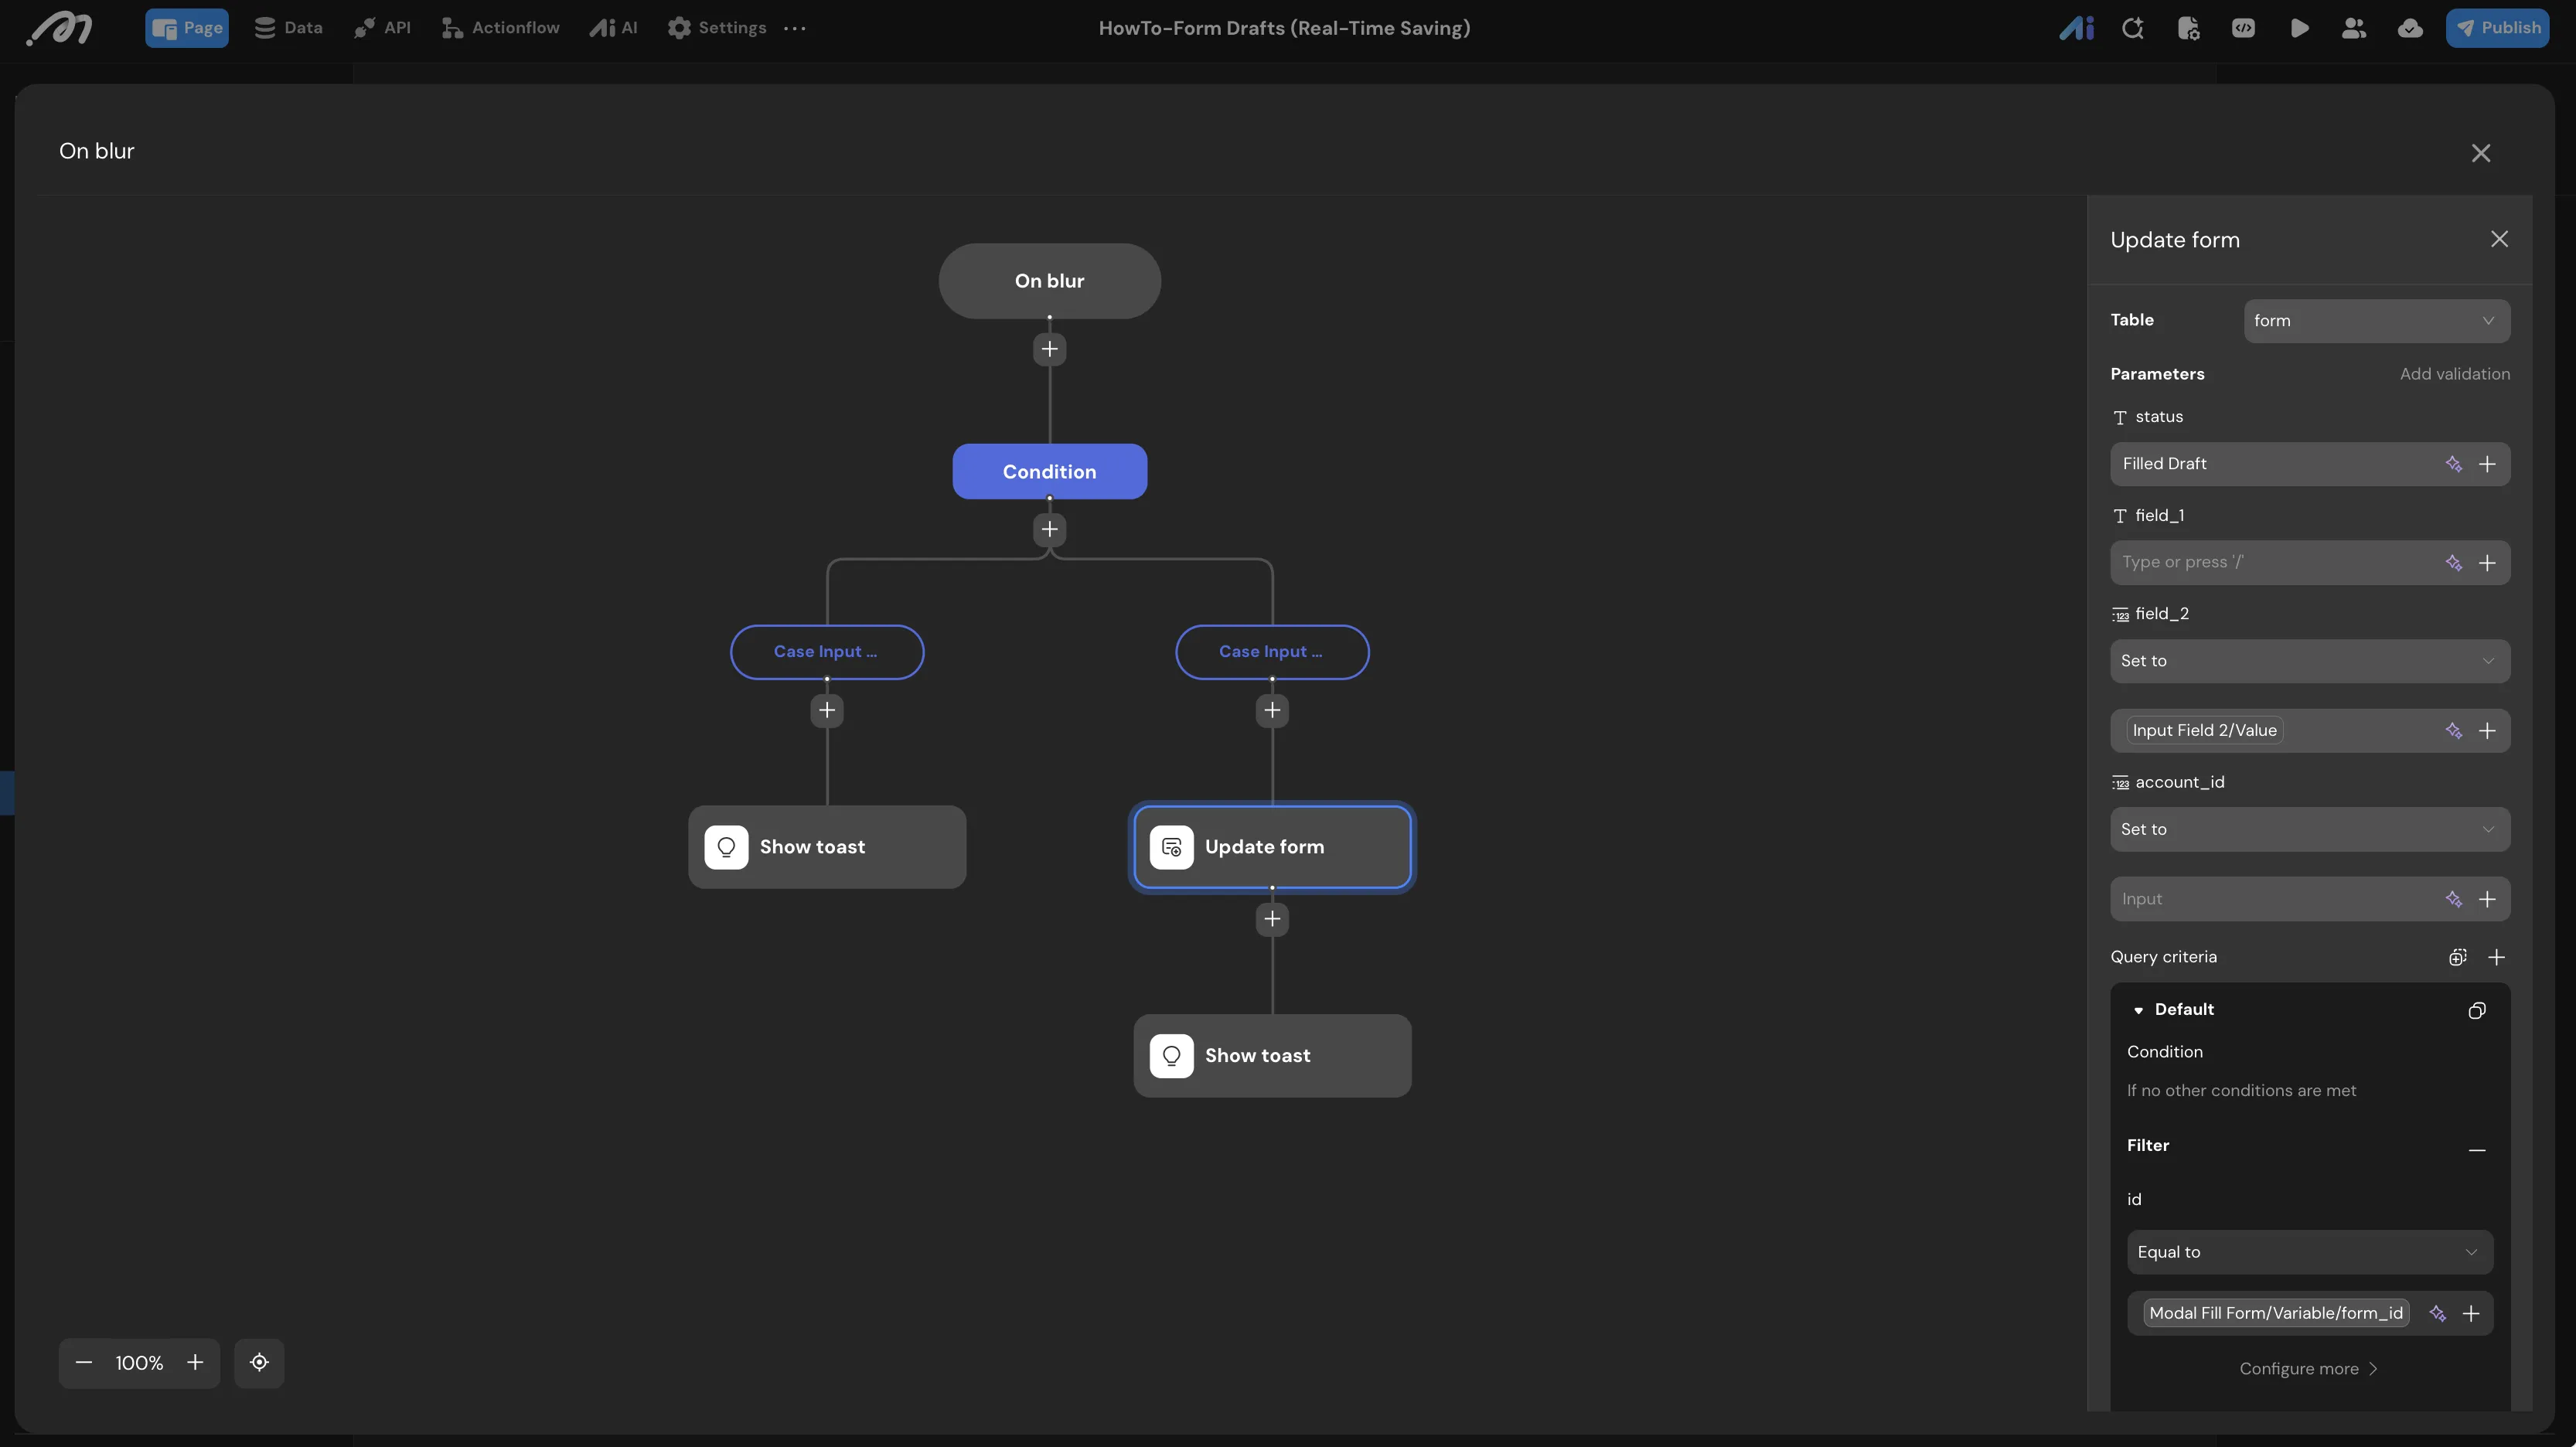
- Path 2 - Input Not Empty: Set the condition to
always.- Update Data: Target table
form. Query criteria:idEqual toVariable/Modal Fill Form/form_id. - Parameters: Set
statusto"Filled Draft". Bindfield_1toInput Field 1/Value. - On Success Action: Show toast with message
Draft saved successfully.
- Update Data: Target table
- Path 1 - Input is Empty: Set the condition to:
- Select
-
Configure Auto-Save on Blur for Field 2:
- Select
Input Field 2and add an event underOn blur. - Add a Condition node with the same empty-value logic as above.
- Path 1 - Input is Empty: Same toast intercept.
- Path 2 - Input Not Empty: Update Data with the same query criteria (
idequal toform_id). Setstatusto"Filled Draft"and bindfield_2toInput Field 2/Value. Show toastDraft saved successfully.
- Select
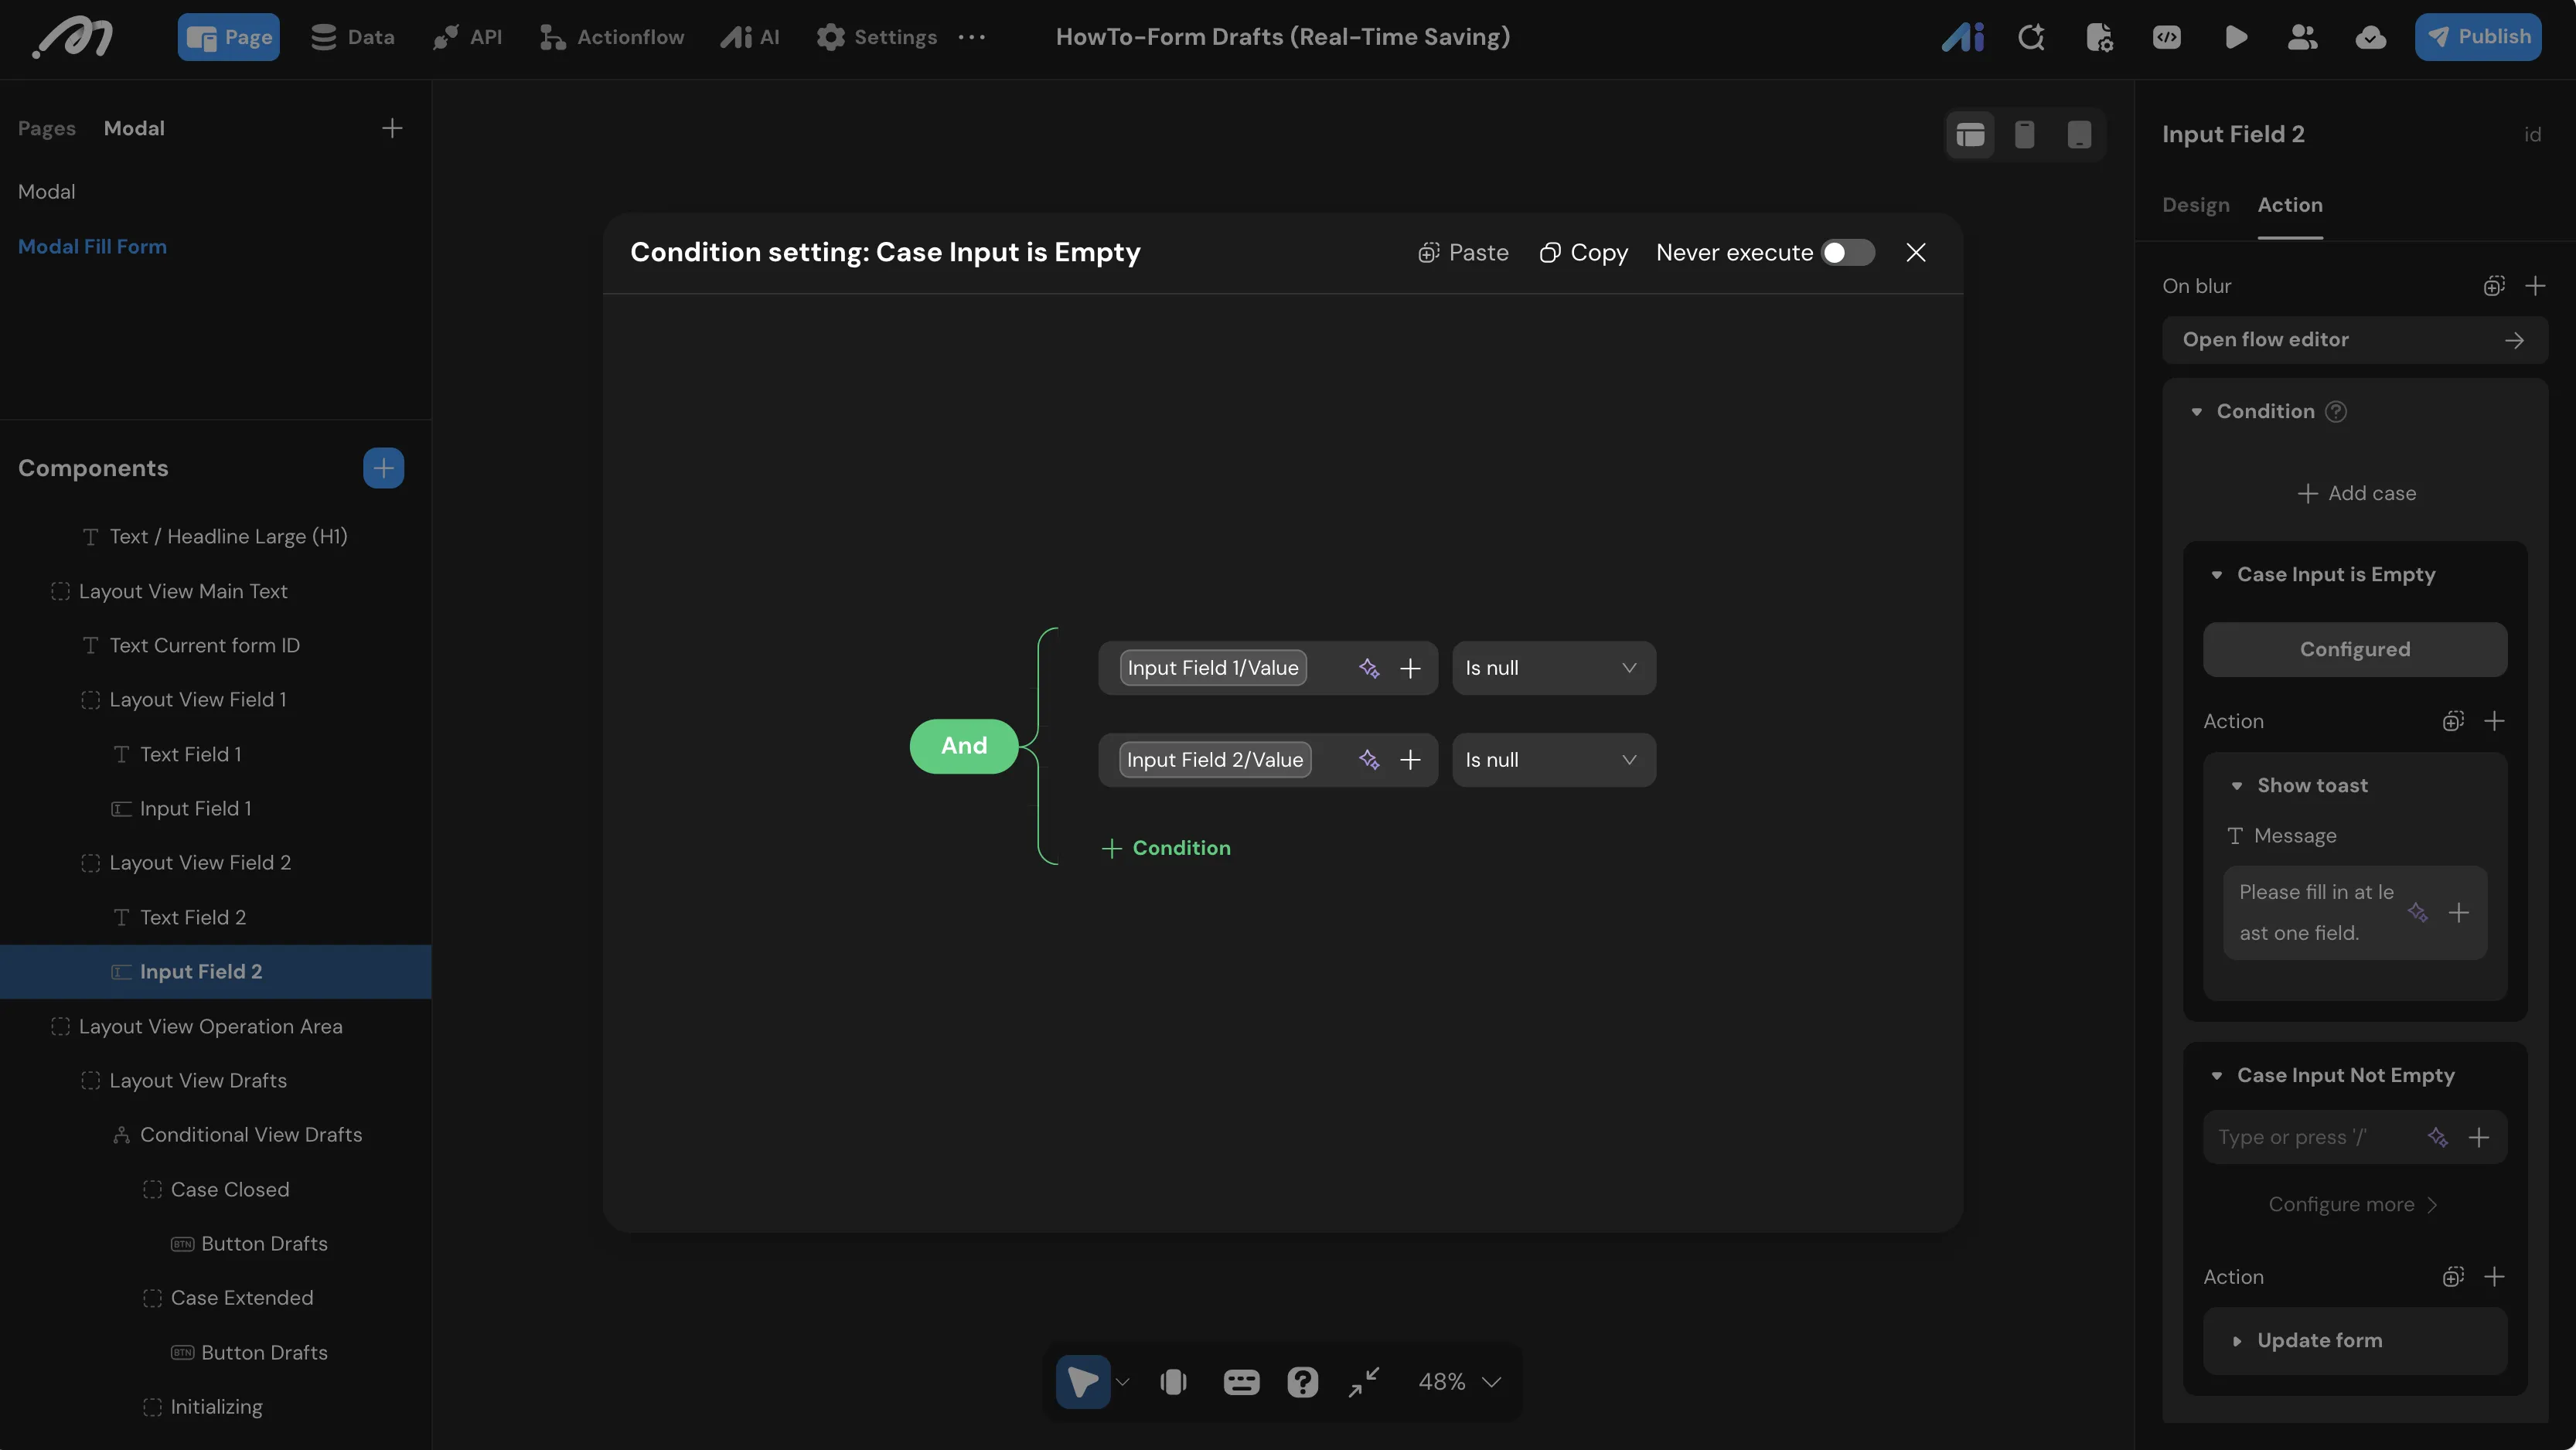
Dual-field Empty Intercept:Both input fields must be empty for the interception to trigger. This validation is configured independently on both On blur events, ensuring users cannot bypass the check by only interacting with one field.
Historical Drafts Panel
Create a panel that displays all saved drafts (status = "Filled Draft") belonging to the current user.
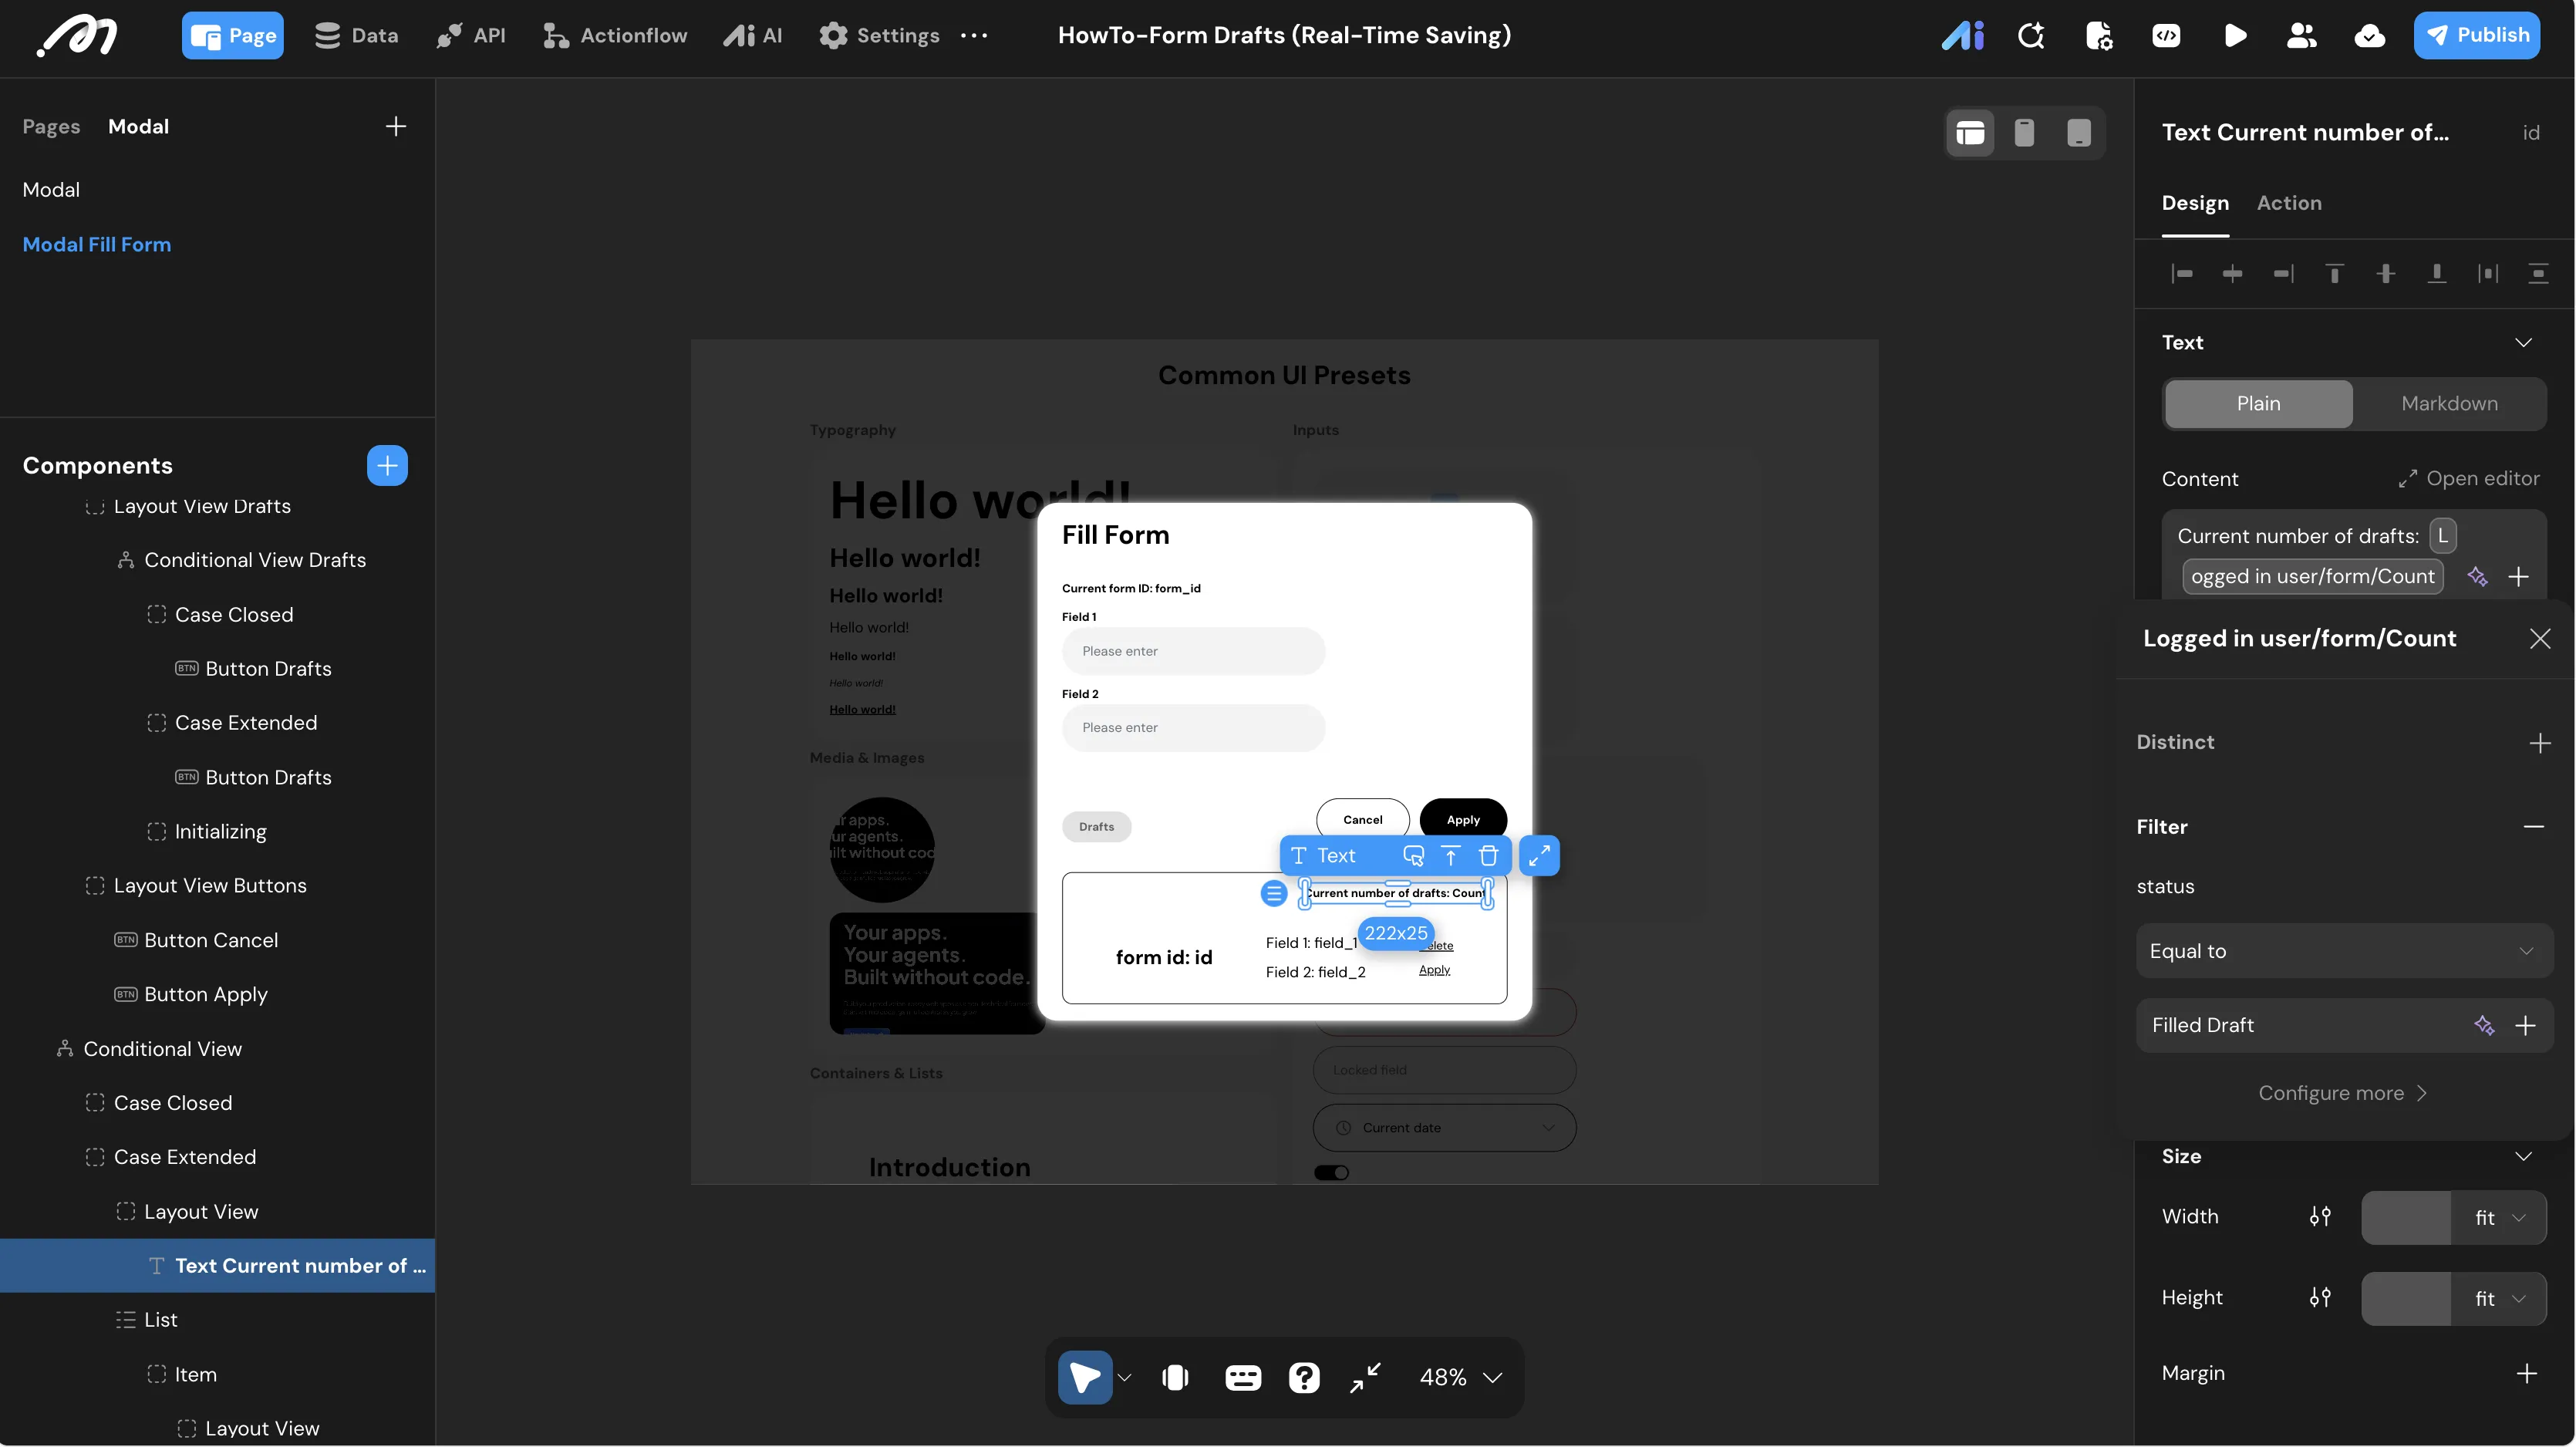
- Draft Counter:
- Select the
Text: Current number of draftscomponent. - Bind its Content to
Logged in user/form/Count. - Add a local filter:
statusEqual to"Filled Draft".
- Select the
Logged in user/form/Count updates when user data loads or refreshes. The draft list uses Subscription (see below), so we add a Refresh current user data action inside the list’s On subscription success event to keep the counter accurate.
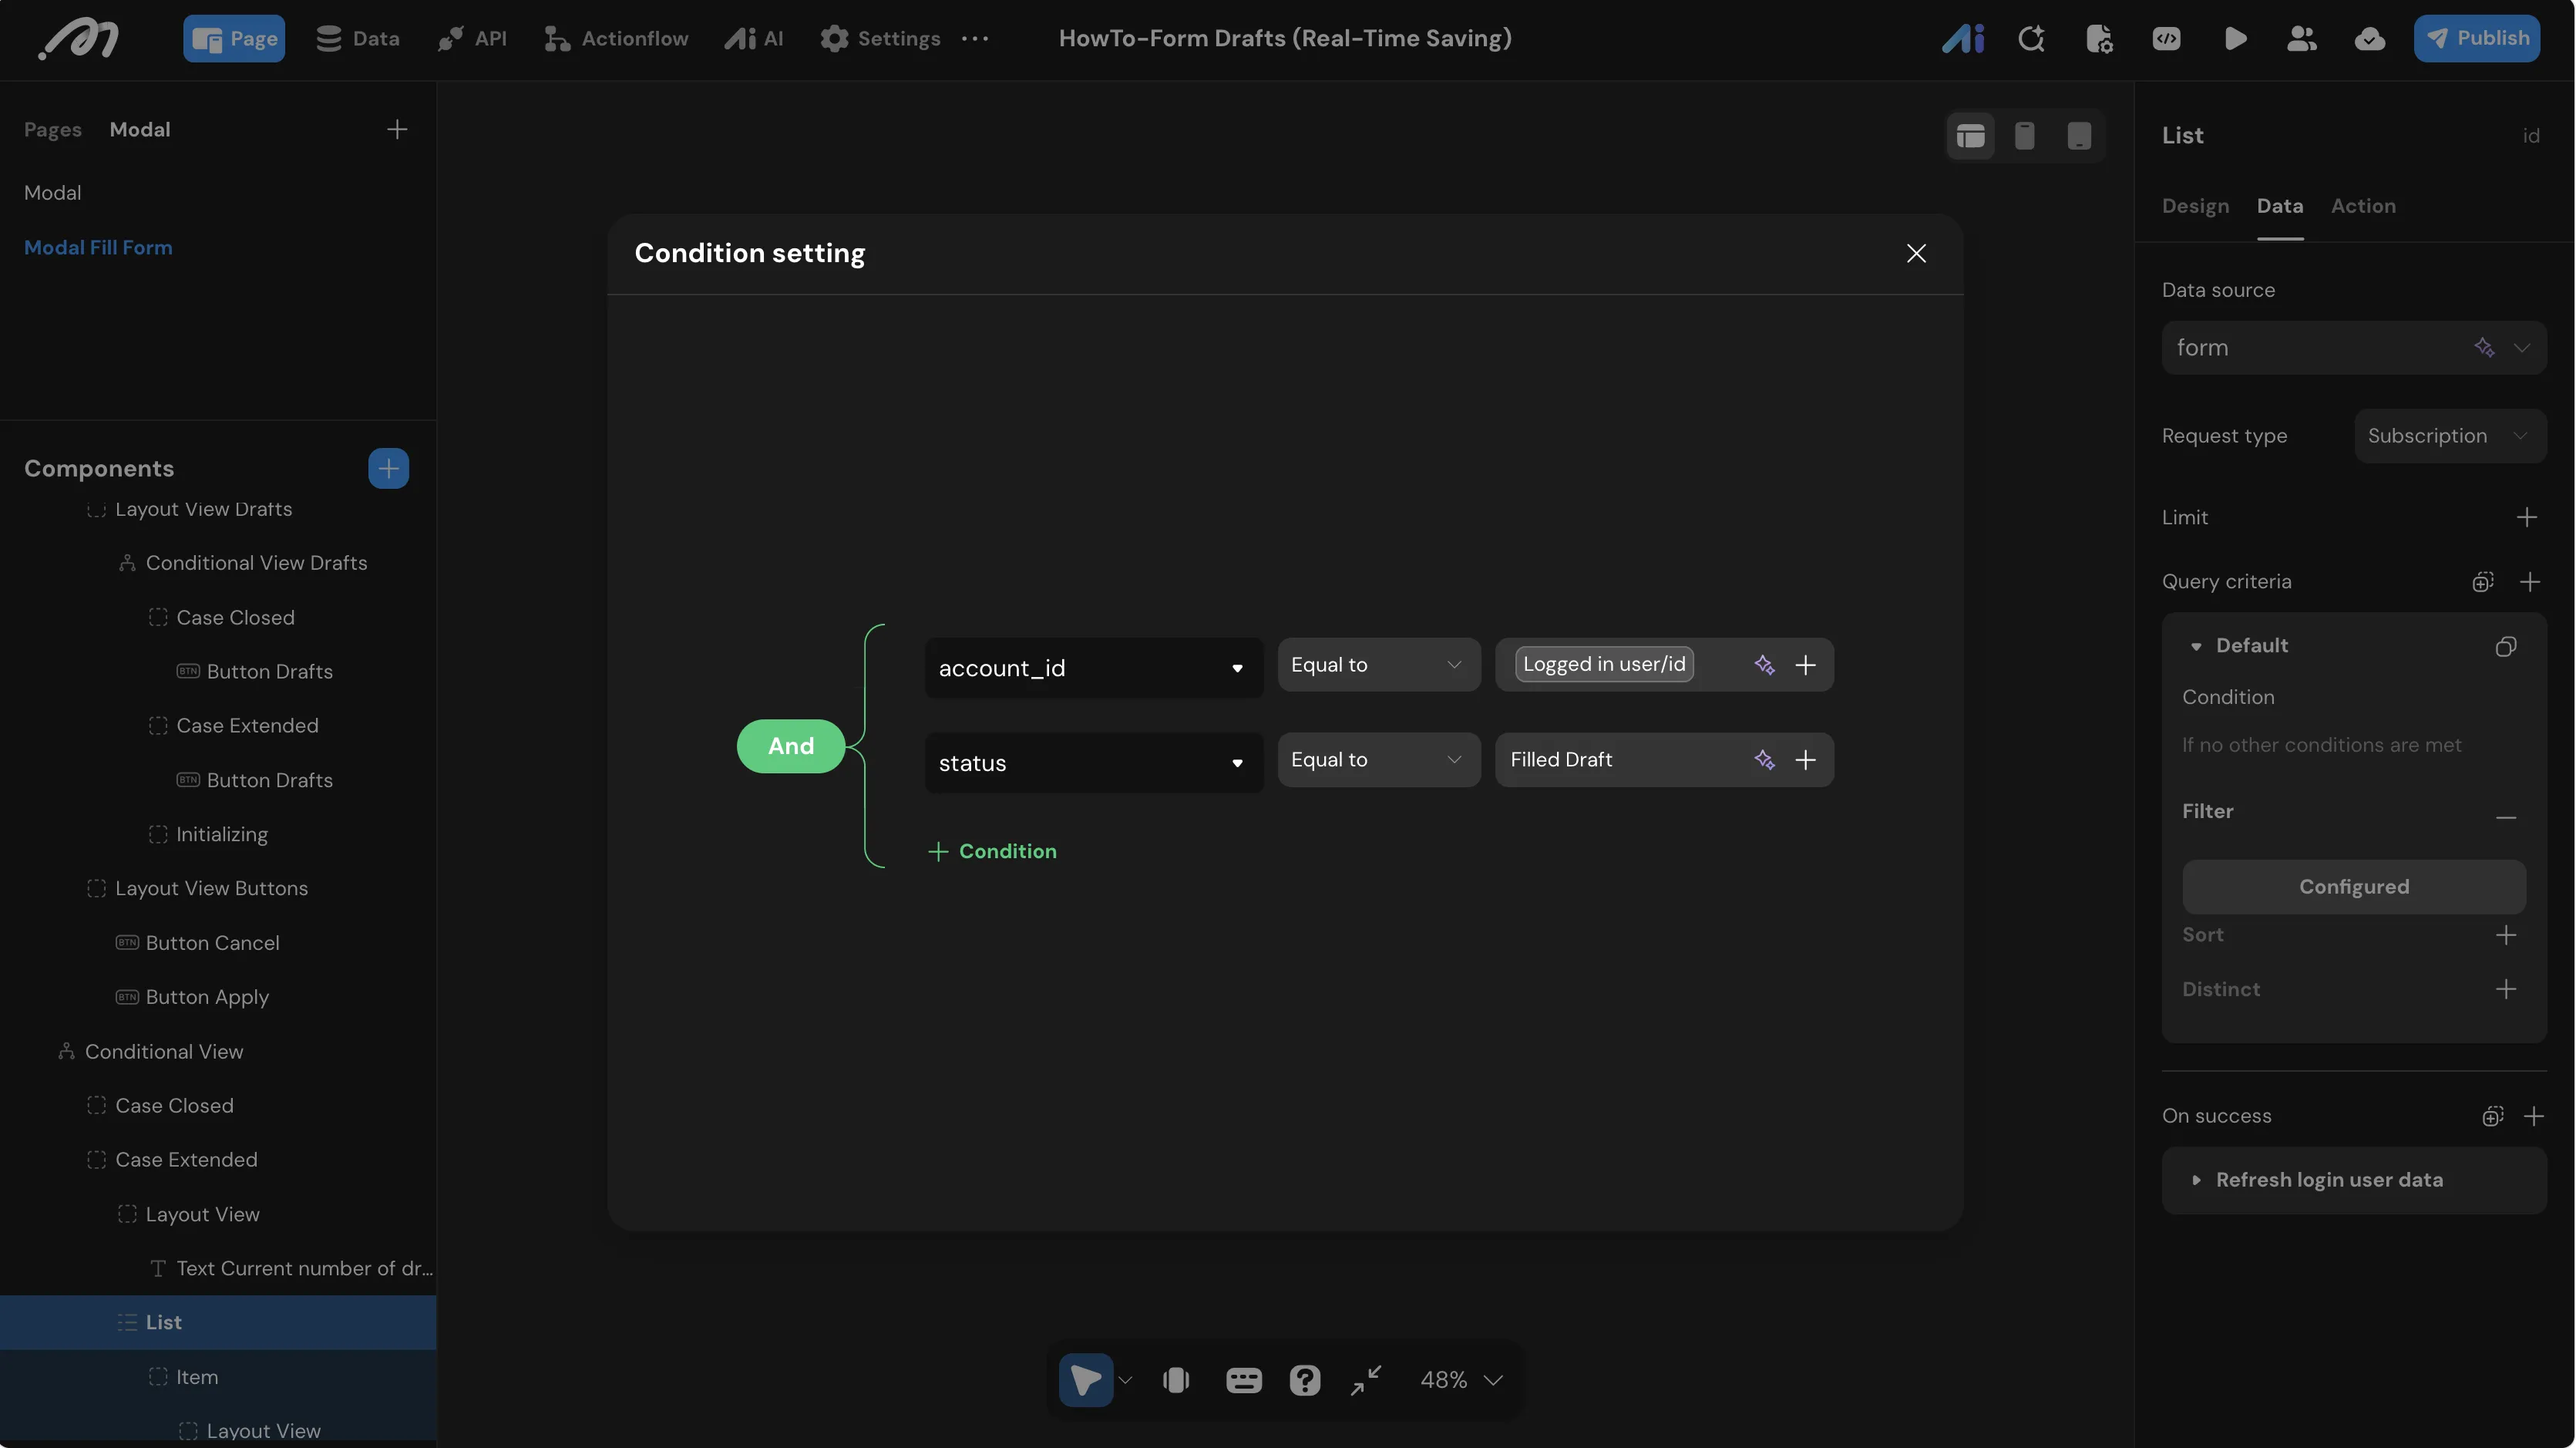
- Draft List Data Source:
- Select the
Listcomponent inside the modal. - Set Request type to
Subscription. - Target Table:
form. - Query Criteria (combined with
And):account_idEqual toLogged in user/id.statusEqual to"Filled Draft".
- On subscription success: Add a Refresh current user data action to keep the draft counter accurate.
- Select the
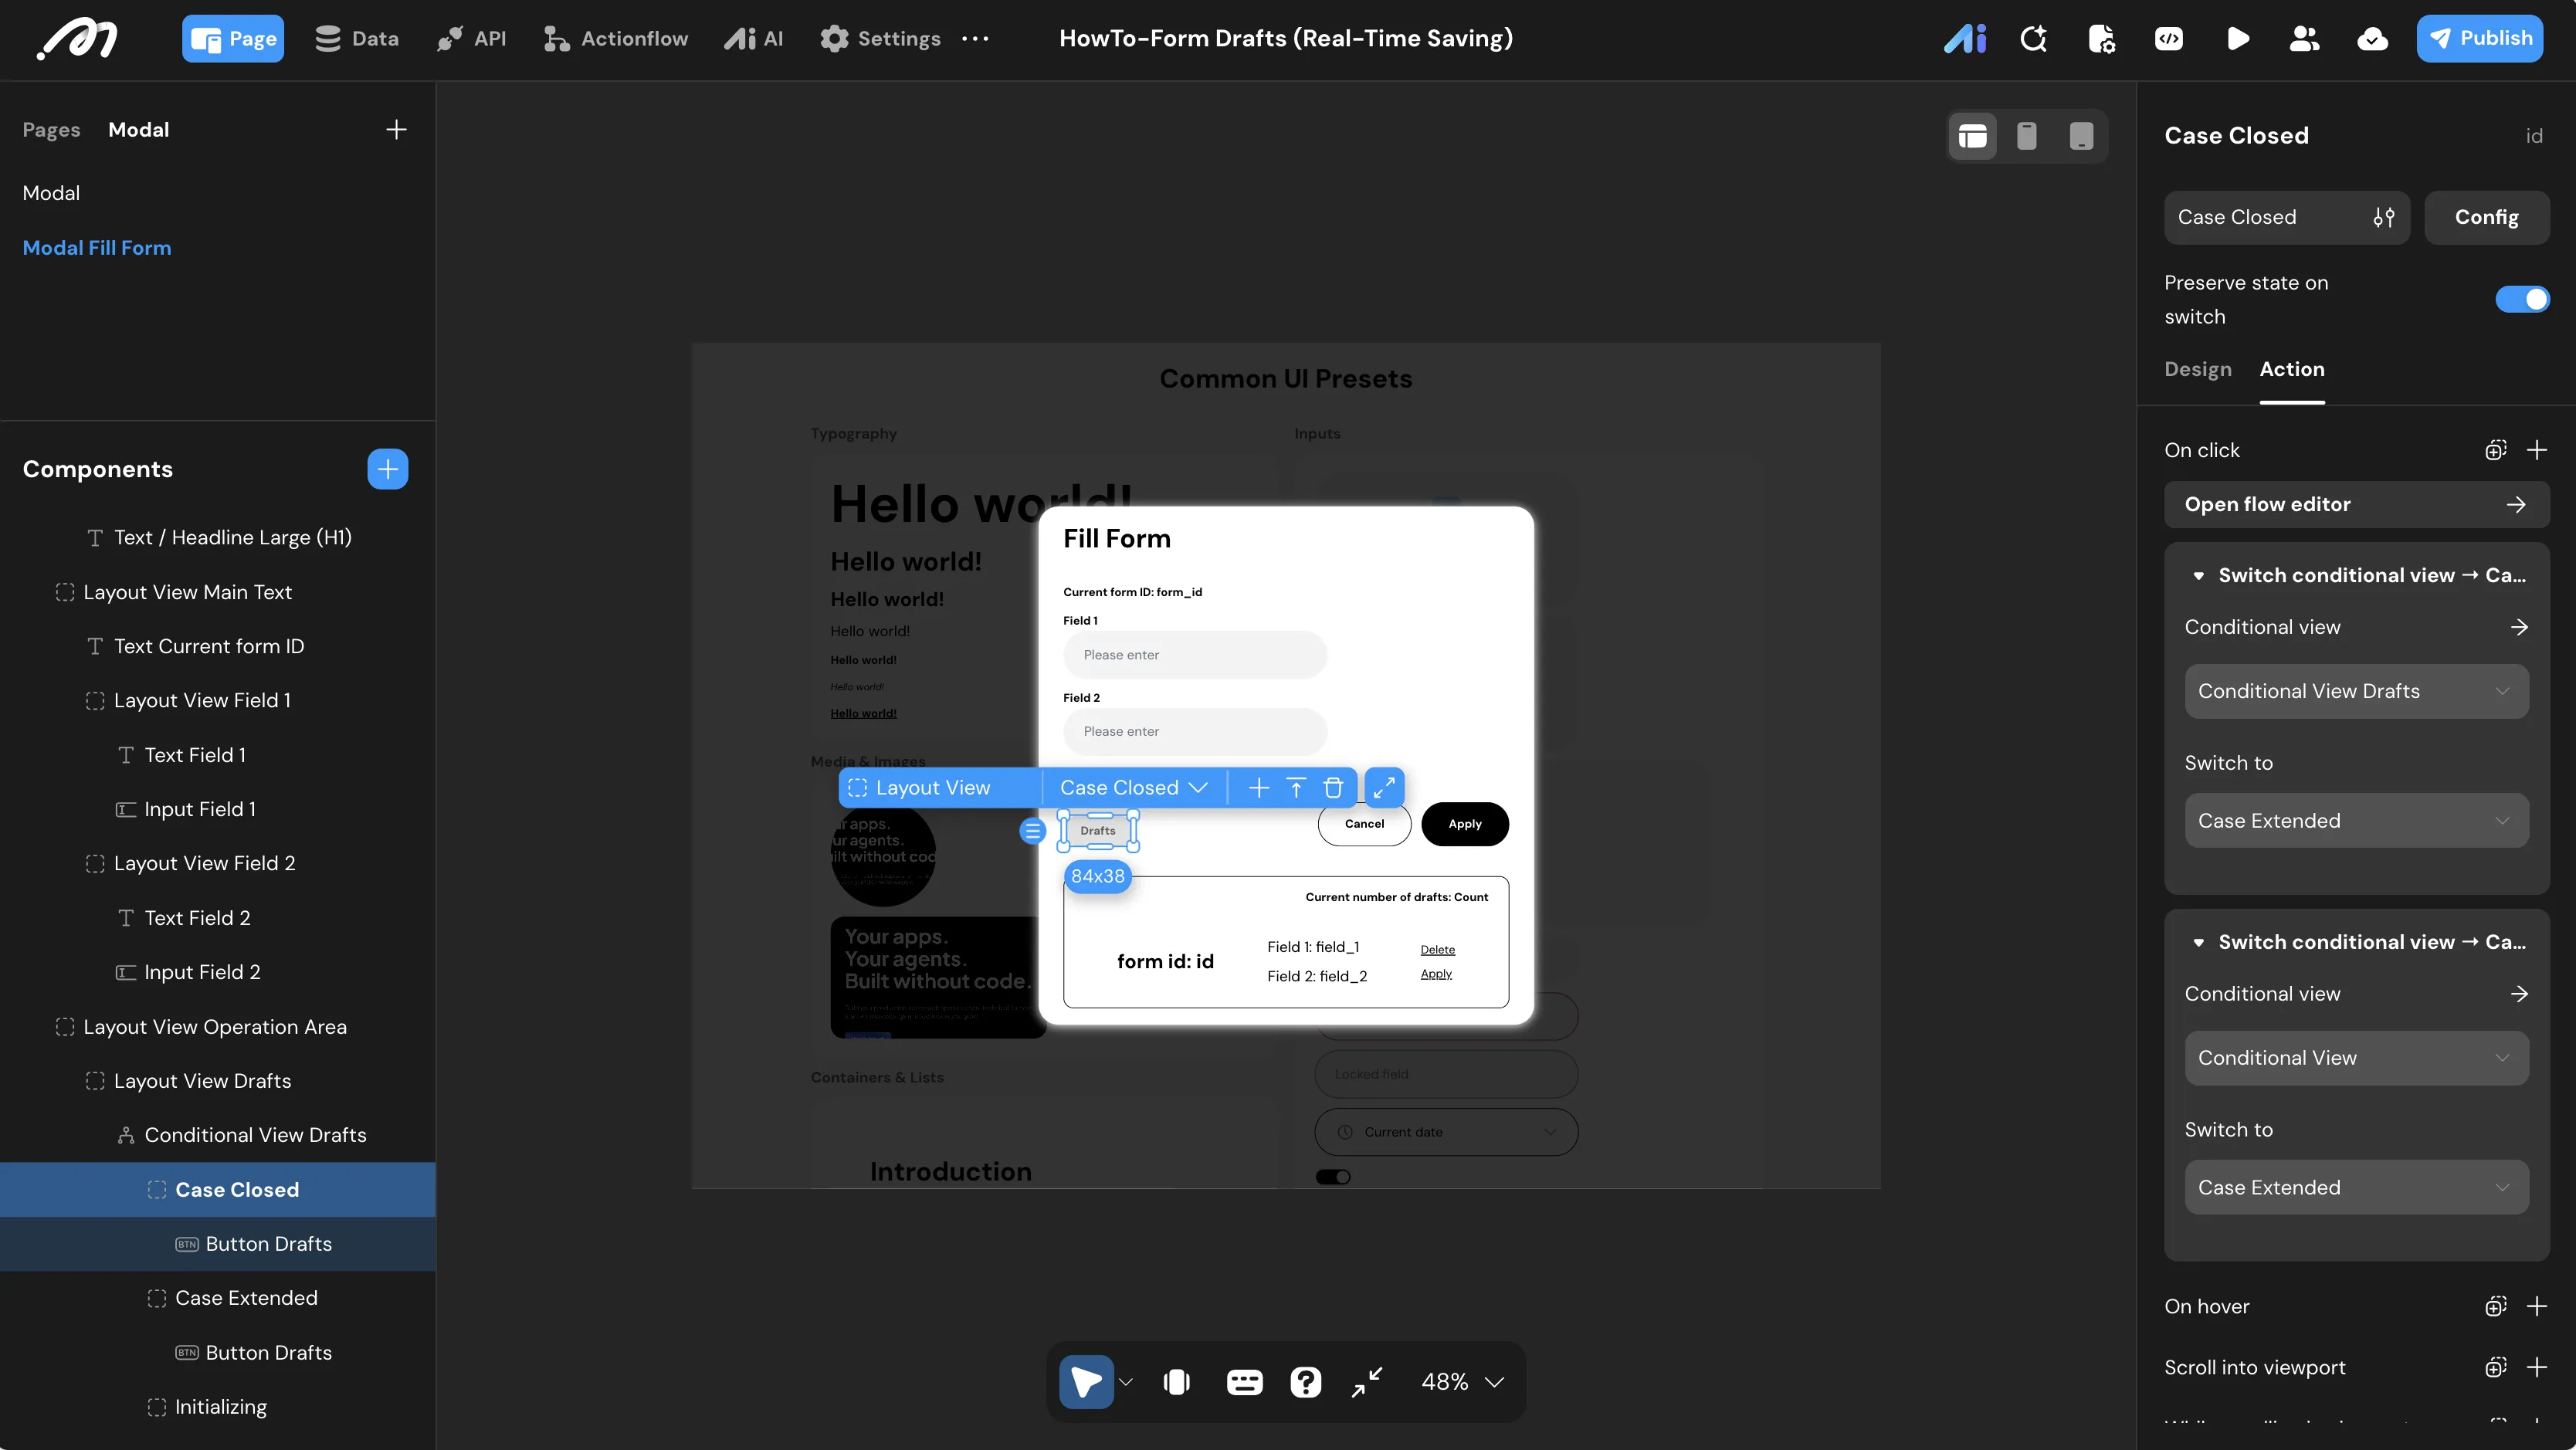
- Expand/Collapse State Control:
- Select the
Conditional View Draftscontainer. It contains two cases:Case ClosedandCase Extended. - Expand: Inside
Case Closed, selectButton Drafts. Under itsOnClick, add:- Switch conditional view → Target
Conditional View Drafts, switch toCase Extended. - Switch conditional view → Target the secondary conditional view (the one wrapping the list), switch to
Case Extended.
- Switch conditional view → Target
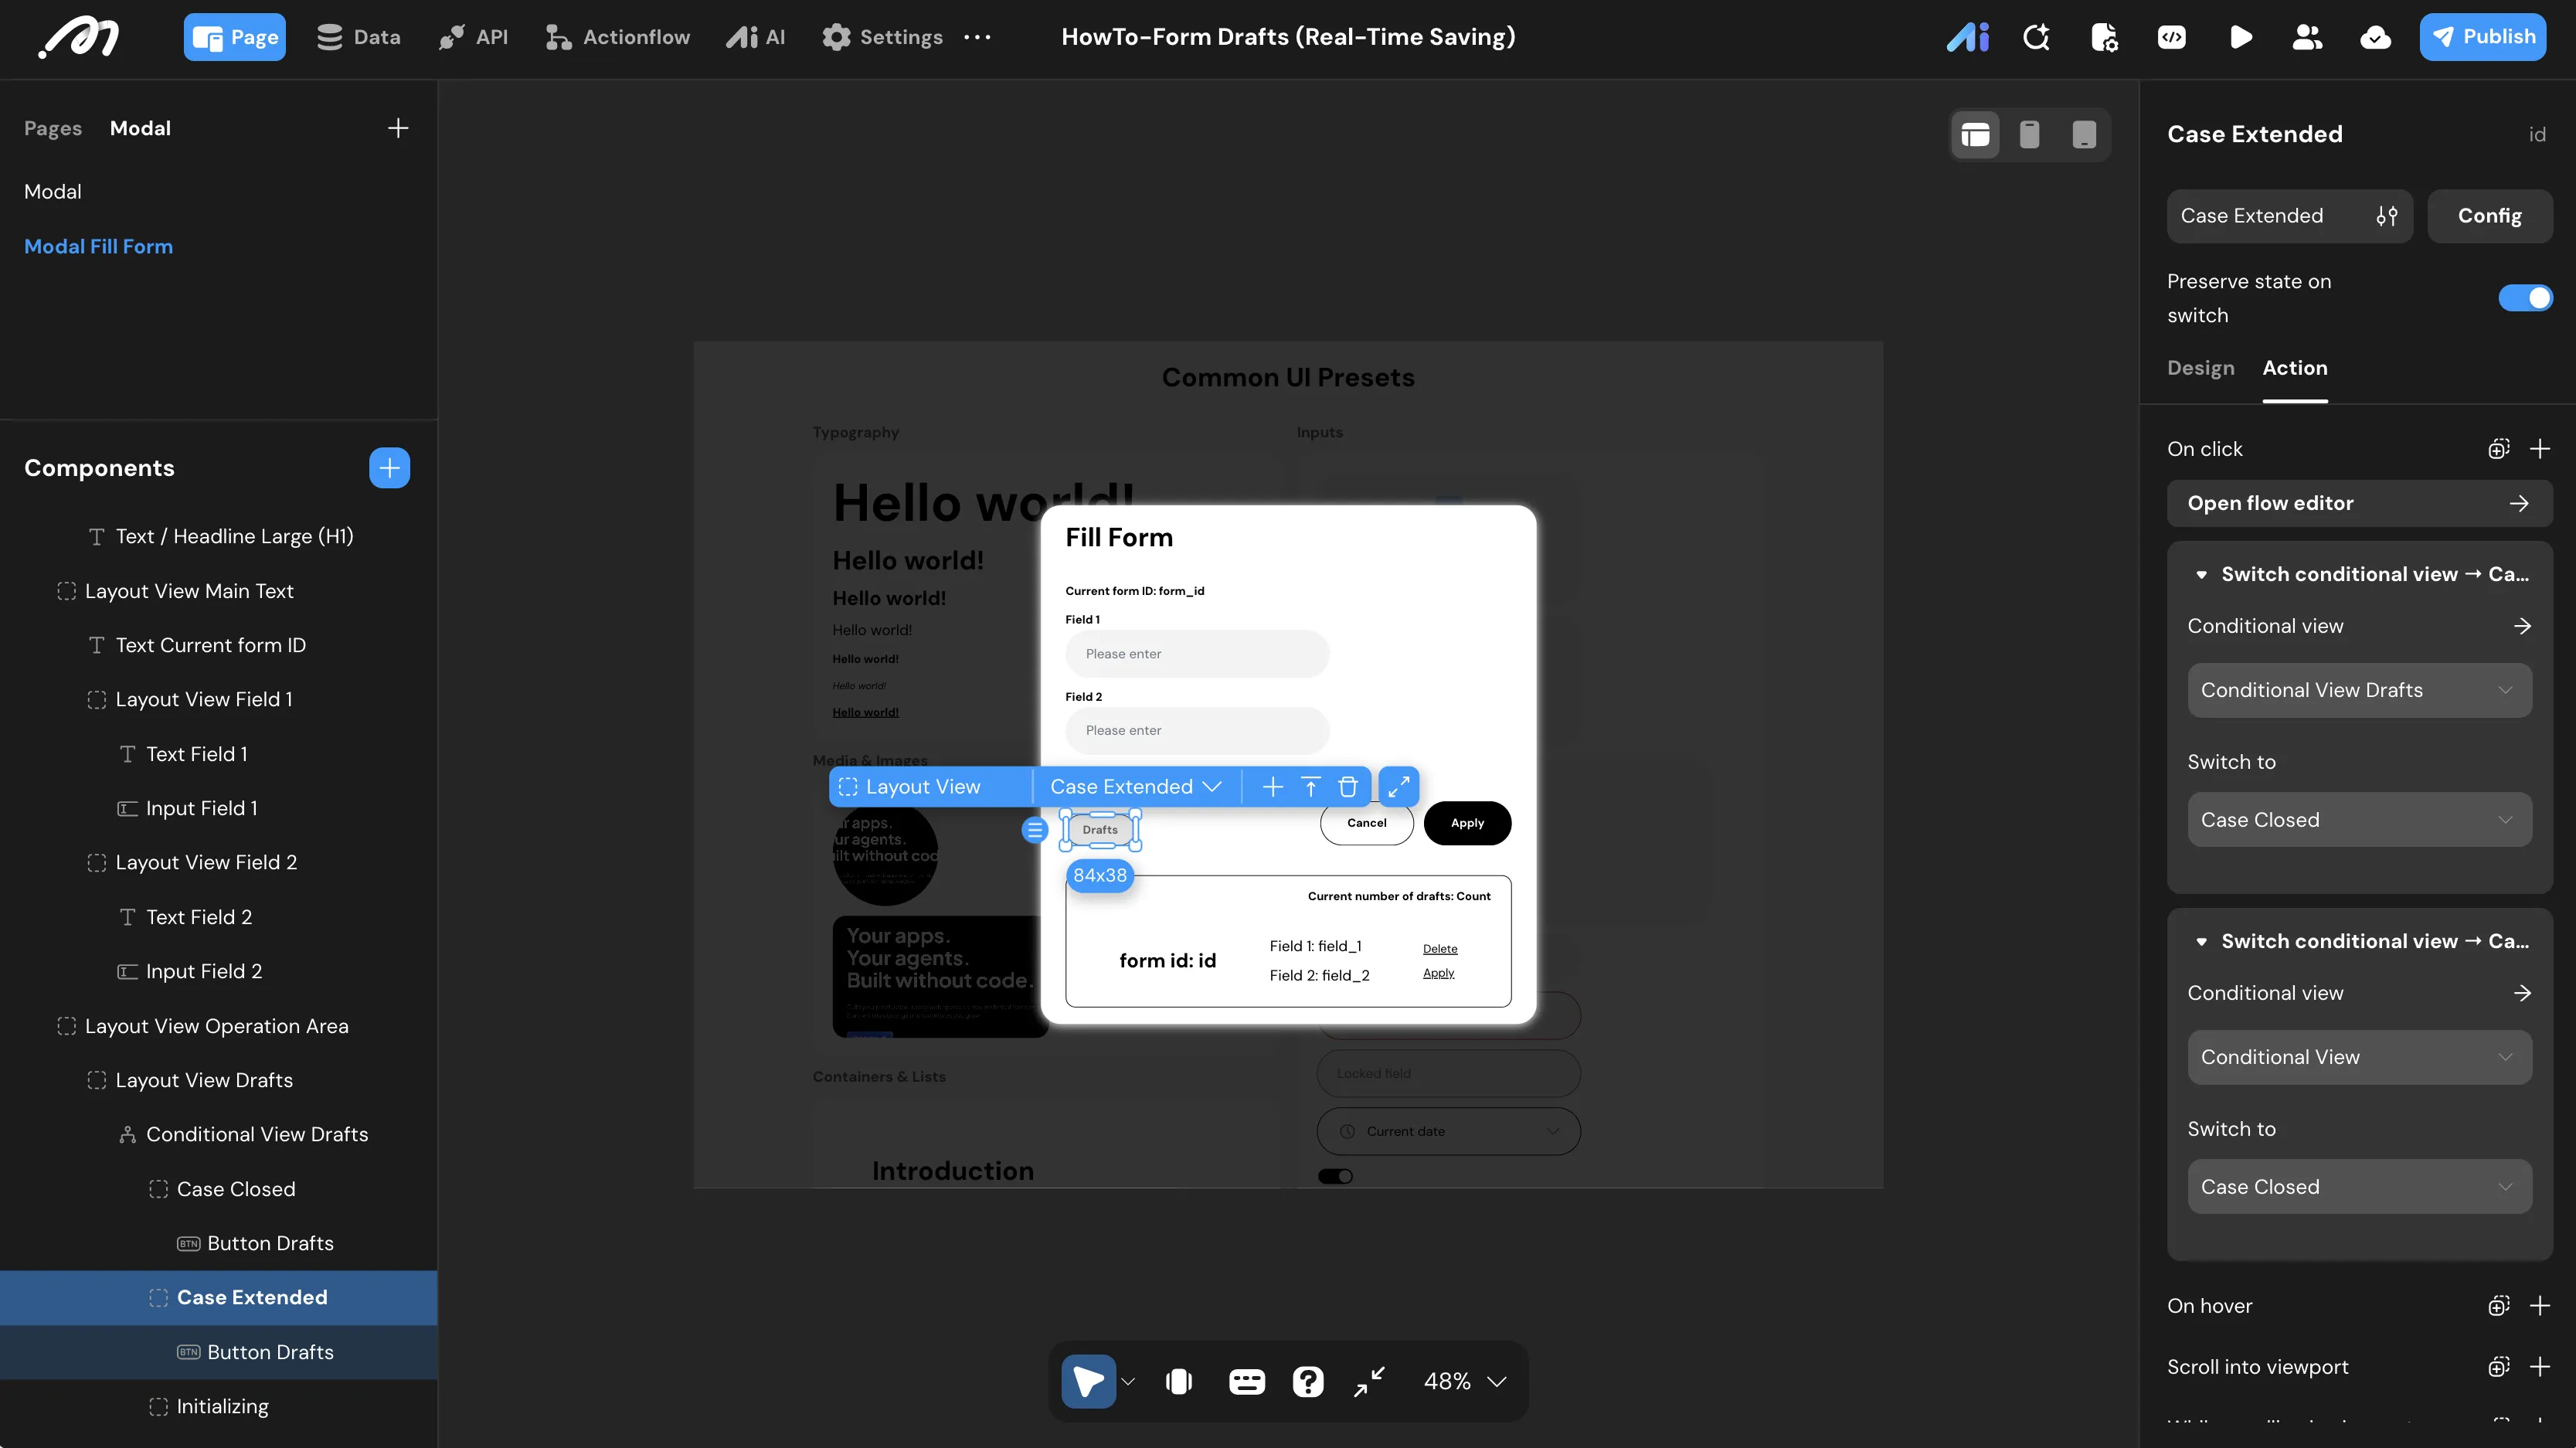
- Collapse: Inside
Case Extended, selectButton Drafts. Under itsOnClick, add:- Switch conditional view → Target
Conditional View Drafts, switch toCase Closed. - Switch conditional view → Target the secondary conditional view, switch to
Case Closed.
- Switch conditional view → Target
- Select the
Synced Conditional Views:This setup uses two conditional view components that must be switched simultaneously. The first controls the button state (Closed/Extended), and the second controls the visibility of the draft list. Using two Switch conditional view actions in the same event ensures they stay in sync.
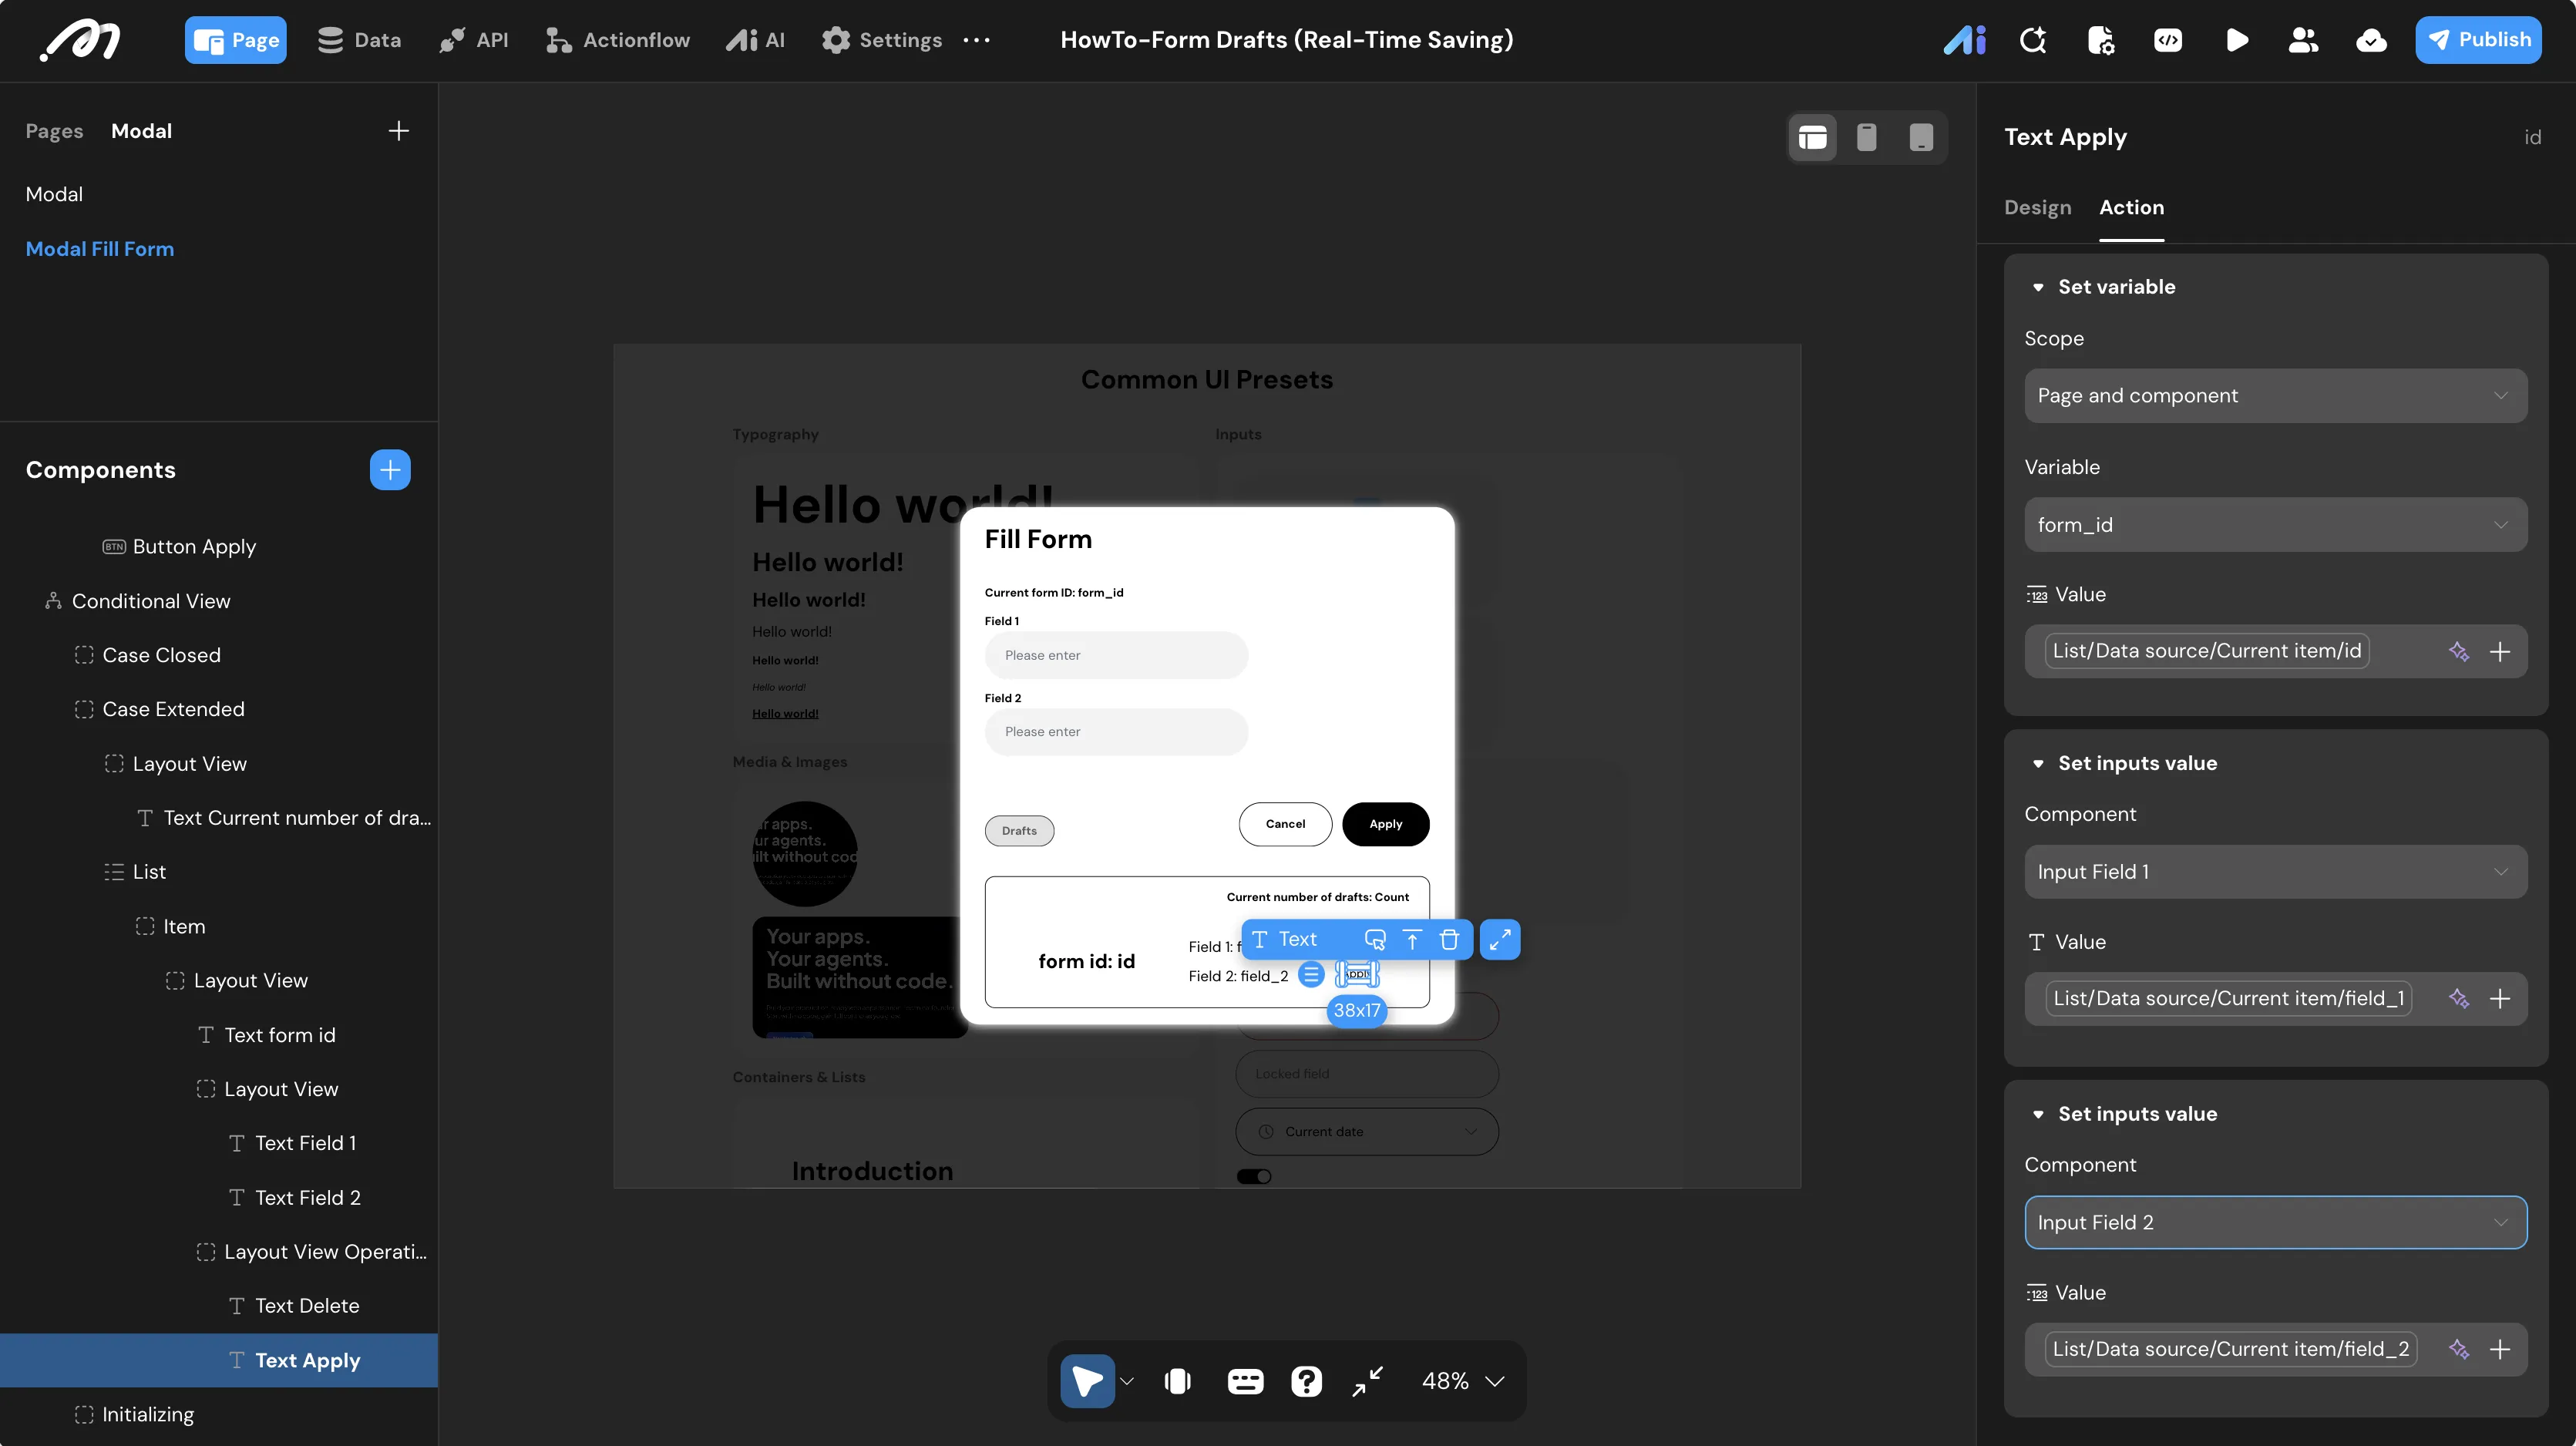
- Load Draft (Apply):
- Inside the list row, select
Text Apply. - Under its
OnClick, add these actions in order:- Set variable: Target
form_id. Set value toData source/List/Current item/id. - Set input value: Target
Input Field 1. Set value toData source/List/Current item/field_1. - Set input value: Target
Input Field 2. Set value toData source/List/Current item/field_2.
- Set variable: Target
- Inside the list row, select
- Delete Draft (with Editing Lock):
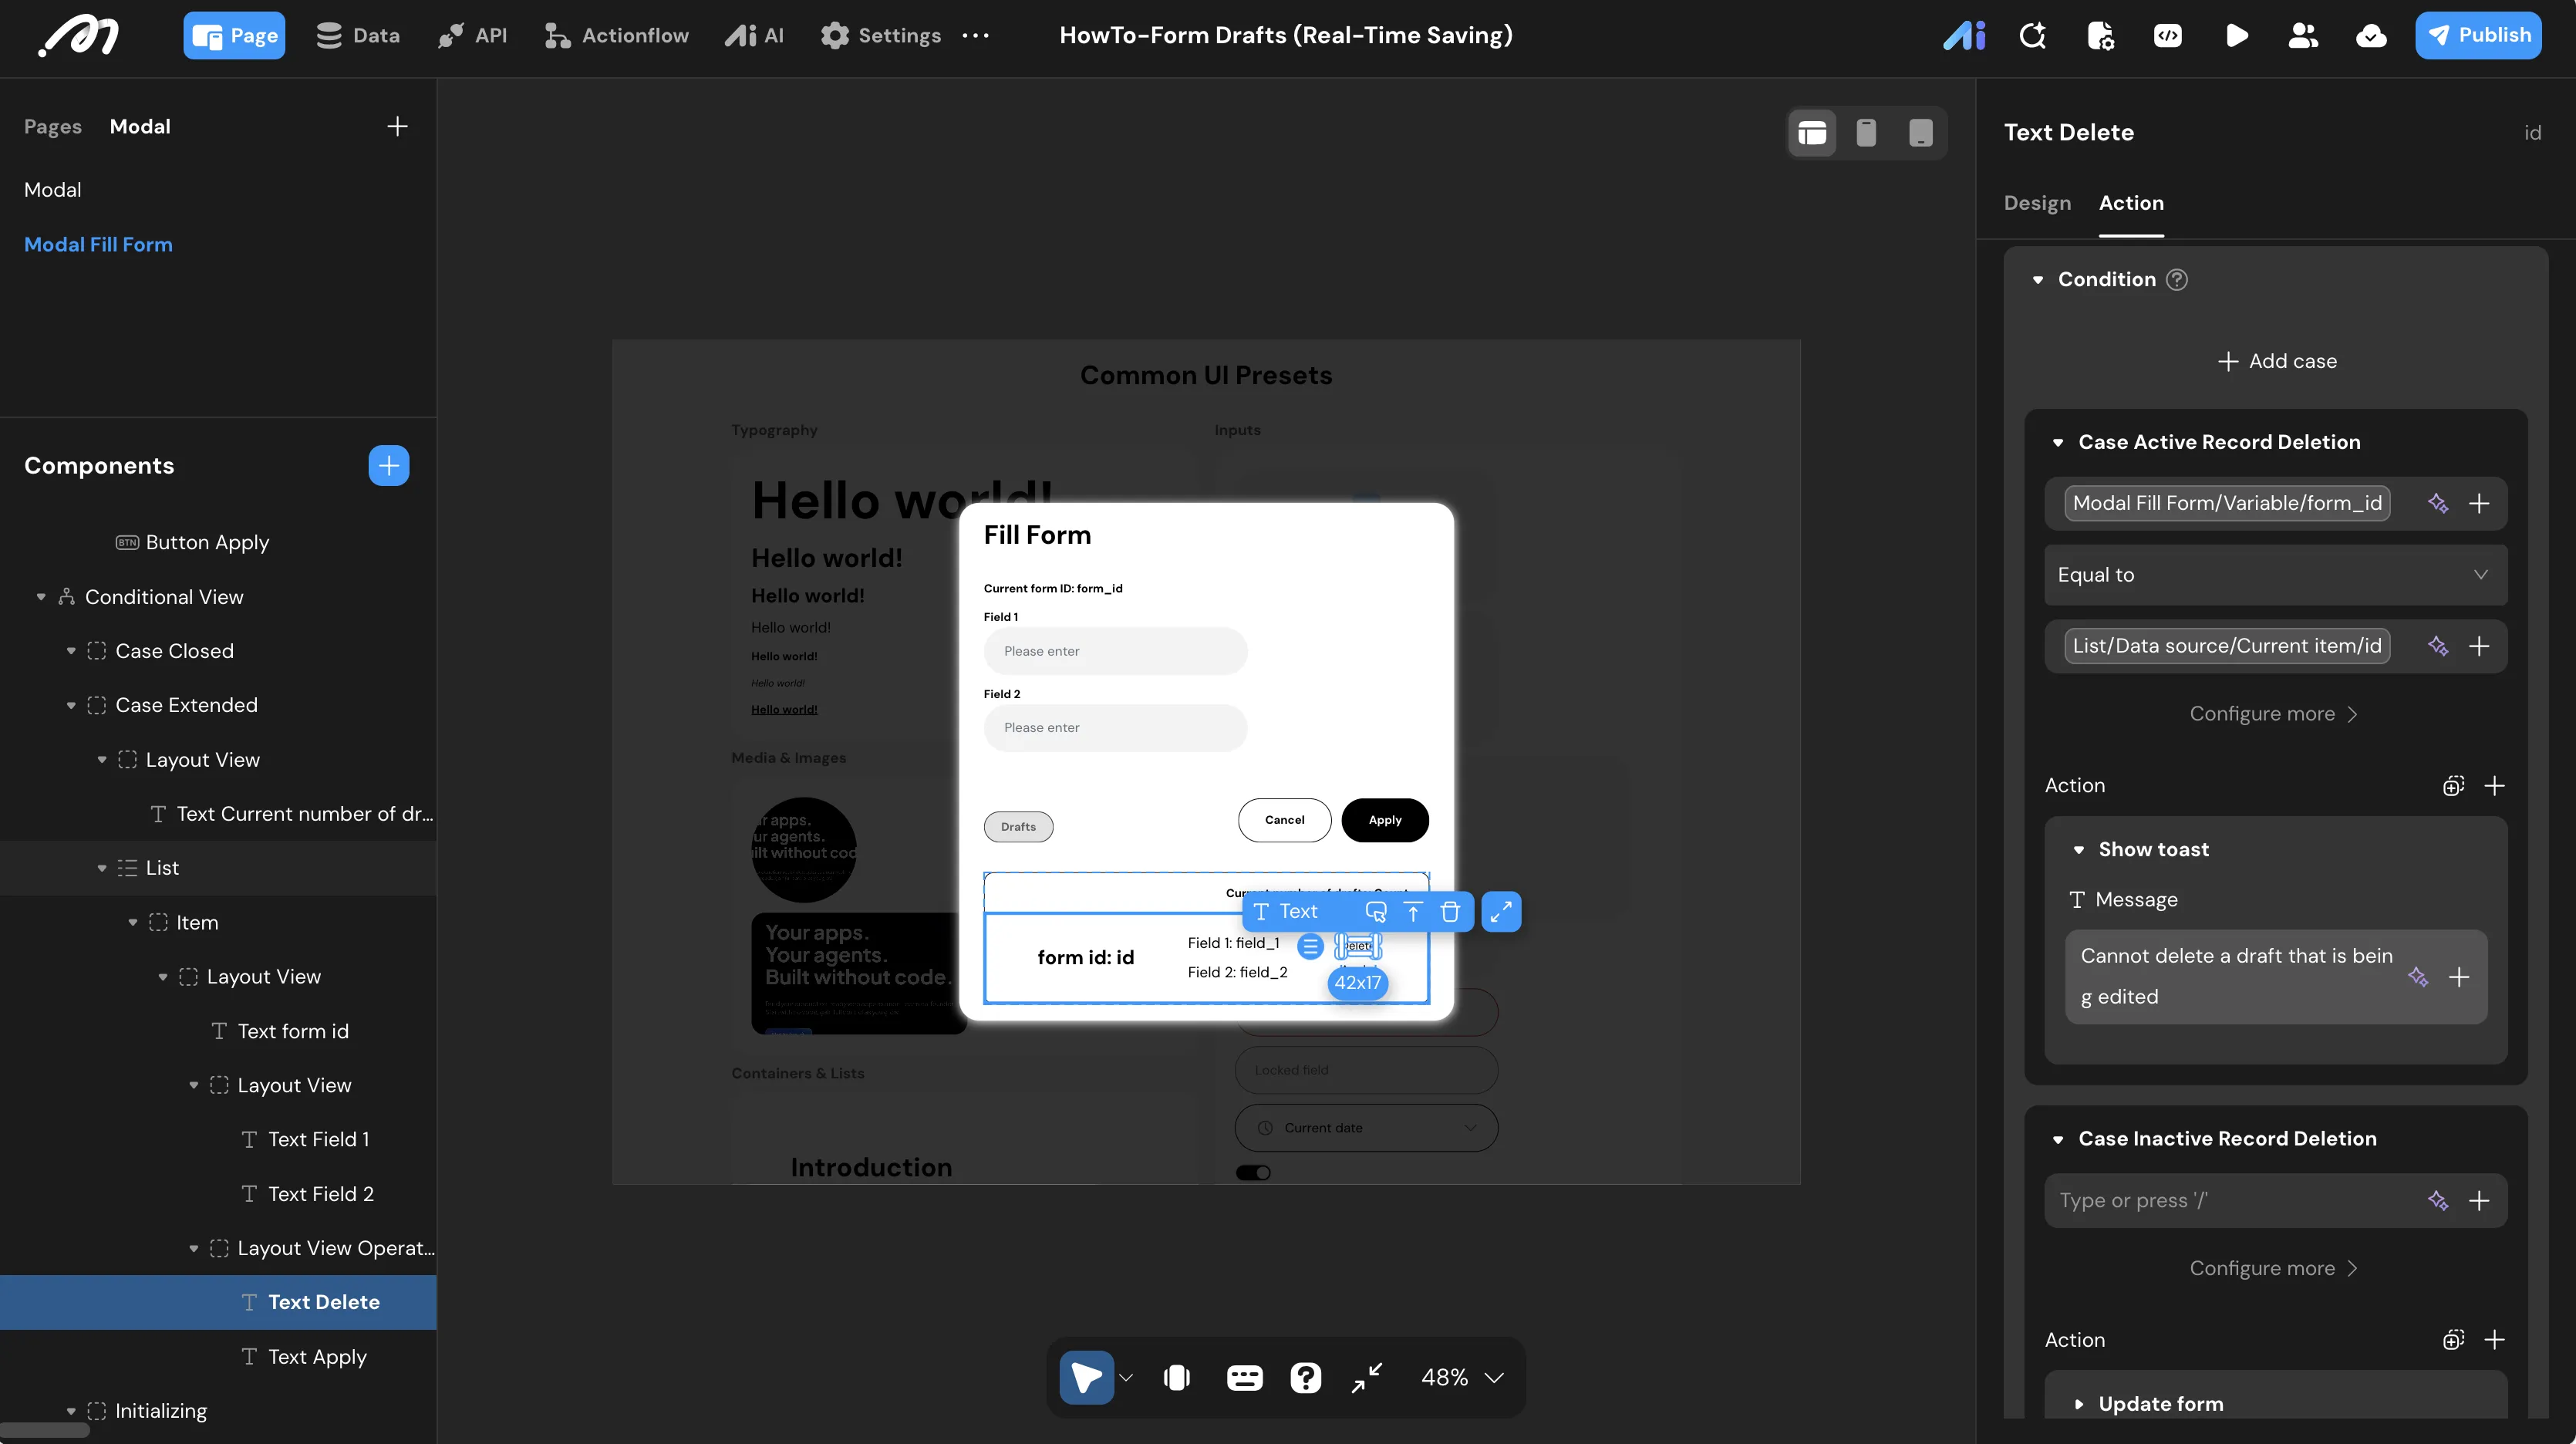
- Inside the list row, select
Text Delete. - Under its
OnClick, add a Condition node.- Path 1 - Editing Protection: Set condition to
Variable/Modal Fill Form/form_idEqual toData source/List/Current item/id.- Action: Show toast with message
Cannot delete a draft that is being edited.
- Action: Show toast with message
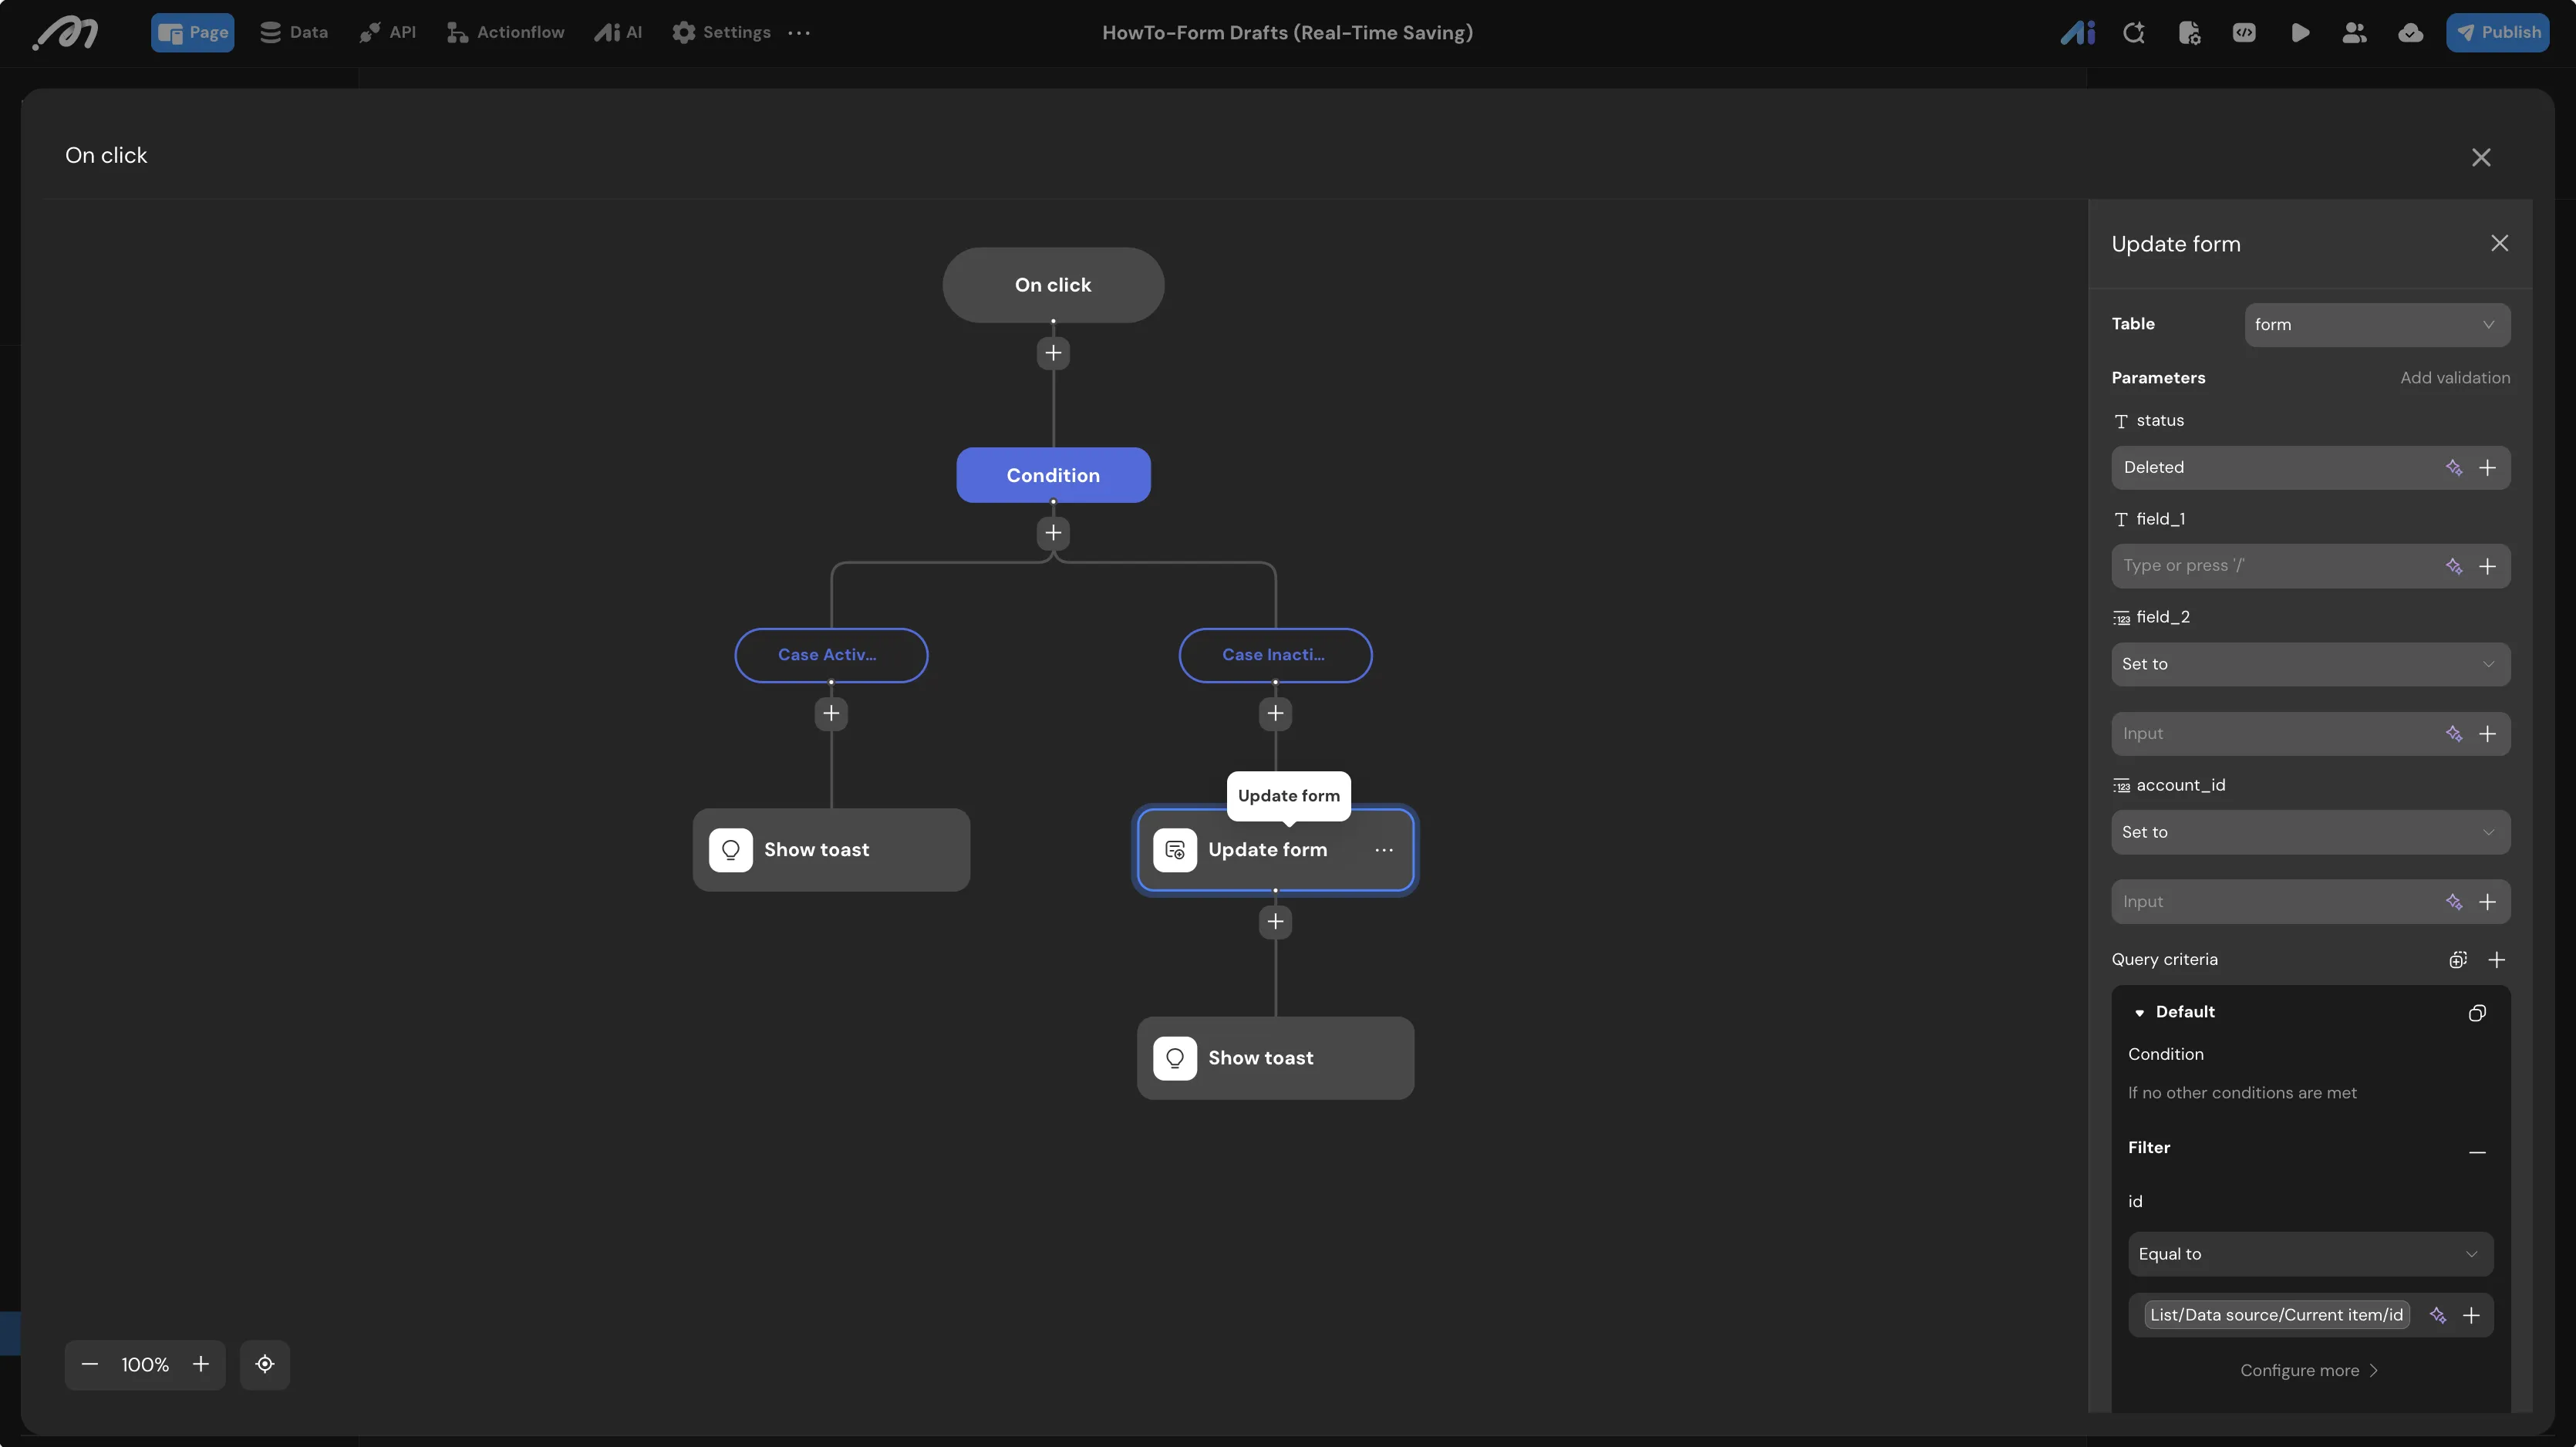
- Path 2 - Safe to Delete: Set condition to
always.- Update Data: Target table
form. Query criteria:idEqual toData source/List/Current item/id. - Parameters: Set
statusto"Deleted". - On Success Action: Show toast with message
Draft deleted successfully.
- Update Data: Target table
- Path 1 - Editing Protection: Set condition to
- Inside the list row, select
Form Submission
Configure the final submission and exit actions.
-
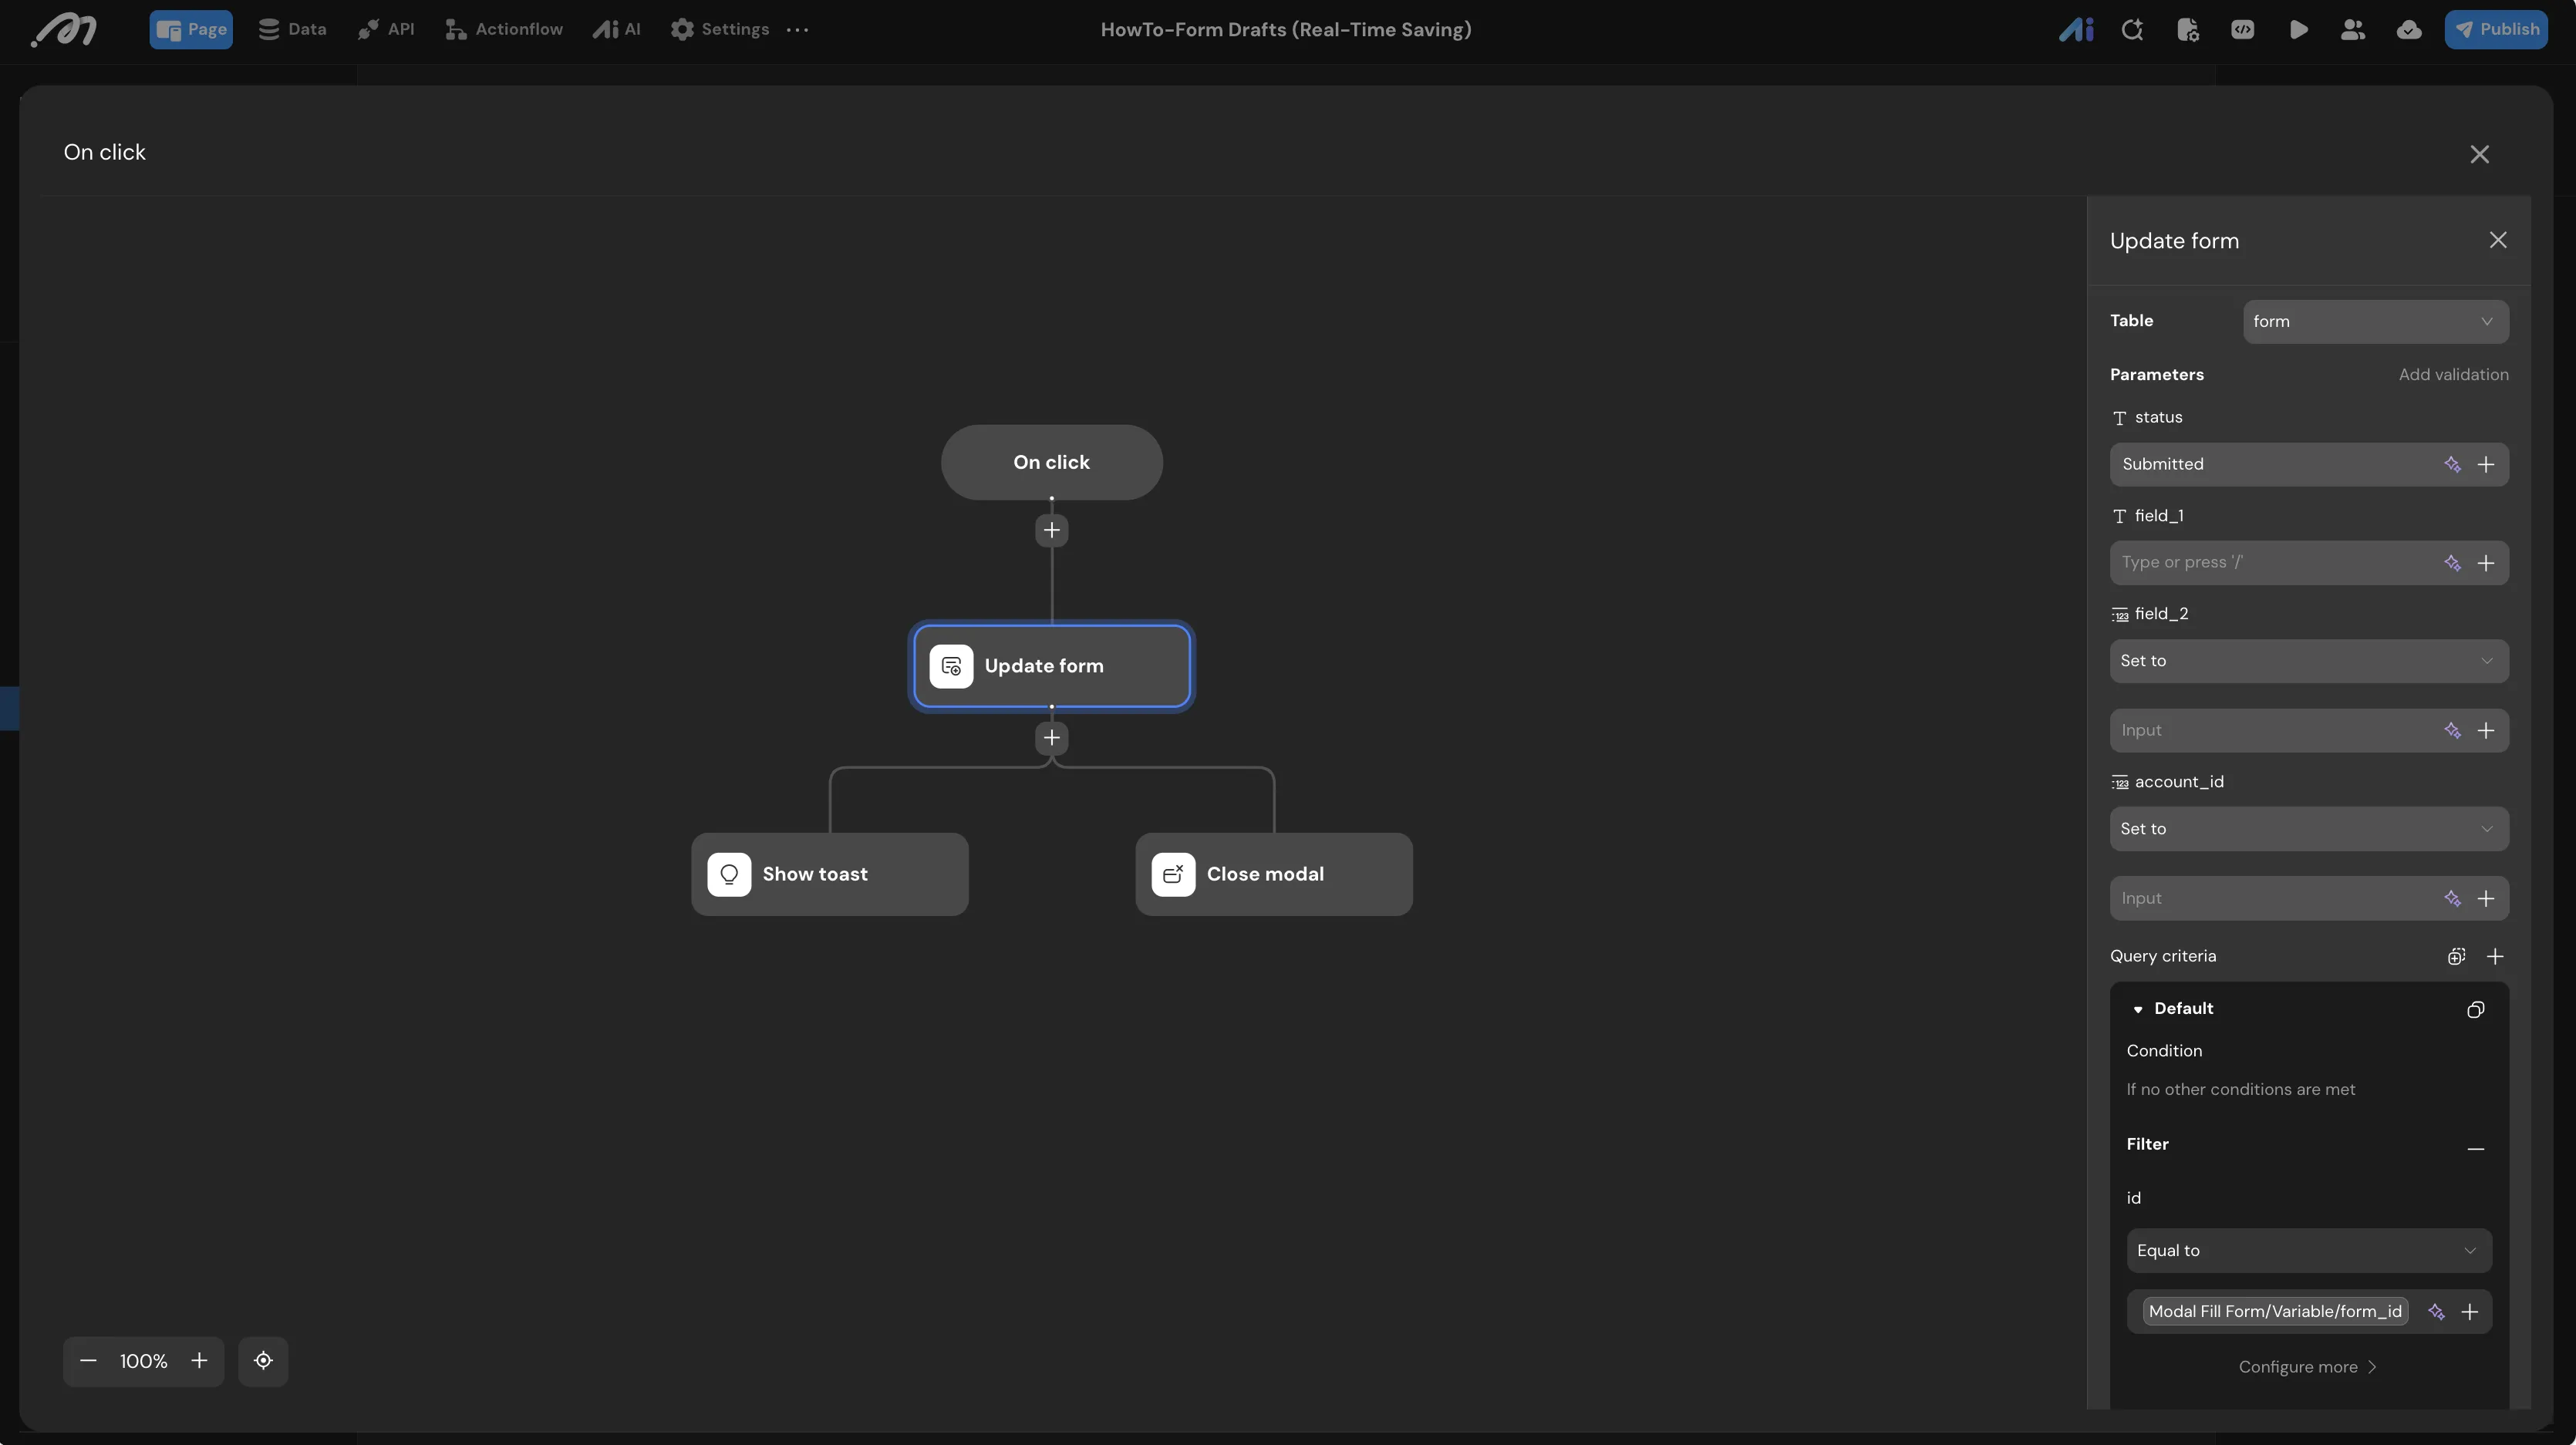
Apply Button (Submit):
- Select
Button Applyinside the modal. - Under its
OnClick, add an Update Data action. - Target Table:
form. - Query Criteria:
idEqual toVariable/Modal Fill Form/form_id. - Parameters: Set
statusto"Submitted". - Success Actions:
- Show toast:
Submission successful. - Close modal: Mode
CLOSE_ON_TOP.
- Show toast:
- Select
-
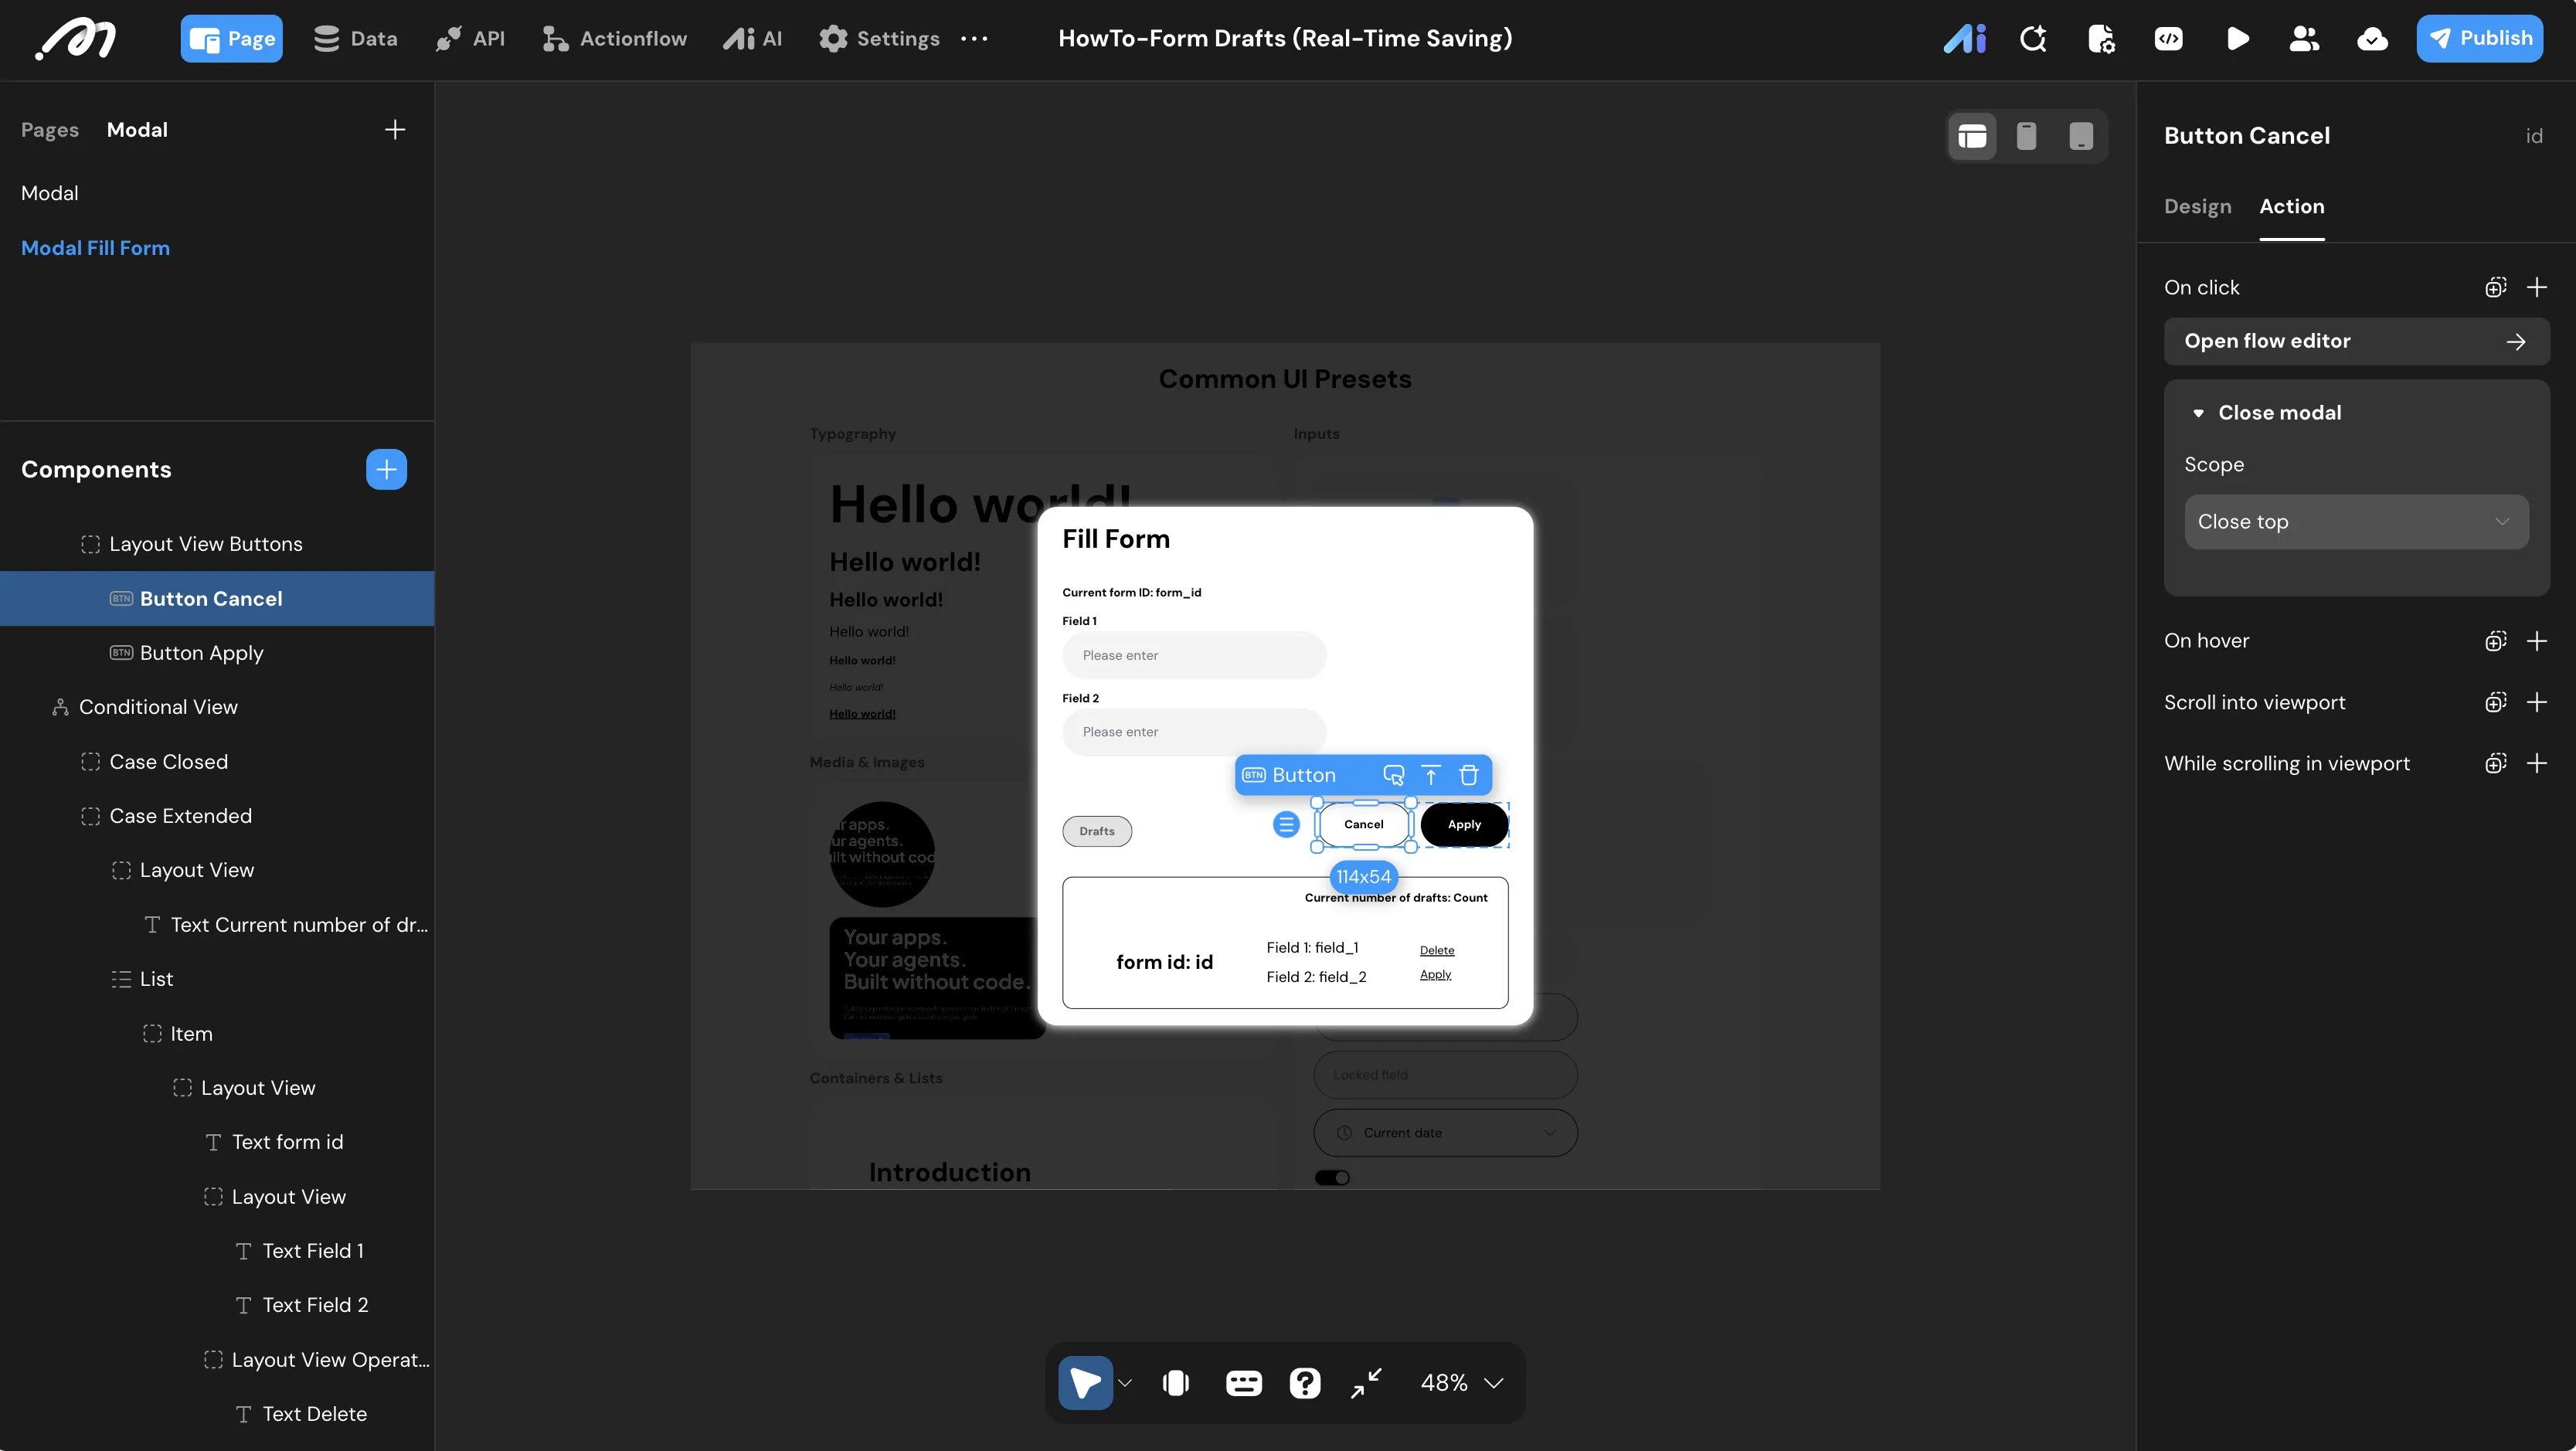
Cancel Button (Exit):
- Select
Button Cancel. - Under its
OnClick, add a Close modal action with ModeCLOSE_ON_TOP.
- Select
Verification
Step 1: Verify Blank Draft Reuse Logic
- Use the Login Simulation toolkit at the bottom bar to select a test account.
- Click the Create button to open the form modal.
- Leave both input fields completely empty and click Cancel.
- Click Create again.
- Expected Result: The system does not create a new record. The
Current form IDdisplayed at the top of the modal is identical to the previous one, confirming the data source successfully executed the reuse logic.
Step 2: Verify Auto-Save on Blur
- Inside the modal, type some text into
Input Field 1. - Click any blank area outside the input to trigger the blur event.
- Expected Result: A toast appears:
Draft saved successfully. In the database, the record’sstatuschanges fromBlank DrafttoFilled Draft. - Clear
Input Field 1so both fields are completely empty, then click outside to trigger blur. - Expected Result: An intercepting toast appears:
Please fill in at least one field., and the data is not saved.
Step 3: Verify Draft Recovery and Editing Lock
- Expand the draft panel and select any historical draft from the list, then click Apply.
- Expected Result: The values in both input fields refresh to match the historical record. The internal
form_idvariable updates to the selected record’s ID. - In the draft list, click Delete next to the draft currently being edited.
- Expected Result: The system triggers the editing lock protection and shows:
Cannot delete a draft that is being edited.
Step 4: Verify Submission Status Change
- Click Apply (Submit) inside the modal.
- Expected Result: A toast appears:
Submission successful.The modal closes. The submitted record no longer appears in the draft list. In the database, the record’sstatusis nowSubmitted.
Step 5: Verify Deletion Status Change
- Click Create to open a new form modal. Fill in at least one field and let it auto-save to create a new
Filled Draft. - In the draft list, click Delete on this new draft (make sure it is not currently loaded in the editor).
- Expected Result: A toast appears:
Draft deleted successfully. The record disappears from the list. In the database, the record’sstatusis nowDeleted.