Import and Export Data
Bulk import and export in Data tab → Database — Excel, CSV, multimedia files, and account creation.
Momen supports importing up to approximately 10 million rows, with throughput of up to 100,000 rows per minute.
Import data
Prepare data files
Table file requirements:
- UTF-8 encoded Excel files (.xlsx only) or CSV files.
- First row must be headers.
- Cells intended to be blank must be completely empty (no hidden spaces or line breaks).
- Must contain at least one data record.
- No formula calculations are supported.
You can download template tables from the bottom left of the upload interface.
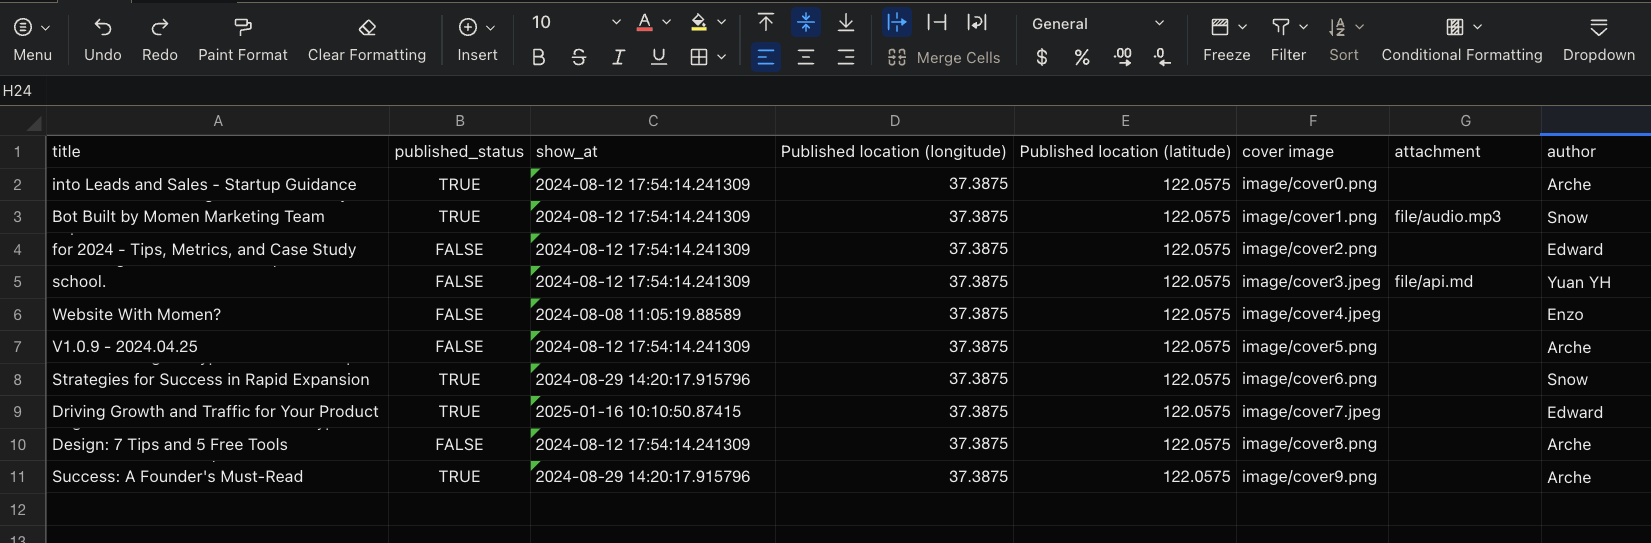
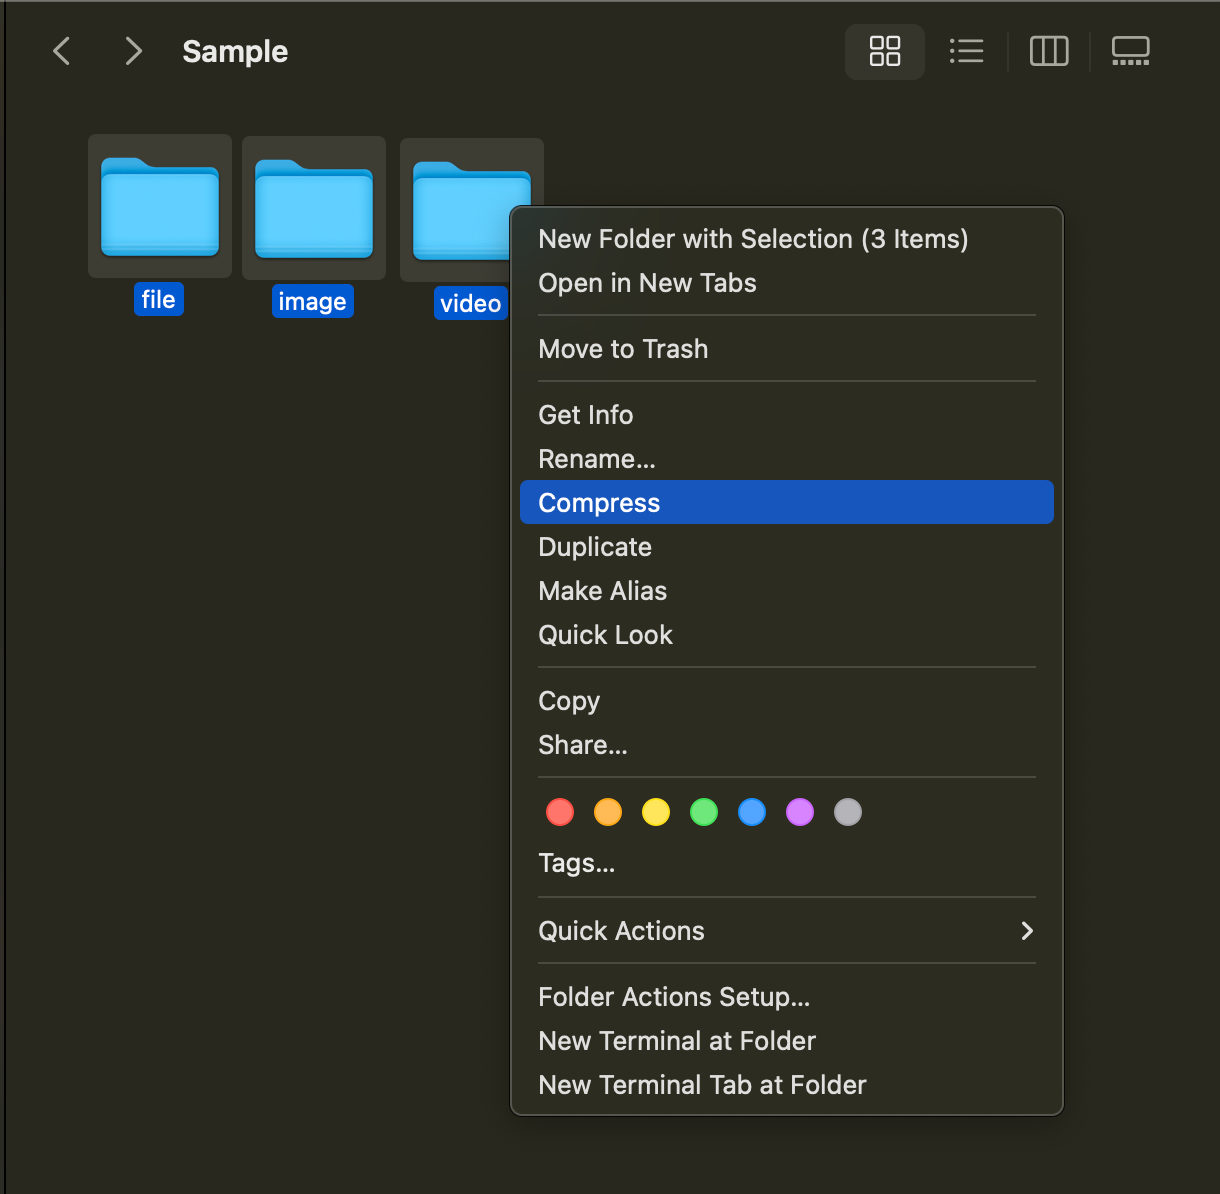
For importing images, videos, and files, prepare an additional ZIP package:
- Place media files anywhere in the ZIP — at the root or inside any subfolder. Dedicated
image,video, andfilefolders are no longer required. - Each file is imported as the type of the column you map it to: map it to an image column and it imports as an image; map it to a file column and it imports as a file. The same image can therefore be imported as both an image and a file attachment.
- In the CSV or Excel file, each multimedia column value must match the file’s path inside the ZIP, such as
cover0.png,products/cover0.png, orapi.pdf. - Compress the files or folders directly into a ZIP. Do not wrap everything in an extra top-level folder before compressing.
Upload files
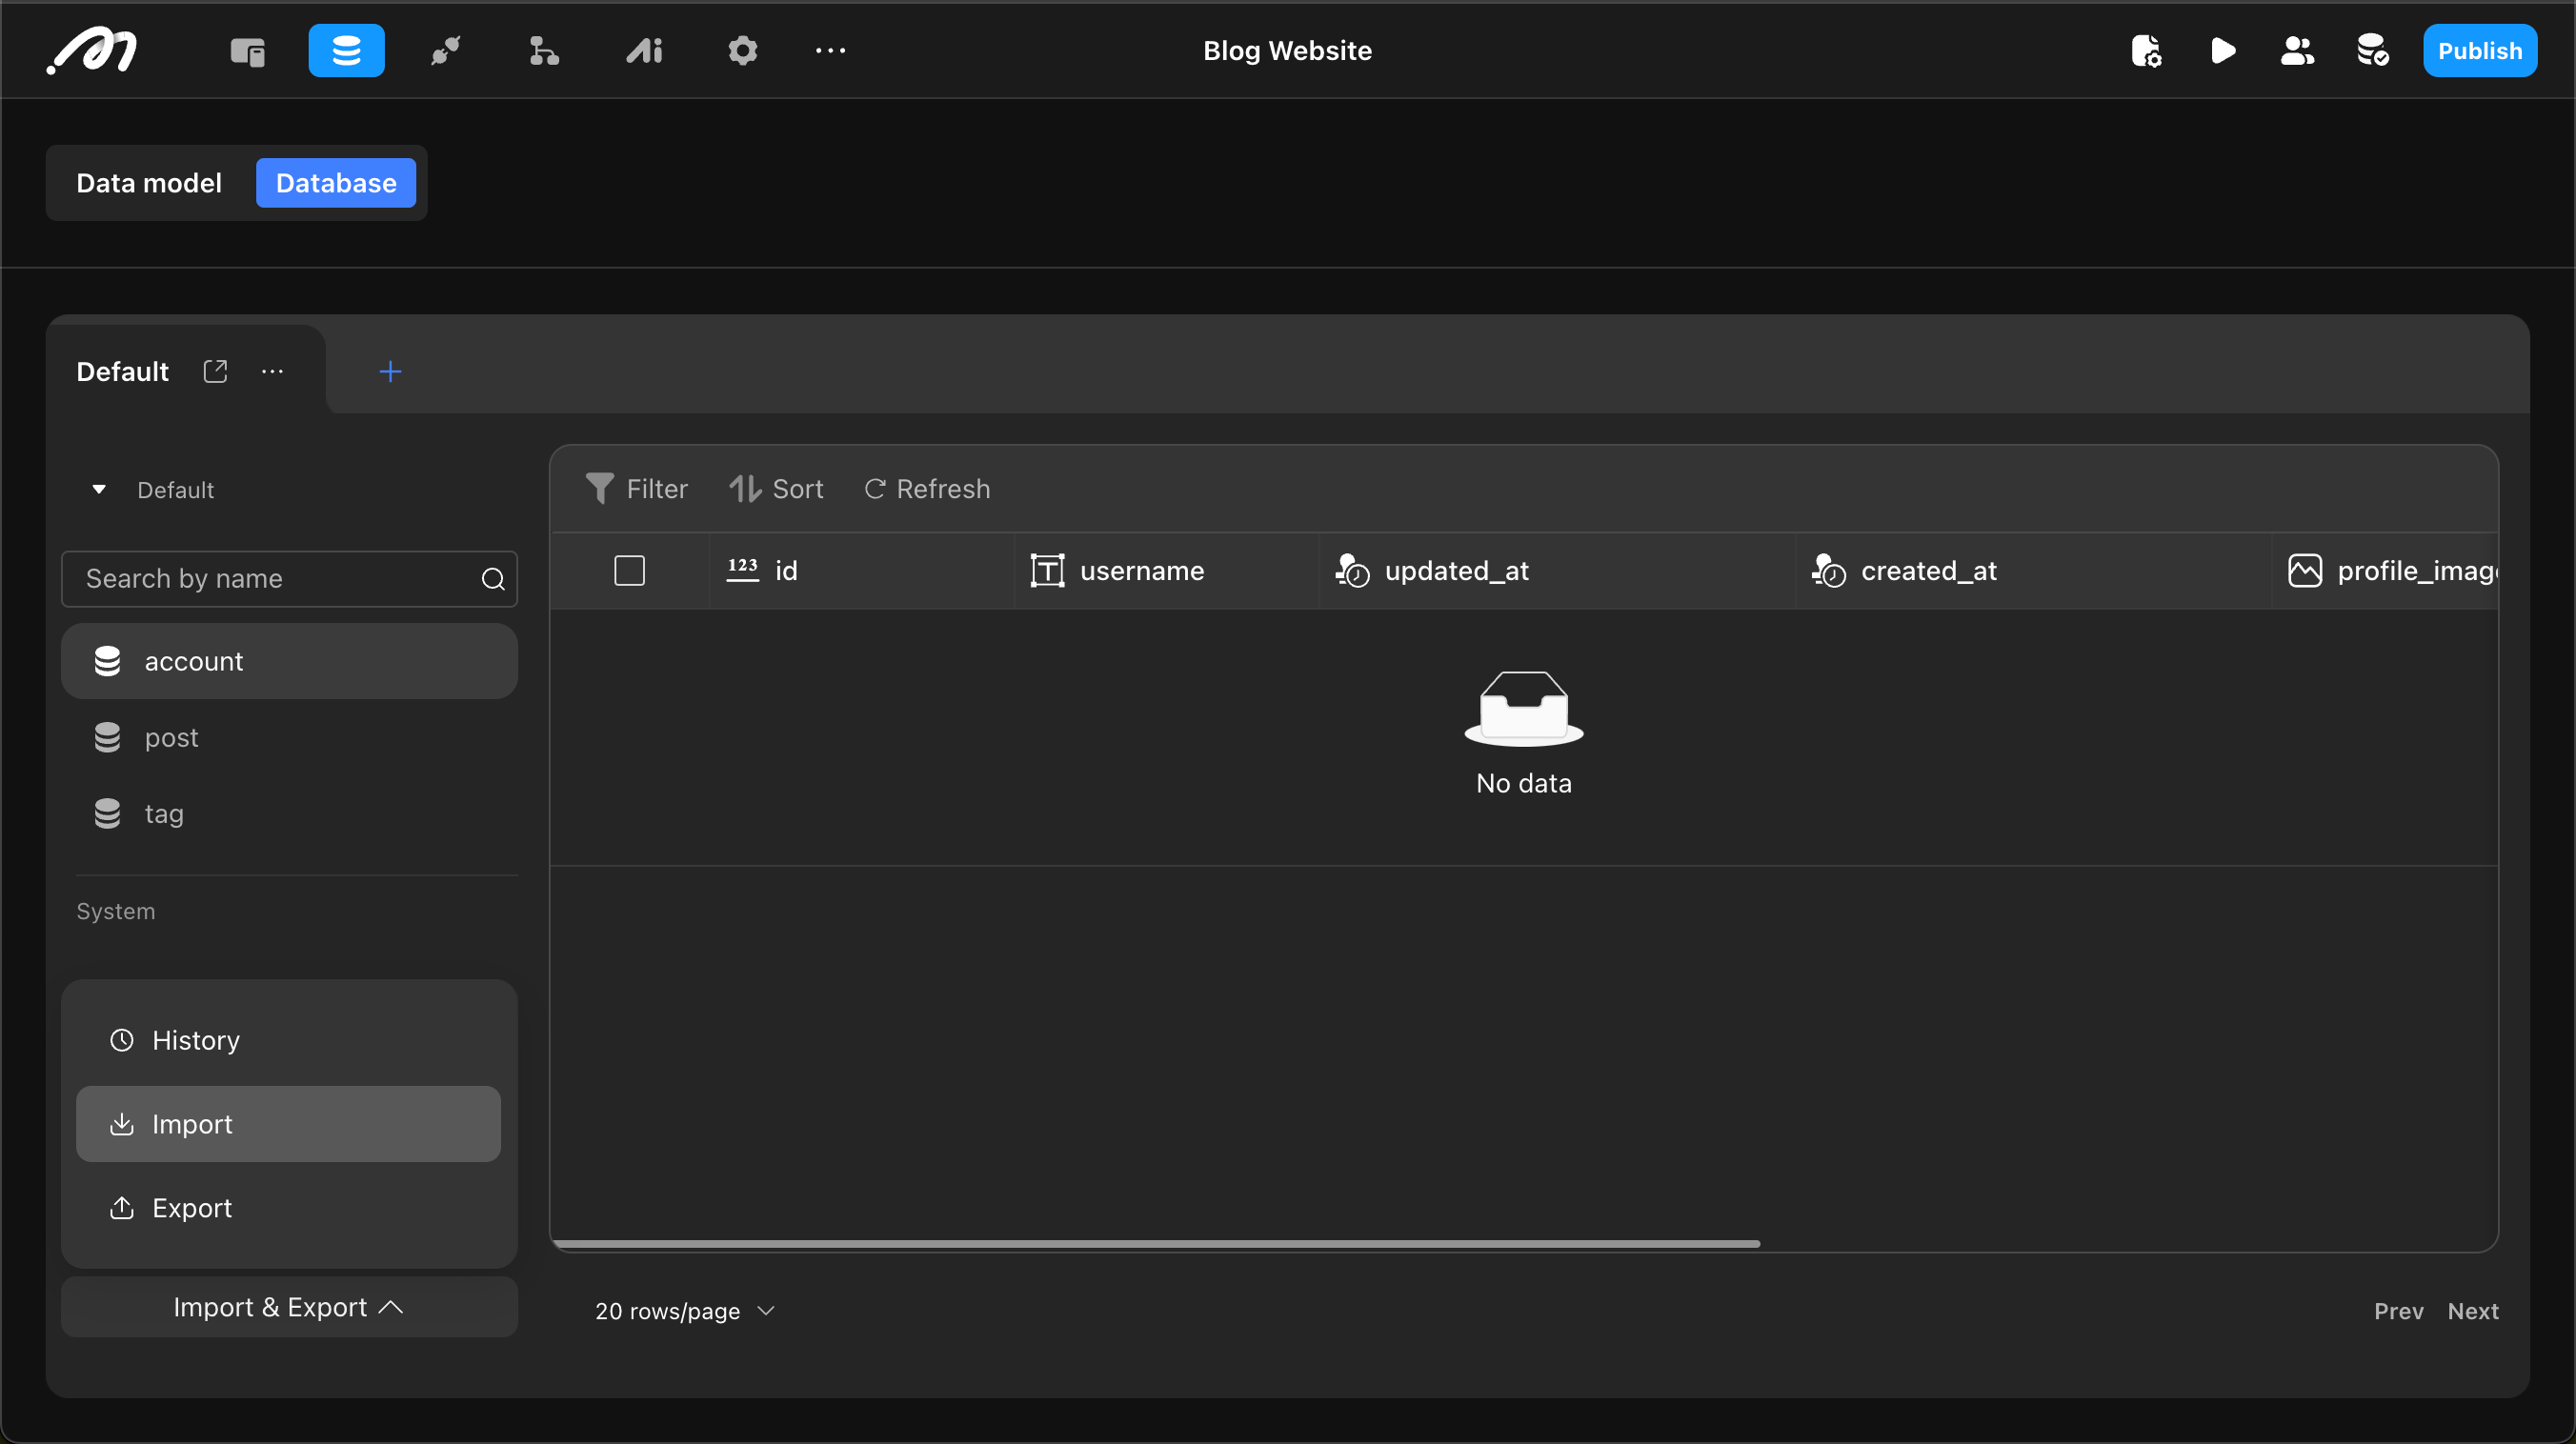
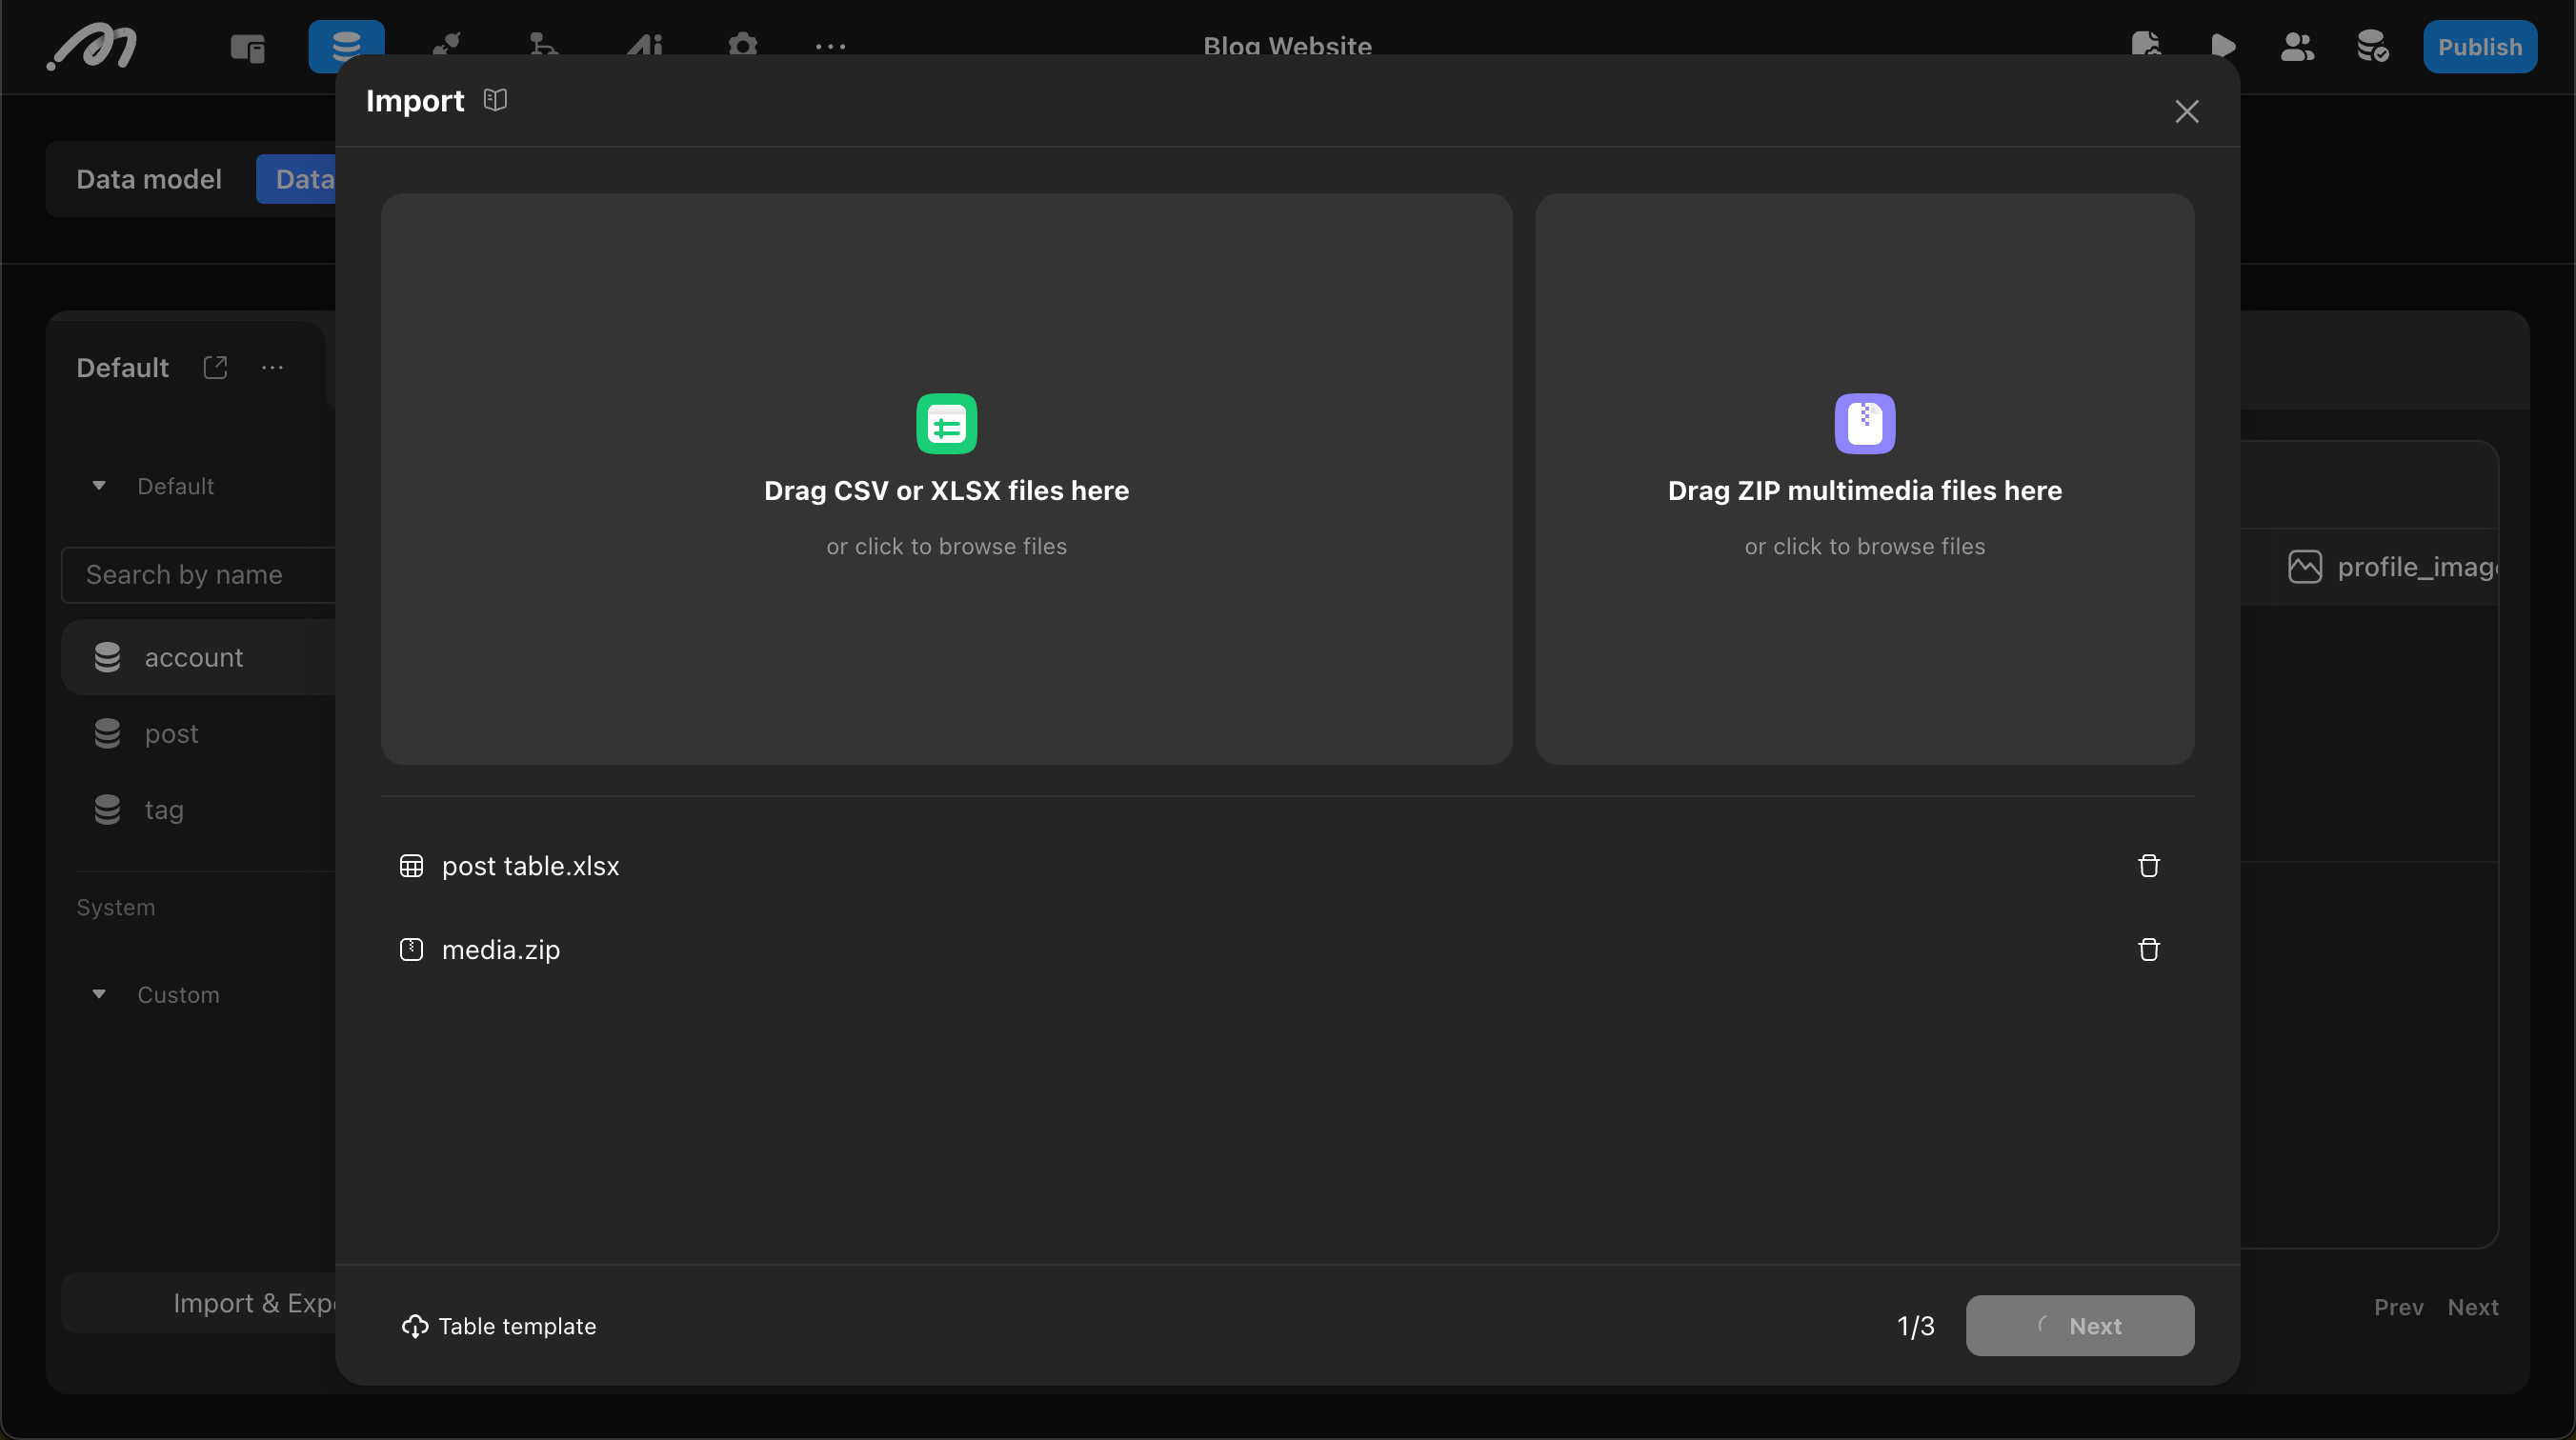
Click Import & Export in the bottom-left corner of Database, then choose Import. Upload prepared tables and optional multimedia ZIP. Multiple tables per run (mixed CSV and Excel); one multimedia ZIP only.
Select an import type
Choose Insert or Update. Insert means directly inserting data into the database, while Update updates existing records based on the primary key (id).
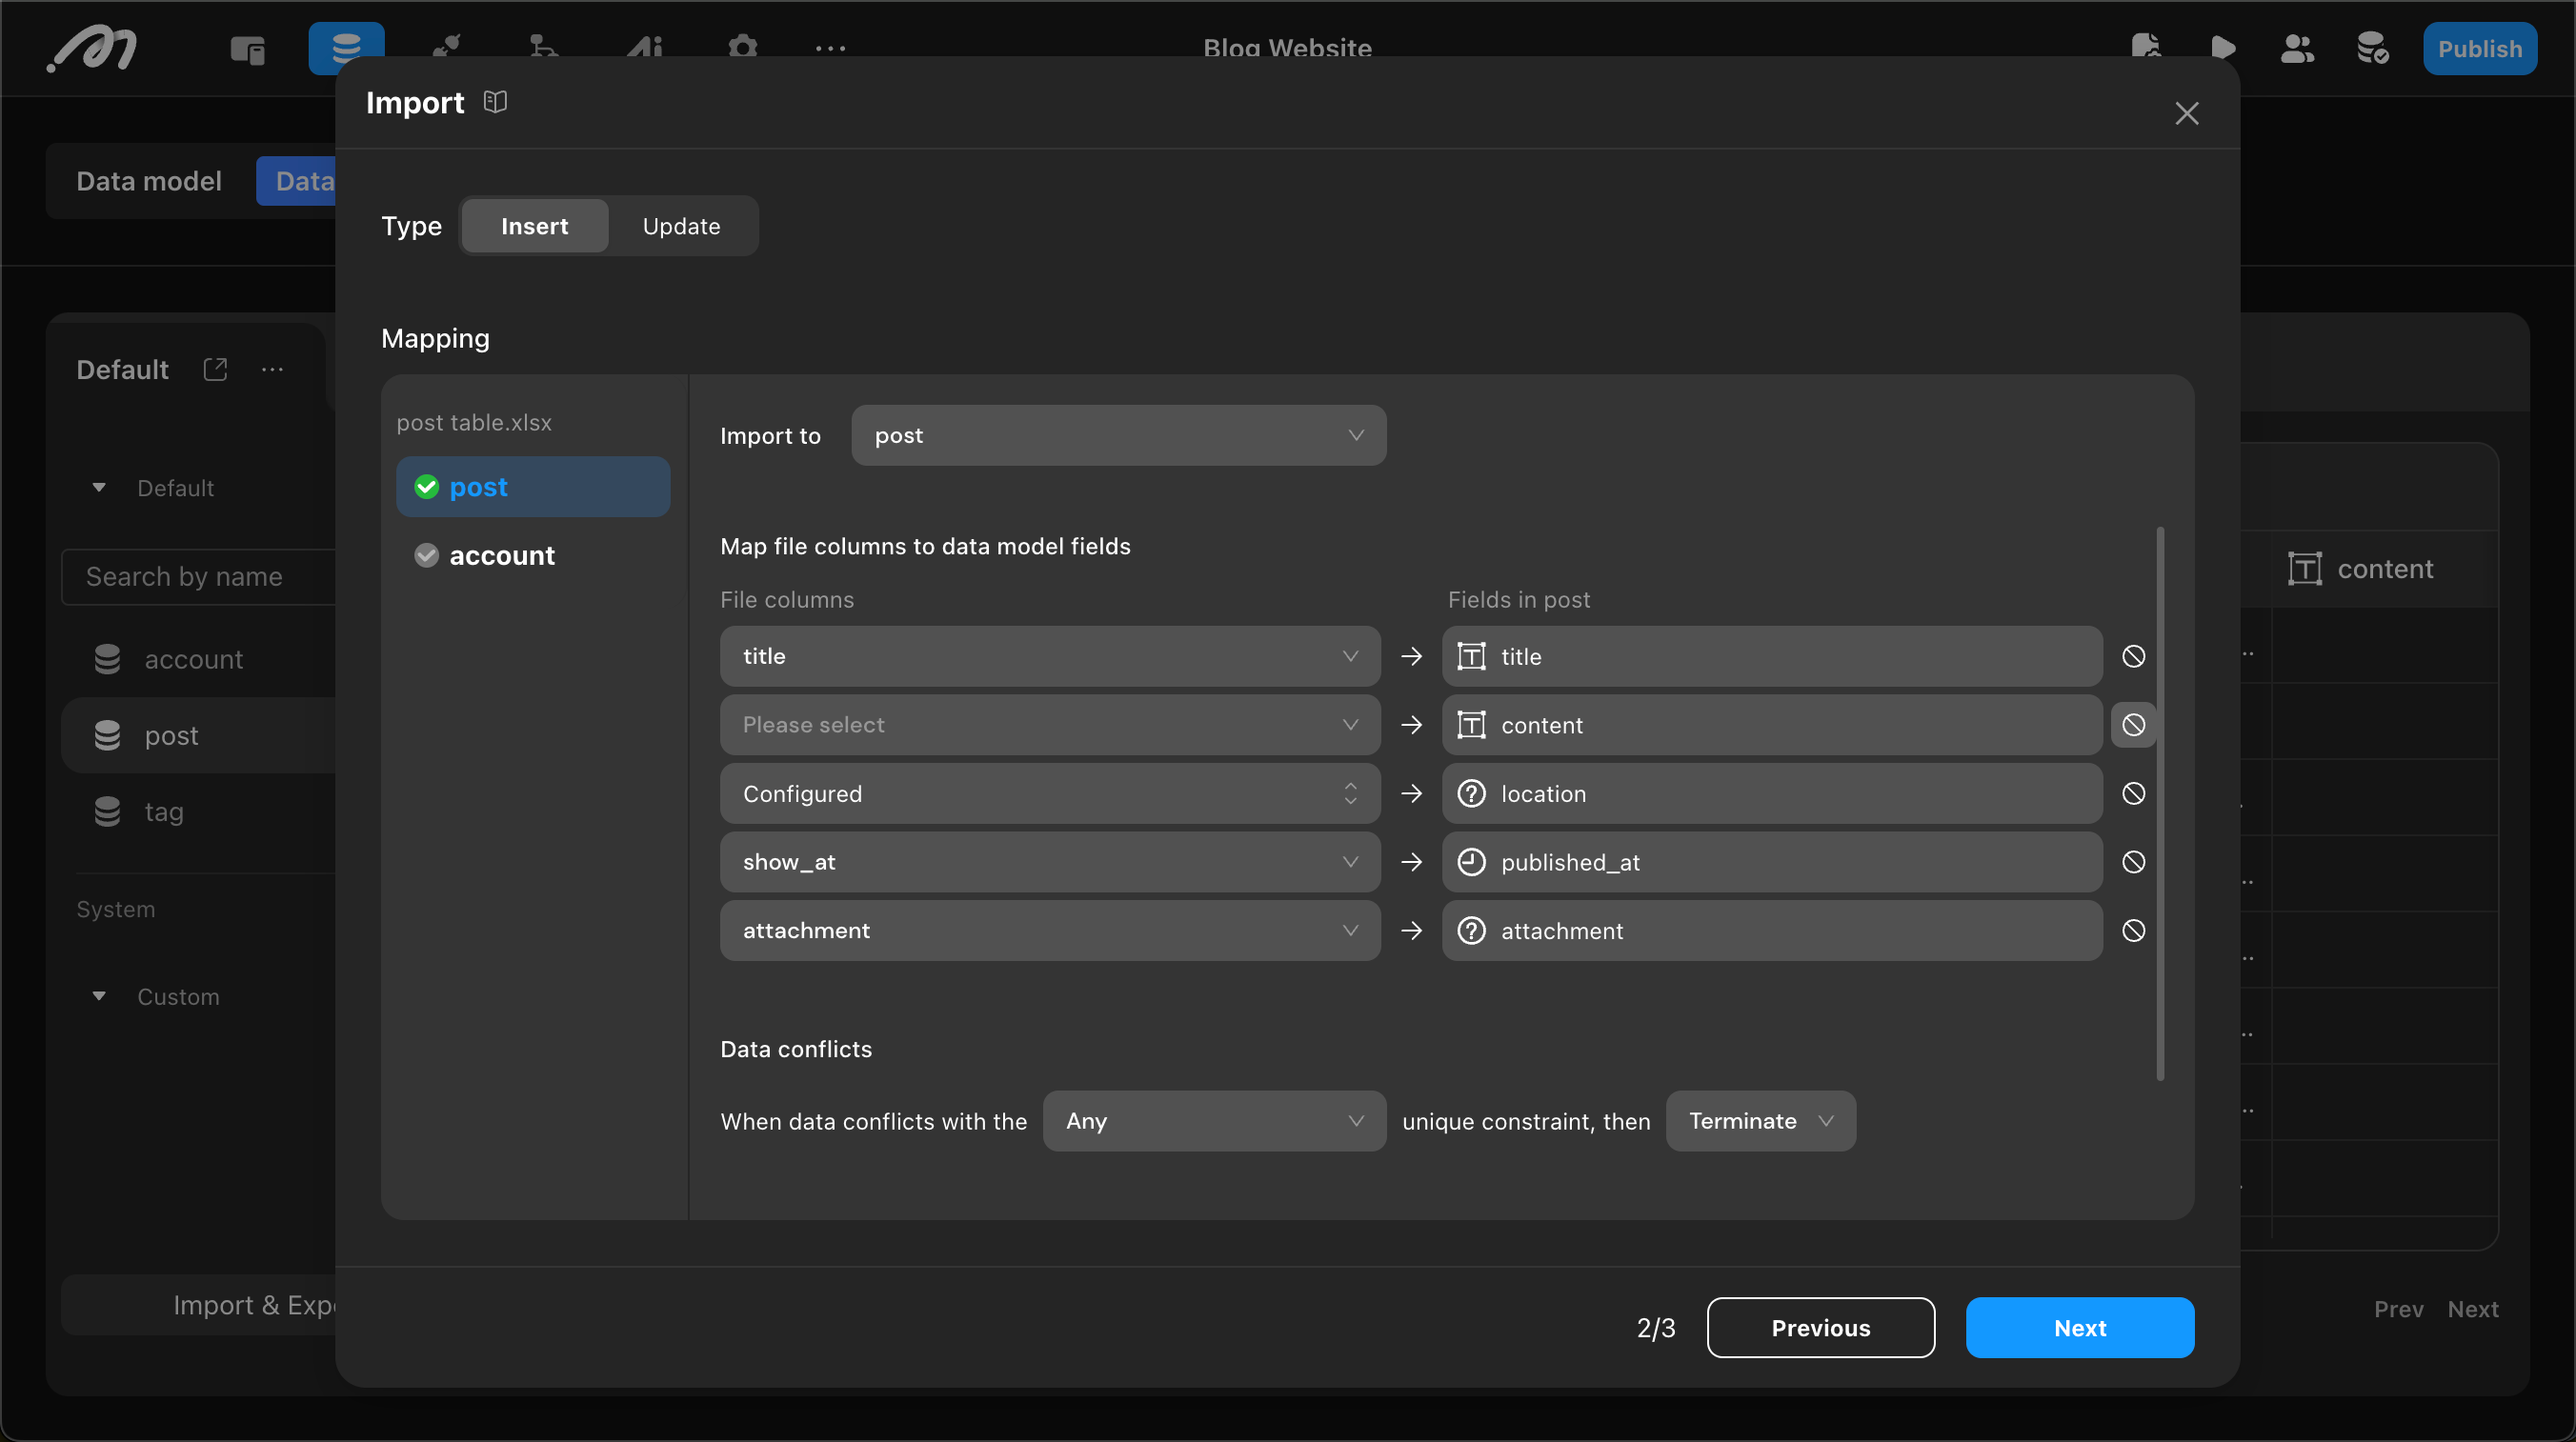
Configure mapping
Mapping consists of:
-
Table mapping: Maps uploaded tables to database tables. System tables (
account,payment, etc.) are not supported in this flow — use Import accounts below for bulk account creation. Each Excel sheet and each CSV file maps to one table. -
Field Mapping: Maps columns from uploaded tables to database table fields. Columns that don’t need to be imported can be ignored using the Ignore option on the right side of each row.
Related Field Mapping
If other tables are related to the current table, related table mapping needs to be configured.
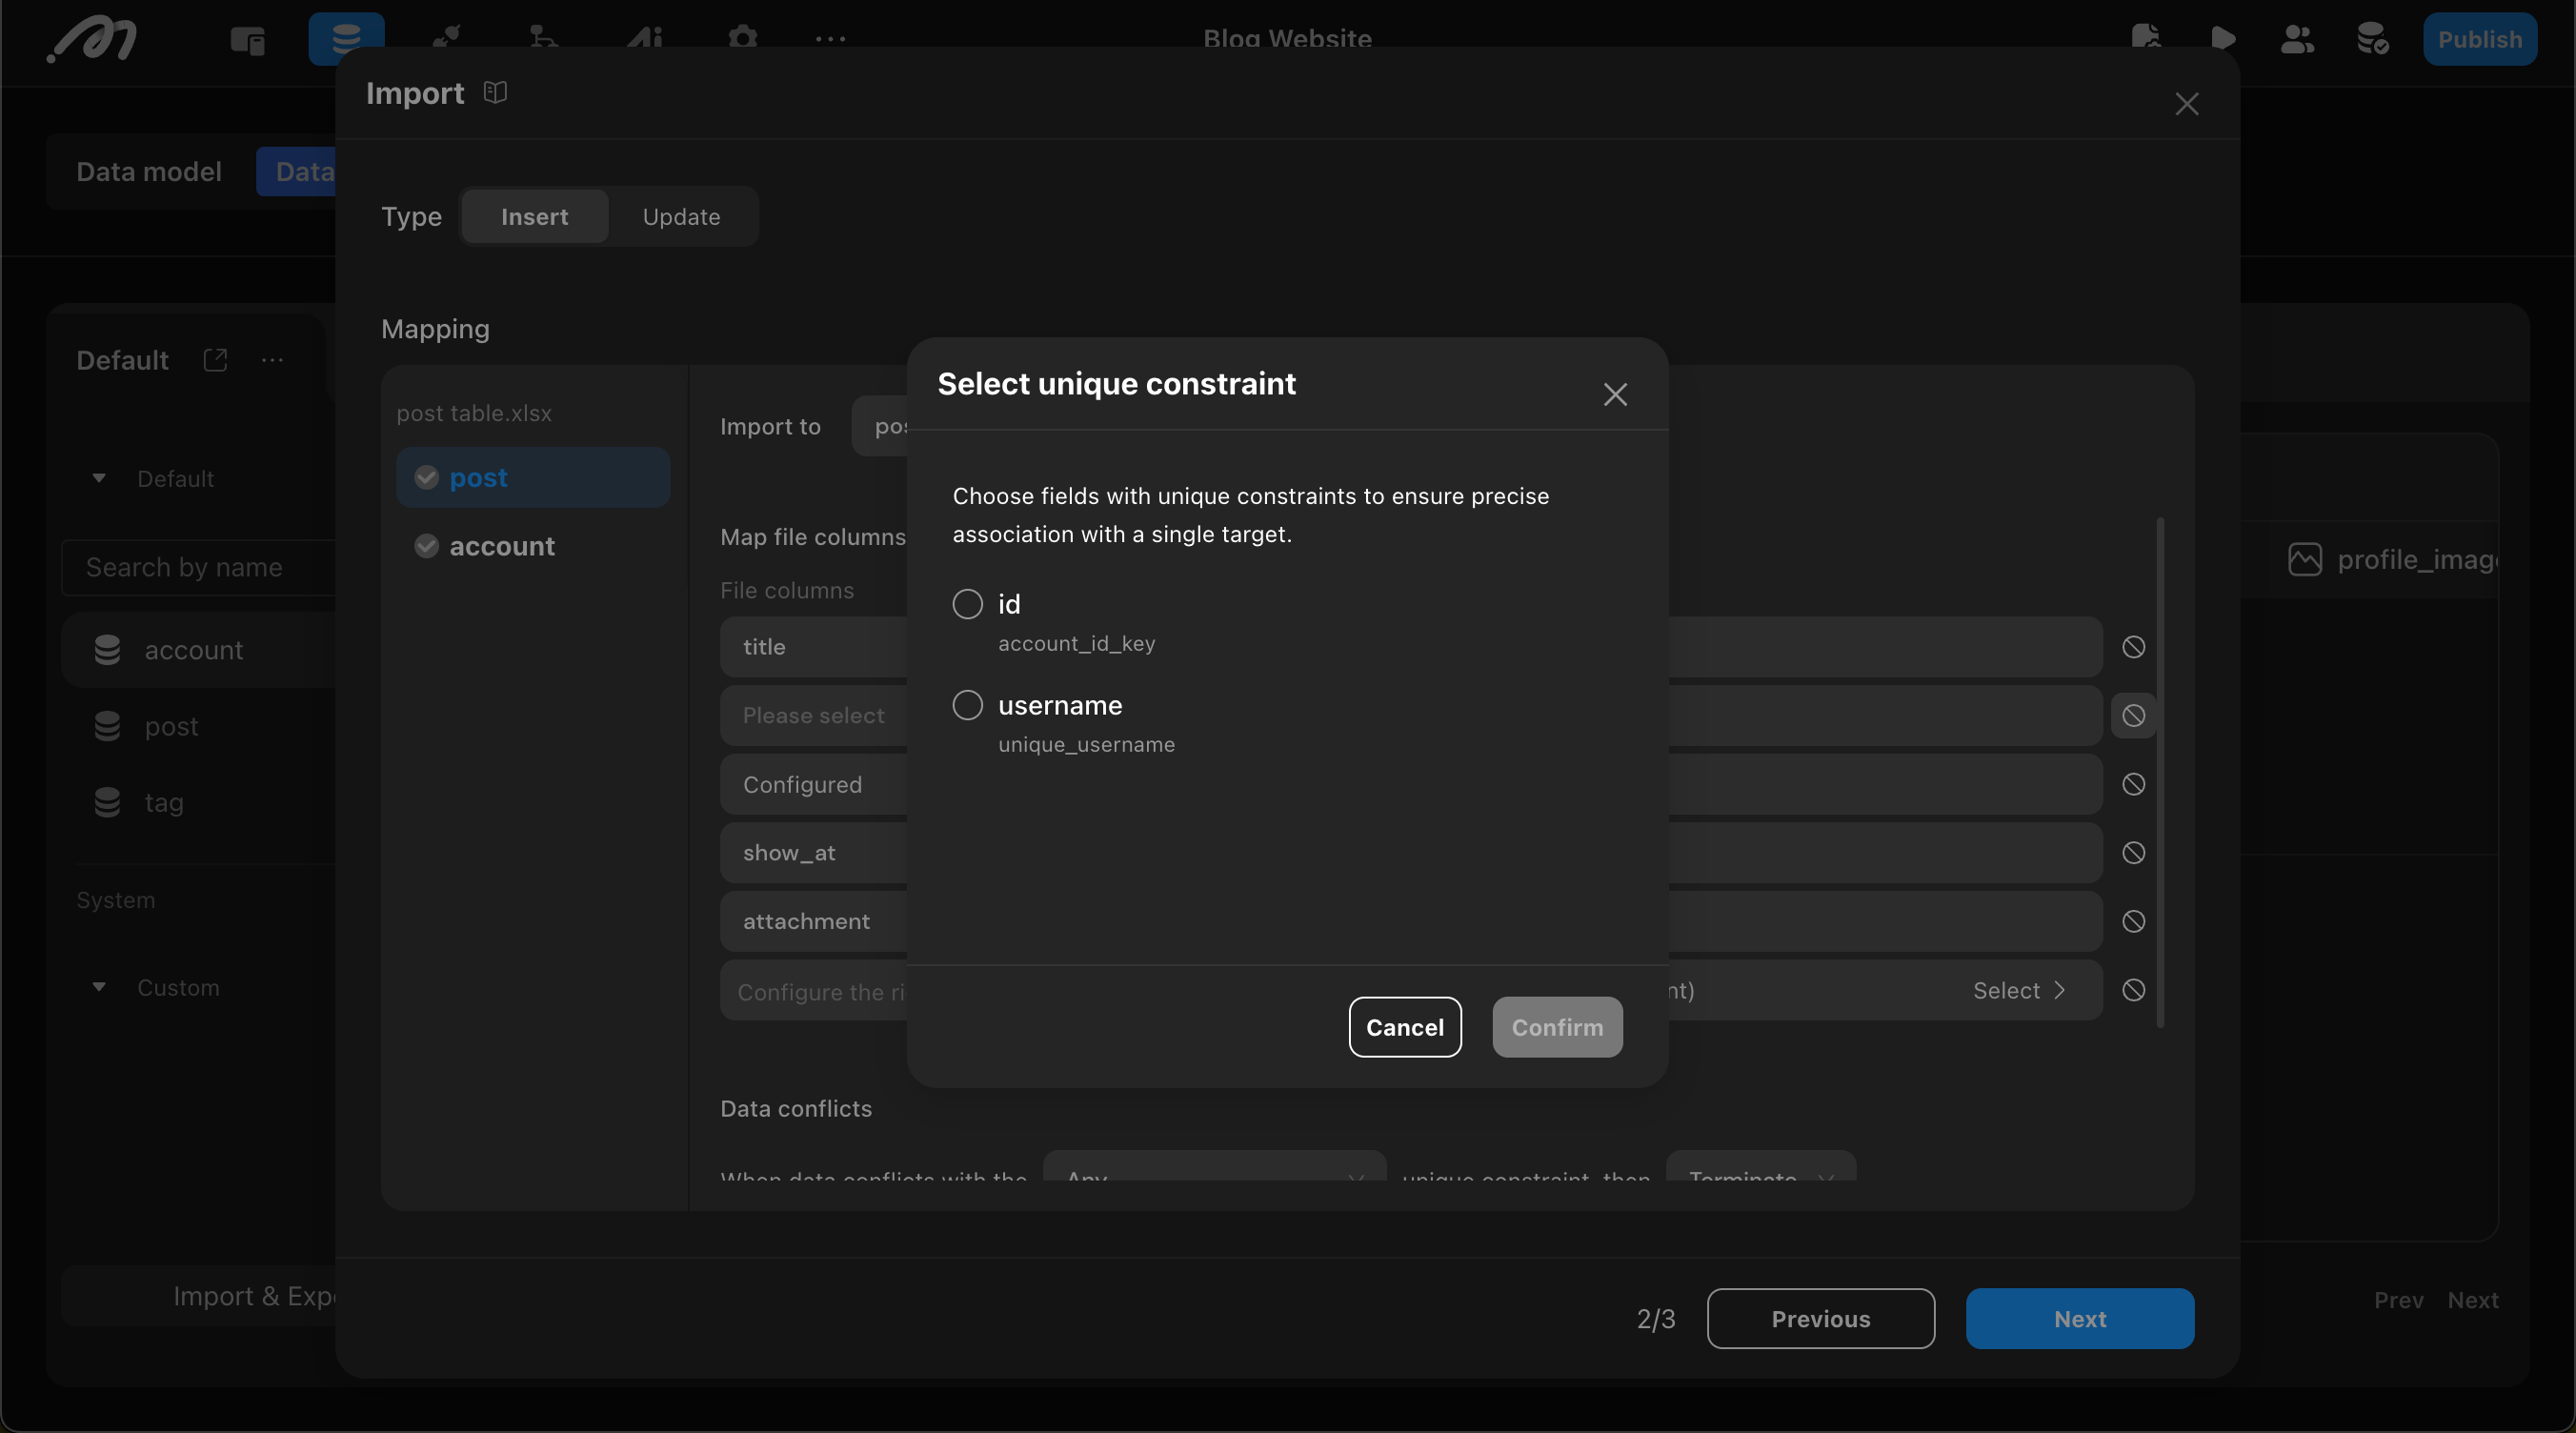
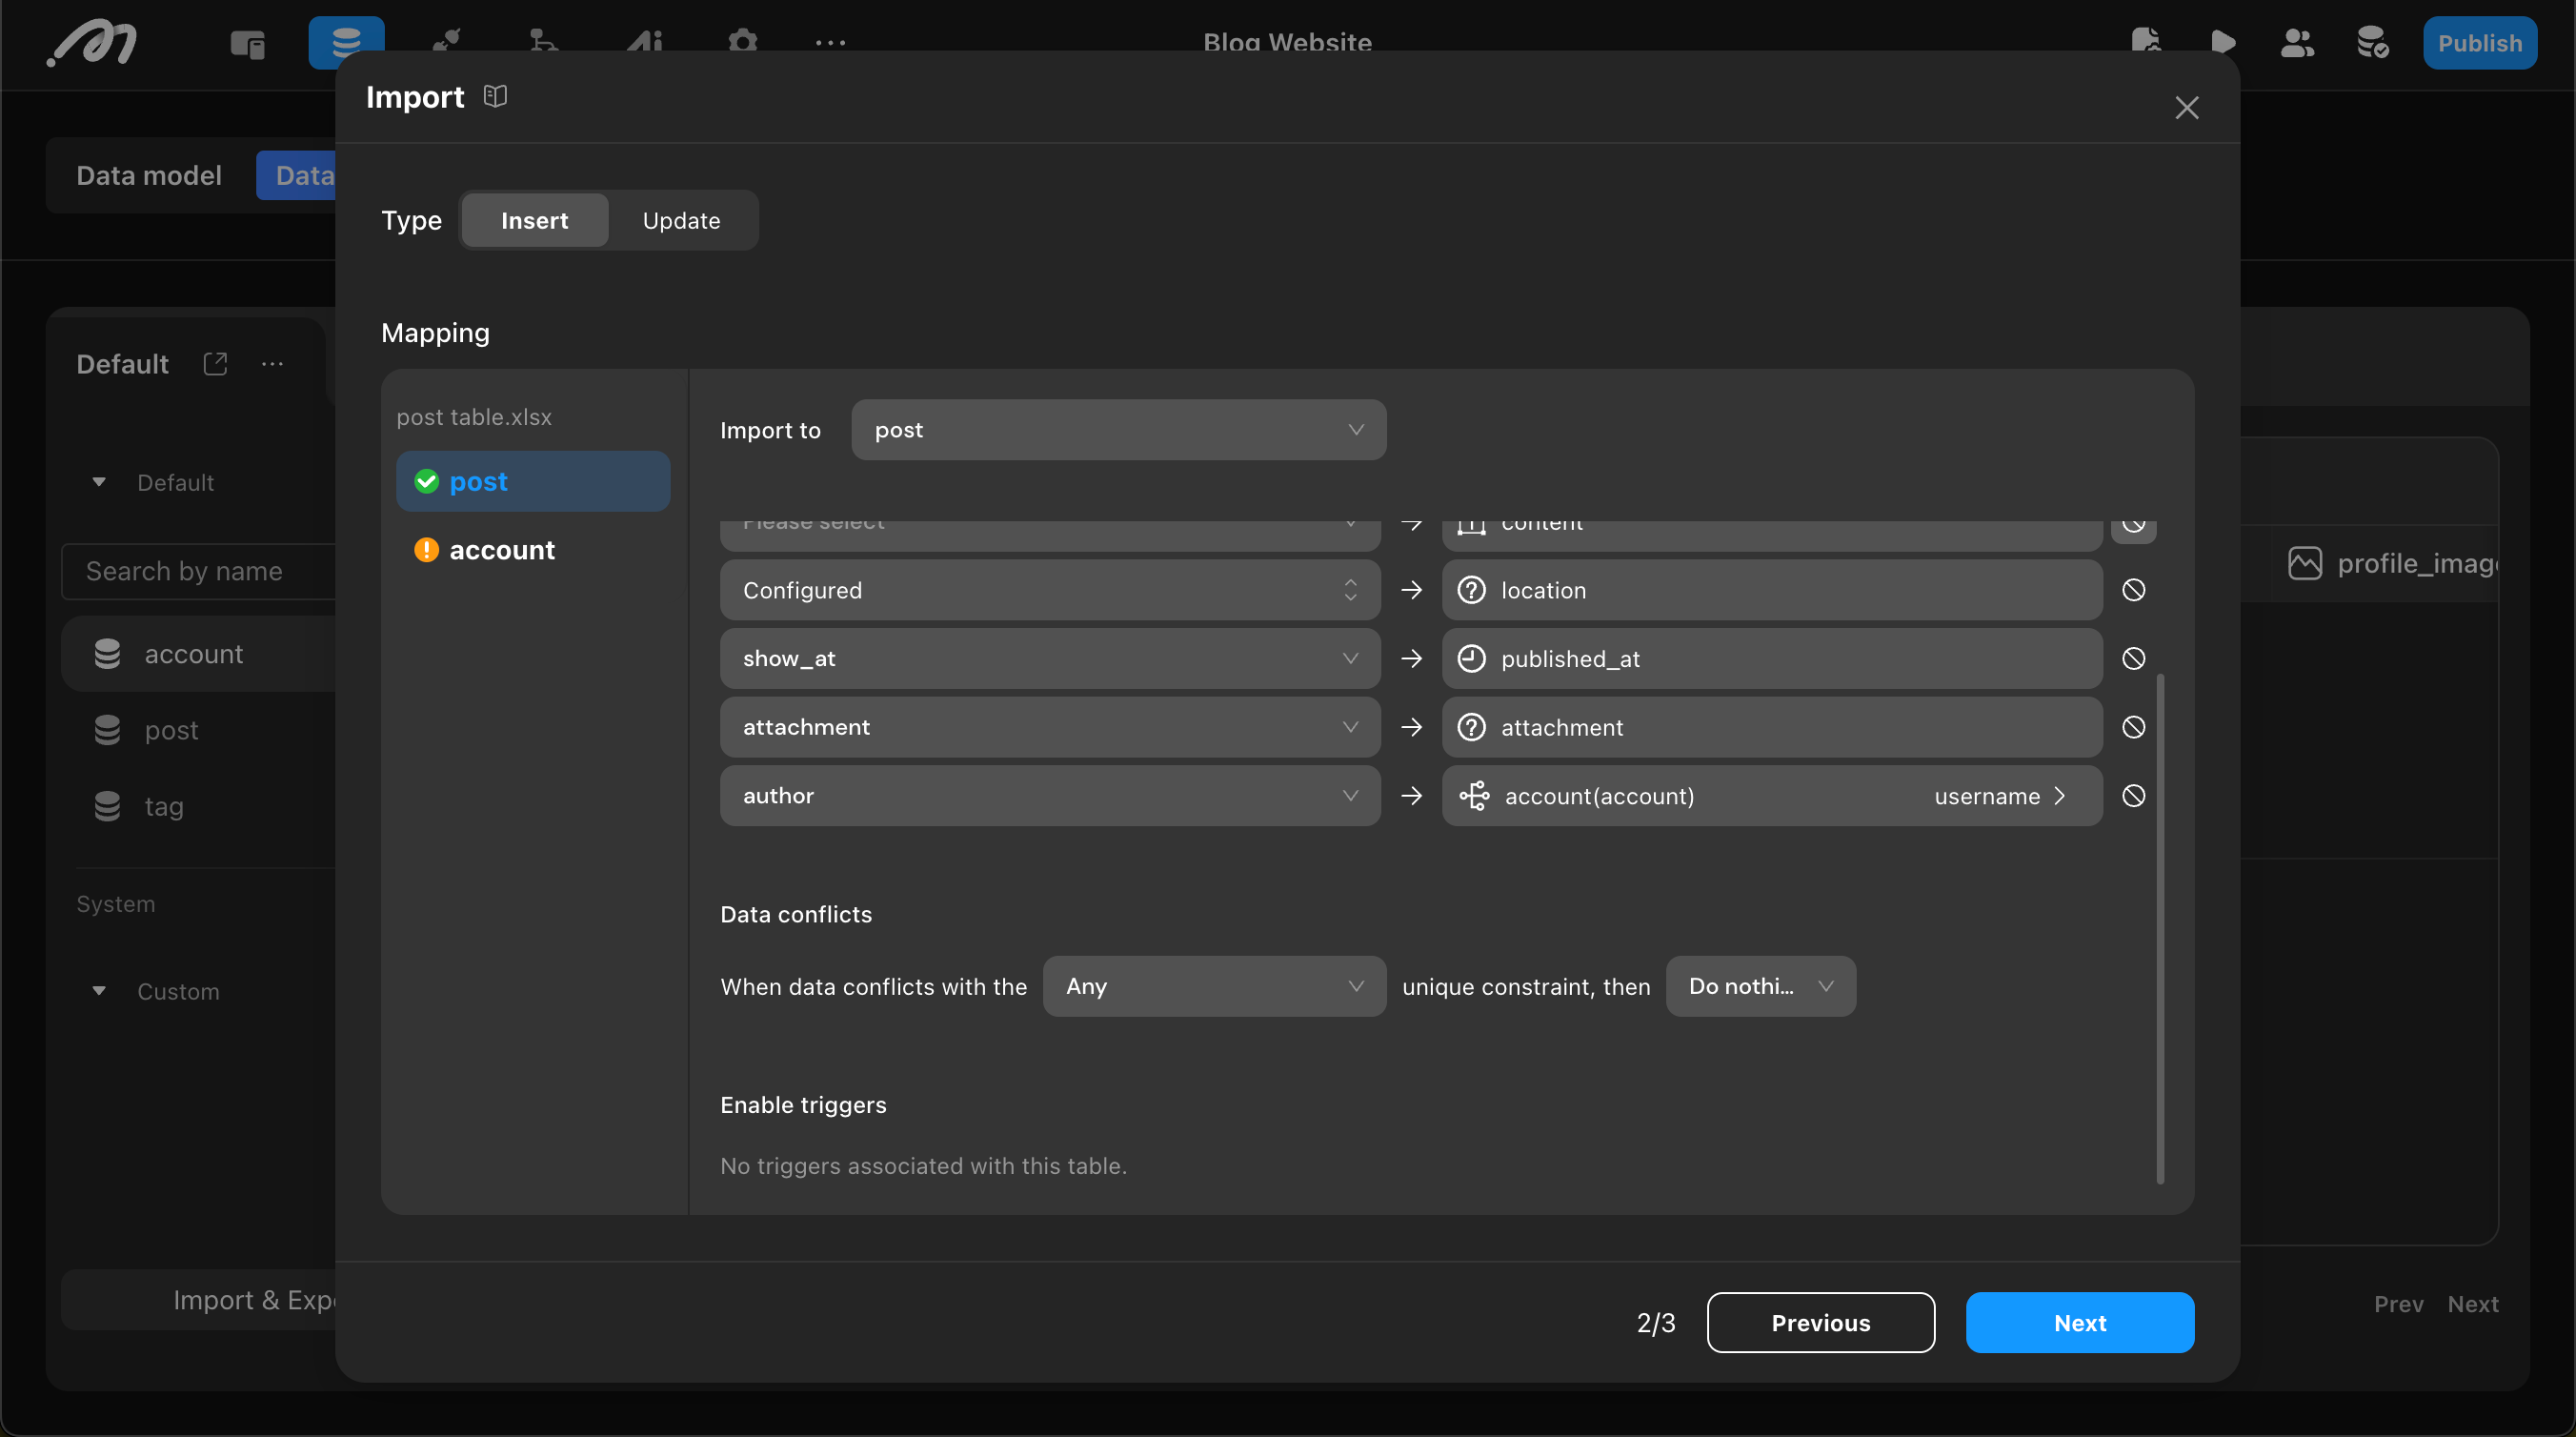
How it works: after a relation is established, the current table stores the related record ID. During import, match a column in your file to a field on the related table (such as username or email) to resolve the corresponding unique ID.
For example, if account and post have a one-to-many relation, the author column in post stores the account id. During import, match an author name in your file to username on the account table to resolve the ID.
To prevent ambiguous ID resolution when related lookup values are duplicated (for example, multiple Account rows share the same display name), configure a unique constraint so the field you match on (such as username) is unique in the related table.
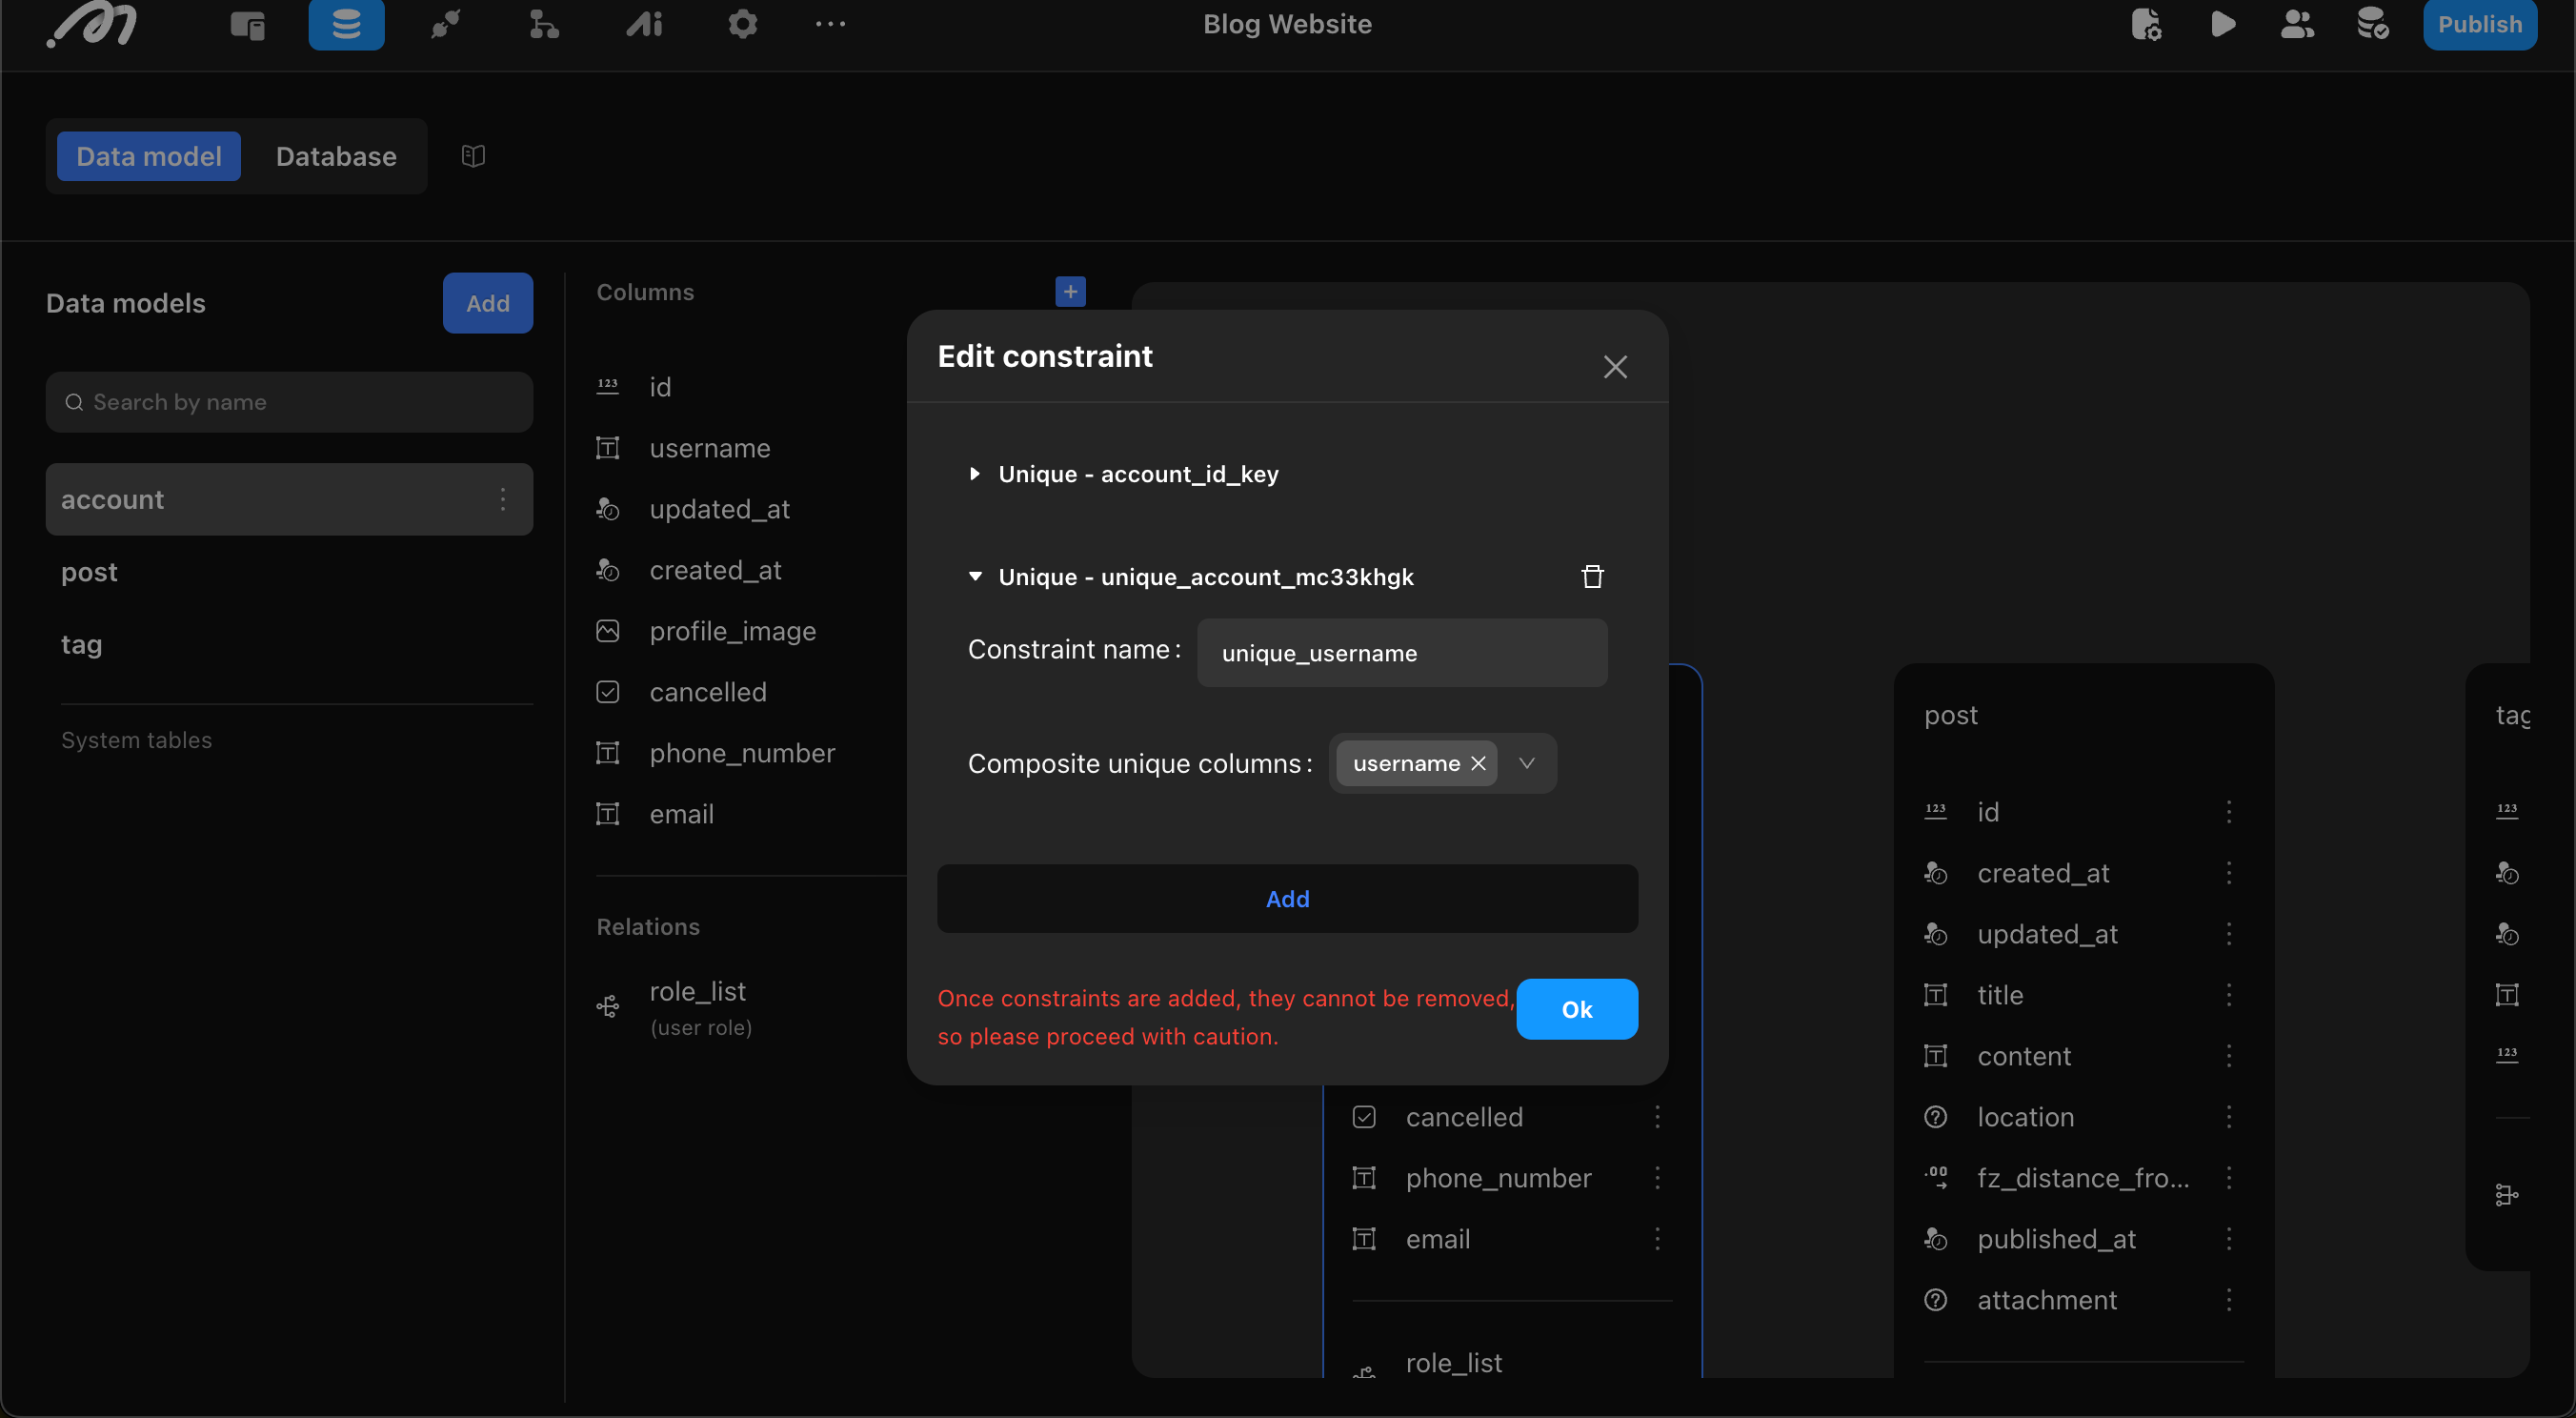
After configuring the unique constraint, when mapping related tables, map the author column from the Excel table to the username field in the Account table. If the constraint includes multiple fields, configure matching for multiple fields.
Multimedia Field Mapping
To import multimedia files (images, videos, and files), each multimedia column value should be the file’s path inside the uploaded ZIP, such as cover0.png, media/intro.mp4, or api.pdf. Each file is imported as the type of the column it is mapped to.
During import, the system will automatically extract these files from the uploaded ZIP package and store them in the database.
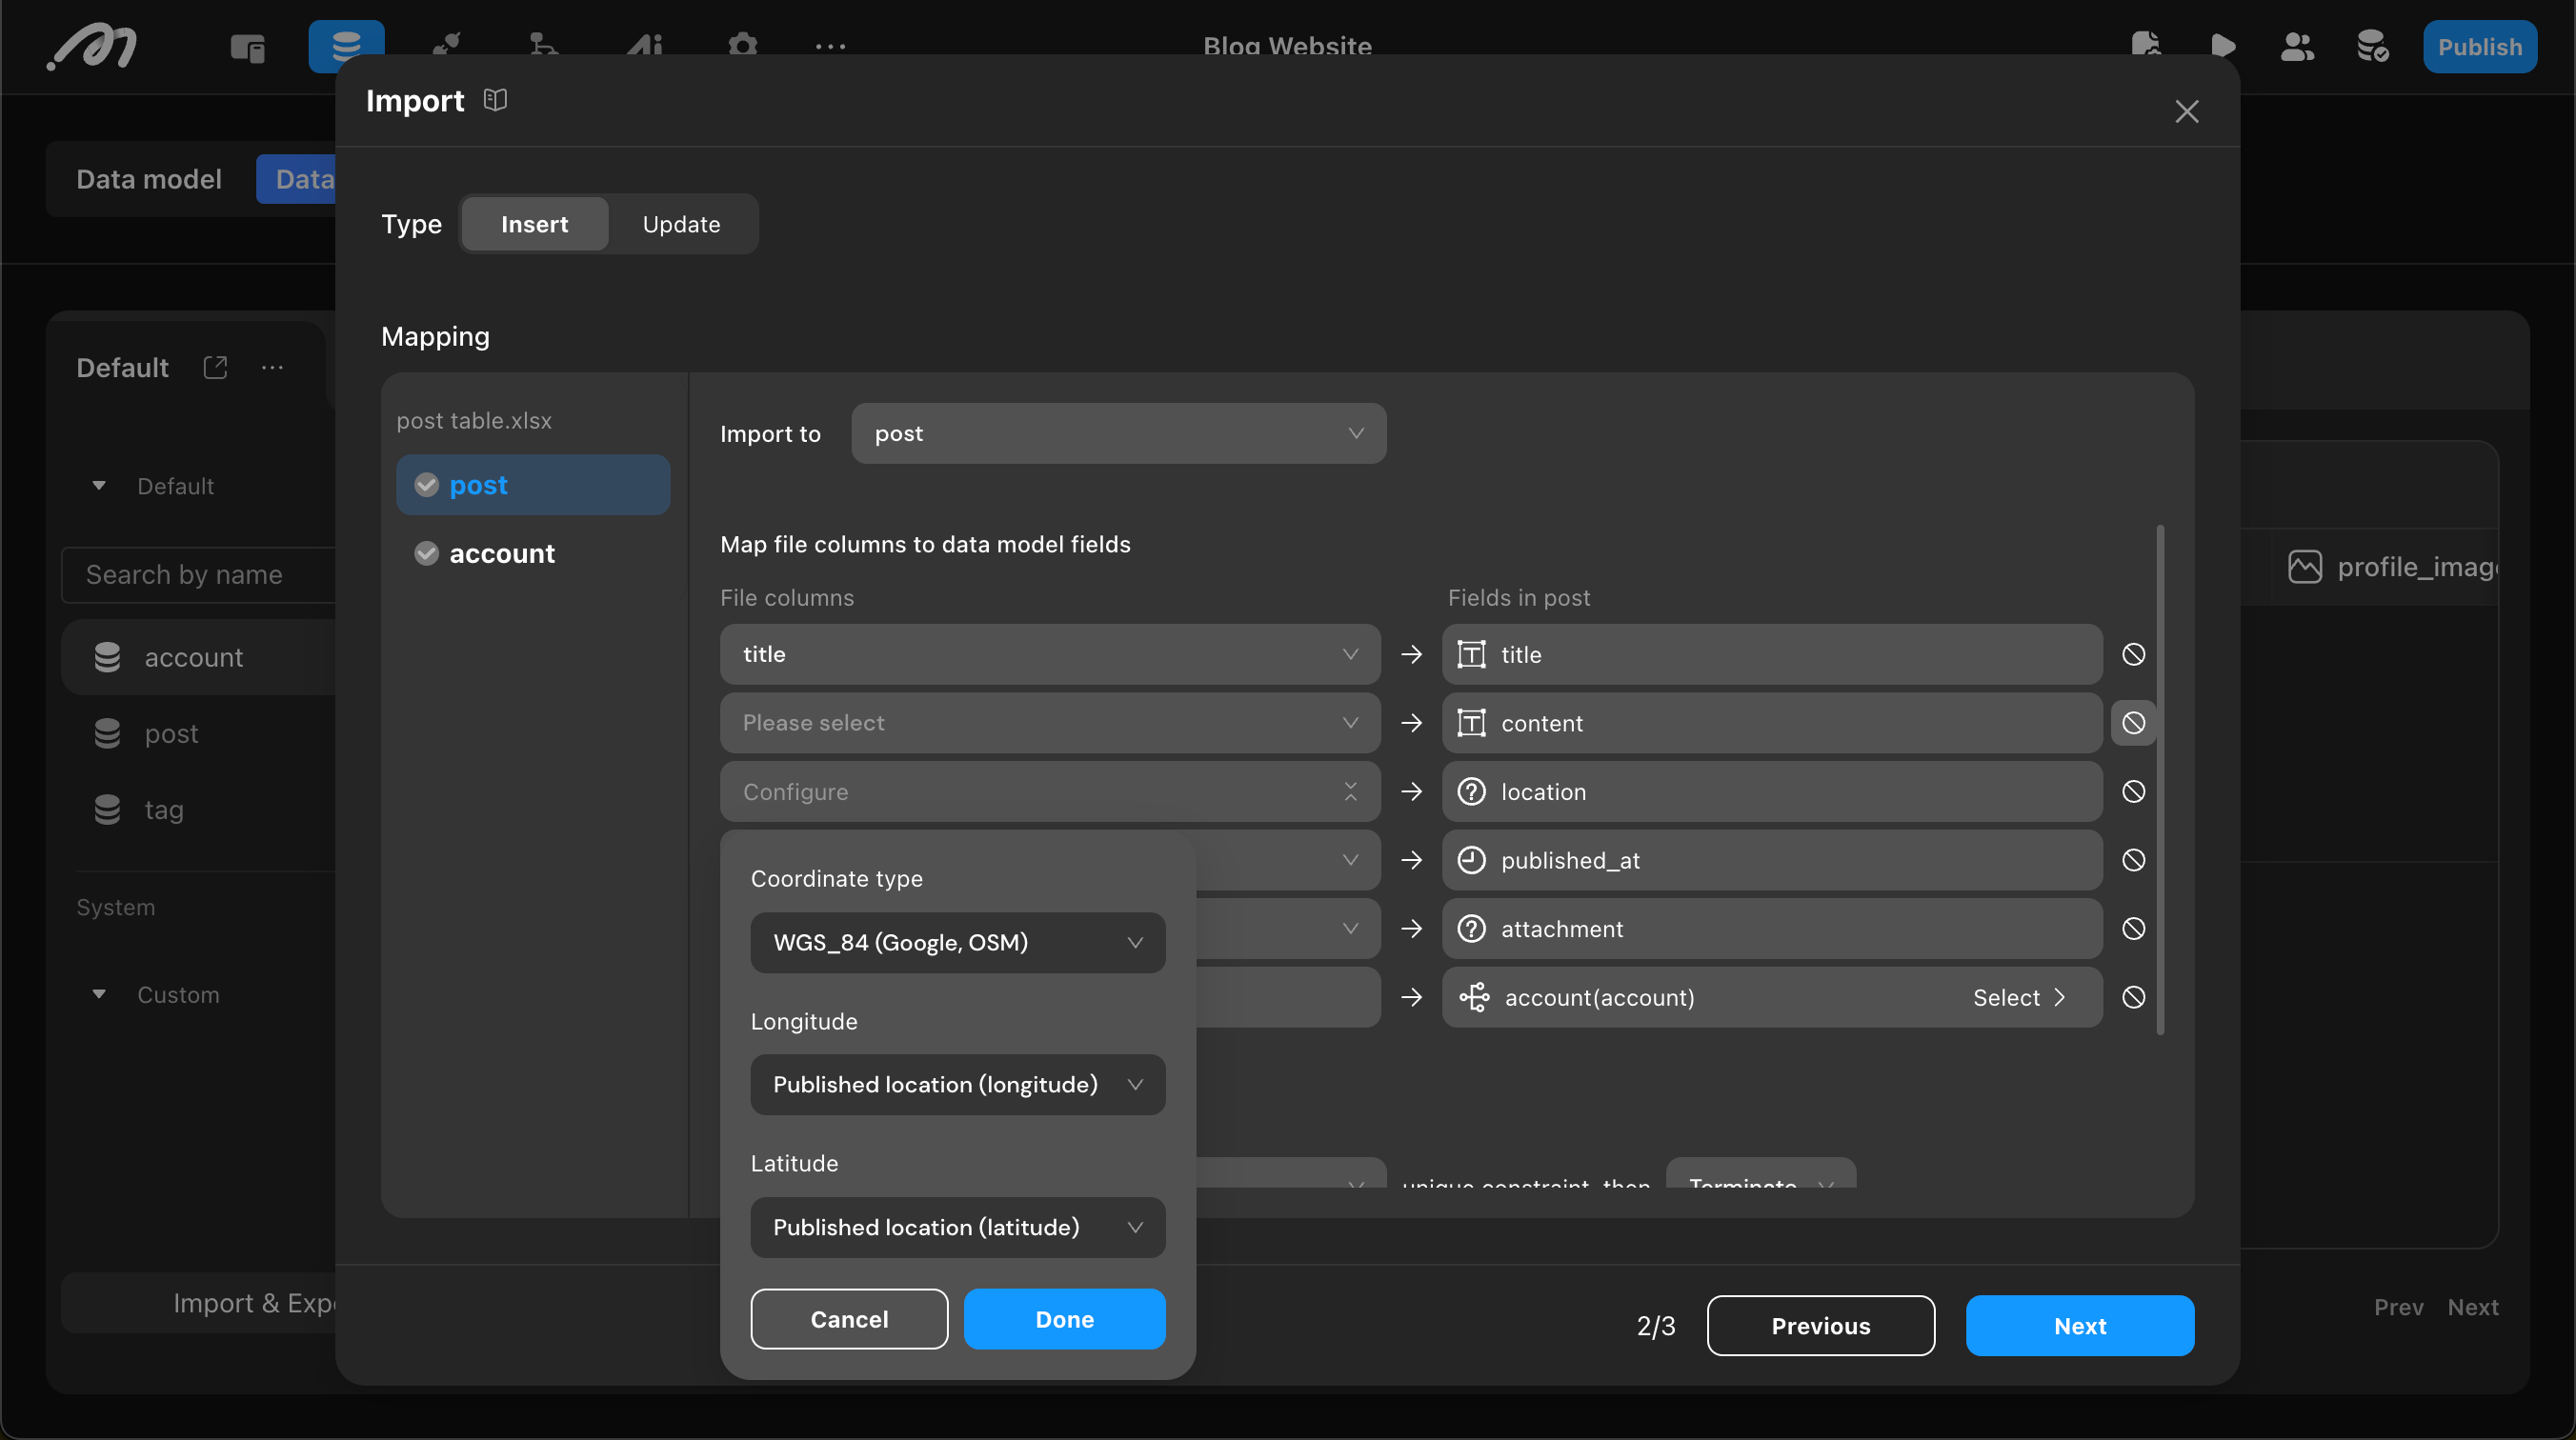
Geographic Coordinate Field Mapping
To import coordinates, first select the coordinate type (WGS84, GCJ-02, or BD-09), then configure latitude and longitude mapping separately. Therefore, the import table needs two columns to store latitude and longitude.
Handle data conflicts
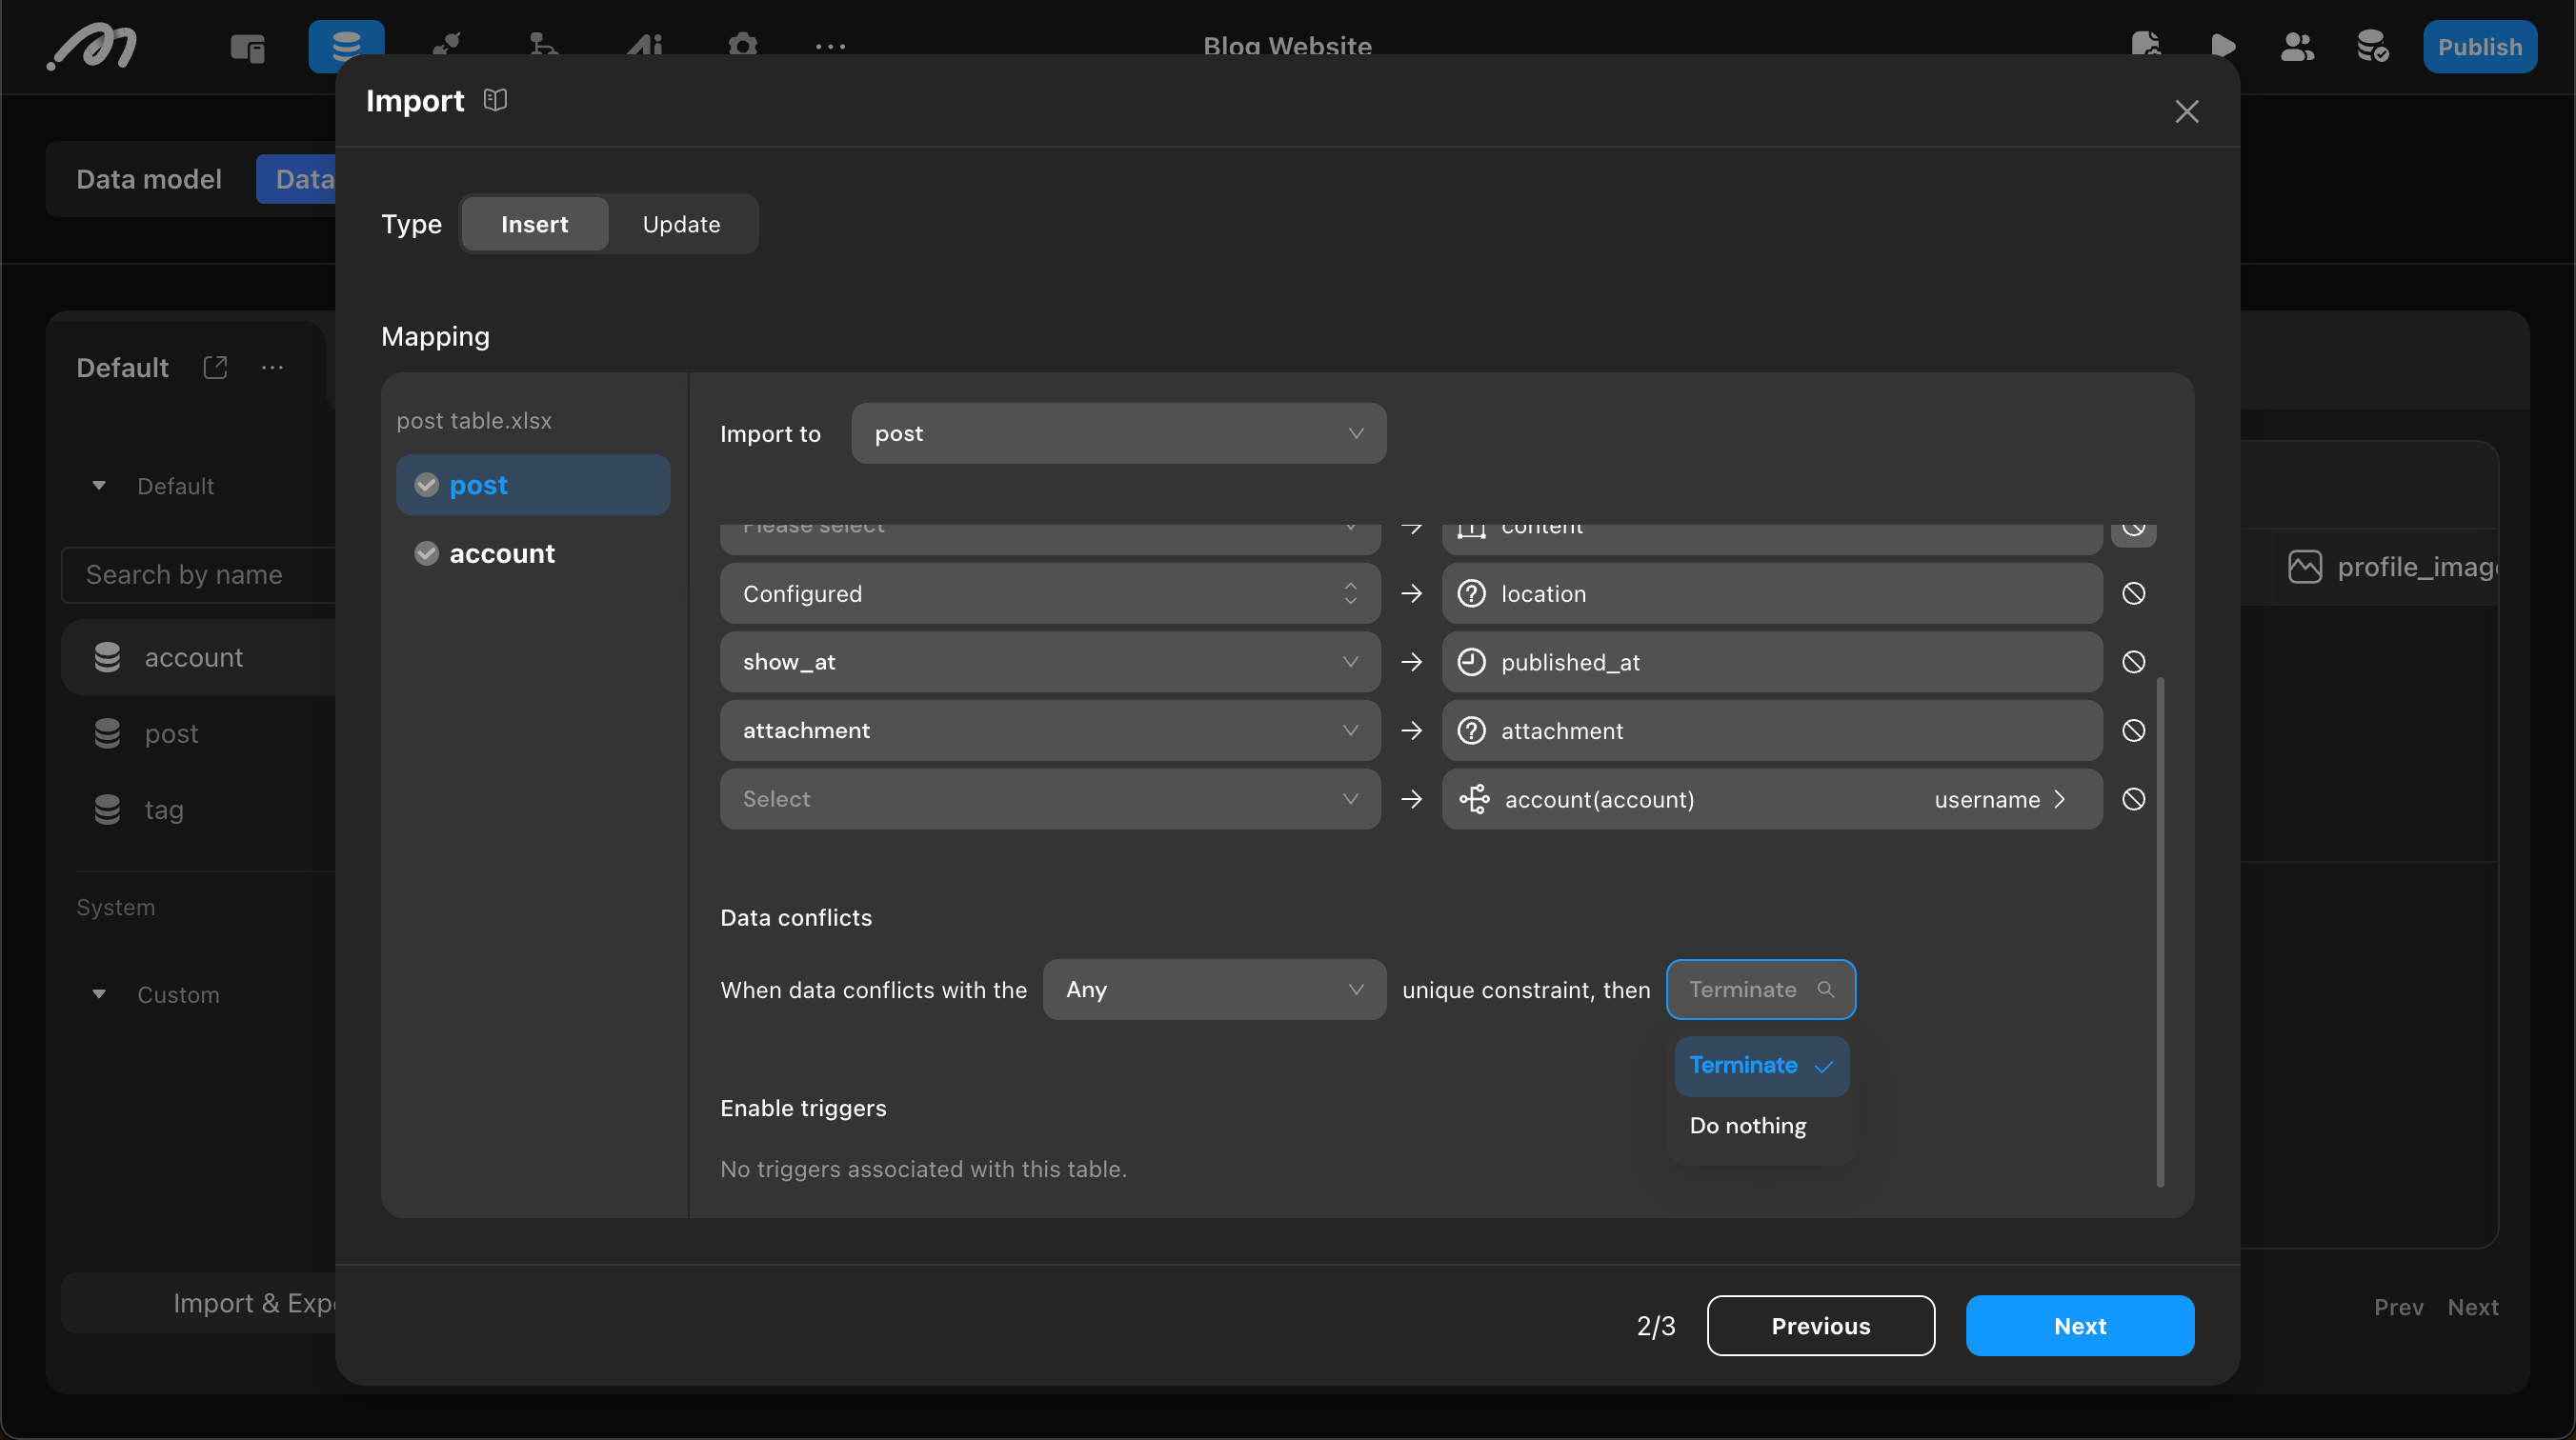
When the import mode is Insert and fields have unique constraints, a conflict occurs if duplicate values appear in the imported data (or between imported data and existing rows, depending on your configuration). Conflict handling applies only in these unique-constraint conflict cases.
First, select the constraint:
-
Any Unique Constraint: Triggers conflict handling if any field with a unique constraint conflicts.
-
Specific Unique Constraint: Select a specific unique constraint as the basis for conflict judgment.
The system provides three conflict handling methods:
-
Do nothing: Ignore rows that conflict with the selected unique constraint and continue importing non-conflicting rows. Use case: You can tolerate skipping conflicting rows and prioritize importing the rest first.
-
Update: Use the newly imported data to overwrite existing rows that conflict under the selected unique constraint. Use case: Imported data is the latest source of truth and should overwrite existing values.
-
Terminate: Immediately stop the entire import process and record detailed error information. This option is only available when Any is selected. Use case: You require strict consistency and cannot accept any unresolved unique-constraint conflict.
Configure triggers
If the data table has configured triggers (such as INSERT, UPDATE, or DELETE), you can choose whether to trigger them during import. Import triggers use a whitelist mechanism. During import:
- Newly added triggers are not triggered unless they are added to the whitelist.
- Modified triggers are triggered with their updated logic if they remain in the whitelist.
- Deleted triggers are removed from the whitelist and will no longer be triggered.
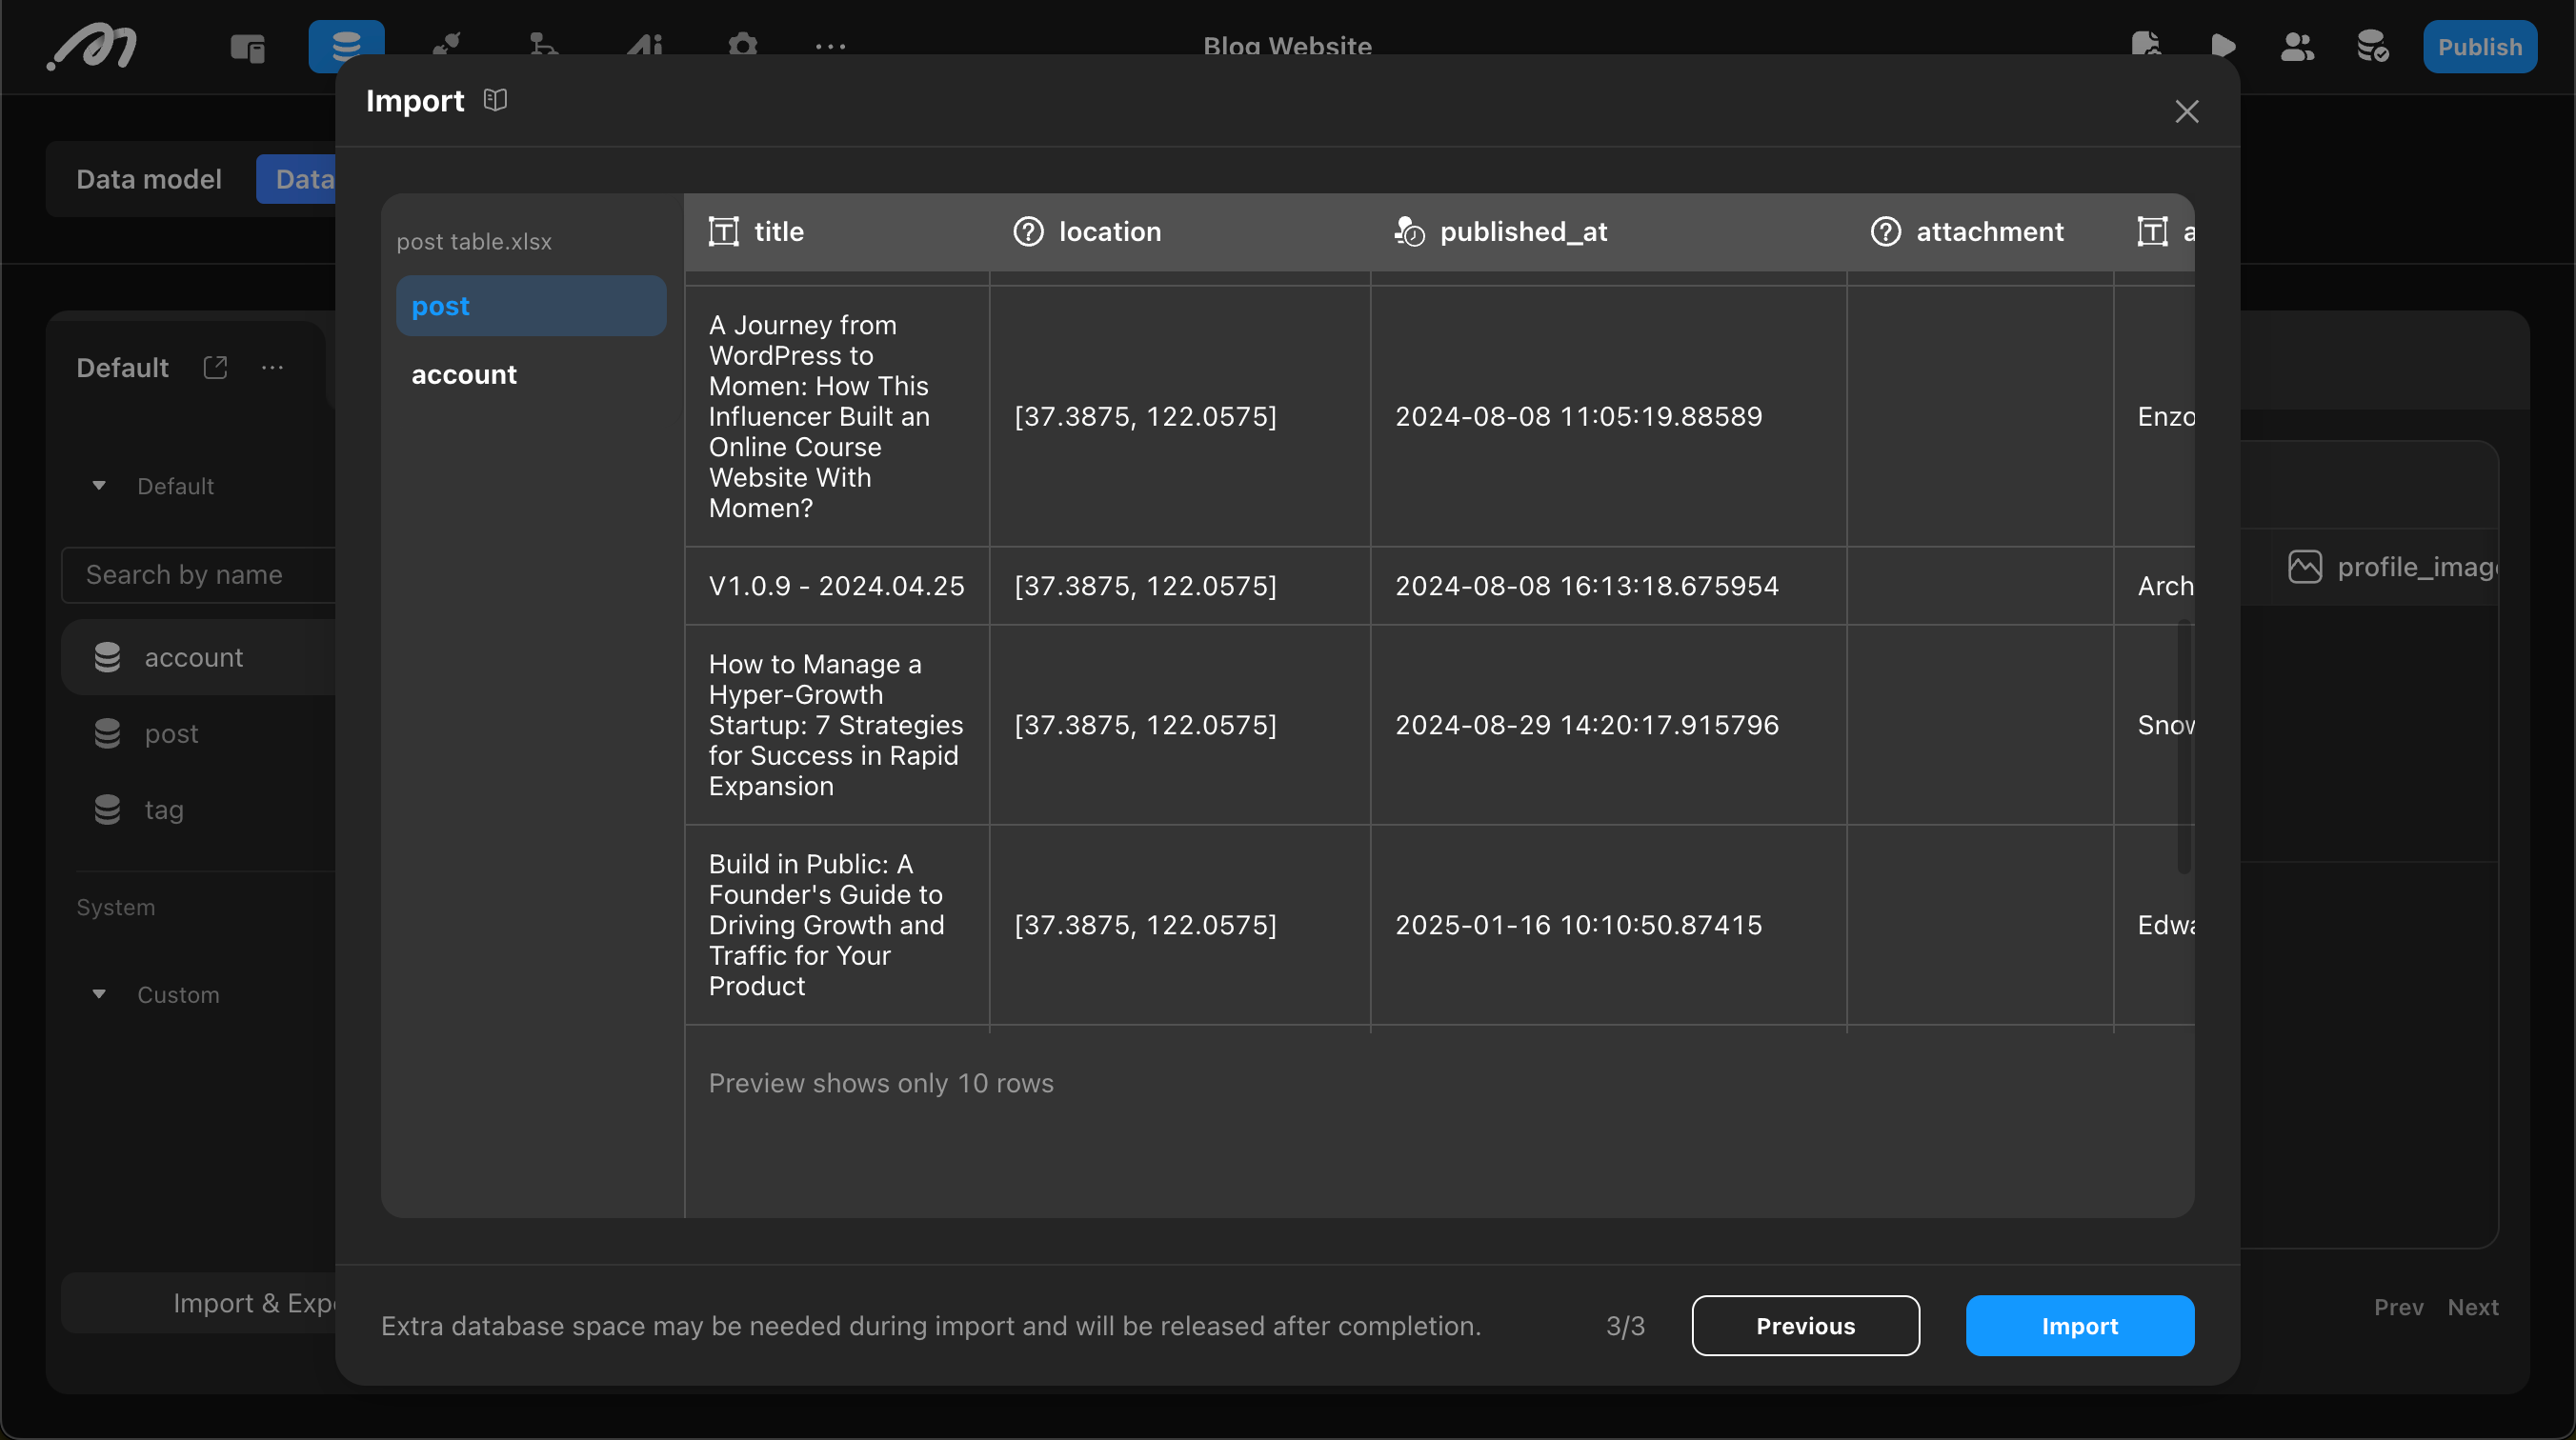
Preview data
After configuration, you can preview the import data. The system displays the first 10 rows of the table for users to confirm data format and content. Multimedia file previews only show filenames, not specific content.
Run the import and view results
After confirmation, click the Import button to start the import process. The import process uses temporary storage, which is released automatically when the import completes.
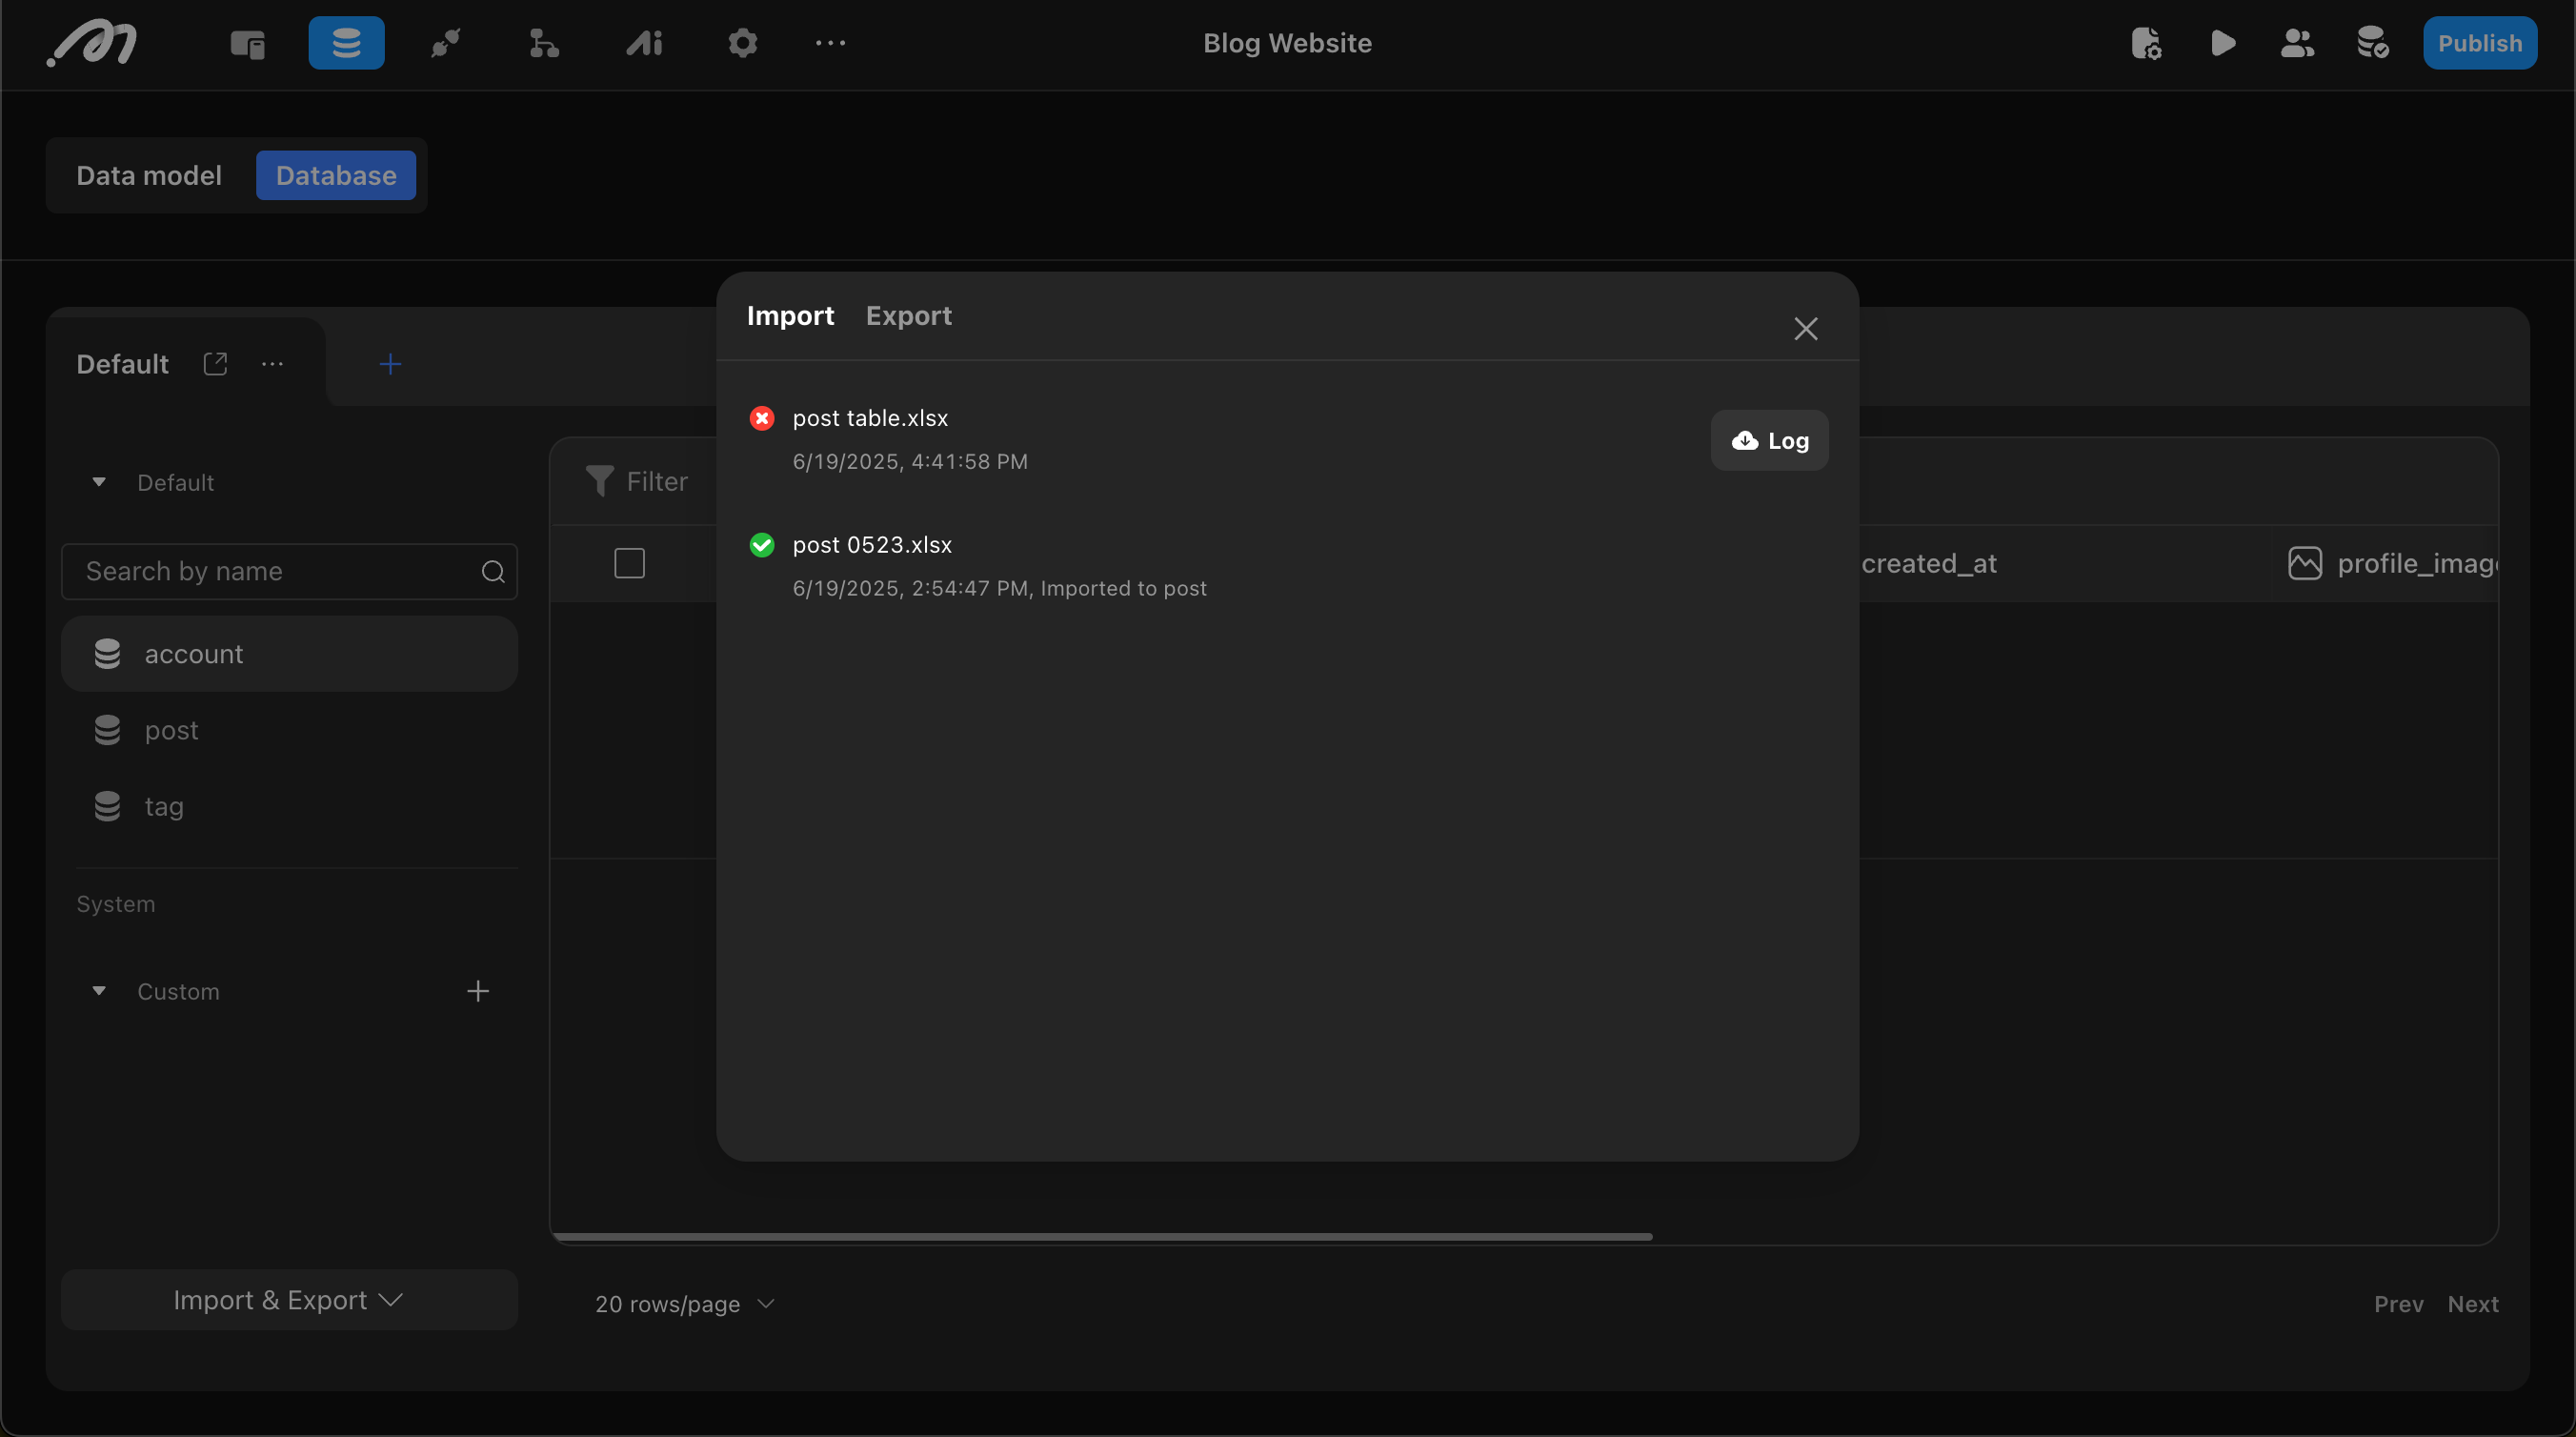
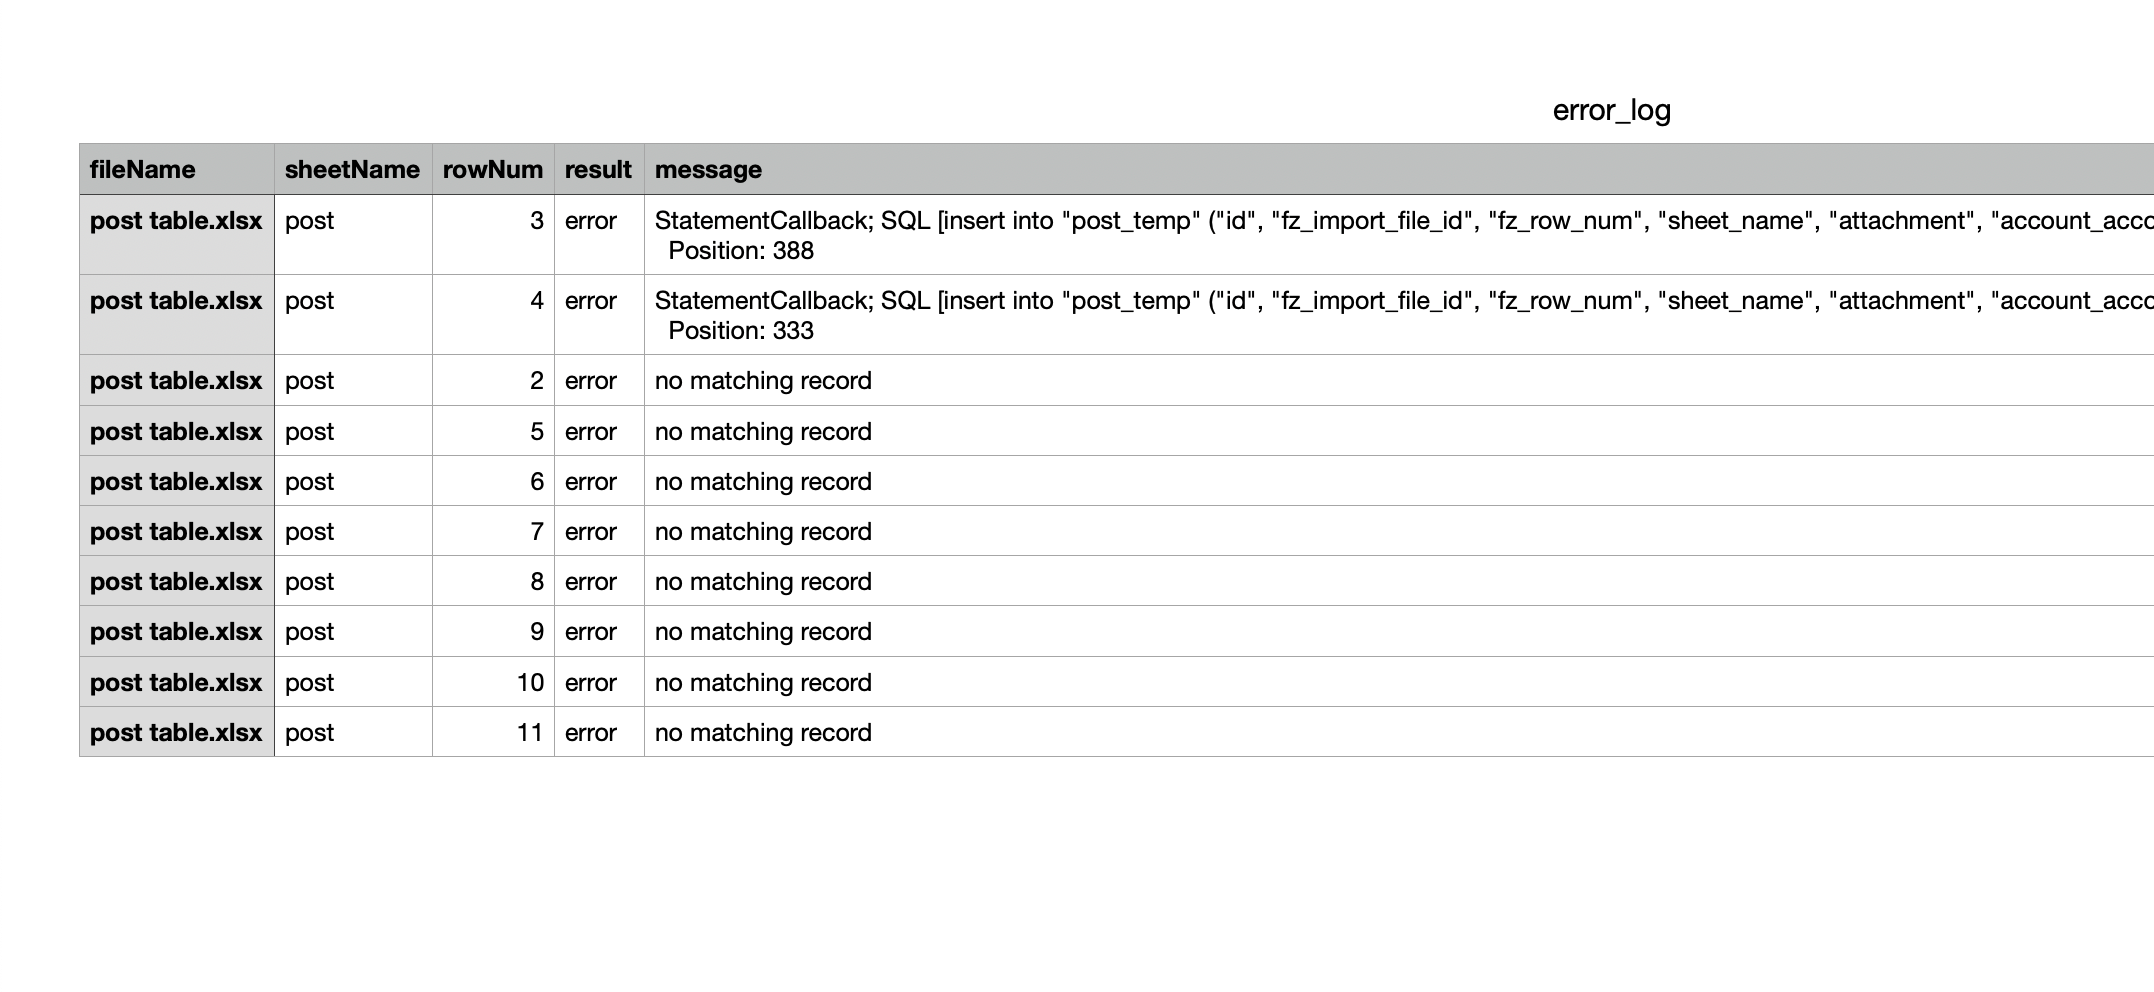
After import, the system will indicate success or failure. Detailed import results, including successful entries, can be viewed in History. If records were skipped (due to conflict handling) or failed (due to data or system errors), the system provides a downloadable log file (retained for 7 days) with detailed records and error reasons. If the import fails, check the details in History, then use Handle import errors to identify the cause.
To ensure data integrity, if the import encounters a system or data error (for example, a type mismatch), the operation is atomic: none of the data from this batch will be written to the database. Records intentionally skipped via conflict handling do not trigger this rollback.
Import accounts
Bulk account creation — insert only; does not update existing accounts by id.
Enable a sign-in method
Bulk account creation is essentially a bulk call to the account registration API, so it directly depends on the sign-in methods enabled in your project.
In Settings tab → Sign in, enable username, email, and/or phone sign-in.
When multiple sign in methods are enabled, imported data can include any one sign in method, or multiple sign in methods at the same time.
Prepare the account file
Prepare a table file containing fields for the enabled sign-in methods. File format requirements are the same as Prepare data files:
- UTF-8 encoded Excel files (.xlsx only) or CSV files.
- First row must be headers.
- Cells intended to be blank must be completely empty (no hidden spaces or line breaks).
- Must contain at least one data record.
- No formula calculations are supported.
You can also fill in a template file downloaded from the lower-left corner of the Import accounts upload interface.
Only four fields are supported for import: username, email, phone_number, and password. Other fields (such as profile_image) are not supported.
Upload the file
Click Import & Export in the bottom-left corner of Database, choose Import accounts, then upload the prepared file. One file per run.
Configure mapping
Field mapping must satisfy the following rules:
- The Password field is required.
- At least one of the following fields is required:
username,email, orphone_number.
Passwords are stored in an internal credential table that is not exposed to the project. Username, email, and phone values are synchronized to the corresponding account fields for use in the app.
Handle data conflicts
username, phone_number, and email all have unique constraints. When imported data conflicts with existing database data (duplicate in any unique field), you can choose:
- Do nothing: Ignore conflicting records and continue importing non-conflicting records. Use case: You can tolerate a small number of duplicate accounts and prioritize completing bulk import.
- Terminate: Stop the entire import process immediately. Use case: You require strict account uniqueness and prefer manual verification once conflicts are detected.
Configure triggers
If database triggers are configured on the account table, you can choose whether to trigger them during import. Import triggers use a whitelist mechanism. During import:
- Newly added triggers are not triggered unless they are added to the whitelist.
- Modified triggers are triggered with their updated logic if they remain in the whitelist.
- Deleted triggers are removed from the whitelist and will no longer be triggered.
Preview data
After configuration, you can preview import data. The system displays the first 10 rows for format and content verification.
Run the import and view results
After confirmation, click Import to start.
After import, detailed results are available in History. If some data was skipped or fails, a downloadable log file (retained for 7 days) is provided for troubleshooting.
If the import fails, check the details in History, then use Handle import errors to identify the cause.
Conflict handling vs. import errors: Do nothing and Terminate apply only when a unique-constraint conflict is detected for accounts. If the import encounters an error during processing, the operation is atomic: no data from this import batch is written to the database.
Export
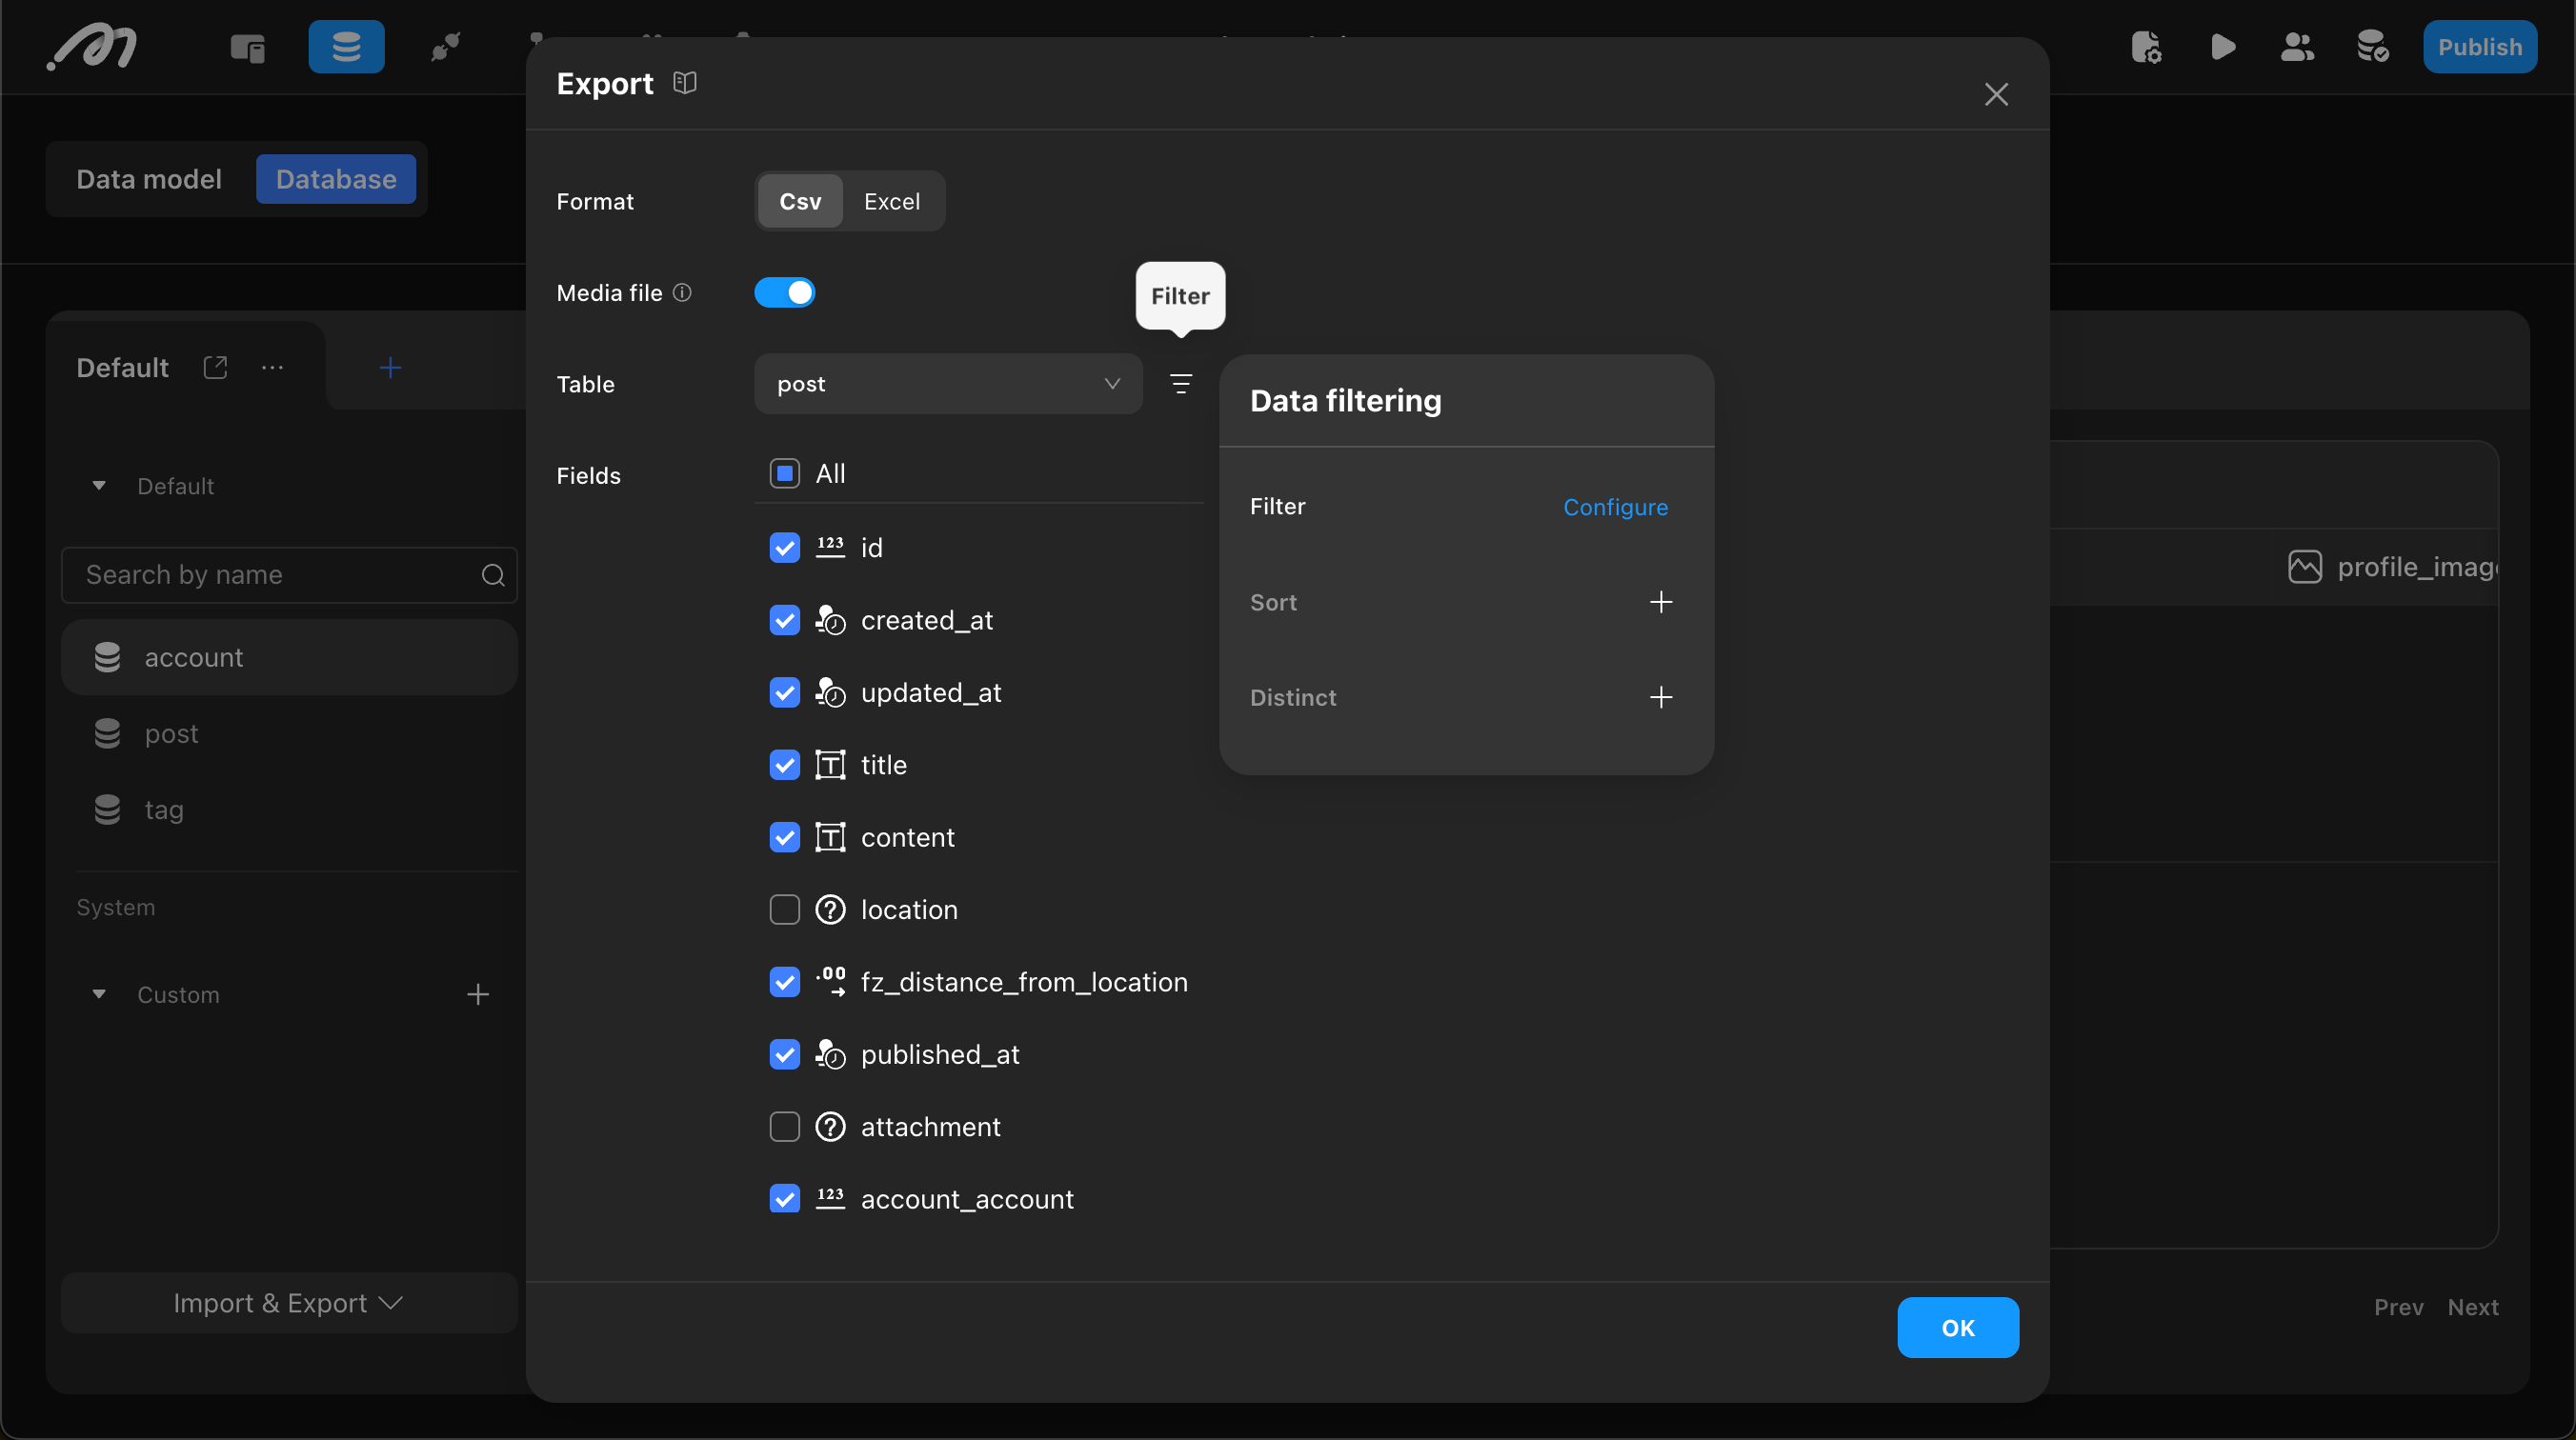
Configure export options
-
Format: CSV or Excel (
.xlsx). When exporting both the current table and related tables, CSV generates multiple files, while Excel generates one workbook containing multiple worksheets. -
Media file: When enabled, the system will package all related multimedia files (images, videos, files) into a ZIP archive for export. The archive contains
image,video, andfilefolders for storing corresponding media content.
Select a data range
- Select Data Table: Supports all system tables, custom tables, and custom views
- Configure Filter Conditions: Set filtering, sorting, and deduplication conditions to precisely filter export data
- Select Export Fields: Freely choose fields from current and related tables
Run the export and view results
After configuration, click the Export button to start the export. Export files can be viewed and downloaded in the History records, with files retained for 7 days.
Handle import errors
Import logs provide detailed error information, including filename, worksheet name, specific row numbers, and error descriptions, facilitating precise location and troubleshooting. Log line numbers correspond to actual table line numbers, with table data starting from row 2 (row 1 being the header), and logs also reporting from row 2.
The following list contains common errors only and is not a complete error code reference. Error strings below reflect values as they may appear in logs; casing can vary by error type.
| Error Message | Cause | Solution |
|---|---|---|
NO_MATCHING_MEDIA | No multimedia file was found for the path given in the table. | 1. Verify the path in the table matches the file’s actual relative path inside the ZIP (including casing and sub-folders). 2. Confirm the file exists in the ZIP. |
unique_constraint_violation | Import data conflicts with unique constraints. | 1. Remove or fix duplicate values in the source data. 2. Adjust conflict handling (for example Do nothing or Update) for the affected unique constraint in the import configuration. |
MISMATCHED_DATA_TYPE | Data type mismatch. | Update the table values so each cell matches the target field’s data type. |
INTERNAL_ERROR | An unclassified processing error occurred during import. It can have multiple causes. | Retry the import. If it continues to fail, keep the import task details and error log and contact support. |