Daily Claim Limit (State Counter)
Demo Project
https://editor.momen.app/tool/Vbr0R9B92XZ/WEB?code=neVO5uQxwHMnX&ref=0562398
Introduction
- Goal: Create a secure daily reward system that limits users to 3 claims per day.
- Use Cases: Daily login rewards, free API rate limiting, daily lucky draws, or high-frequency business action auditing.
- Core Logic: Use a
claim_statustable to track the “Single State” of a user’s progress. BackendActionflowlogic handles date verification and counter increments, while anOn database changedtrigger automates audit logging into aclaim_logtable.
Steps
This tutorial uses pre-styled layout blocks from the “Common UI Presets ” template page to streamline the visual setup. These preset elements contain only basic styling and typography; they do not include any conditional logic, database bindings, or Actionflows. When building your own app, you can directly copy elements from this template page to skip manual styling and focus entirely on core frontend logic.
Data Storage
To implement a daily claim limit system, we need to establish a dedicated table in the database to map user data and its processing status.
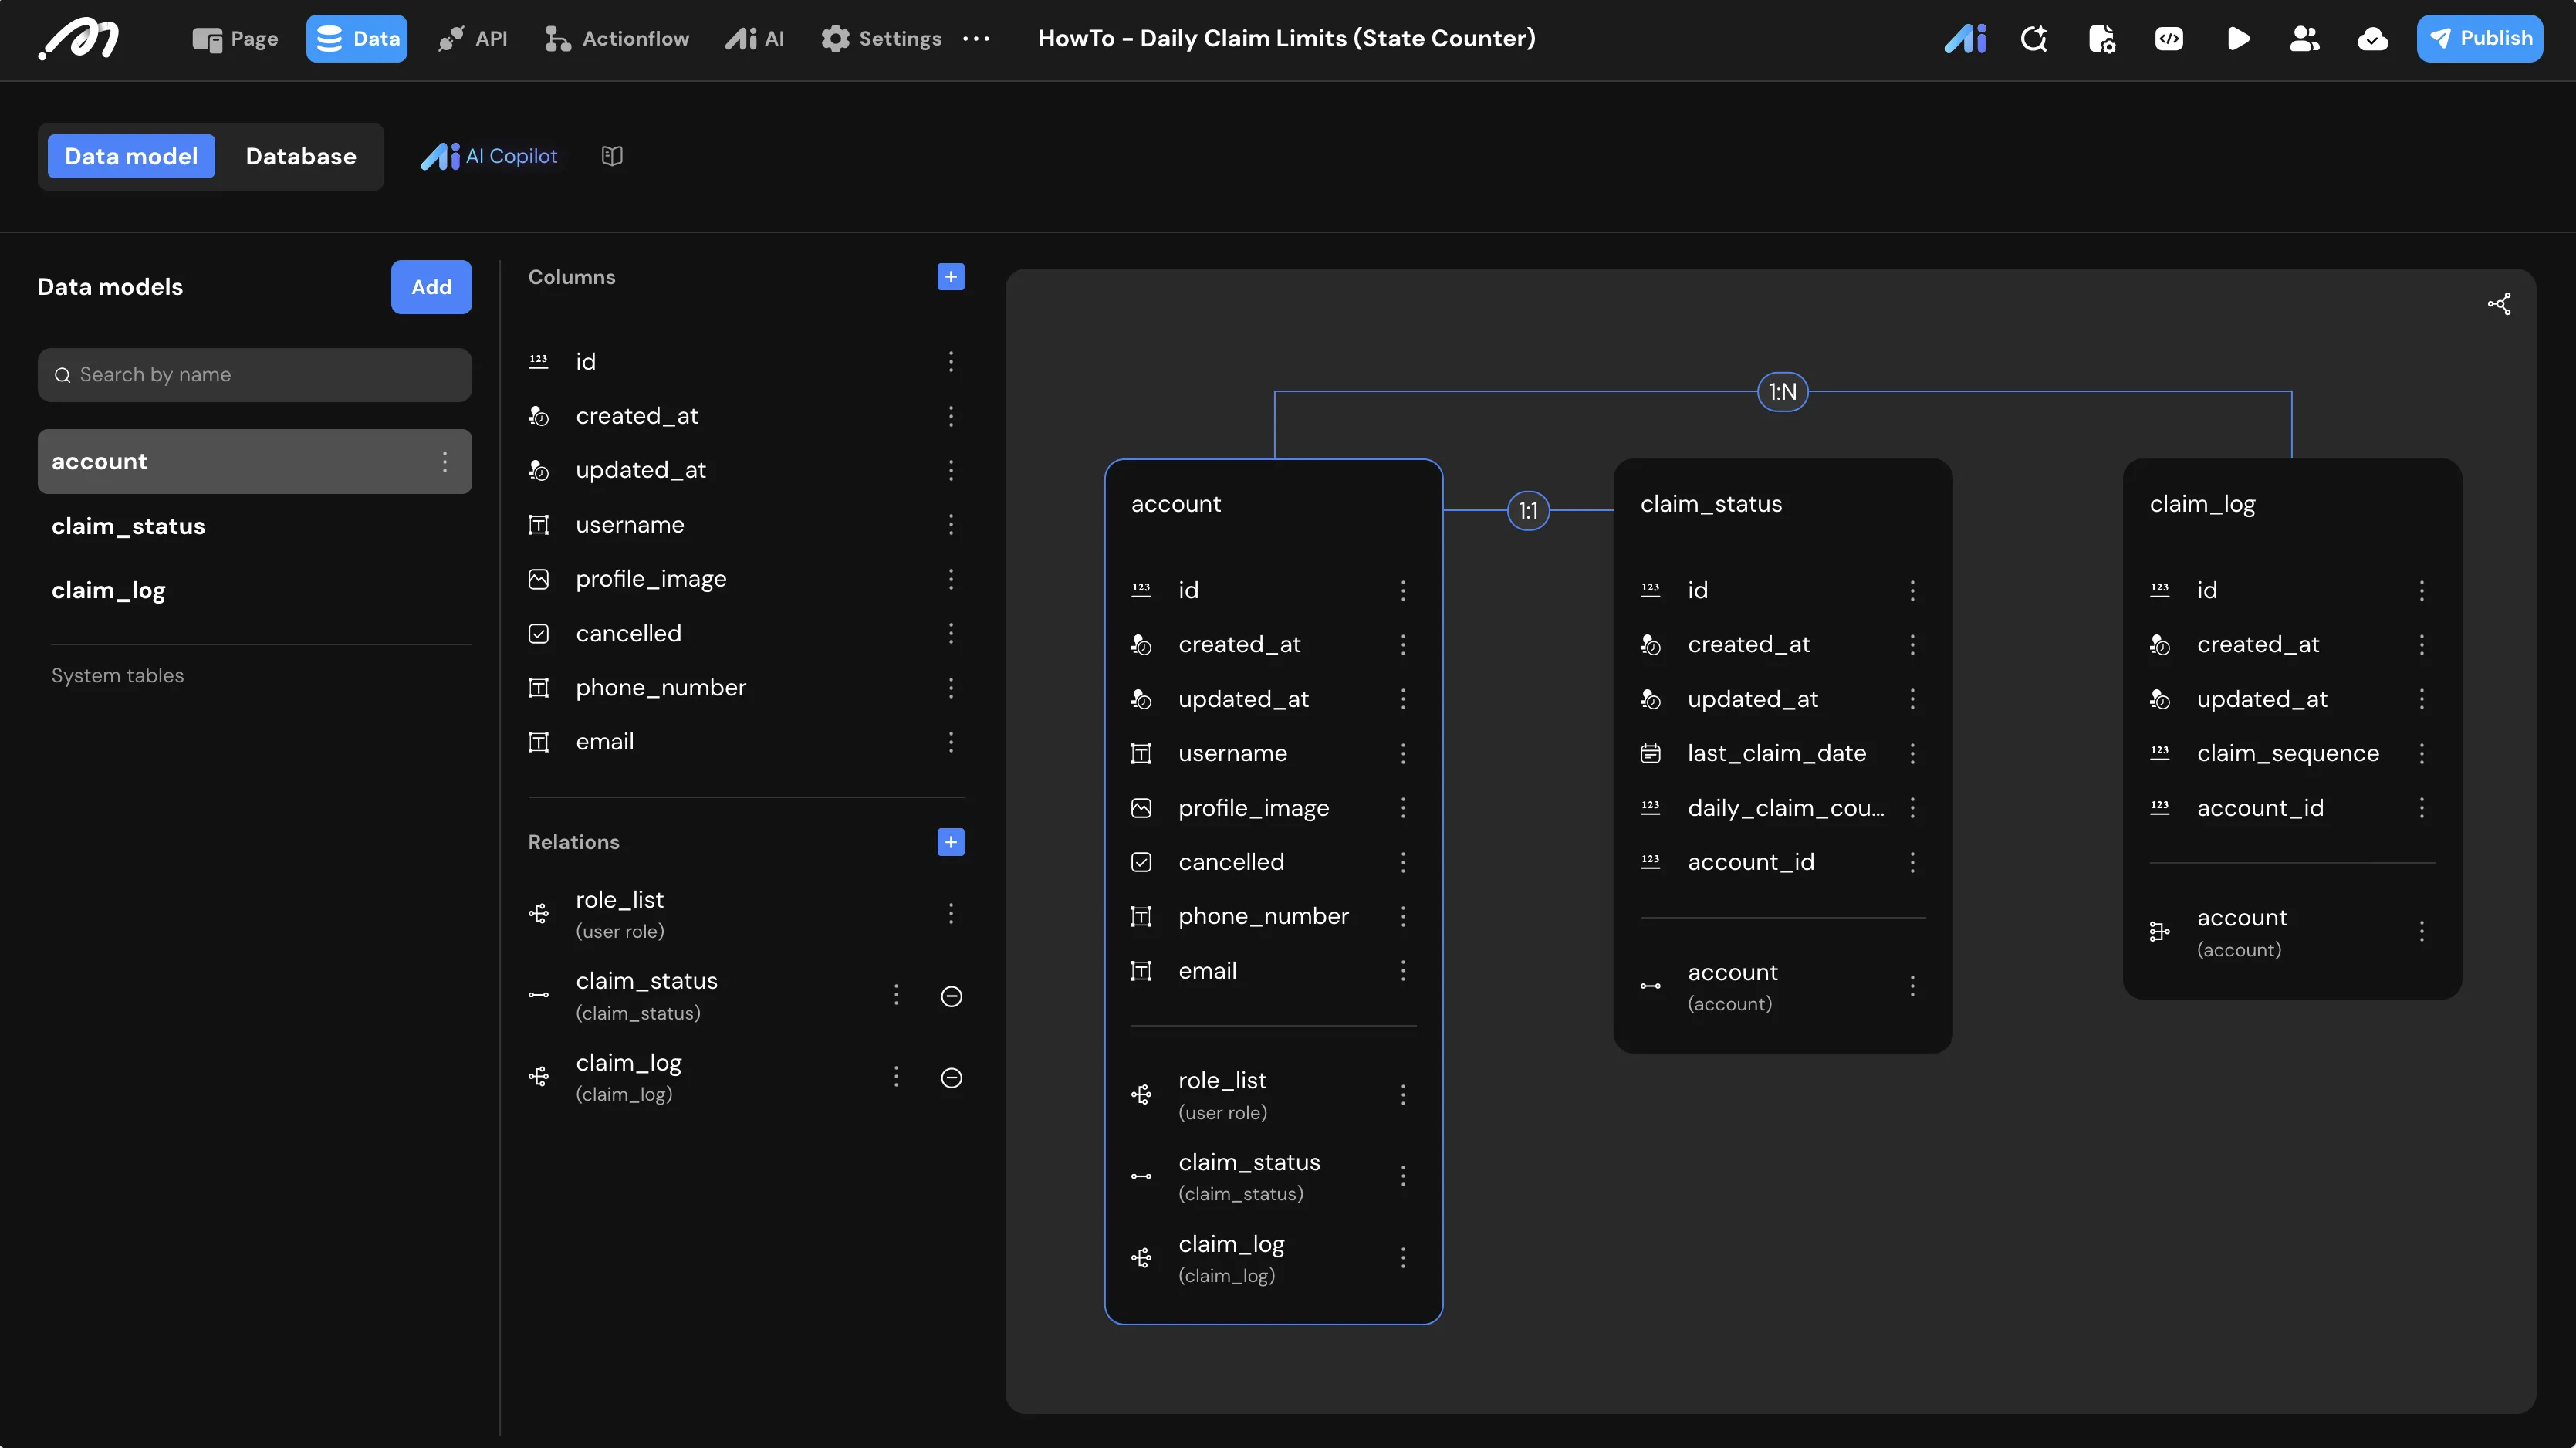
Data Model
Configure the relational database to store user status and transactional history. Every table automatically includes system fields such as id, created_at, and updated_at; only custom fields are listed in detail below.
1. Table: claim_status
Used for state control; each account holds at most one corresponding record. The account_id field has a built-in unique constraint due to the 1:1 relationship with the account table.
| Field Name | Type | Note |
|---|---|---|
| id | Bigint | Primary Key (system default) |
| last_claim_date | Date | Used to verify if the request falls on a “new day” |
| daily_claim_count | Bigint | Increments sequentially (1‑3) |
| account_id | Bigint | Foreign key to account (1:1 relationship, automatically unique) |
2. Table: claim_log An append‑only audit log table.
| Field Name | Type | Note |
|---|---|---|
| id | Bigint | Primary Key (system default) |
| claim_sequence | Bigint | Logs the index of the claim (1, 2, or 3) |
| account_id | Bigint | Foreign key to account (1:N relationship) |
Logic & State Configuration
”Daily Claim” Actionflow Construction
This Actionflow handles the core validation rules: checking if a record exists, resetting the counter on a new day, and incrementing the count if under the limit.
- Actionflow variable: Add a global variable inside the Actionflow named
statuswith the typeBooleanto track the overall success of the request execution.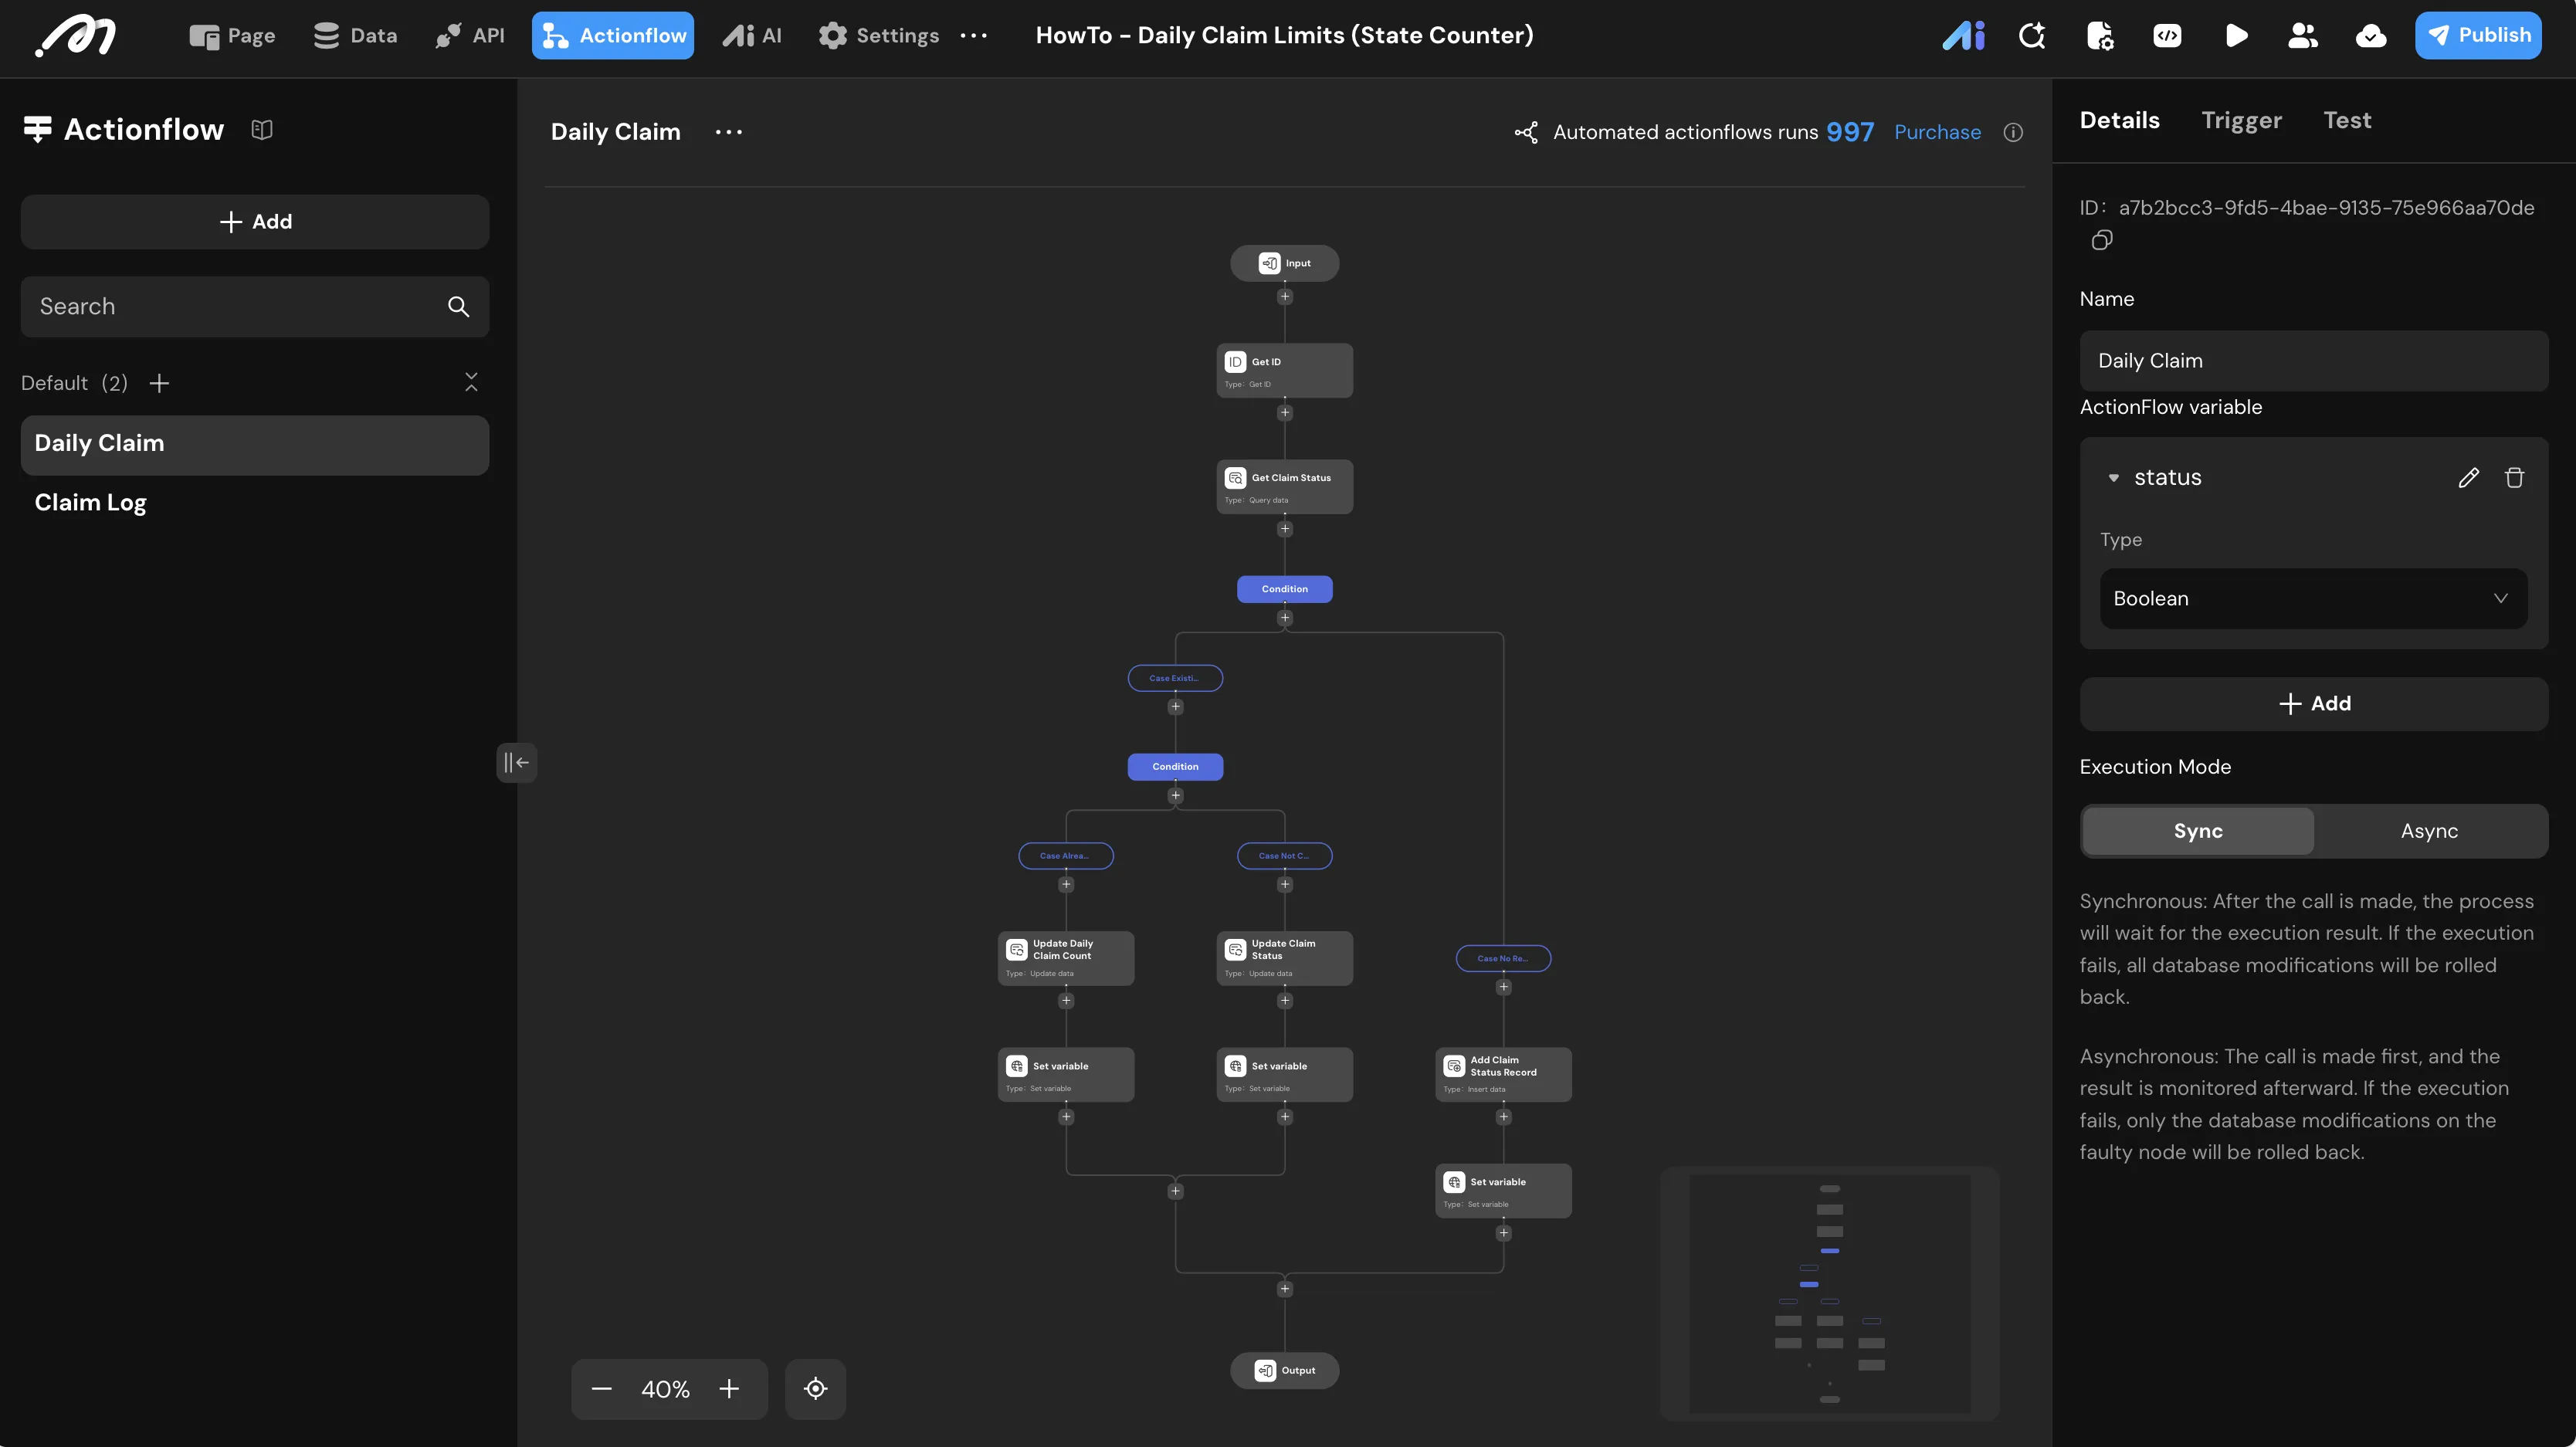
- Get ID: Add a custom code node named “Get ID” to retrieve the logged-in user’s account ID (
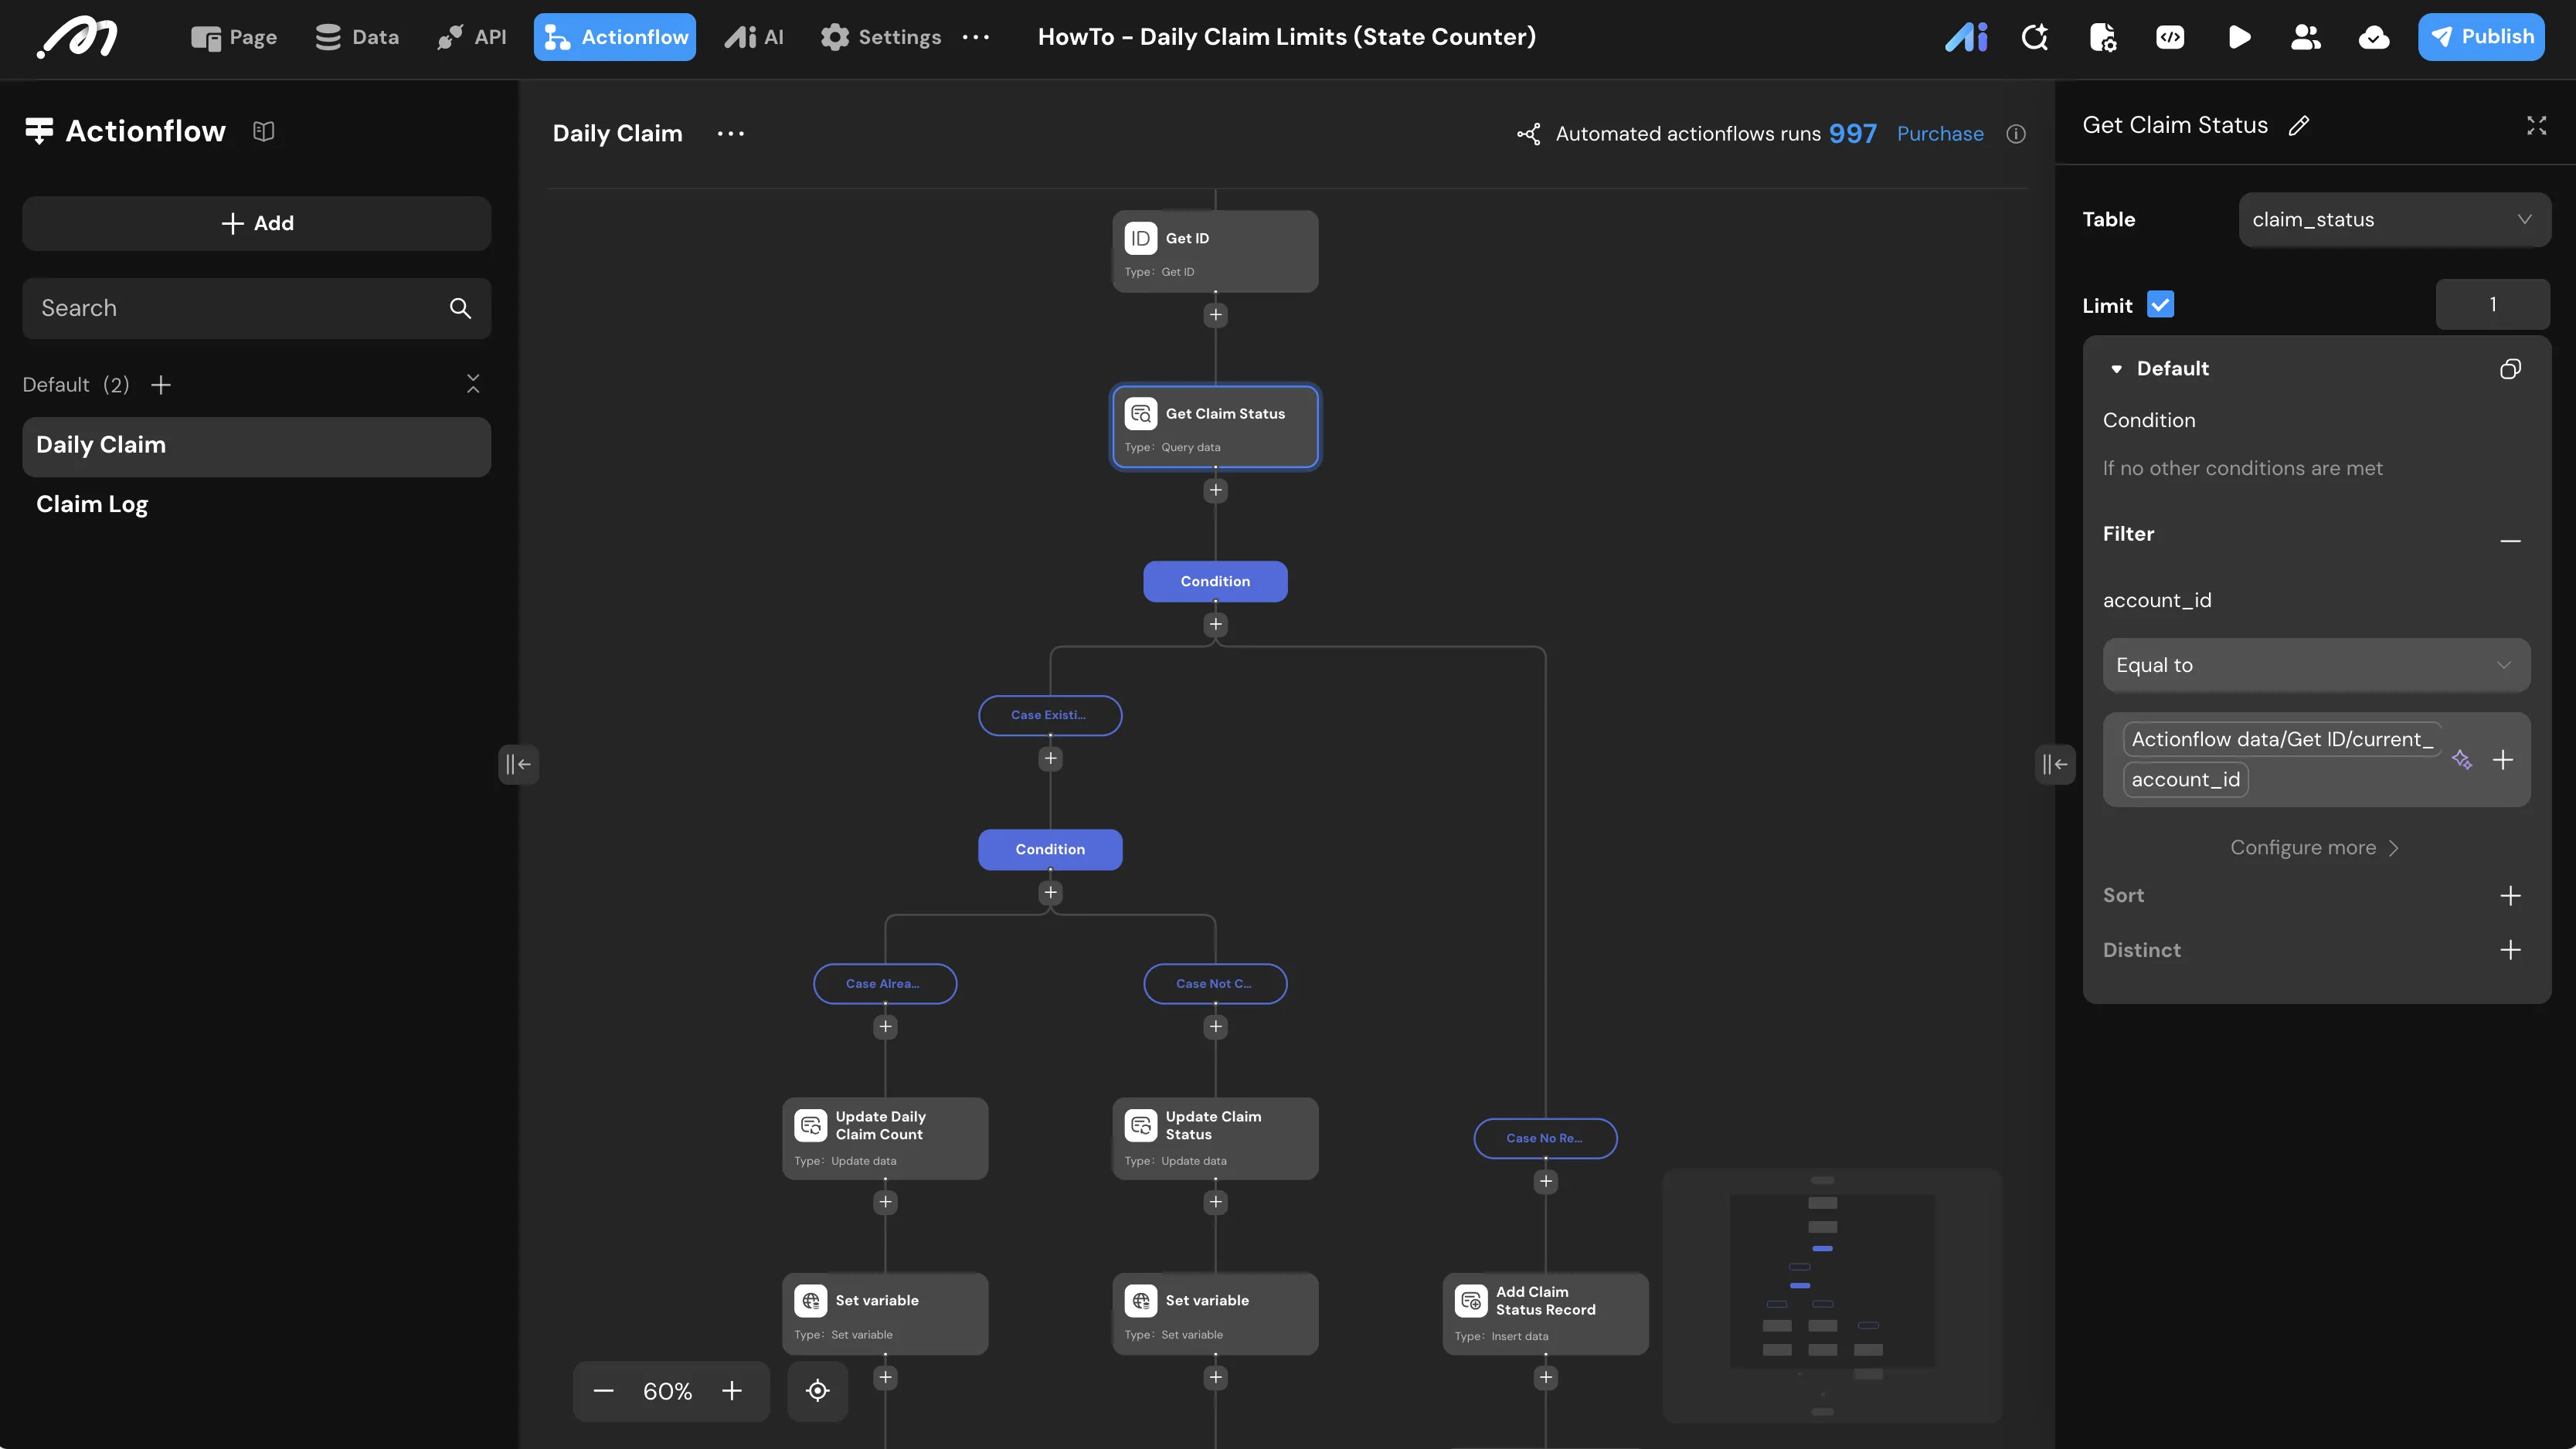
current_account_id). - Query data: Add a Query Record node named “Get Claim Status”.
- Table:
claim_status. - Filter:
account_idEqual toActionflow data/Get ID/current_account_id. - Limit: 1.
- Table:
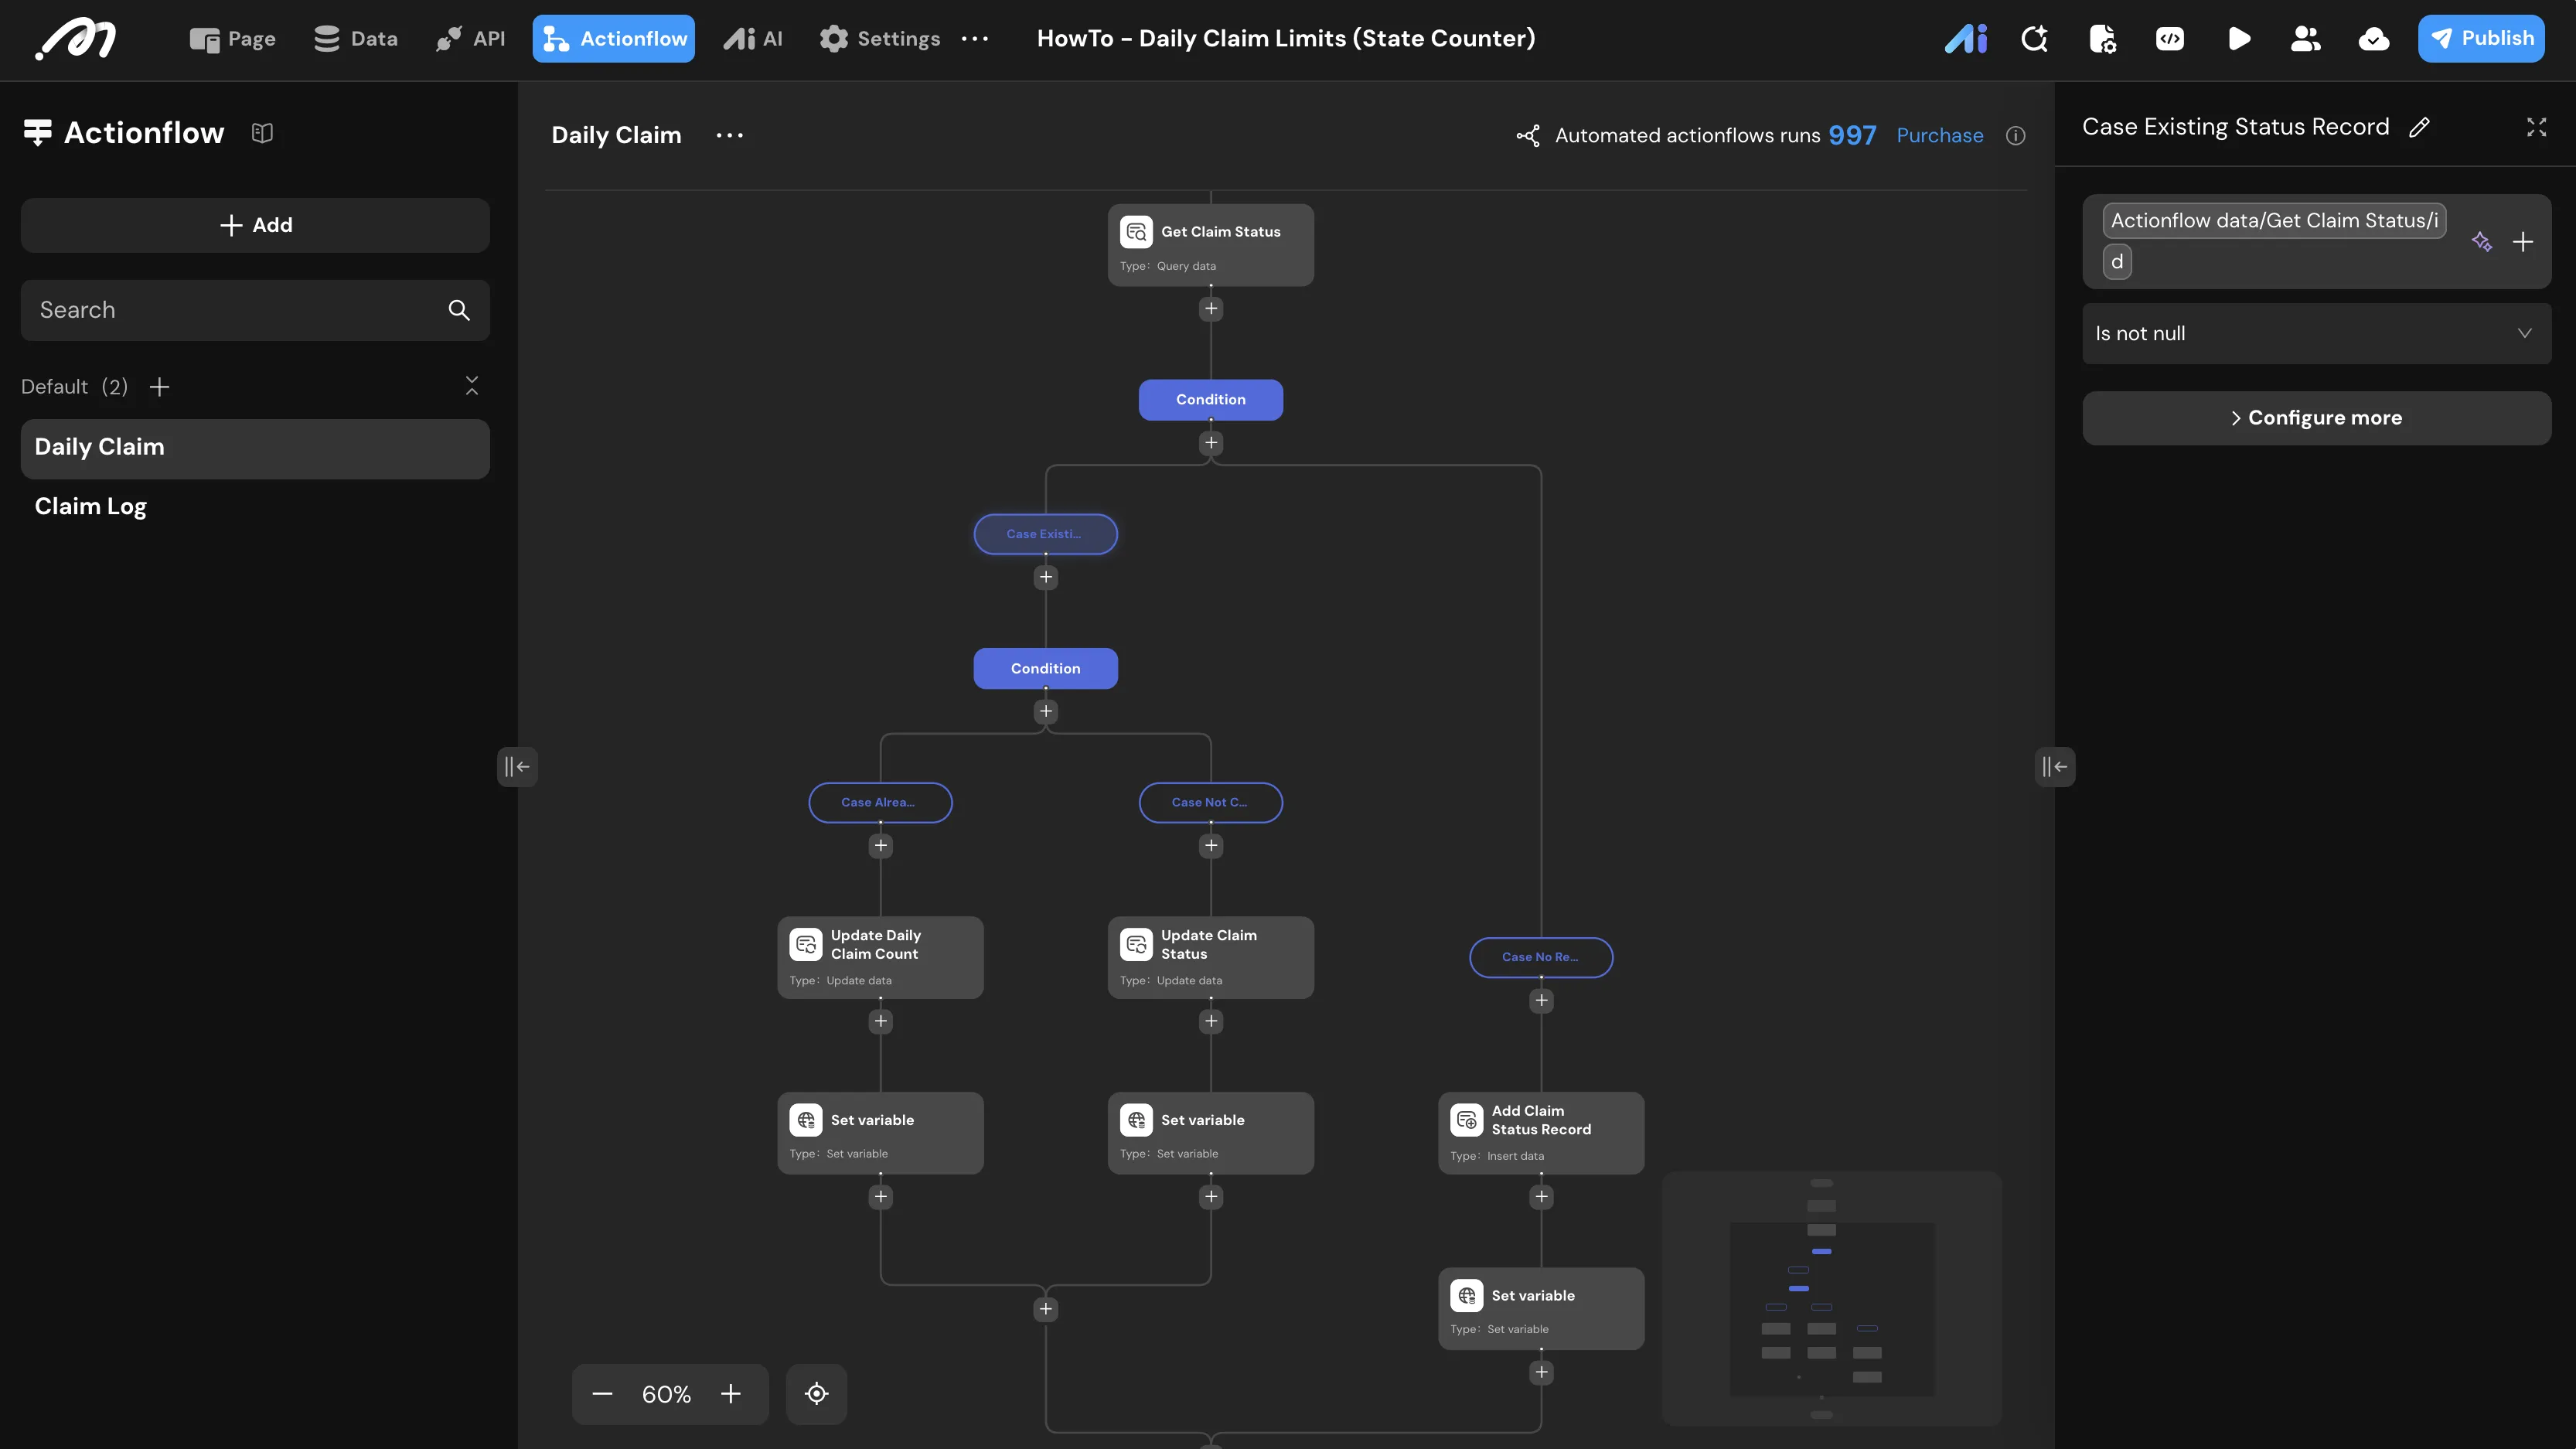
- Condition - Root Branching: Add a Branch Separation node named “Condition” to verify if the status record exists in the database.
- Case Existing Status Record:
Actionflow data/Get Claim Status/idIs not null. (Proceeds to Step 5) - Case No Records (Else): If the user has never claimed before (the record is null). (Proceeds to Step 9)
- Case Existing Status Record:
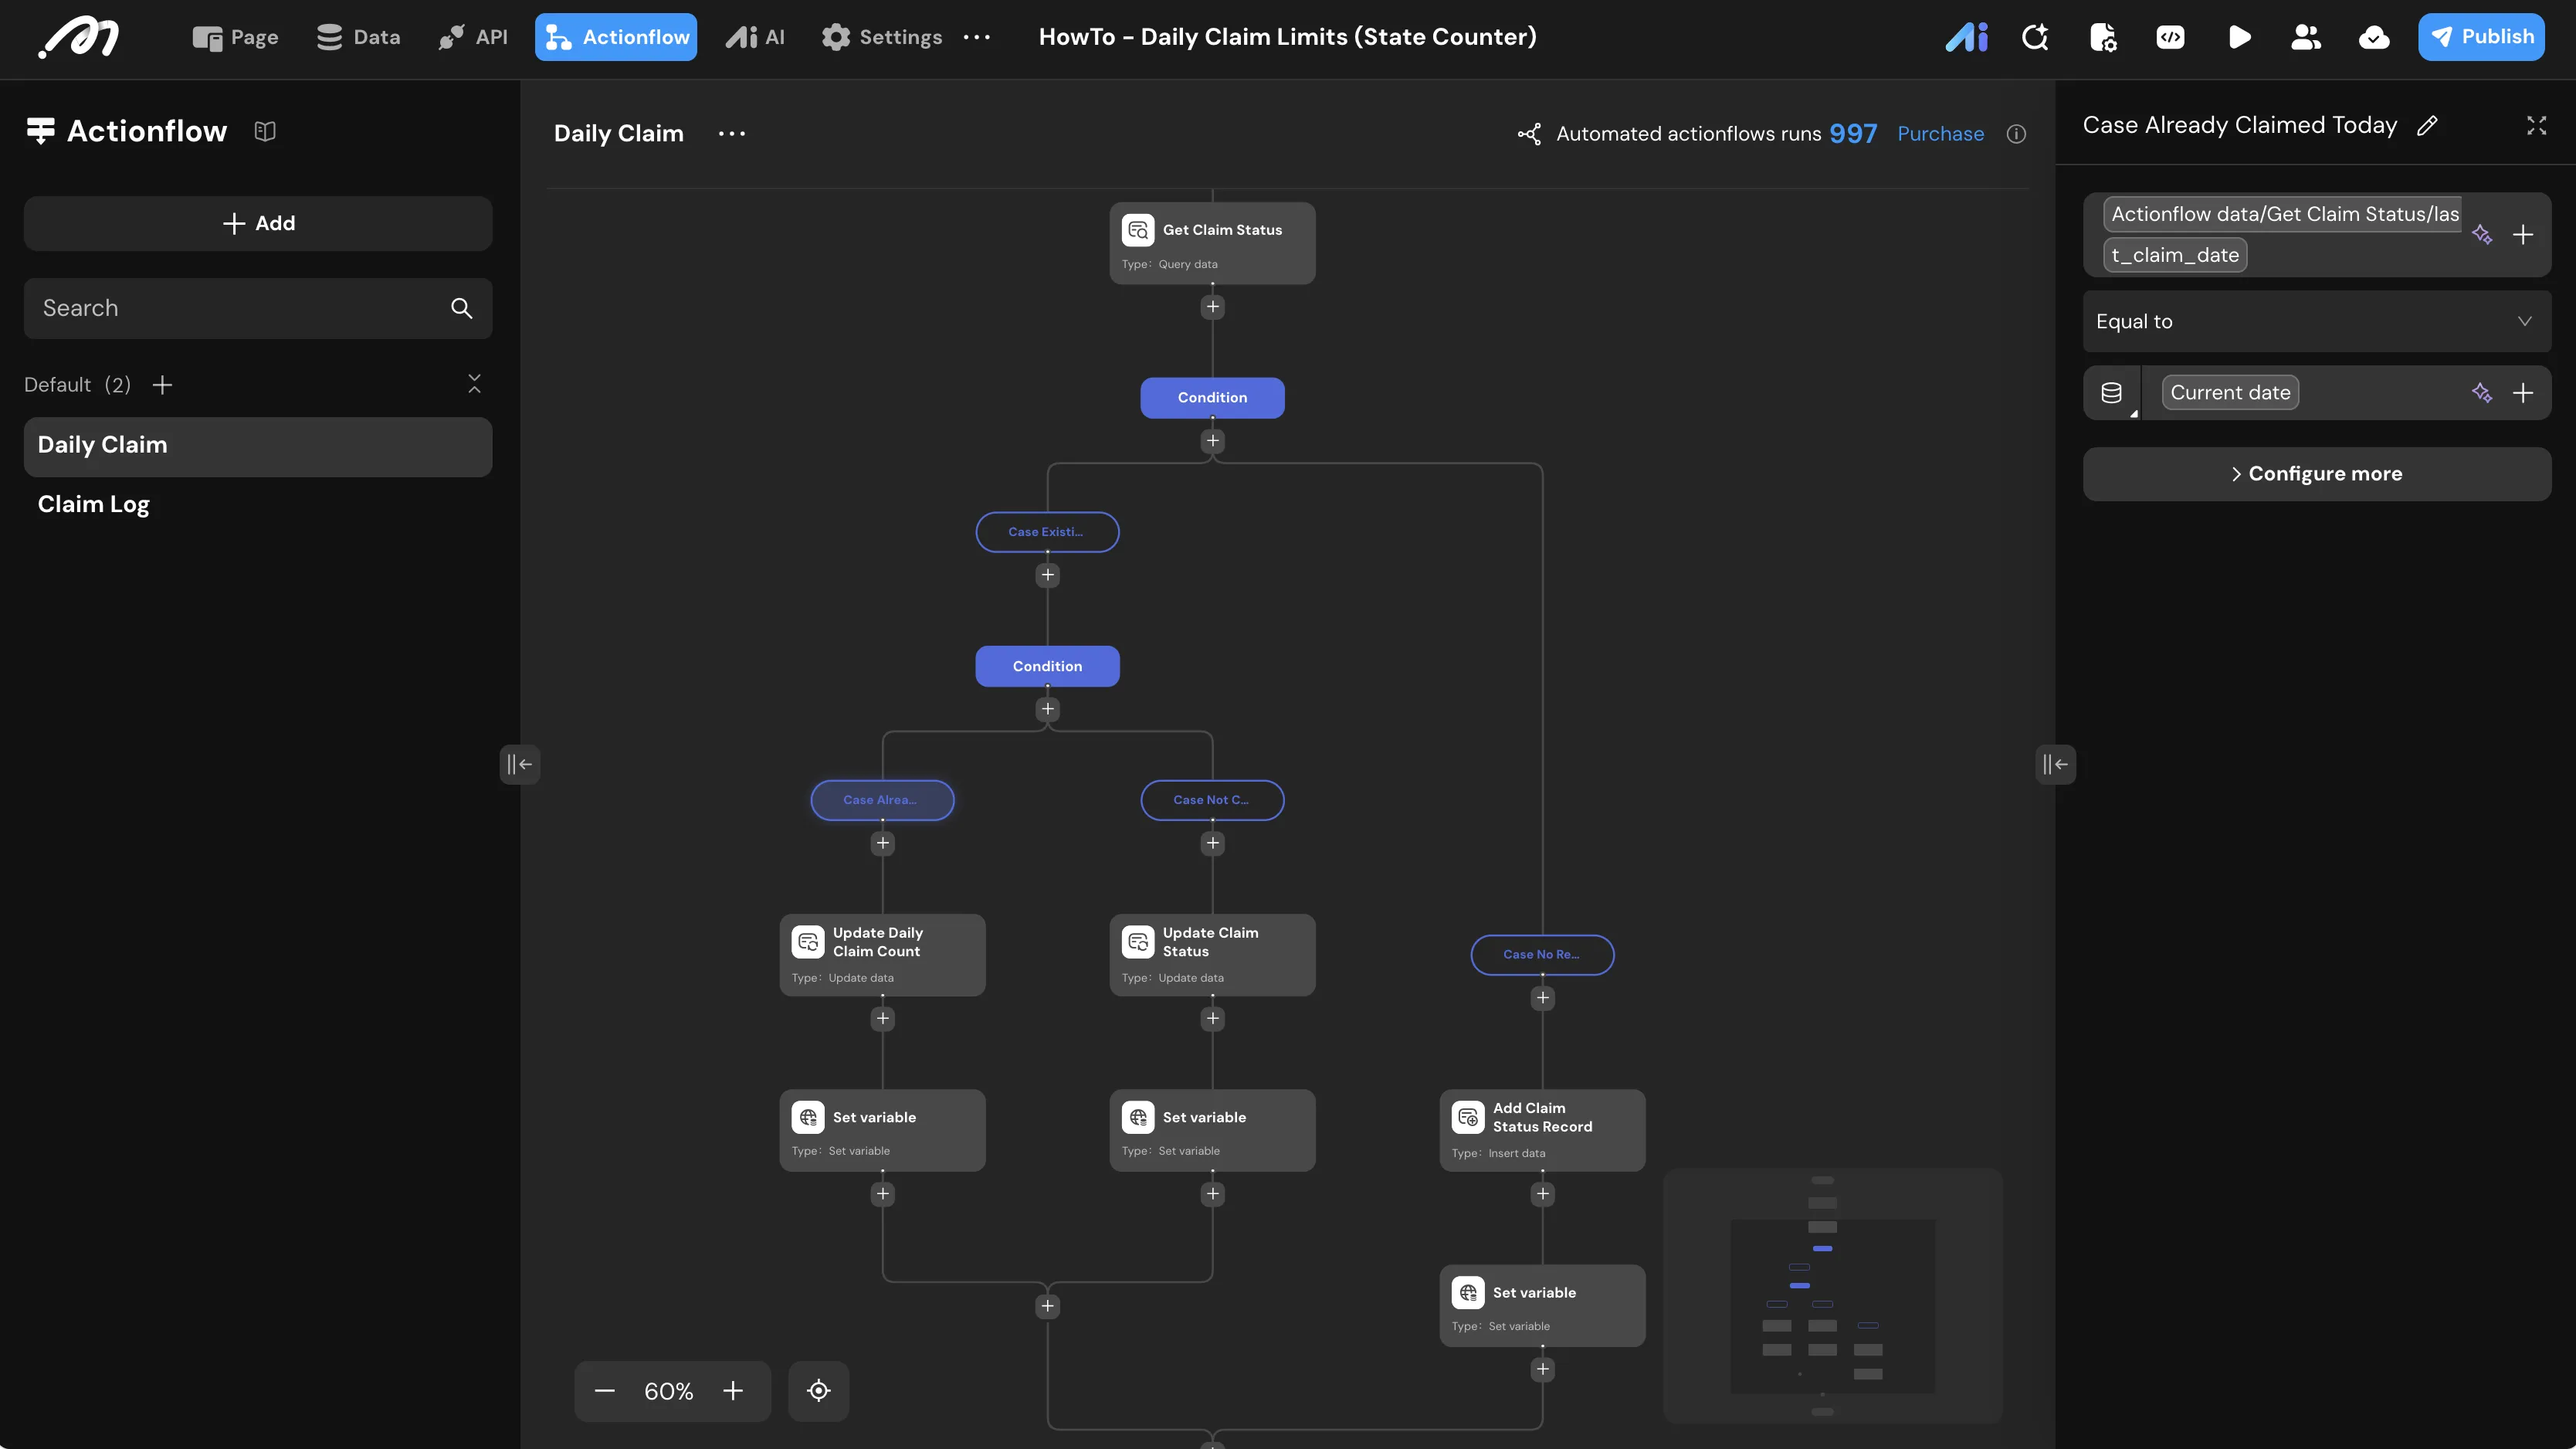
- Condition - Nested Date Check: Inside the existing record branch, add a nested Branch Separation node named “Condition”.
- Case Already Claimed Today:
Actionflow data/Get Claim Status/last_claim_dateEqual togetCurrentDate. (Proceeds to Step 6) - Case Not Claimed Today (Else): If the last claim date belongs to a previous day. (Proceeds to Step 8)
- Case Already Claimed Today:
- Update data (In Case Already Claimed Today): Add an Update Record node named “Update Daily Claim Count”.
- Table:
claim_status. - Parameters:
daily_claim_count->Arithmetic Operator: incrementby1. - Filter:
account_idEqual toActionflow data/Get ID/current_account_idANDdaily_claim_countLess than3.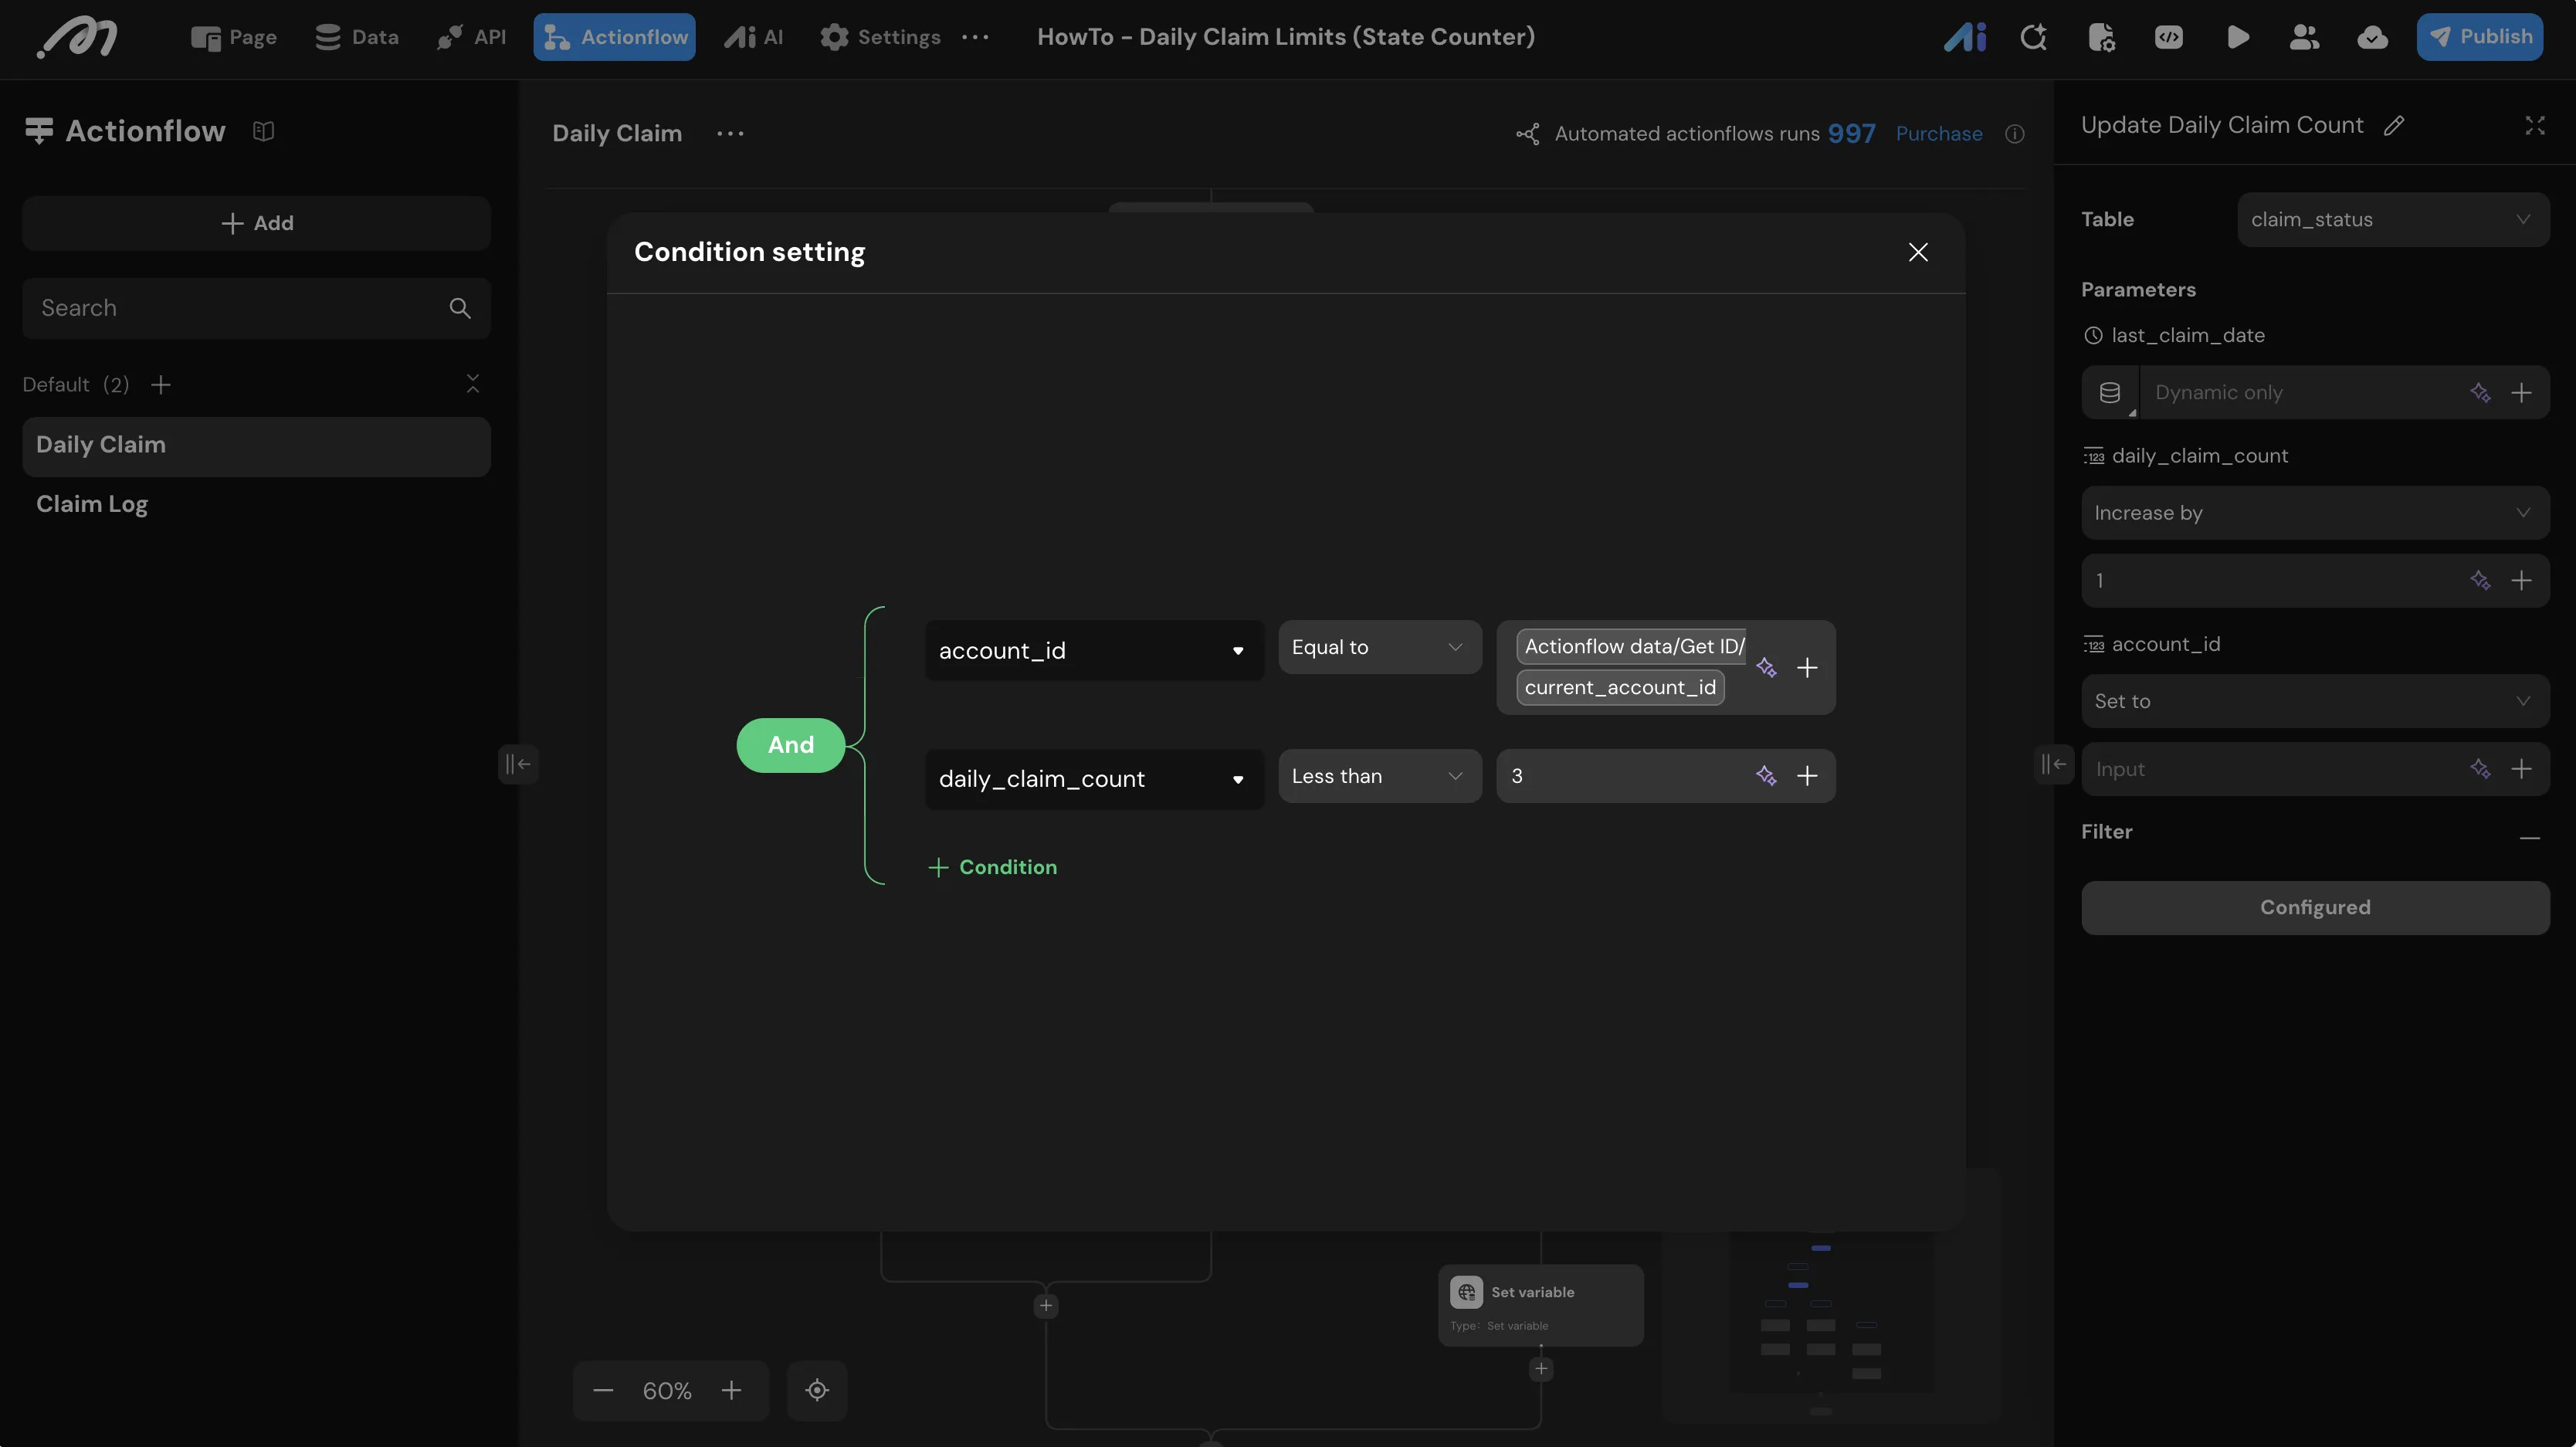
- Table:
- Set variable: Add a Set Variable node to determine the value of the
statusvariable based on the execution result of the counter increment.- Case Updated Successfully:
Actionflow data/Update Daily Claim Count/idIs not null-> Set toTrue. - Case Update Failed (Else): Set to
False(this happens if thedaily_claim_countis already 3 or more, violating the filter constraint).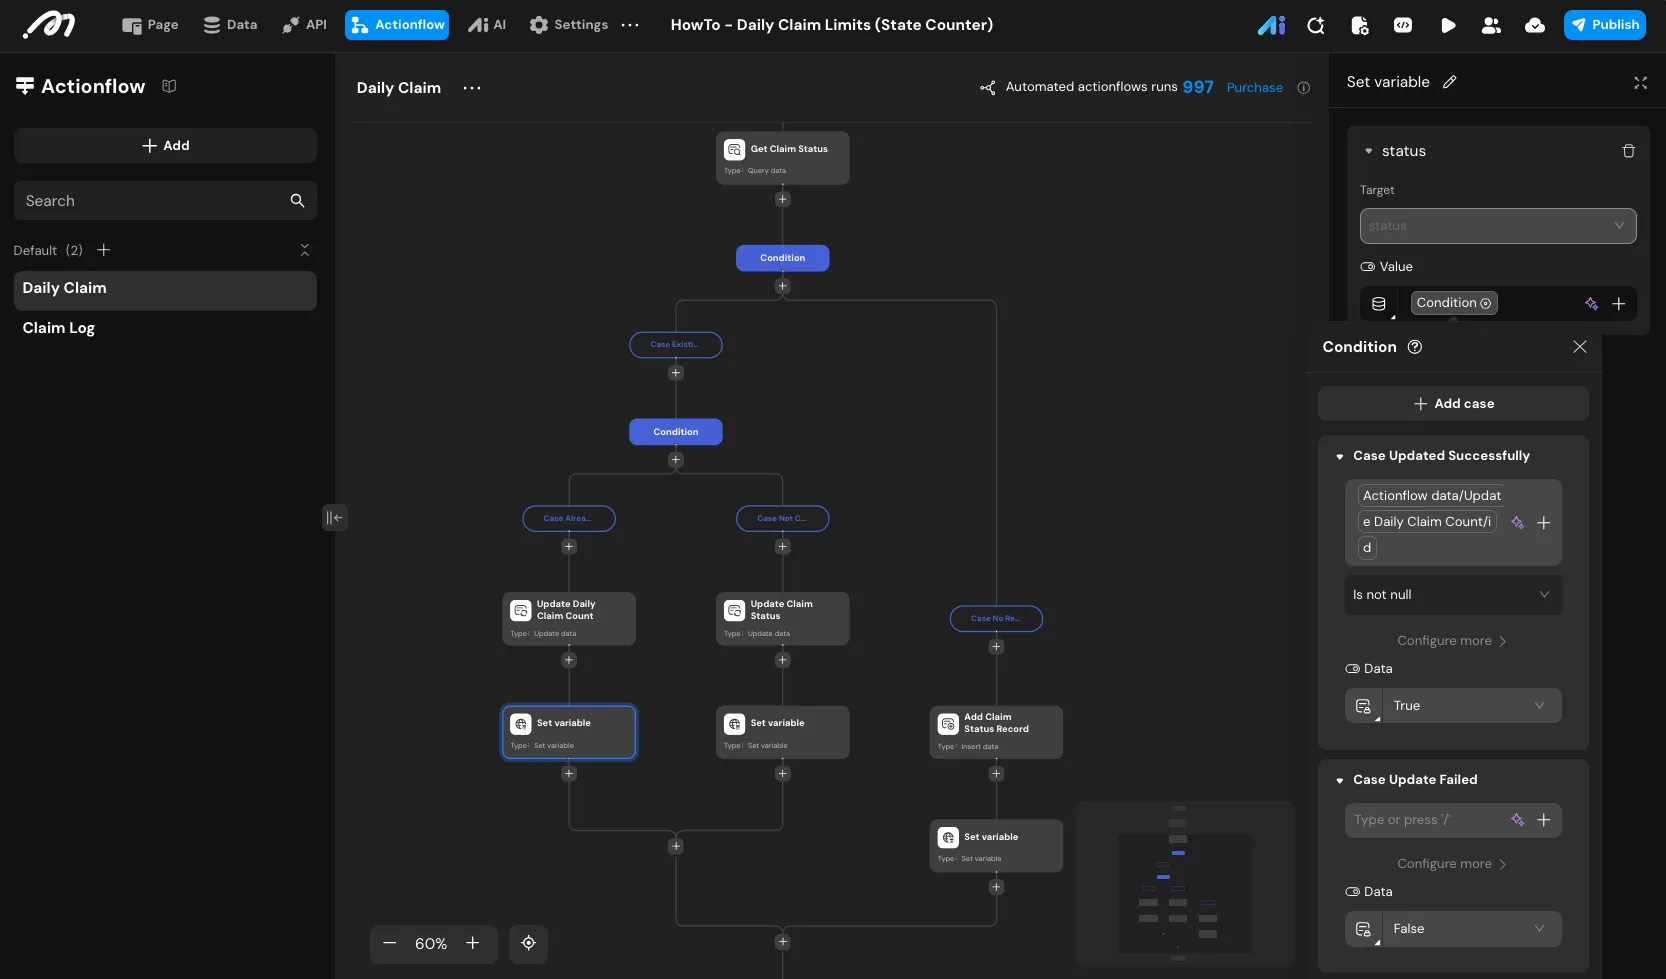
- Case Updated Successfully:
- Update data (In Case Not Claimed Today): Since it is a brand new day, add an Update Record node named “Update Claim Status” to reset the counter tracking.
- Table:
claim_status. - Parameters:
last_claim_date->getCurrentDate,daily_claim_count-> Set directly to1. - Filter:
account_idEqual toActionflow data/Get ID/current_account_idANDlast_claim_dateNot equal togetCurrentDate. - Set variable: Update the Actionflow variable
status. IfUpdate Claim Status/idIs not null, set toTrue, elseFalse.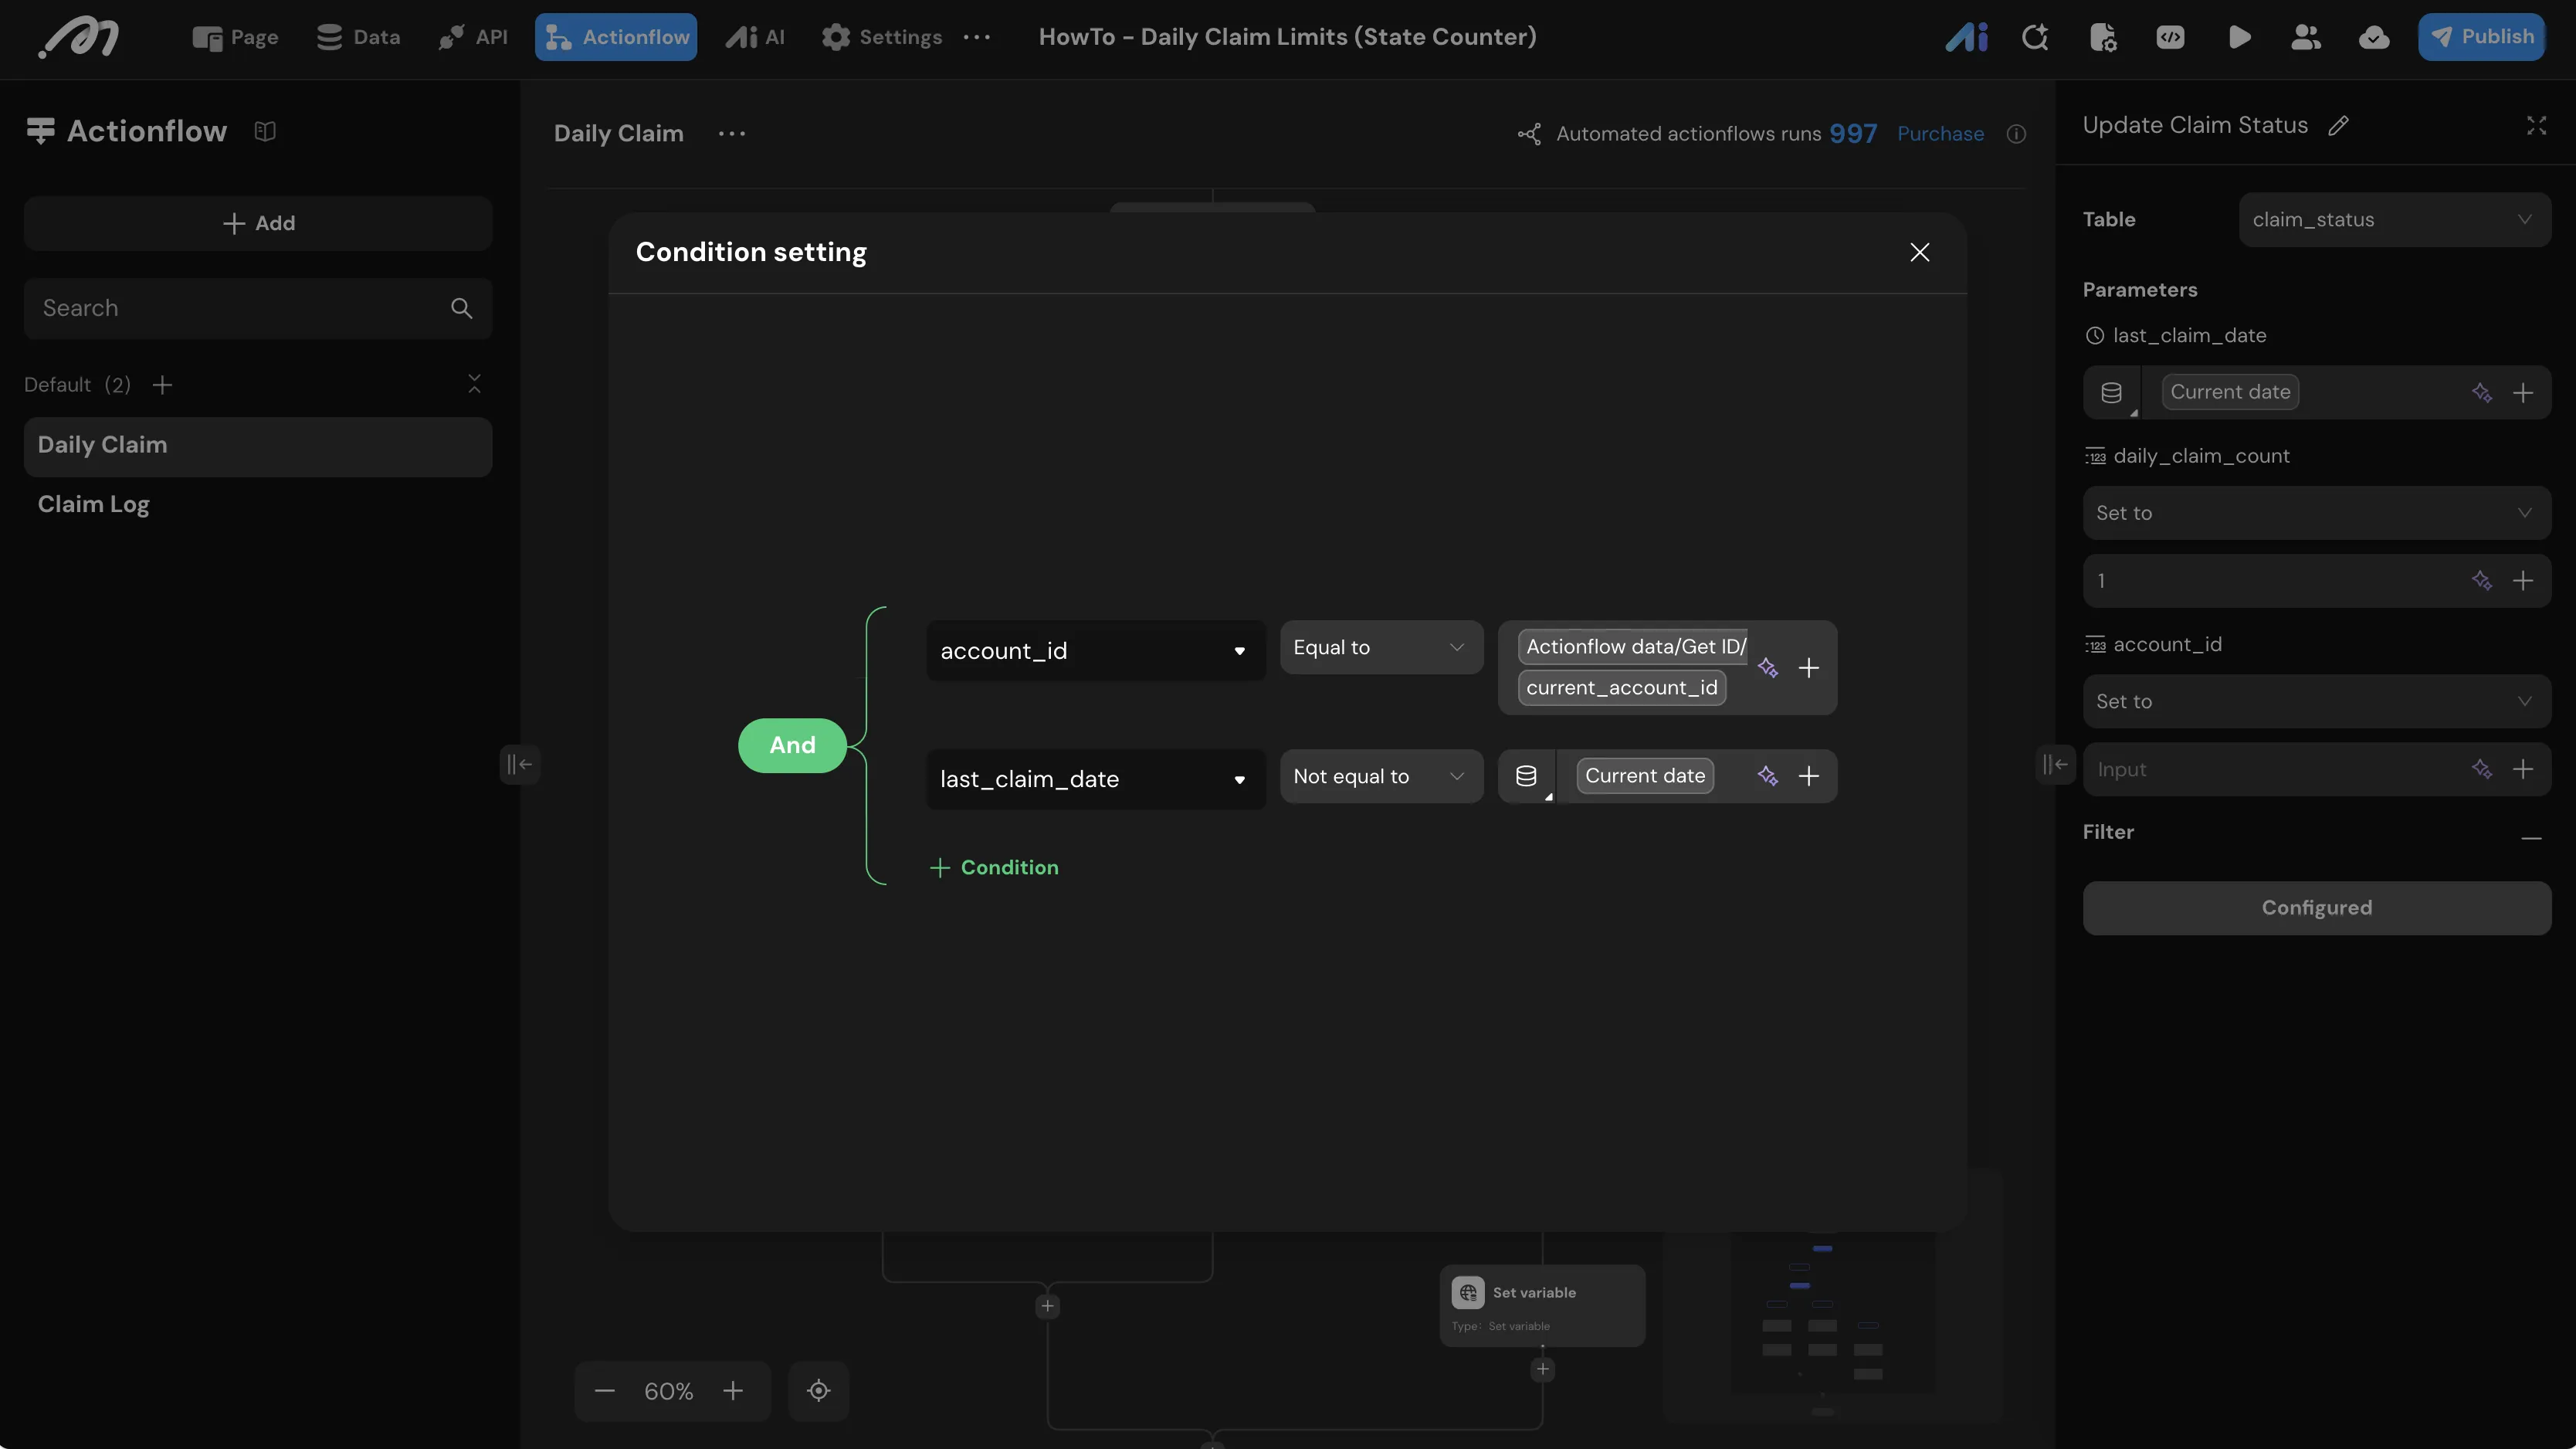
- Table:
- Insert data (In Case No Records): For first-time users, add an Insert Record node named “Add Claim Status Record” to create the initial tracking state.
- Table:
claim_status. - Parameters:
last_claim_date->getCurrentDate,daily_claim_count->1,account_id->Actionflow data/Get ID/current_account_id. - On Conflict: Do nothing. (The
account_idfield has a unique constraint due to its 1:1 relationship with theaccounttable, ensuring this clause works as intended.) - Set variable: Update the Actionflow variable
status. IfAdd Claim Status Record/idIs not null, set toTrue, elseFalse.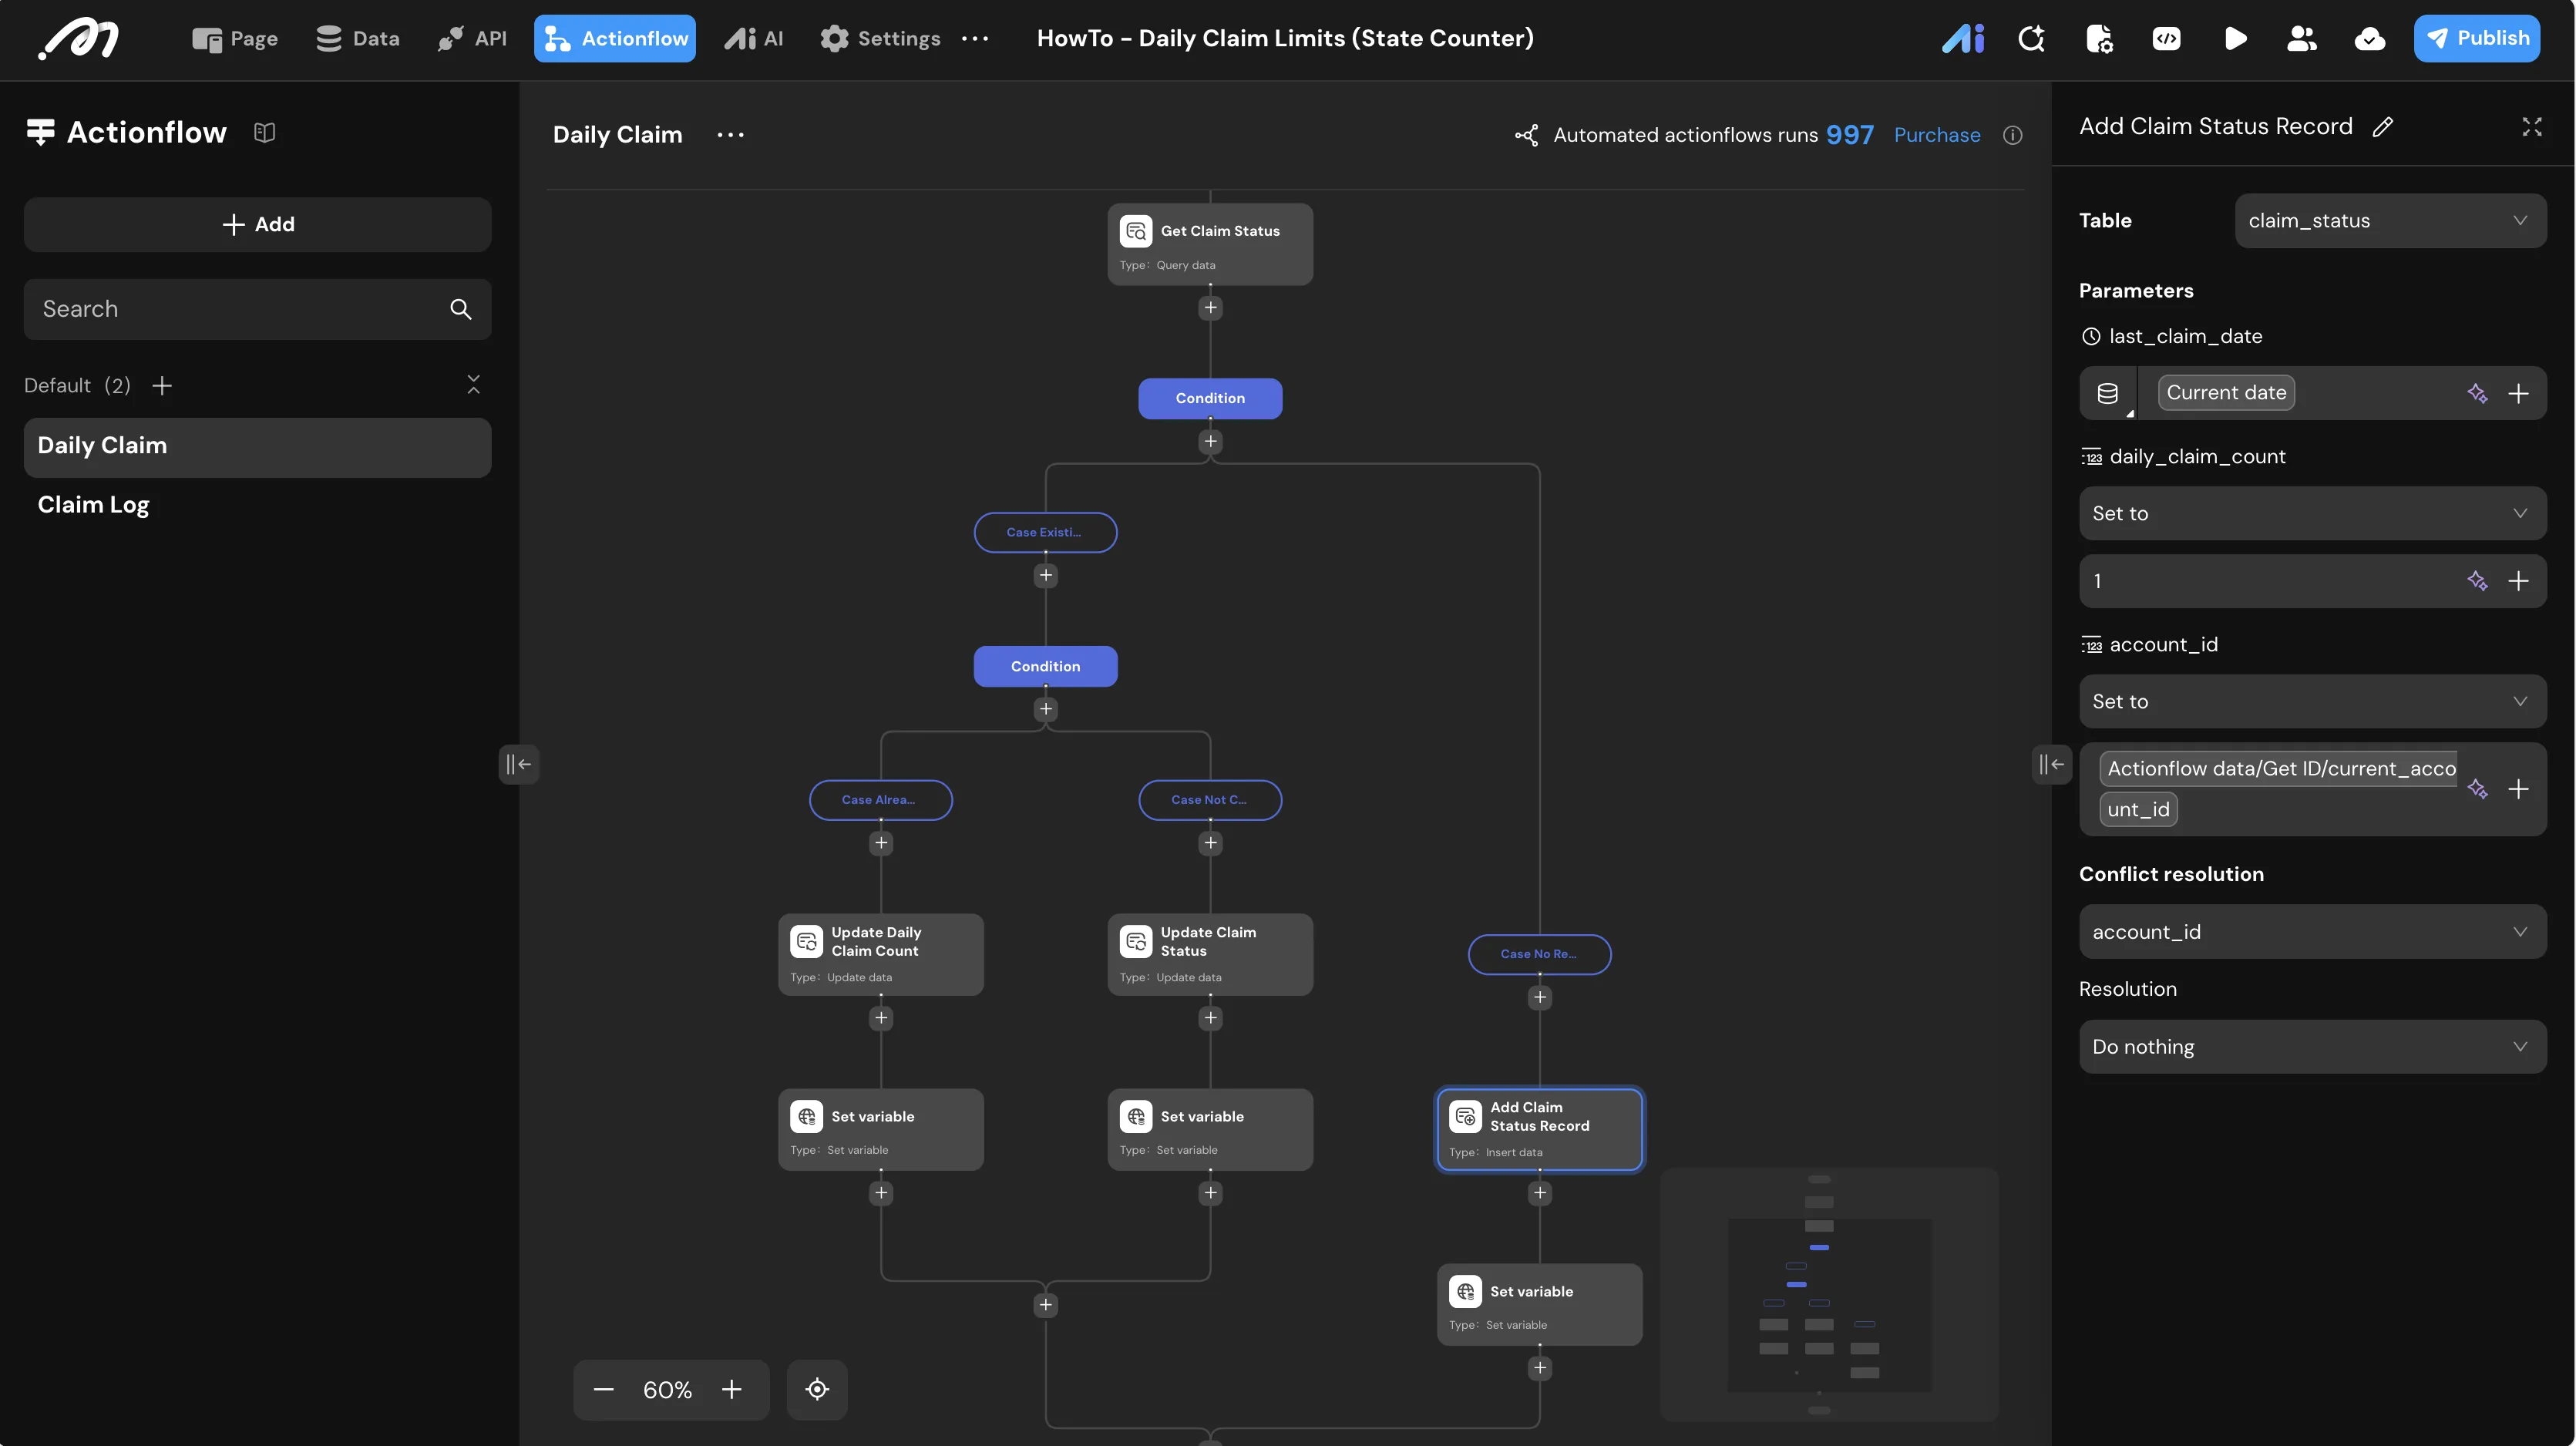
- Table:
- Actionflow output: Merge all conditional branches into the Flow End node and configure the output data binding to return
Actionflow data/Variable/status.
”Claim Log” Actionflow & Trigger
Automate the audit trail whenever the claim_status table is modified.
- Actionflow input: Create a new Actionflow named “Claim Log”. Add inputs:
account_id(Bigint) andsequence(Bigint).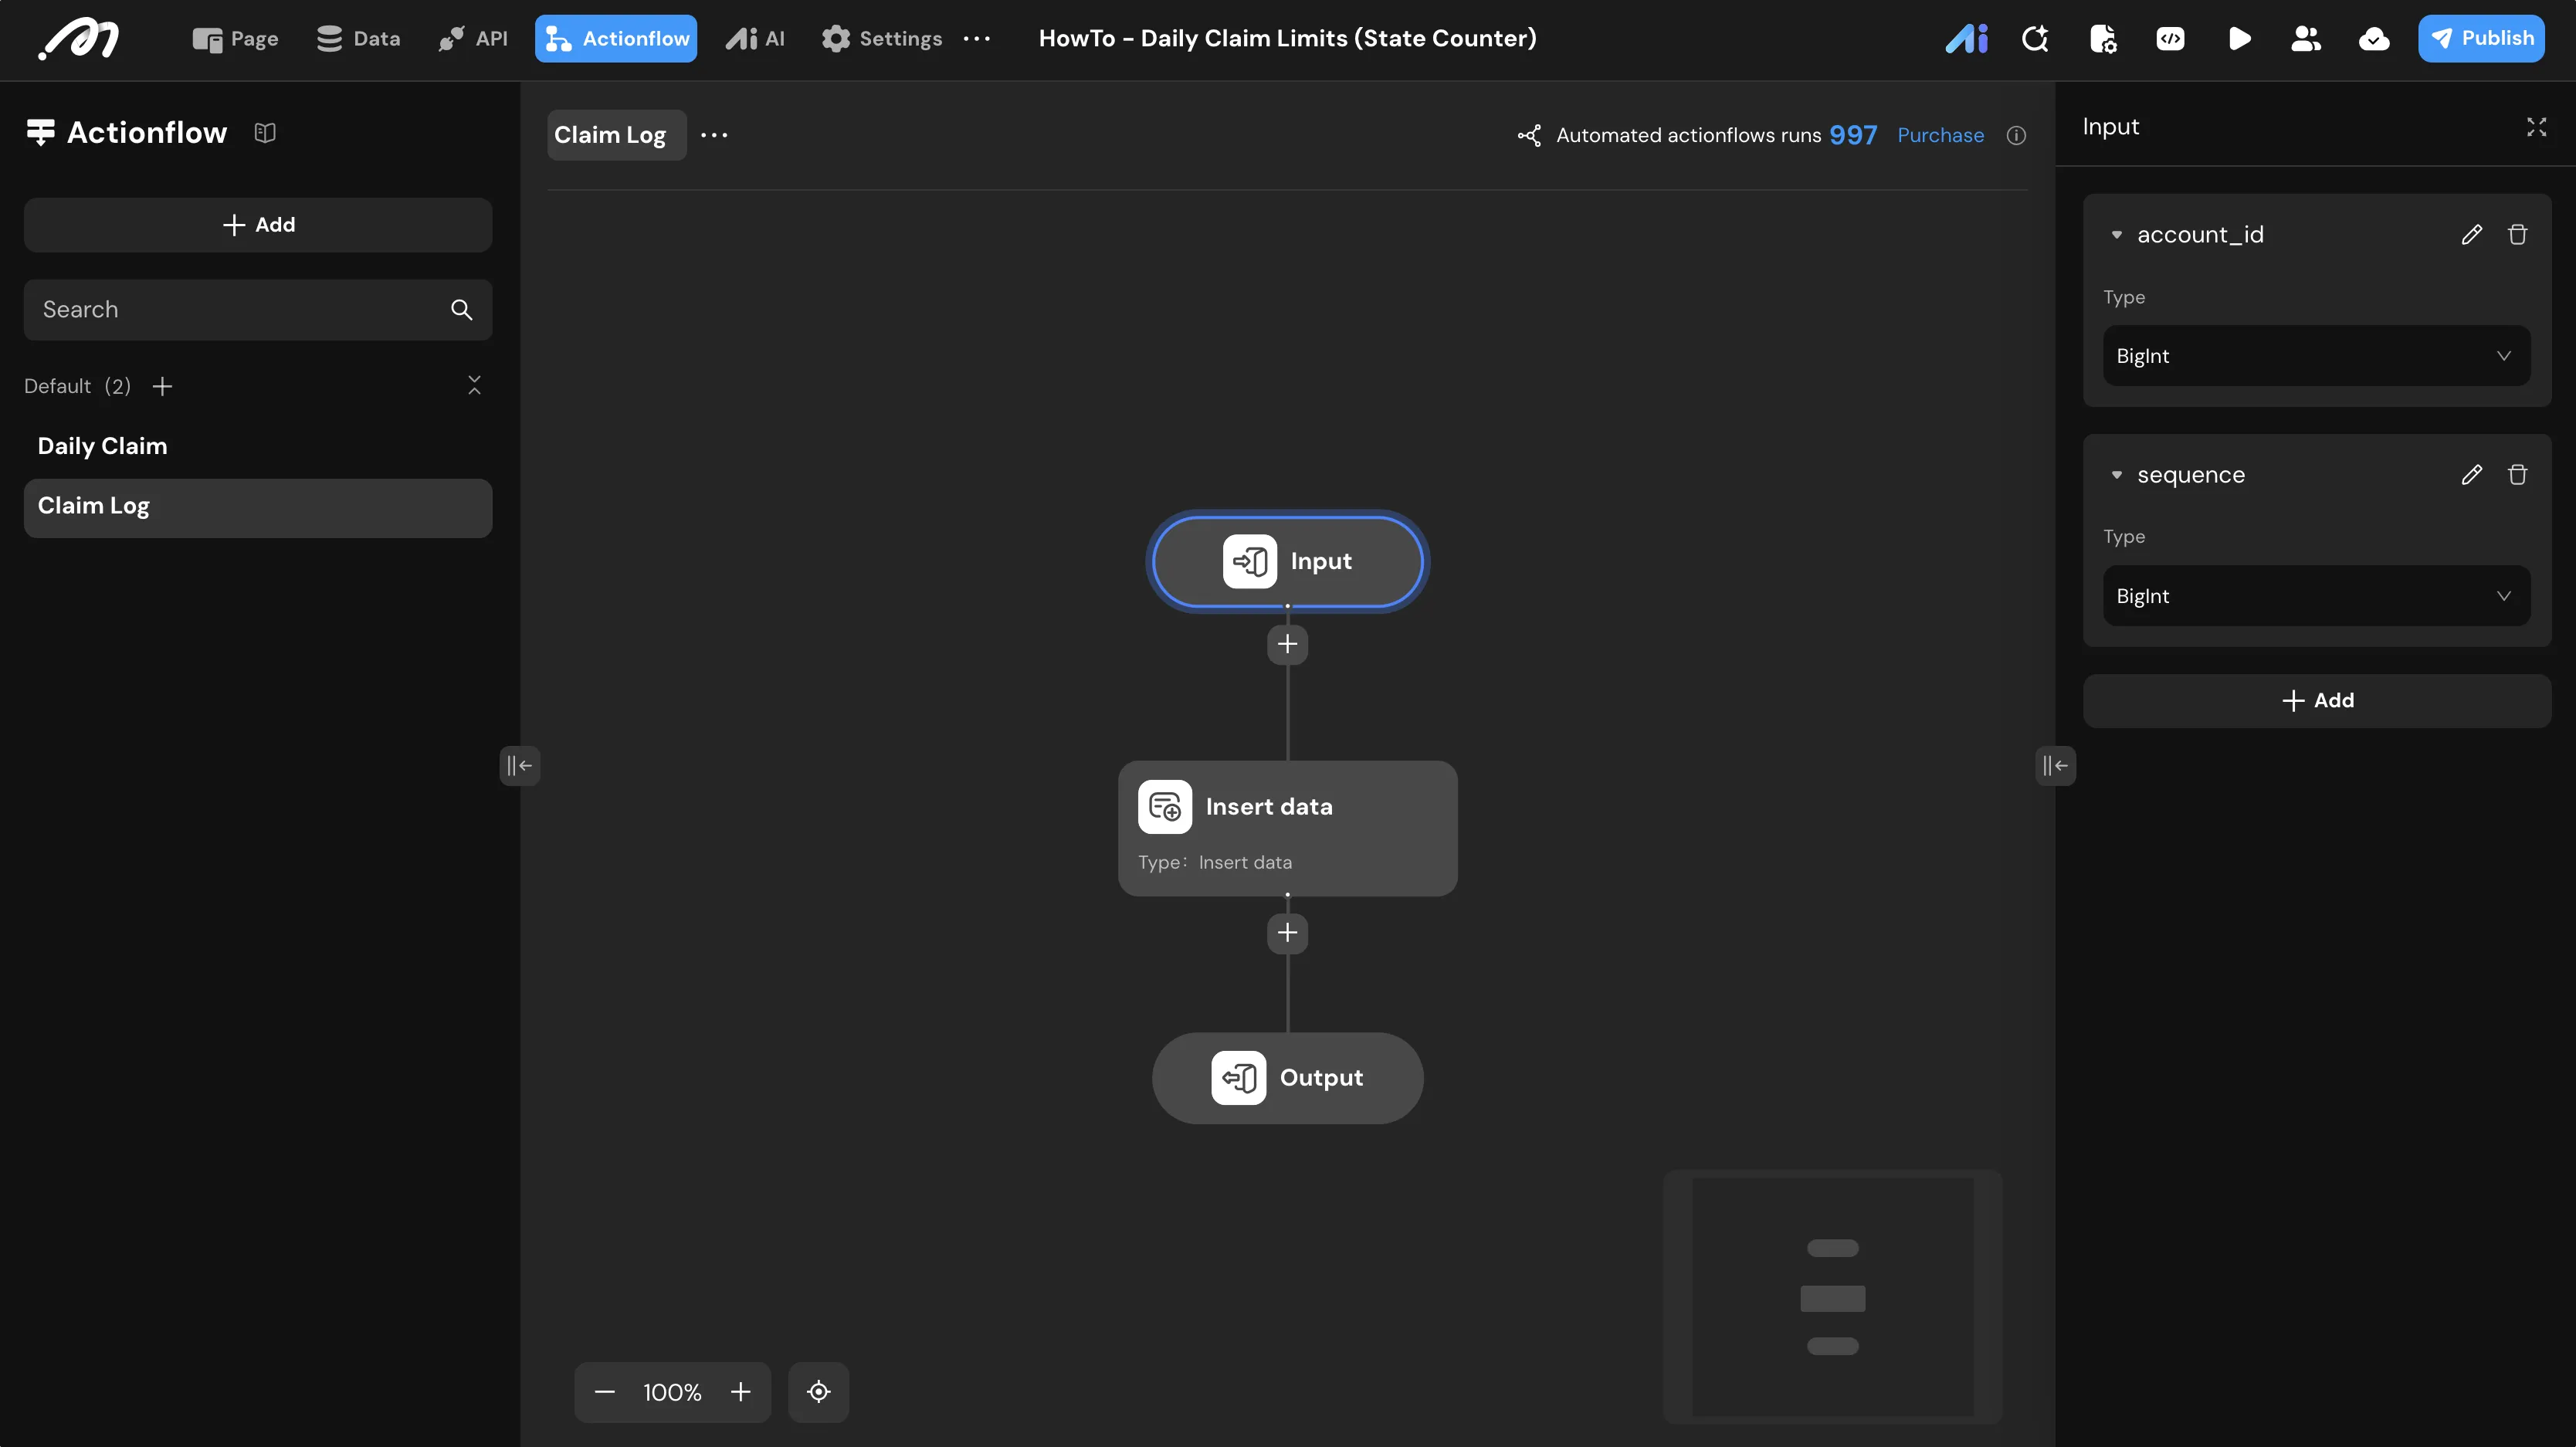
- Configure the Database Trigger: Enable the Database Trigger for this Actionflow to capture automated updates.
- Trigger type:
DB_TRIGGER. - Select DB Operation Type:
INSERT_OR_UPDATE. - Select Table:
claim_status. - Actionflow inputs mapping:
account_id->Inserted or updated data/account_id.sequence->Inserted or updated data/daily_claim_count.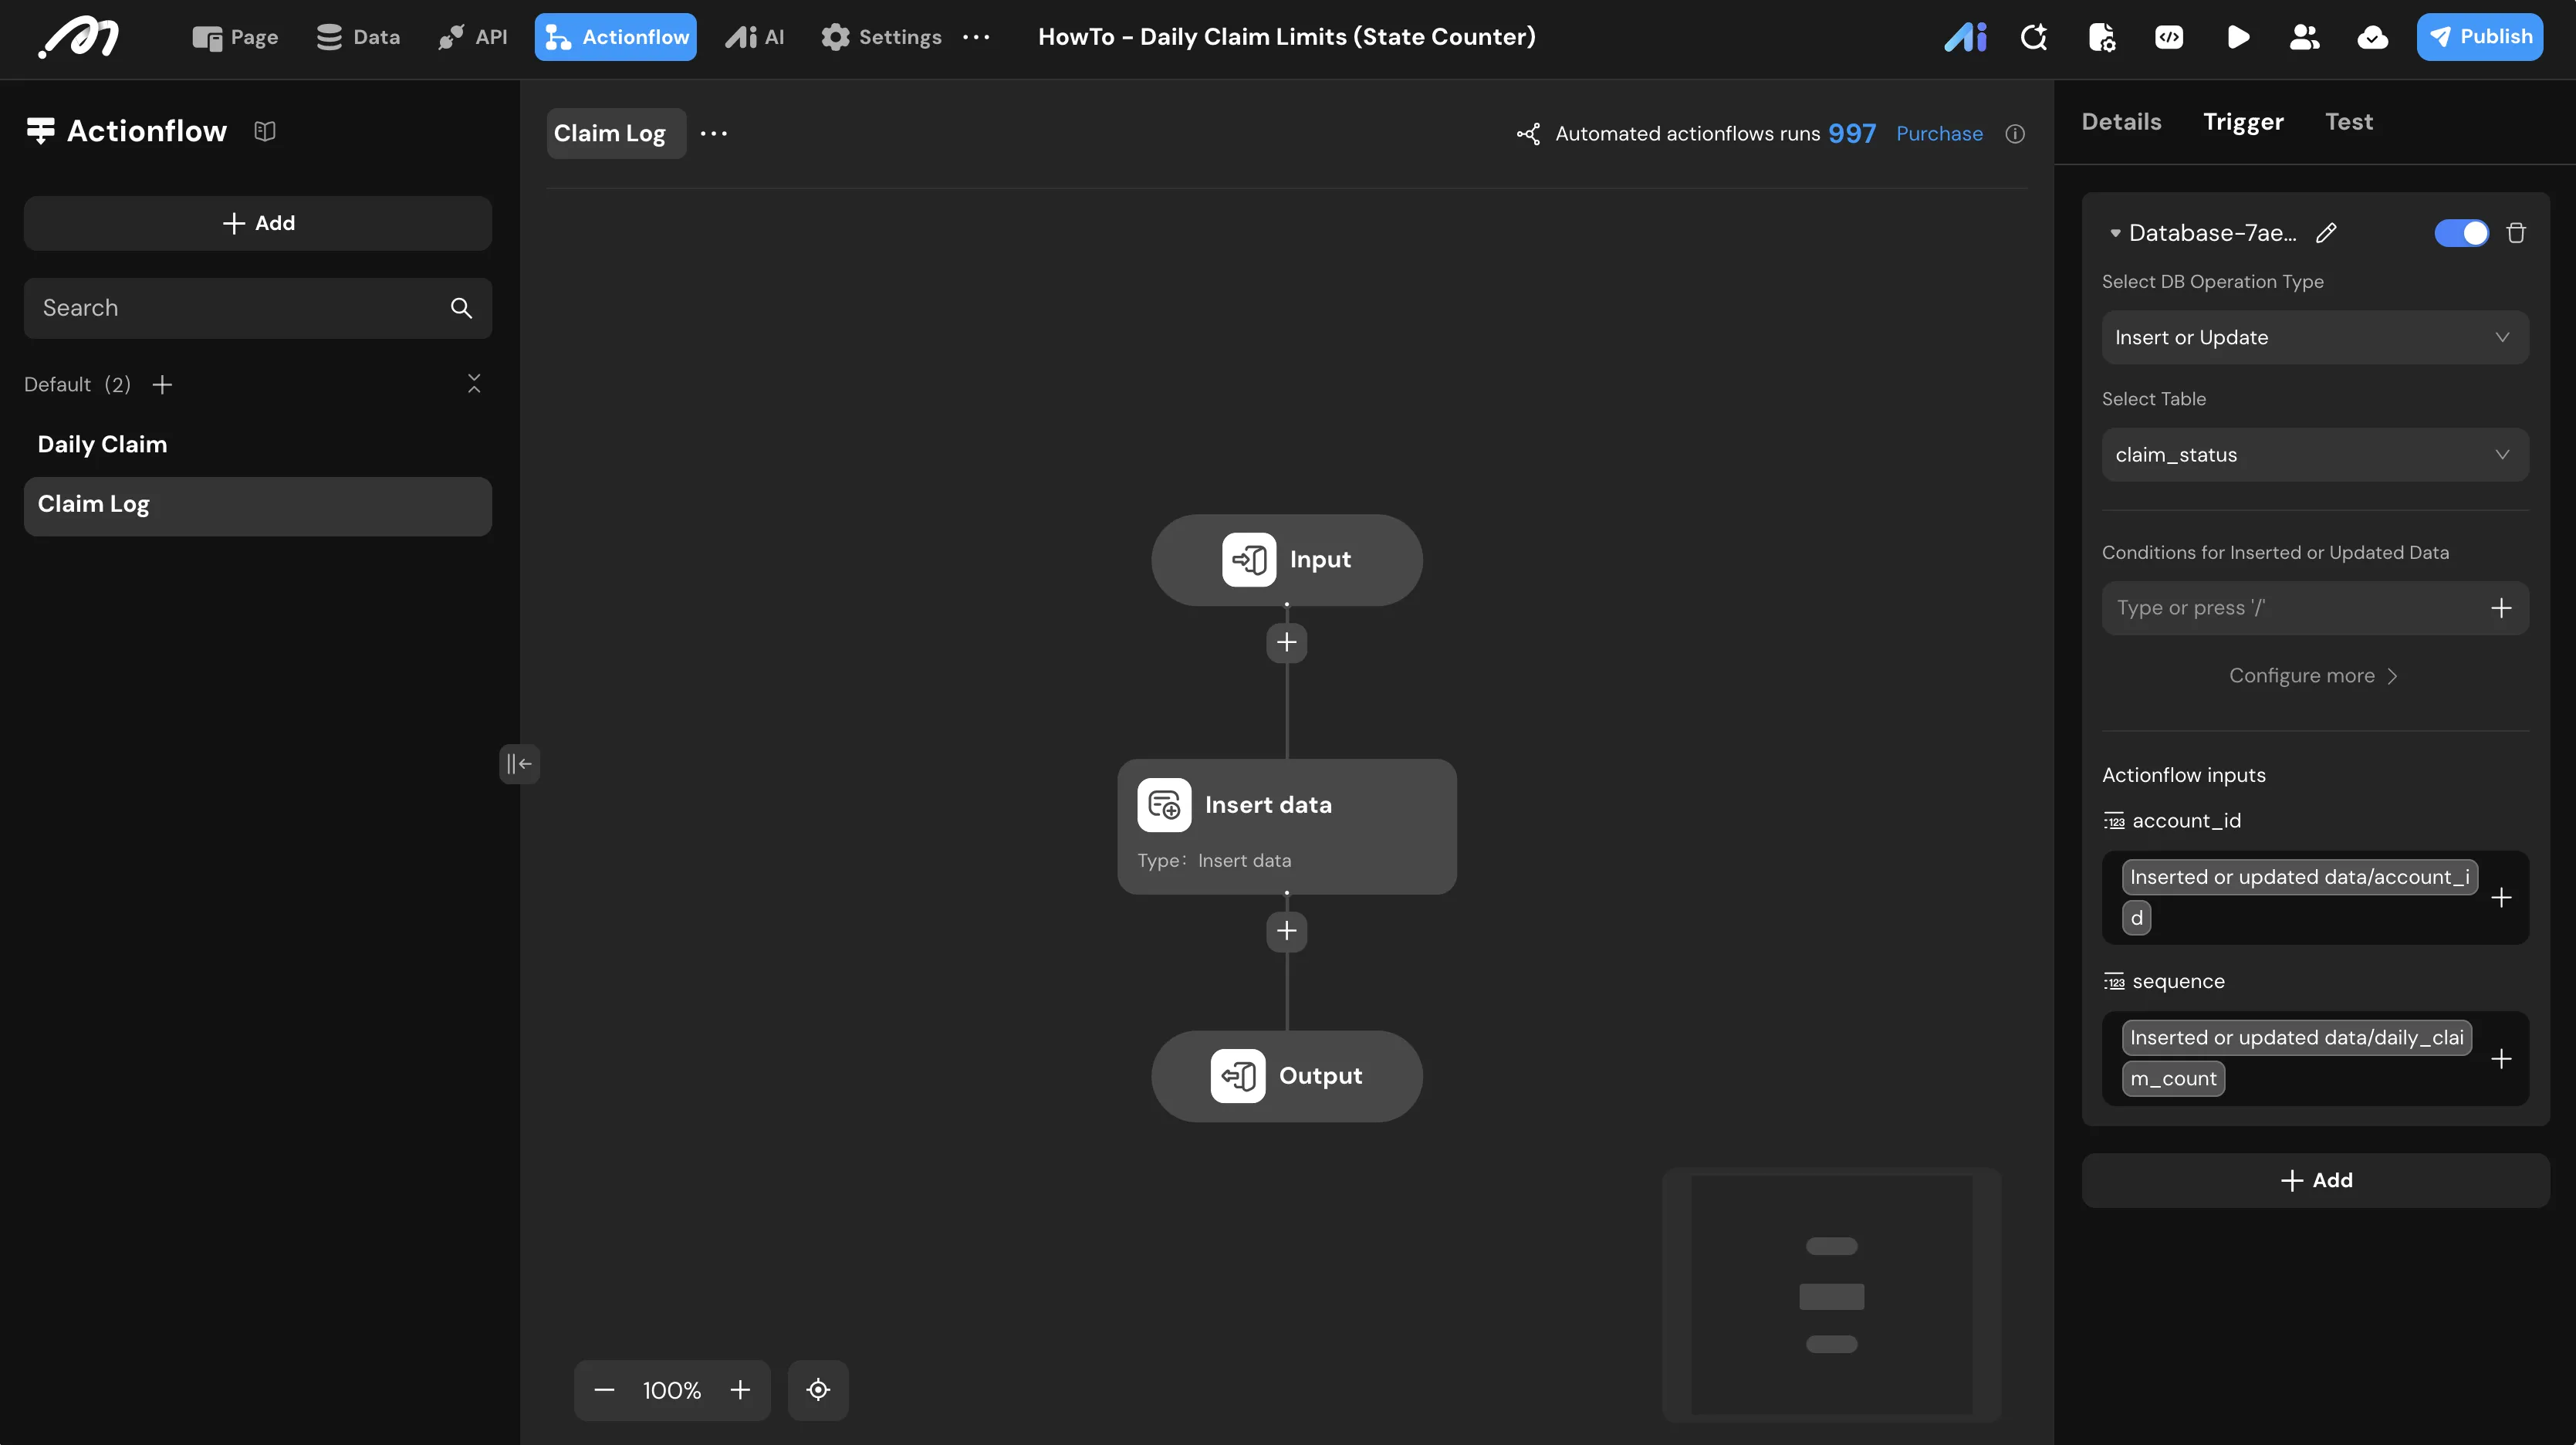
- Trigger type:
- Insert data: Add an Insert Record node named “Insert data” to persist the changes.
- Table:
claim_log. - Parameters:
claim_sequence->Actionflow data/Input/sequence,account_id->Actionflow data/Input/account_id.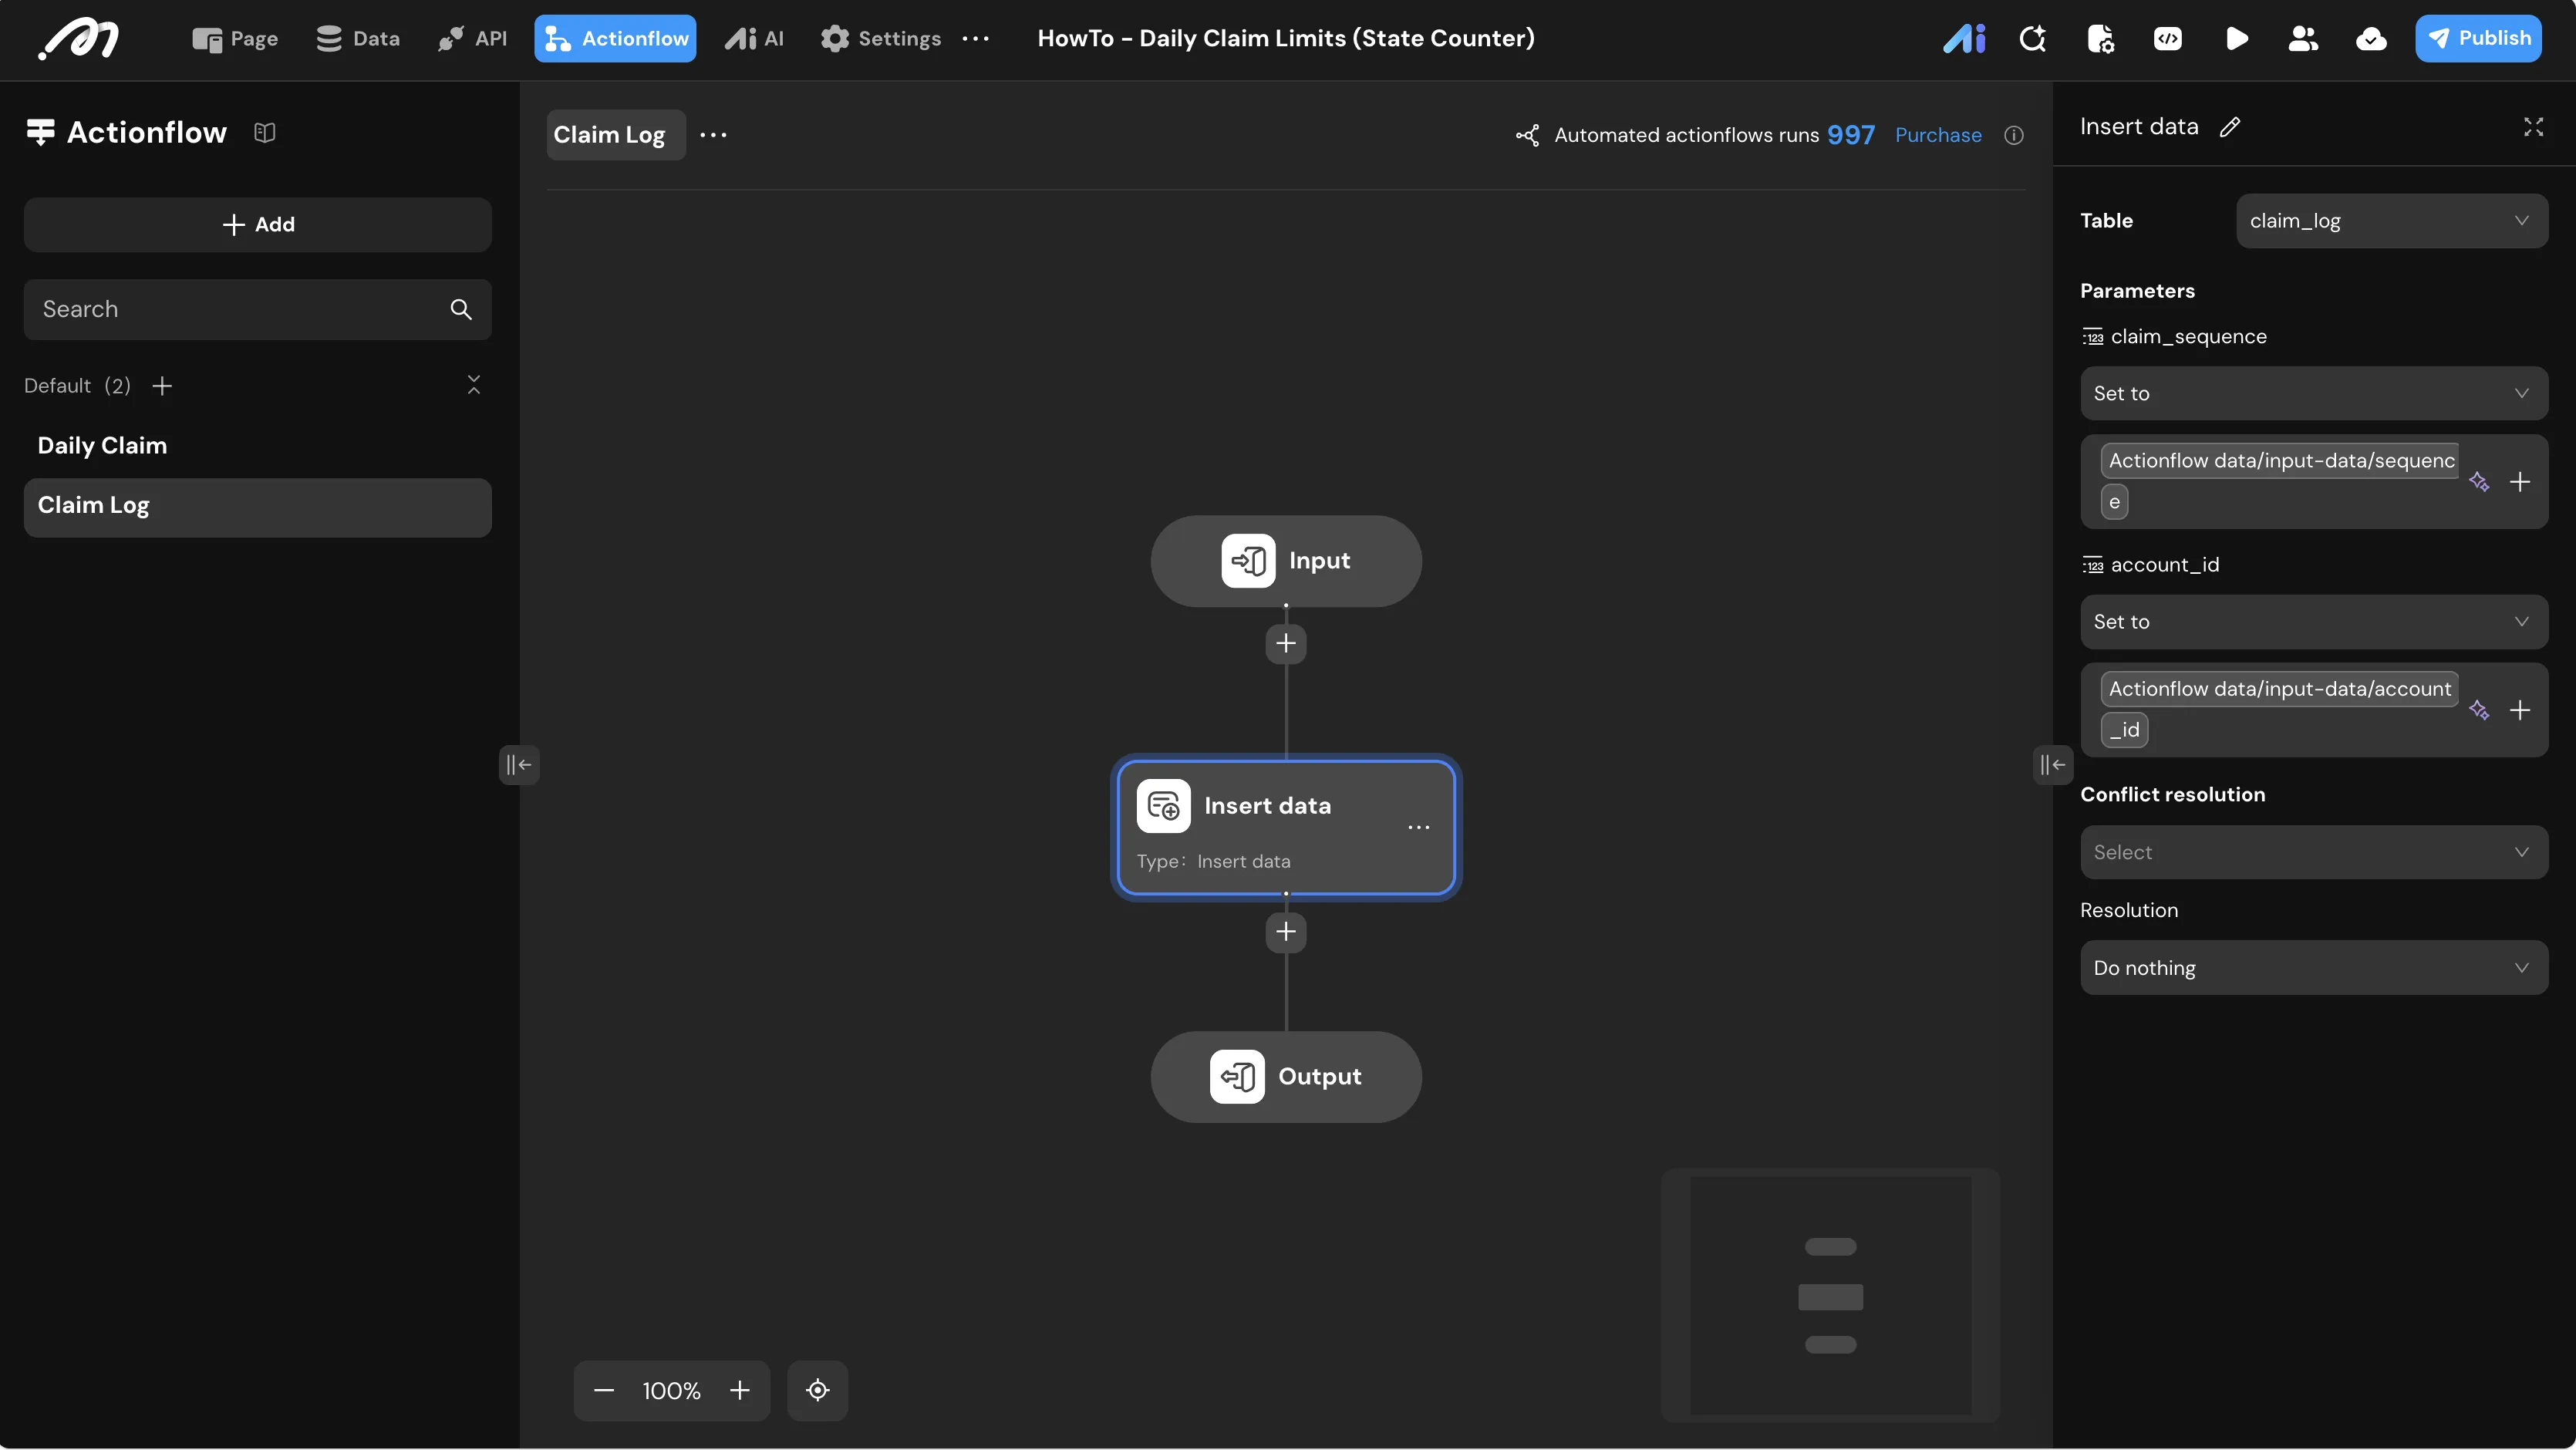
- Table:
By using an On database changed trigger set to INSERT_OR_UPDATE, you ensure that every change to the claim_status table is logged.
UI Construction & Interaction
Configure the frontend to dynamically display the claim status and handle user interactions based on the backend logic.
Page: Daily Reward Claim
-
Conditional View Setup: In the Component Tree, select the
Conditional Viewcomponent. Rename the default cases to reflect the business logic:Case Under 3 Times: For users who can still claim rewards.Case 3 Times Reached: For users who have hit their daily limit.Initializing: The default state for logged-out users.
-
Configure Active Button: Within
Case Under 3 Times, select theButton / Primarycomponent.- Button text: Click the Data Binding icon and select Condition.
- Case No Records: If
Logged in user->claim_status->daily_claim_countIs null, set the display data to0. - Case Record Exists: Else, bind the data to
Logged in user->claim_status->daily_claim_count. - Final String: Set the static text to
Claim Daily Reward ({Condition}/3).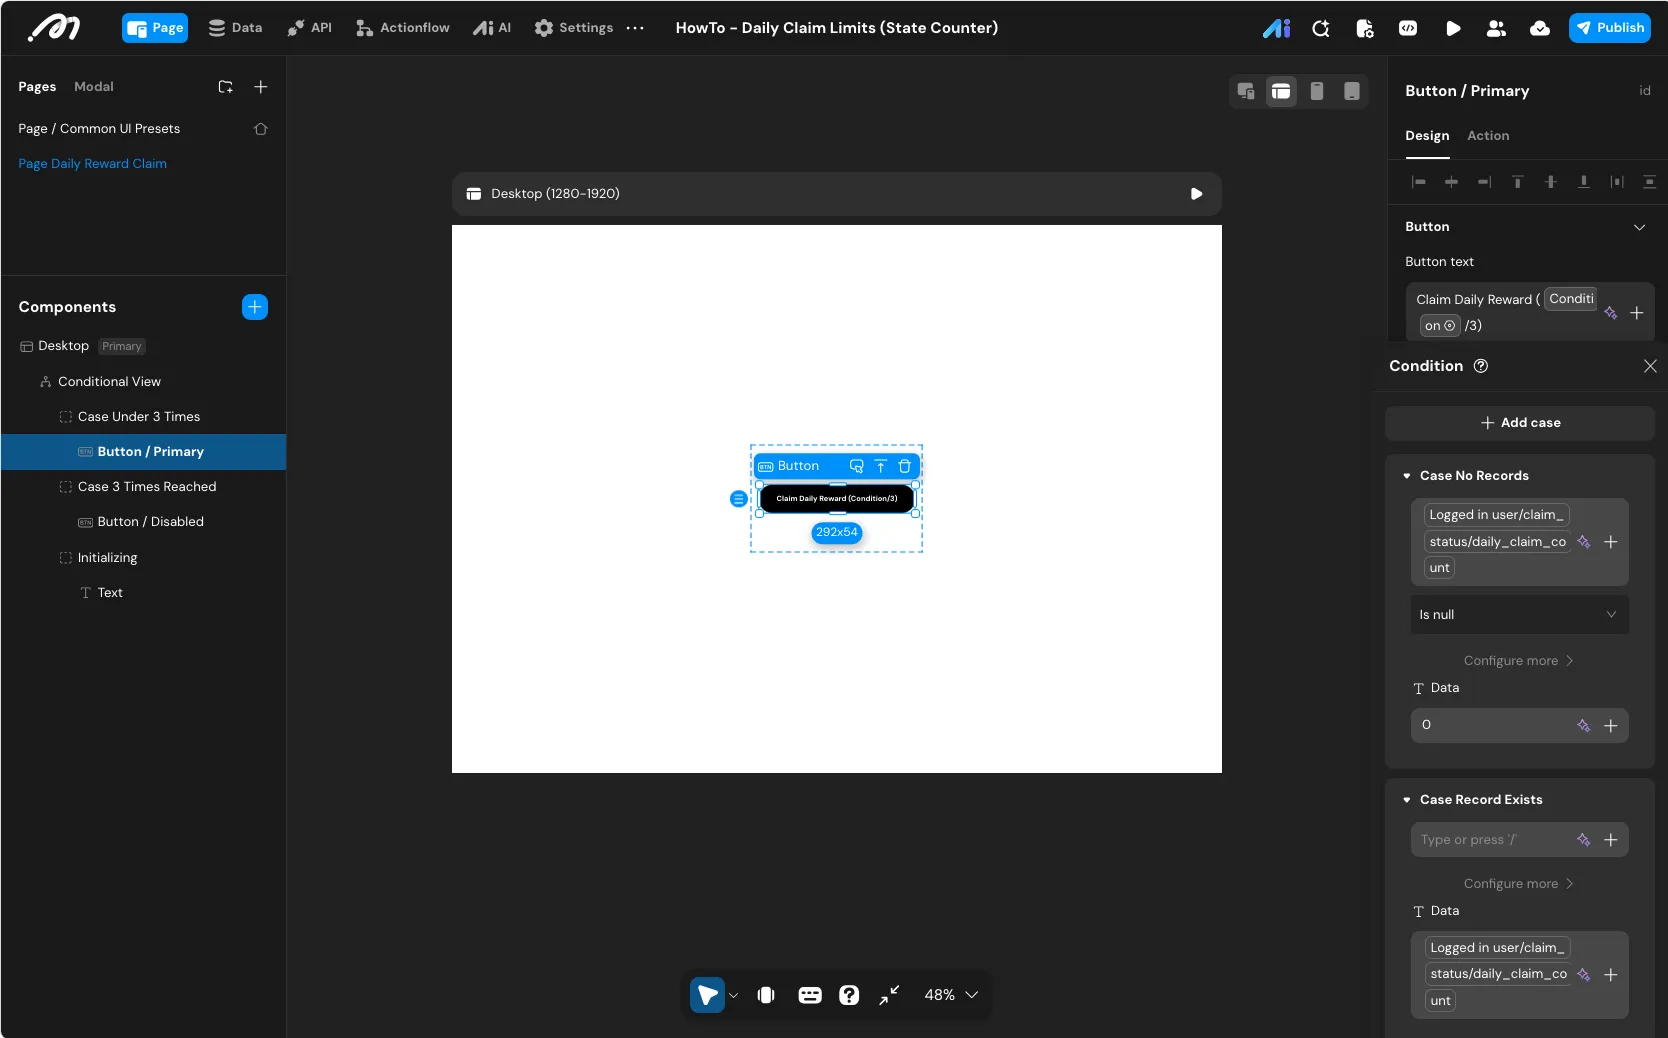
- Case No Records: If
- Button text: Click the Data Binding icon and select Condition.
-
Configure Button Interaction: Select the active button, go to the Interaction tab, and configure its behavior.
- Action: Add an
OnClickevent and select theDaily ClaimActionflow. Enable theLoading animationtoggle. - On success:
-
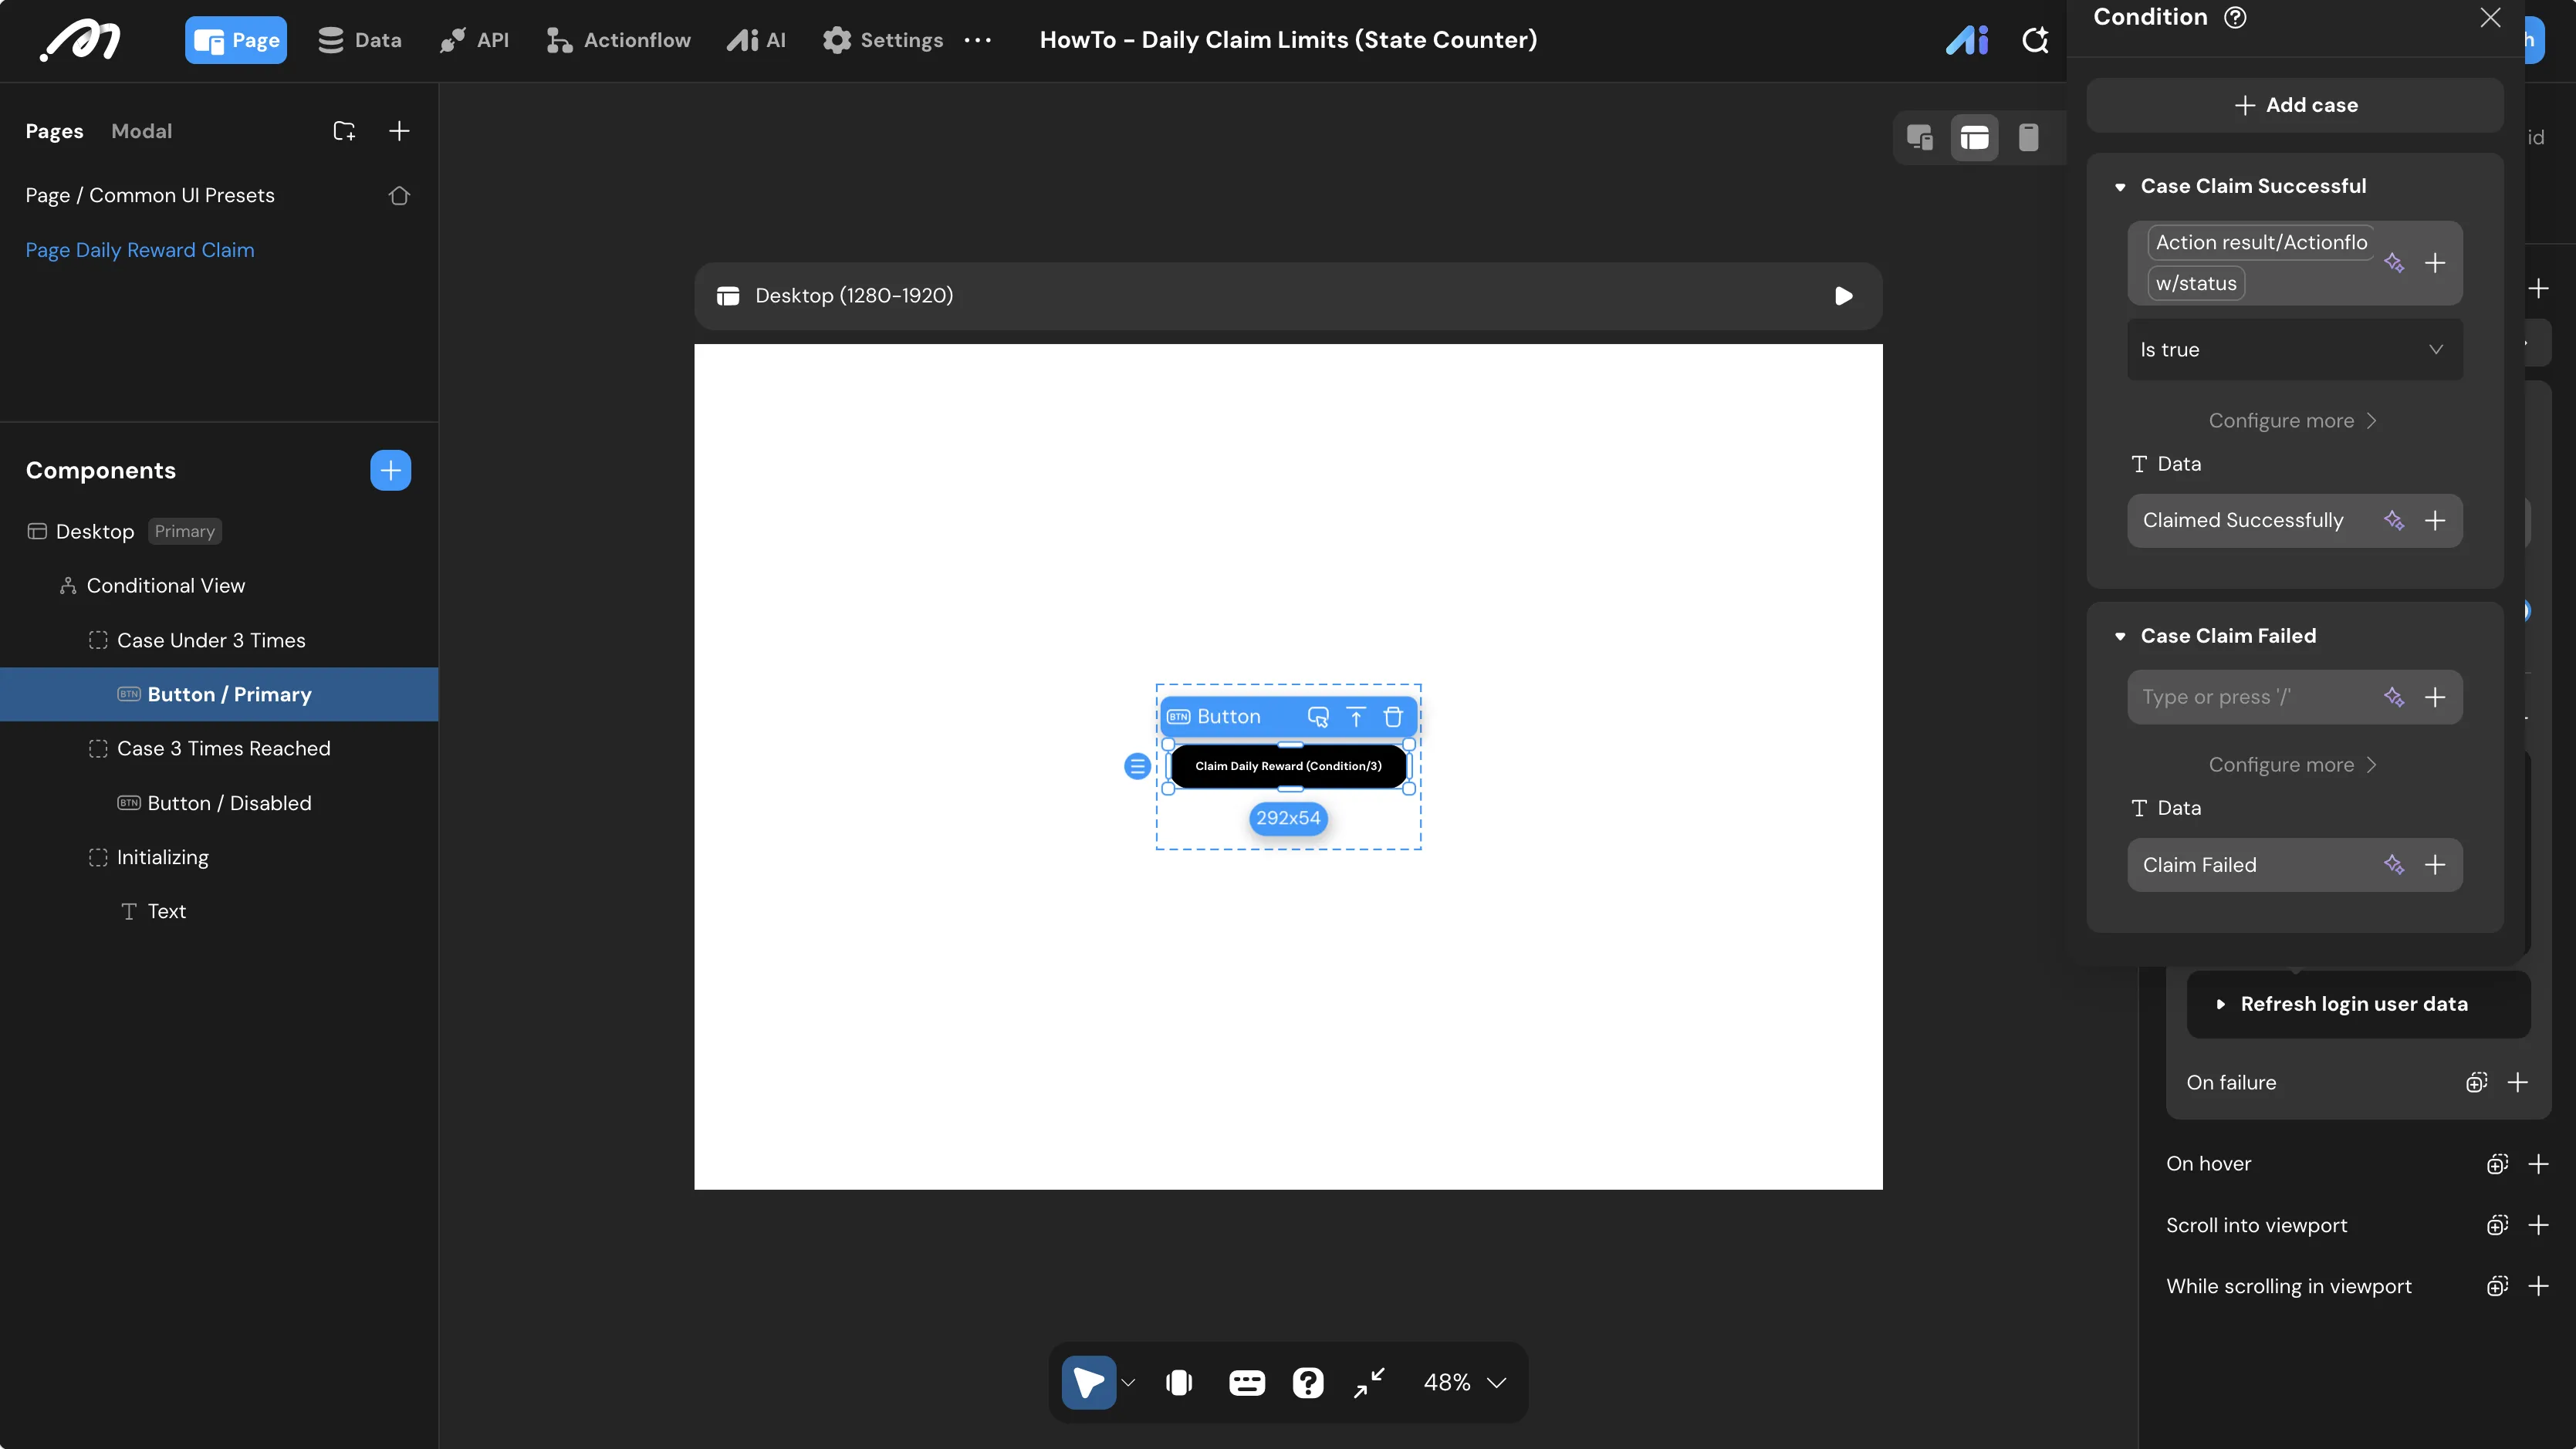
Show toast: Add a
Show toastnode. Click the Data Binding icon for theMessageand select Condition.- Case Claim Successful: If
Action result->Daily Claim->statusIs true, set the message toClaim successful. - Case Claim Failed: Else, set the message to
Claim failed.
- Case Claim Successful: If
-
Refresh login user data: Add a
Refresh login user datanode to ensure the frontend counter updates immediately after the database change.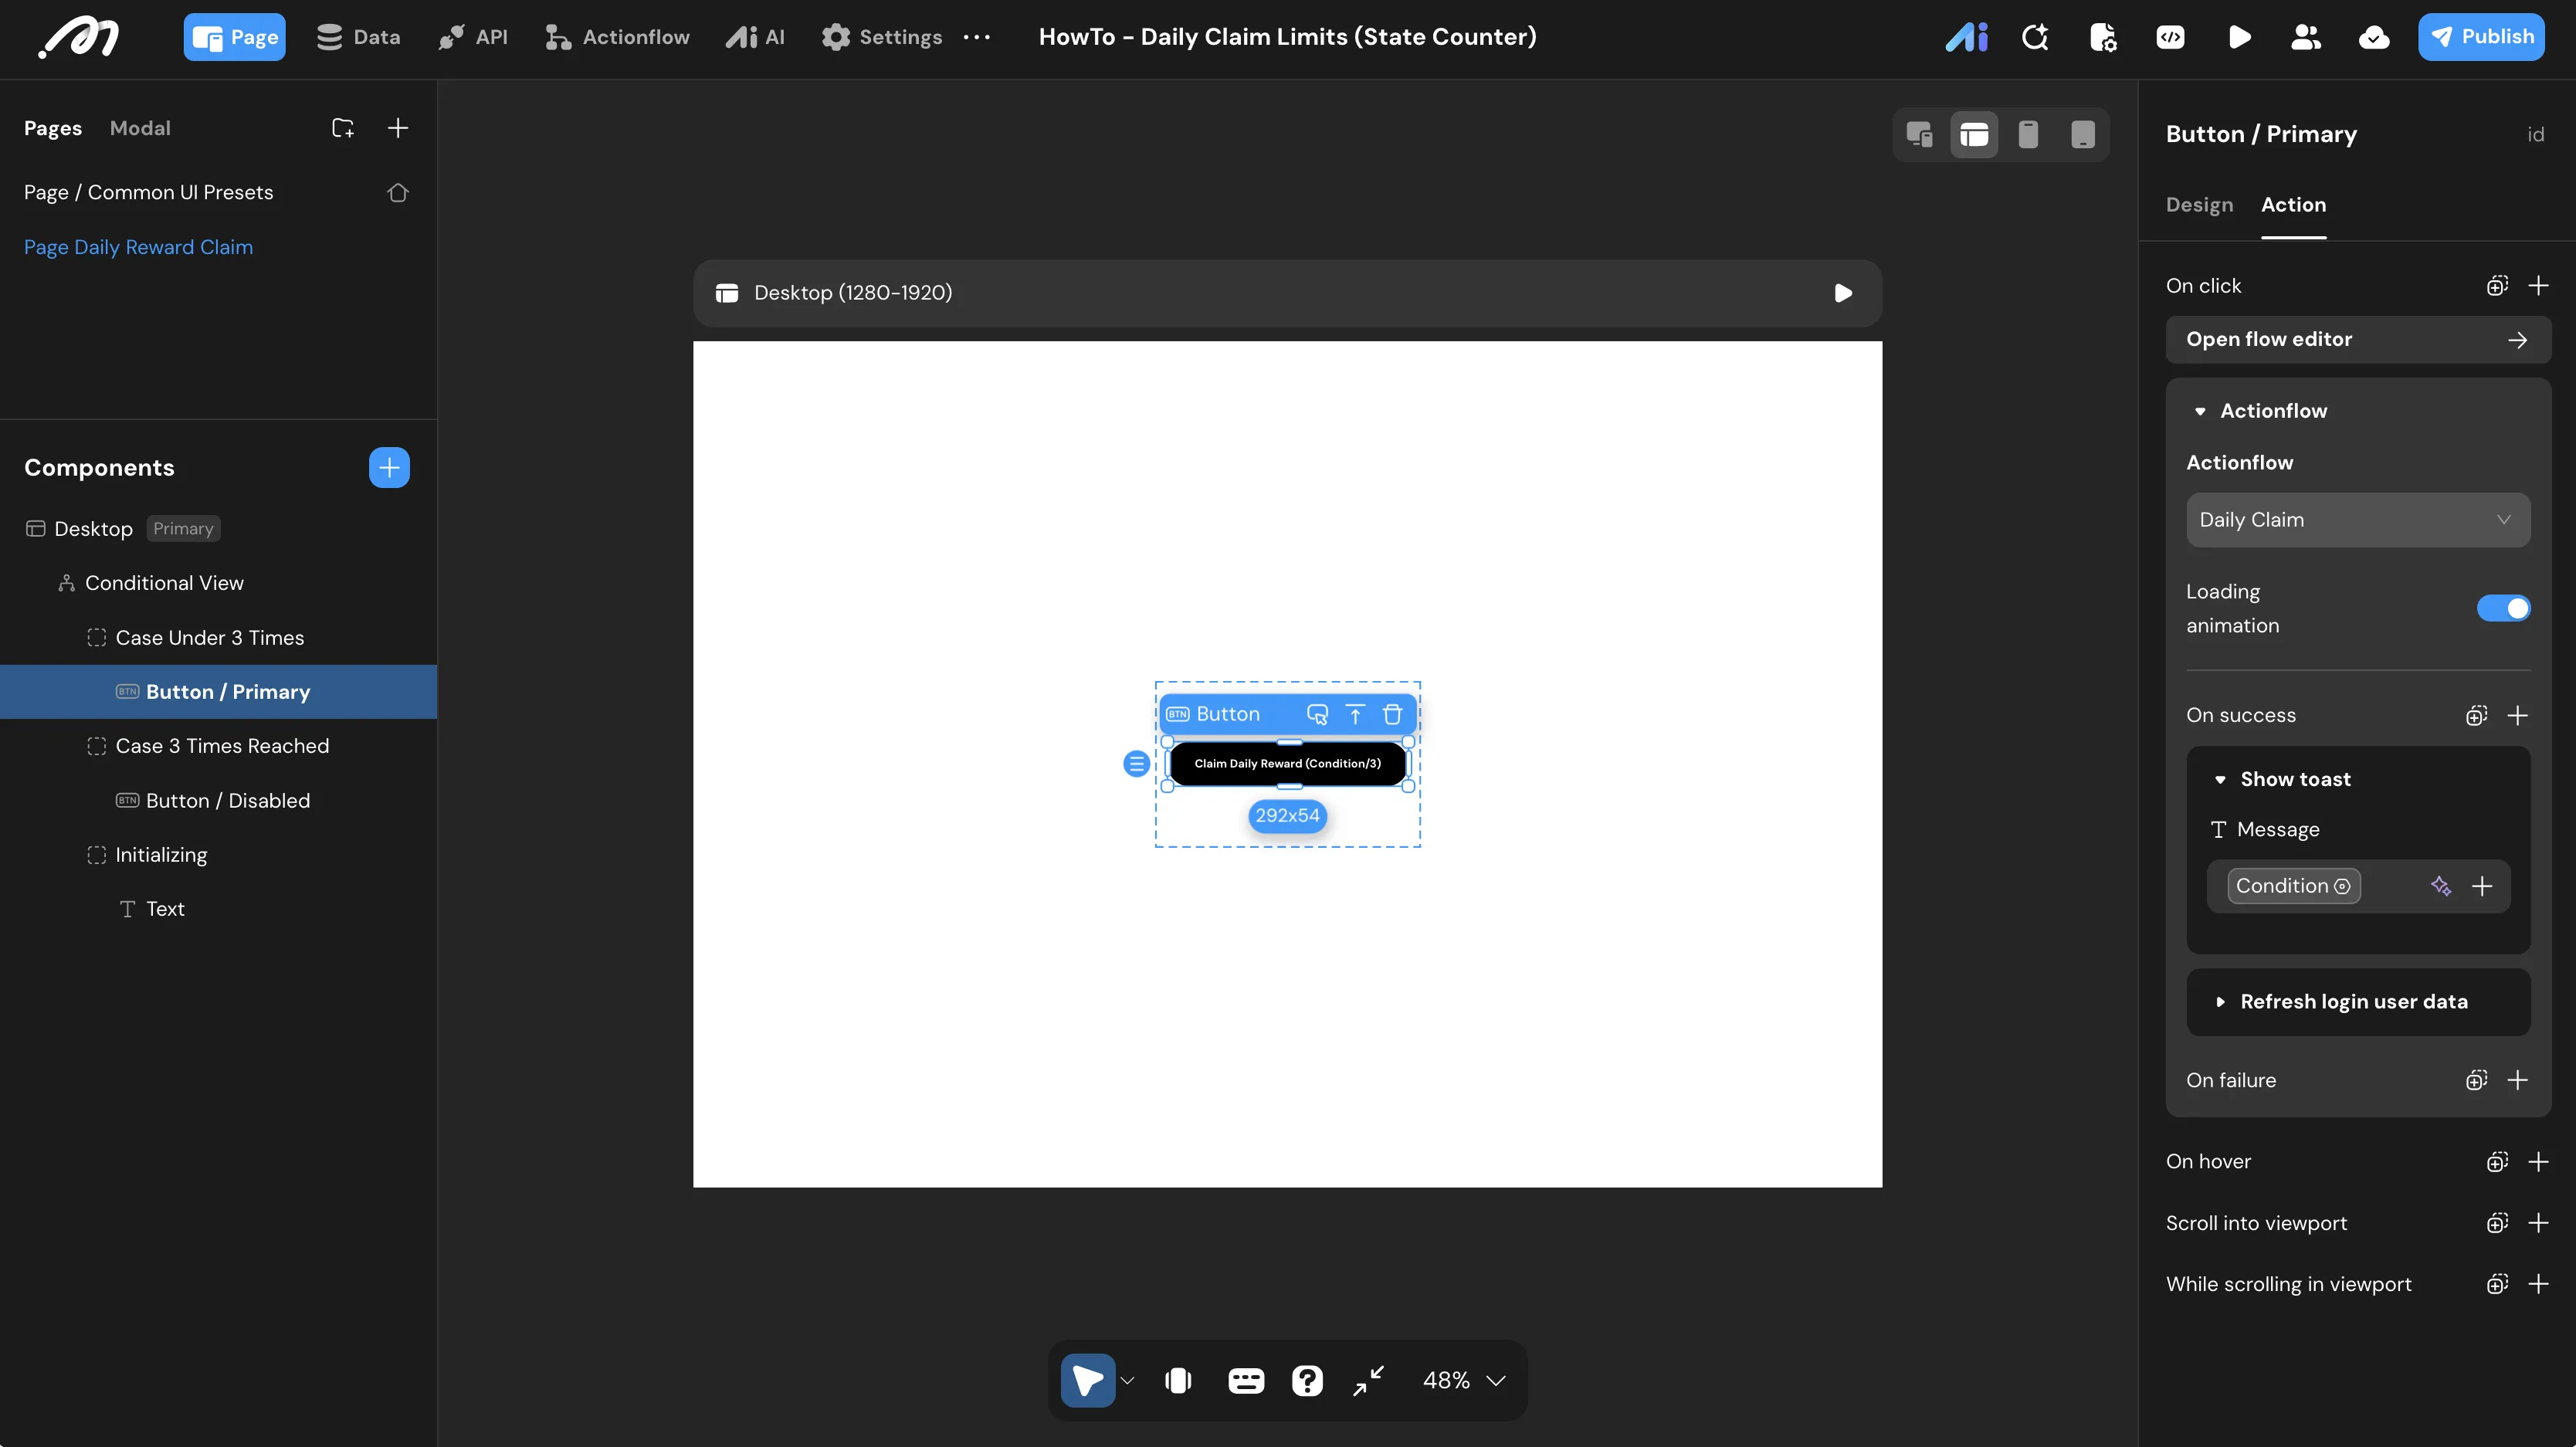
-
- Action: Add an
-
Configure Disabled Button: Within
Case 3 Times Reached, select theButton / Disabledcomponent to configure the UI when the daily limit is hit.- Button text: Click the Data Binding icon and select Condition (following the identical binding logic as the active button), or directly enter the static text:
Claim Daily Reward (3/3).
- Button text: Click the Data Binding icon and select Condition (following the identical binding logic as the active button), or directly enter the static text:
-
Configure Initializing View: Within
Initializing, select theTextcomponent to prompt unauthenticated users.- Text text: Directly enter the static text string:
Please log in first.
- Text text: Directly enter the static text string:
-
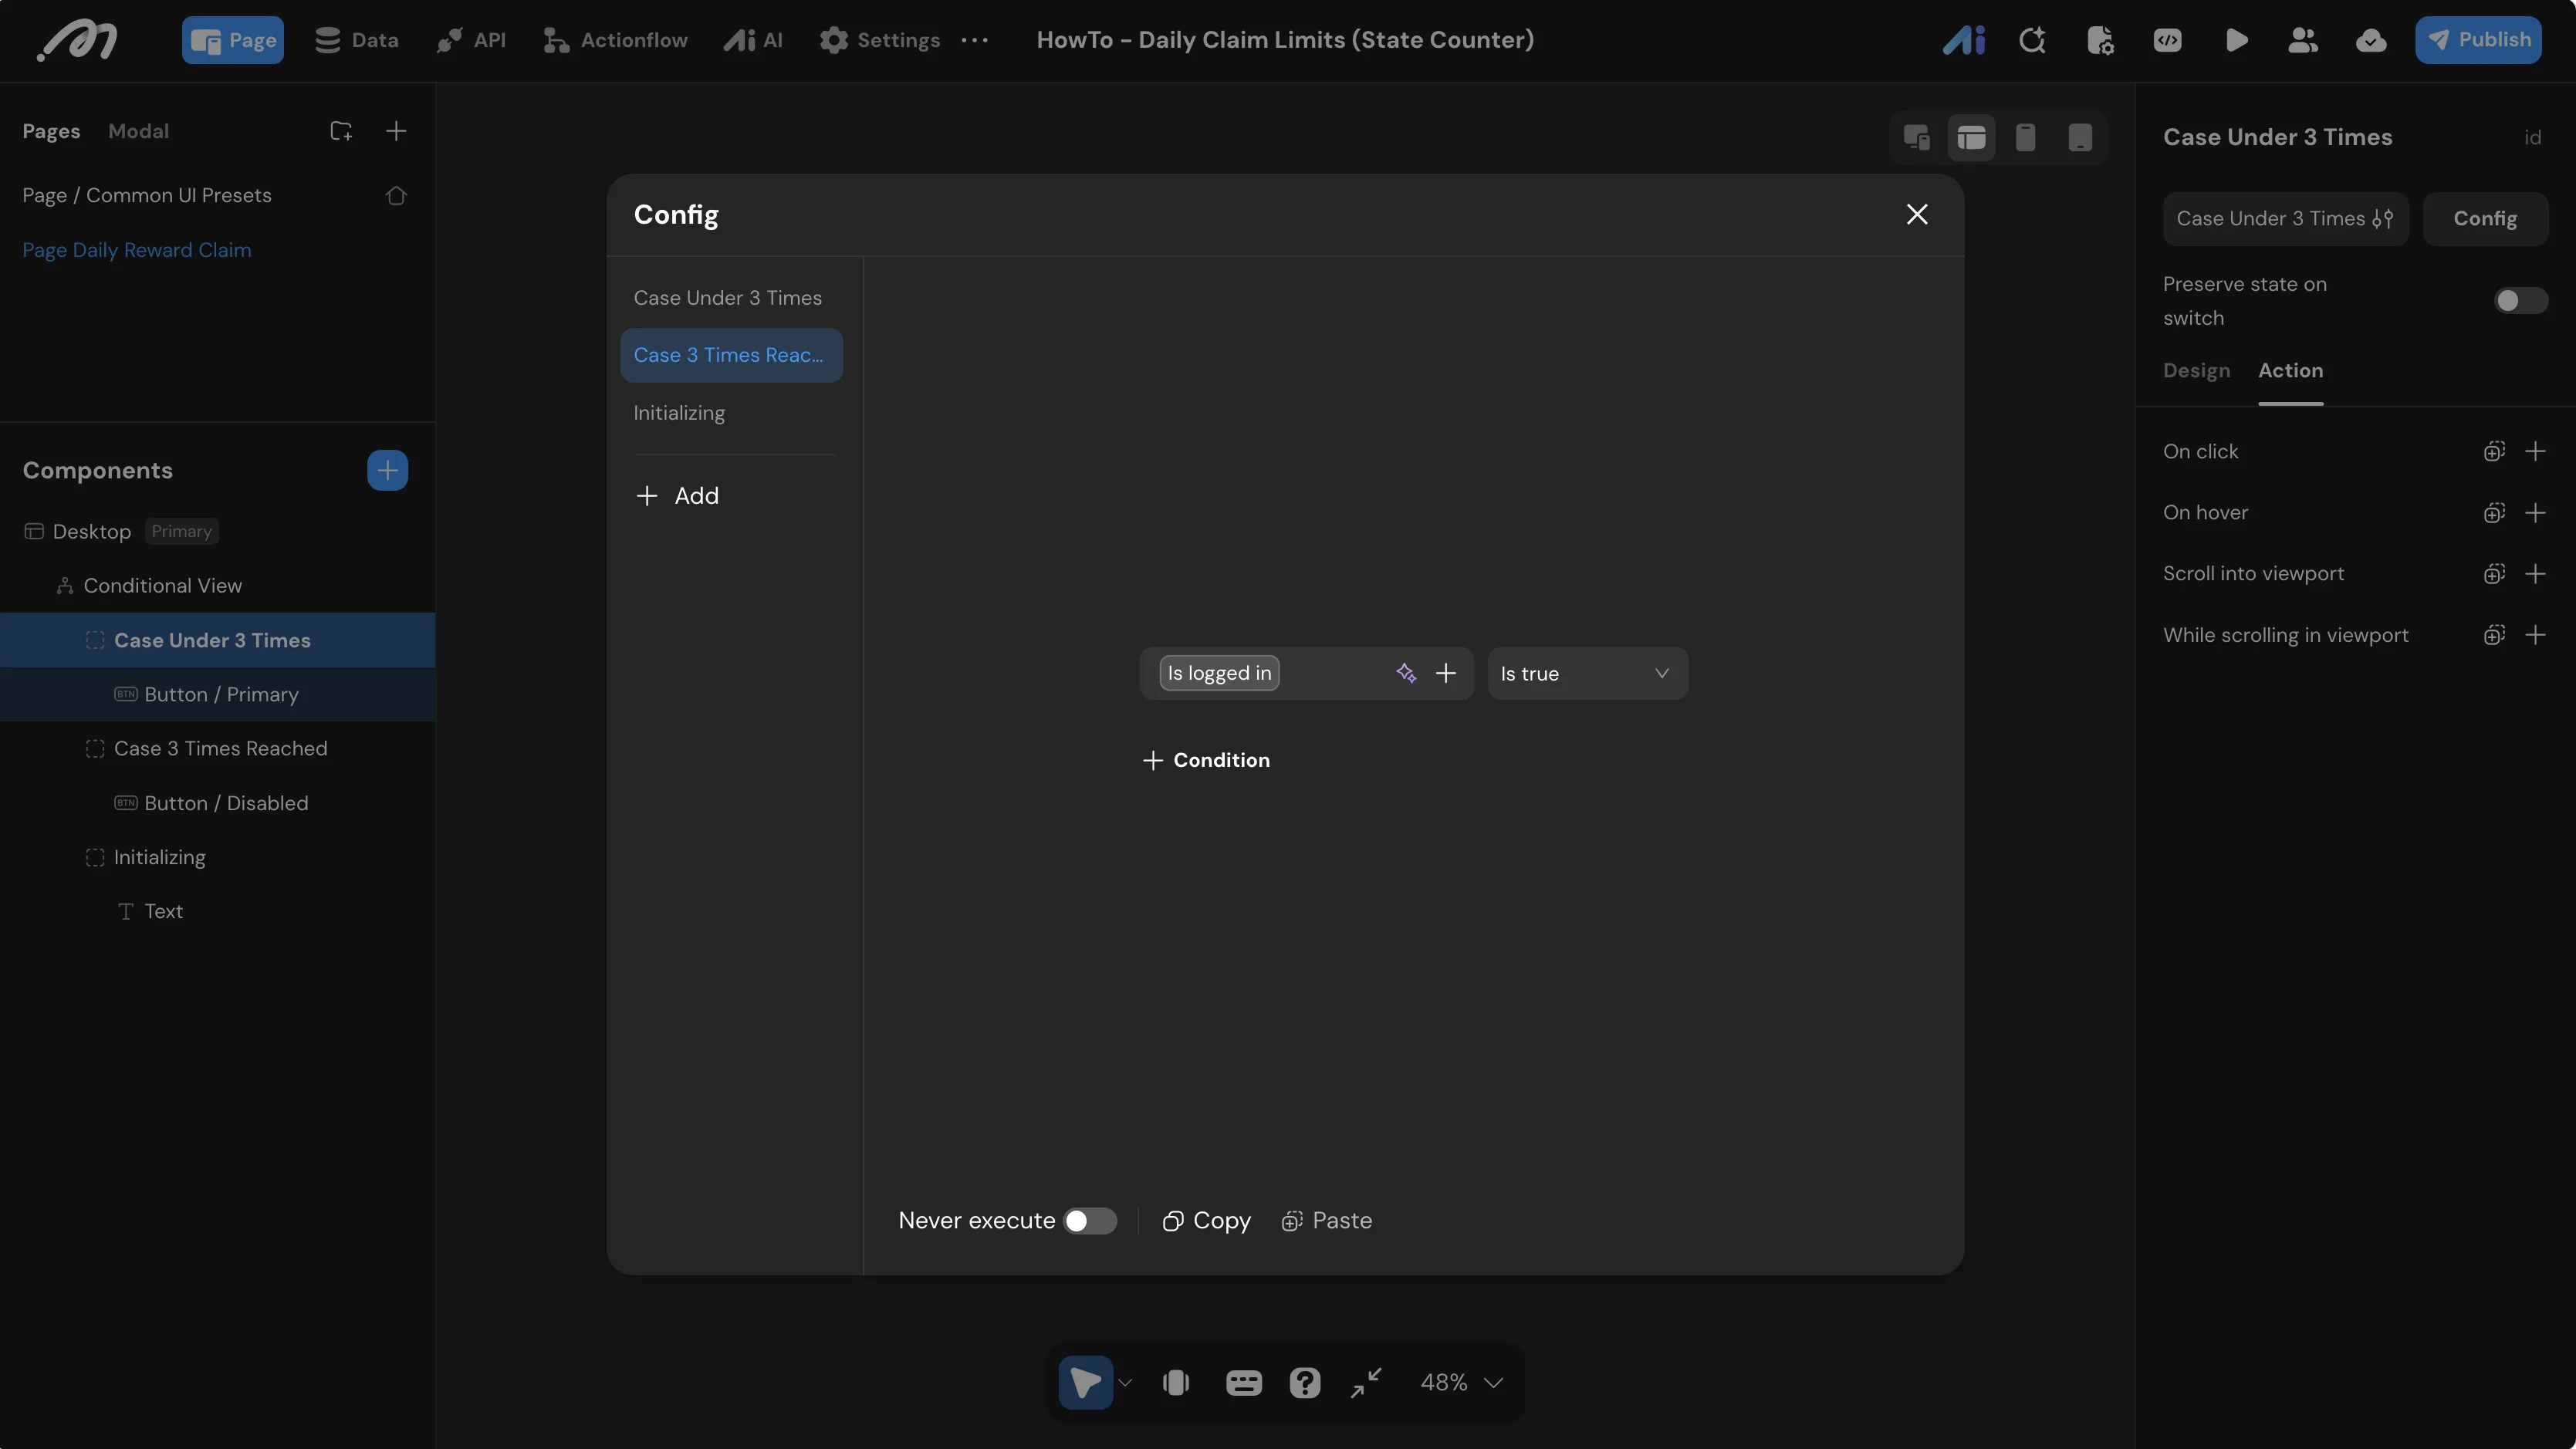
Configure Conditional View Logic: Select the master
Conditional Viewand click Config in the right panel to define when each case is displayed.- Case Under 3 Times:
- Add a condition:
Global->Is logged inIs true. - Add an And condition:
Logged in user->claim_status->daily_claim_countLess than3.
- Add a condition:
- Case 3 Times Reached:
- Add a condition:
Global->Is logged inIs true. - Add an And condition:
Logged in user->claim_status->daily_claim_countGreater than or equal3.
- Add a condition:
- Initializing:
-
Add a condition:
Global->Is logged inIs false.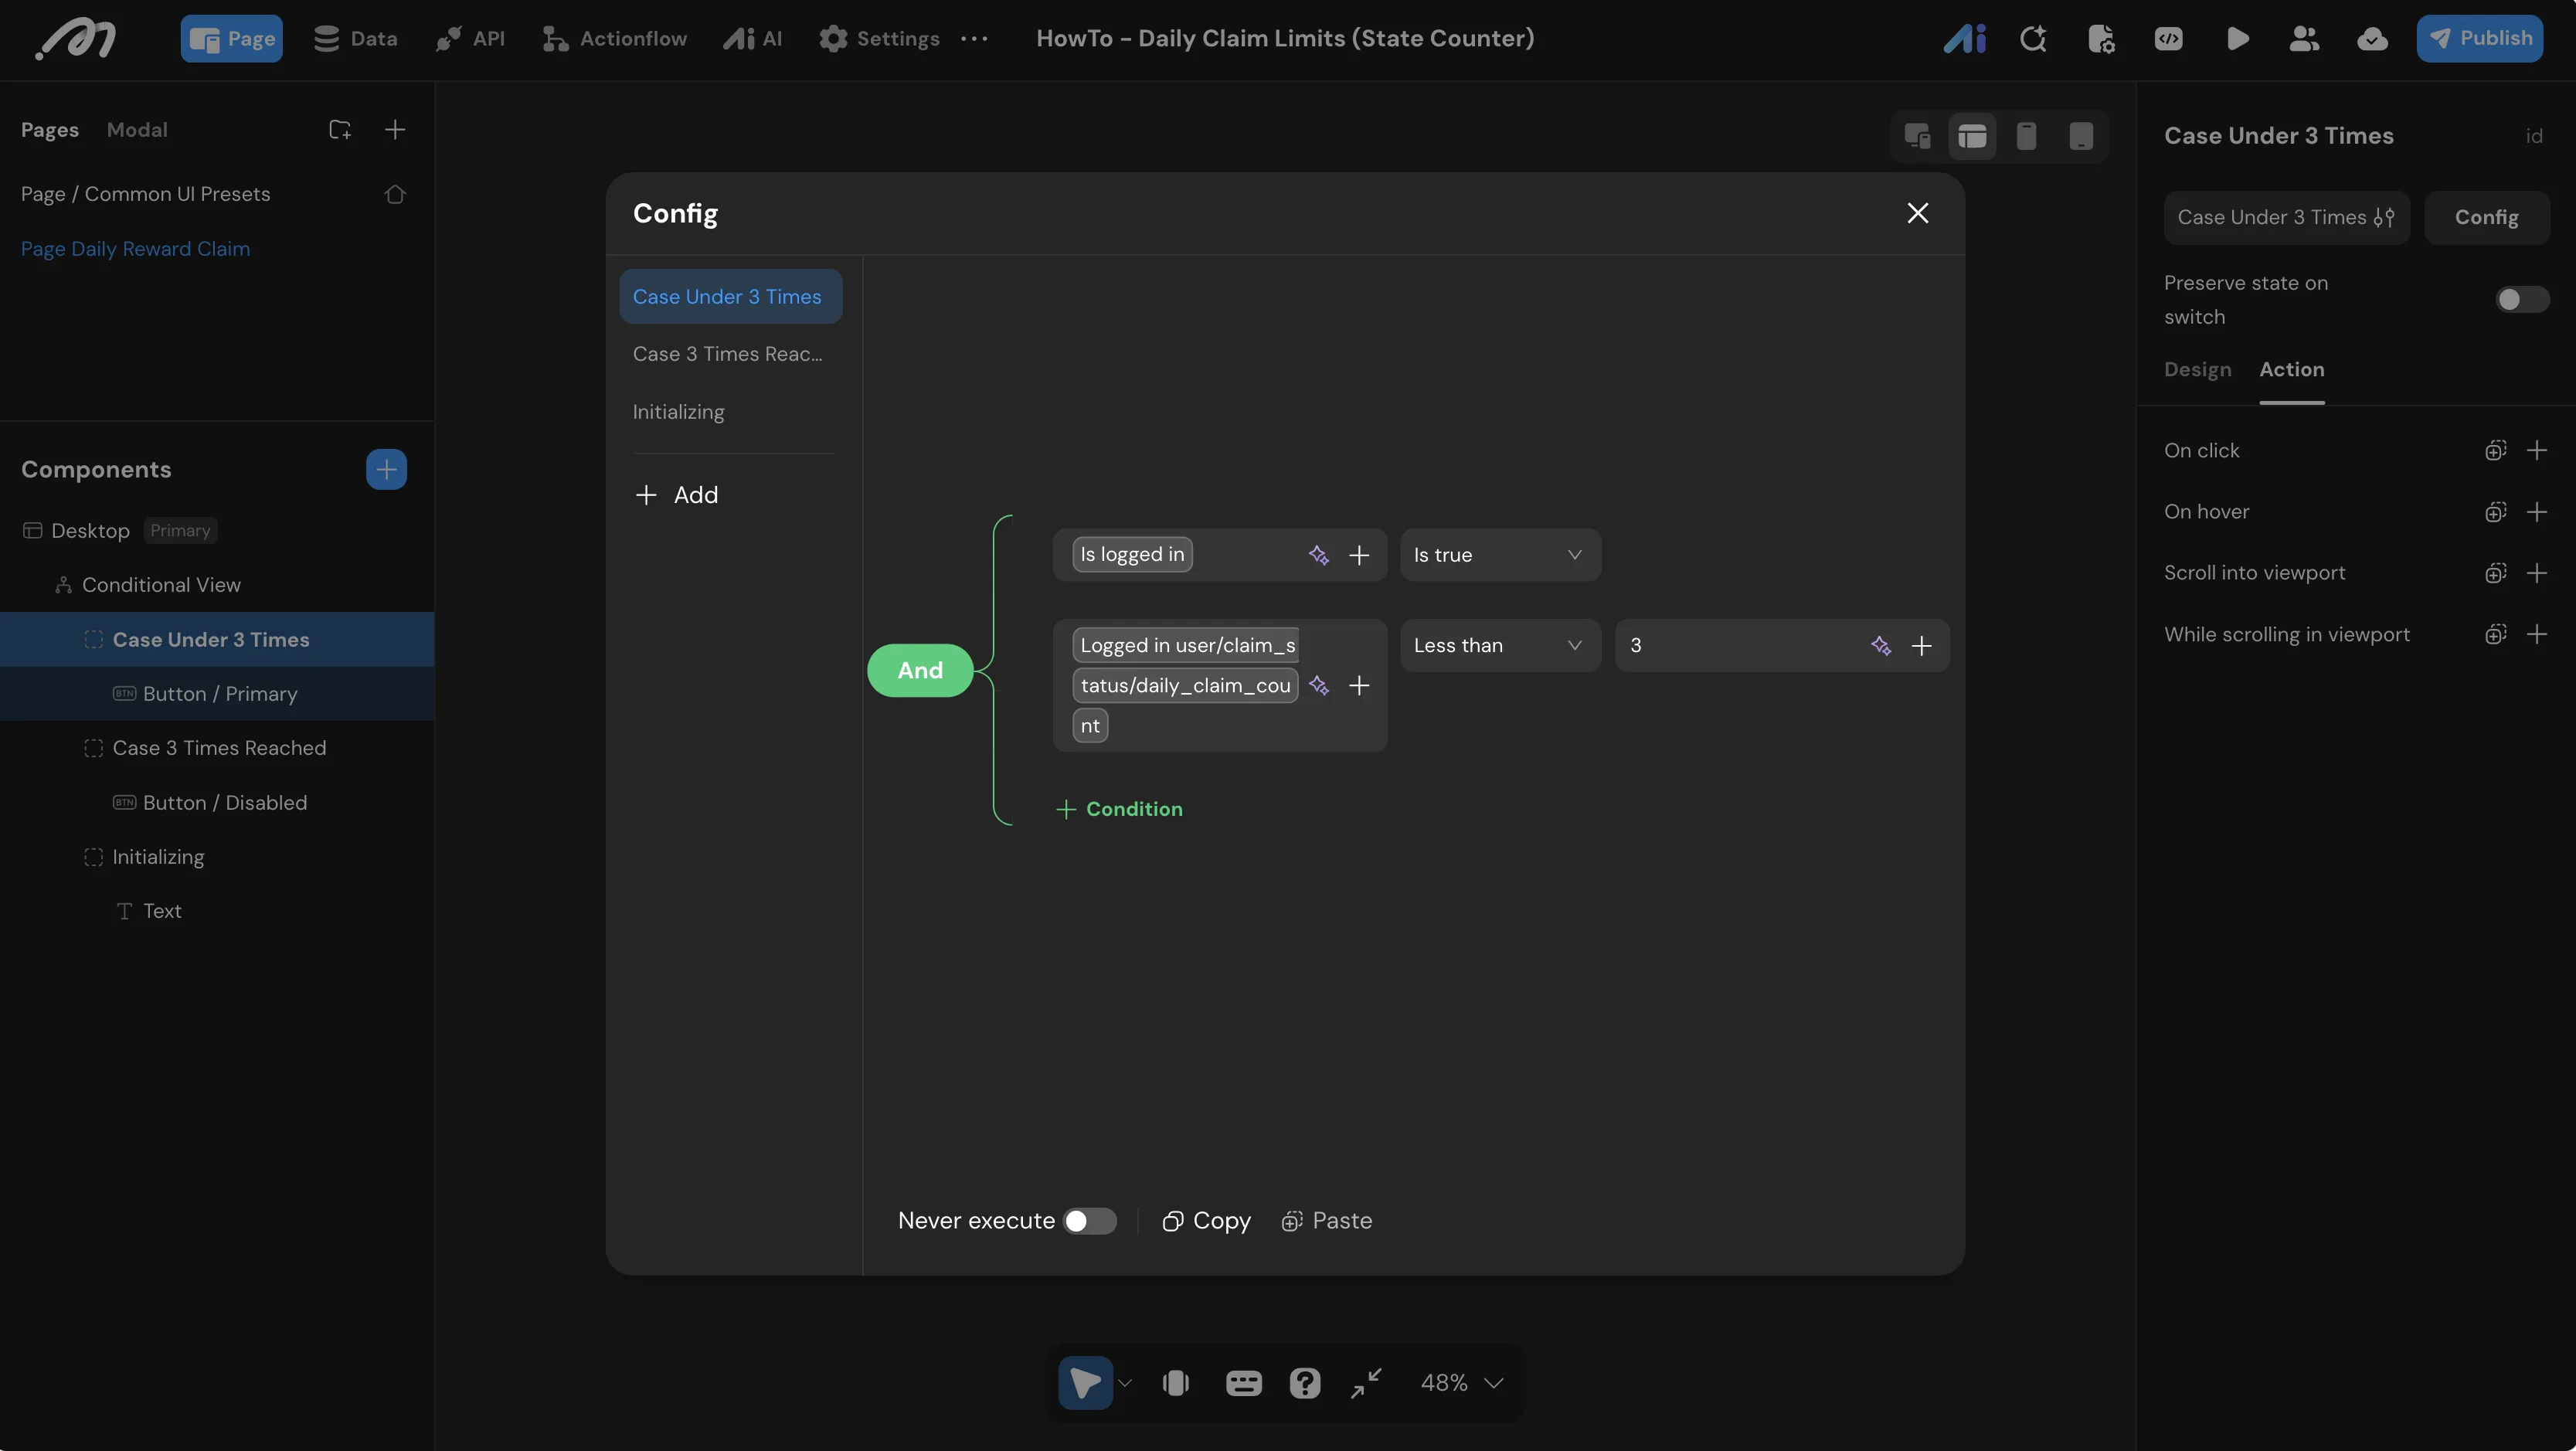
-
- Case Under 3 Times:
Verification
Step 1: Logged-out State
- Click the Preview icon in the top right.
- Expected Result: The page displays the text “Please log in first.”
Step 2: First Claim
- Use the Login simulation tool in the bottom bar. Click Create new and select the
Logged-in userrole. - Click the button labeled Claim Daily Reward (0/3).
- Expected Result: A “Claim successful” toast appears, and the button label updates to Claim Daily Reward (1/3).
Step 3: Reaching the Limit
- Click the button two more times.
- Expected Result: After the third claim, the button label shows Claim Daily Reward (3/3) and becomes disabled (switching to the
Case 3 Times ReachedUI).
Step 4: Database Audit
- Navigate to the Data Source tab.
- Check the
claim_statustable: Thedaily_claim_countshould be3. - Check the
claim_logtable: There should be three distinct records withclaim_sequencevalues of1,2, and3, all linked to the sameaccount_id.
If the counter does not update on the frontend, verify that the Refresh login user data node is correctly placed in the On success branch of the button’s OnClick interaction.