Daily Claim Limit (Unique Constraint)
Demo Project
https://editor.momen.app/tool/z7Bx4APAJrO/WEB?code=LafkRsCNdfdhq&ref=0562398
Introduction
- Goal: Create a daily reward system where users can claim a reward up to 3 times per day, with database-level protection against concurrent over-claiming.
- Use Cases: Daily check-ins, limited coupon distributions, or daily point systems.
- Core Logic: Use a Composite Unique Constraint in the database (Account + Date + Sequence) combined with an Actionflow that calculates the next sequence number and handles insertion conflicts.
Steps
This tutorial uses pre-styled layout blocks from the “Common UI Presets ” template page. These presets include basic styling and typography only; they contain no conditional logic, database bindings, or Actionflows. You can copy them into your own app to skip manual styling and focus on the core logic.
Data Storage
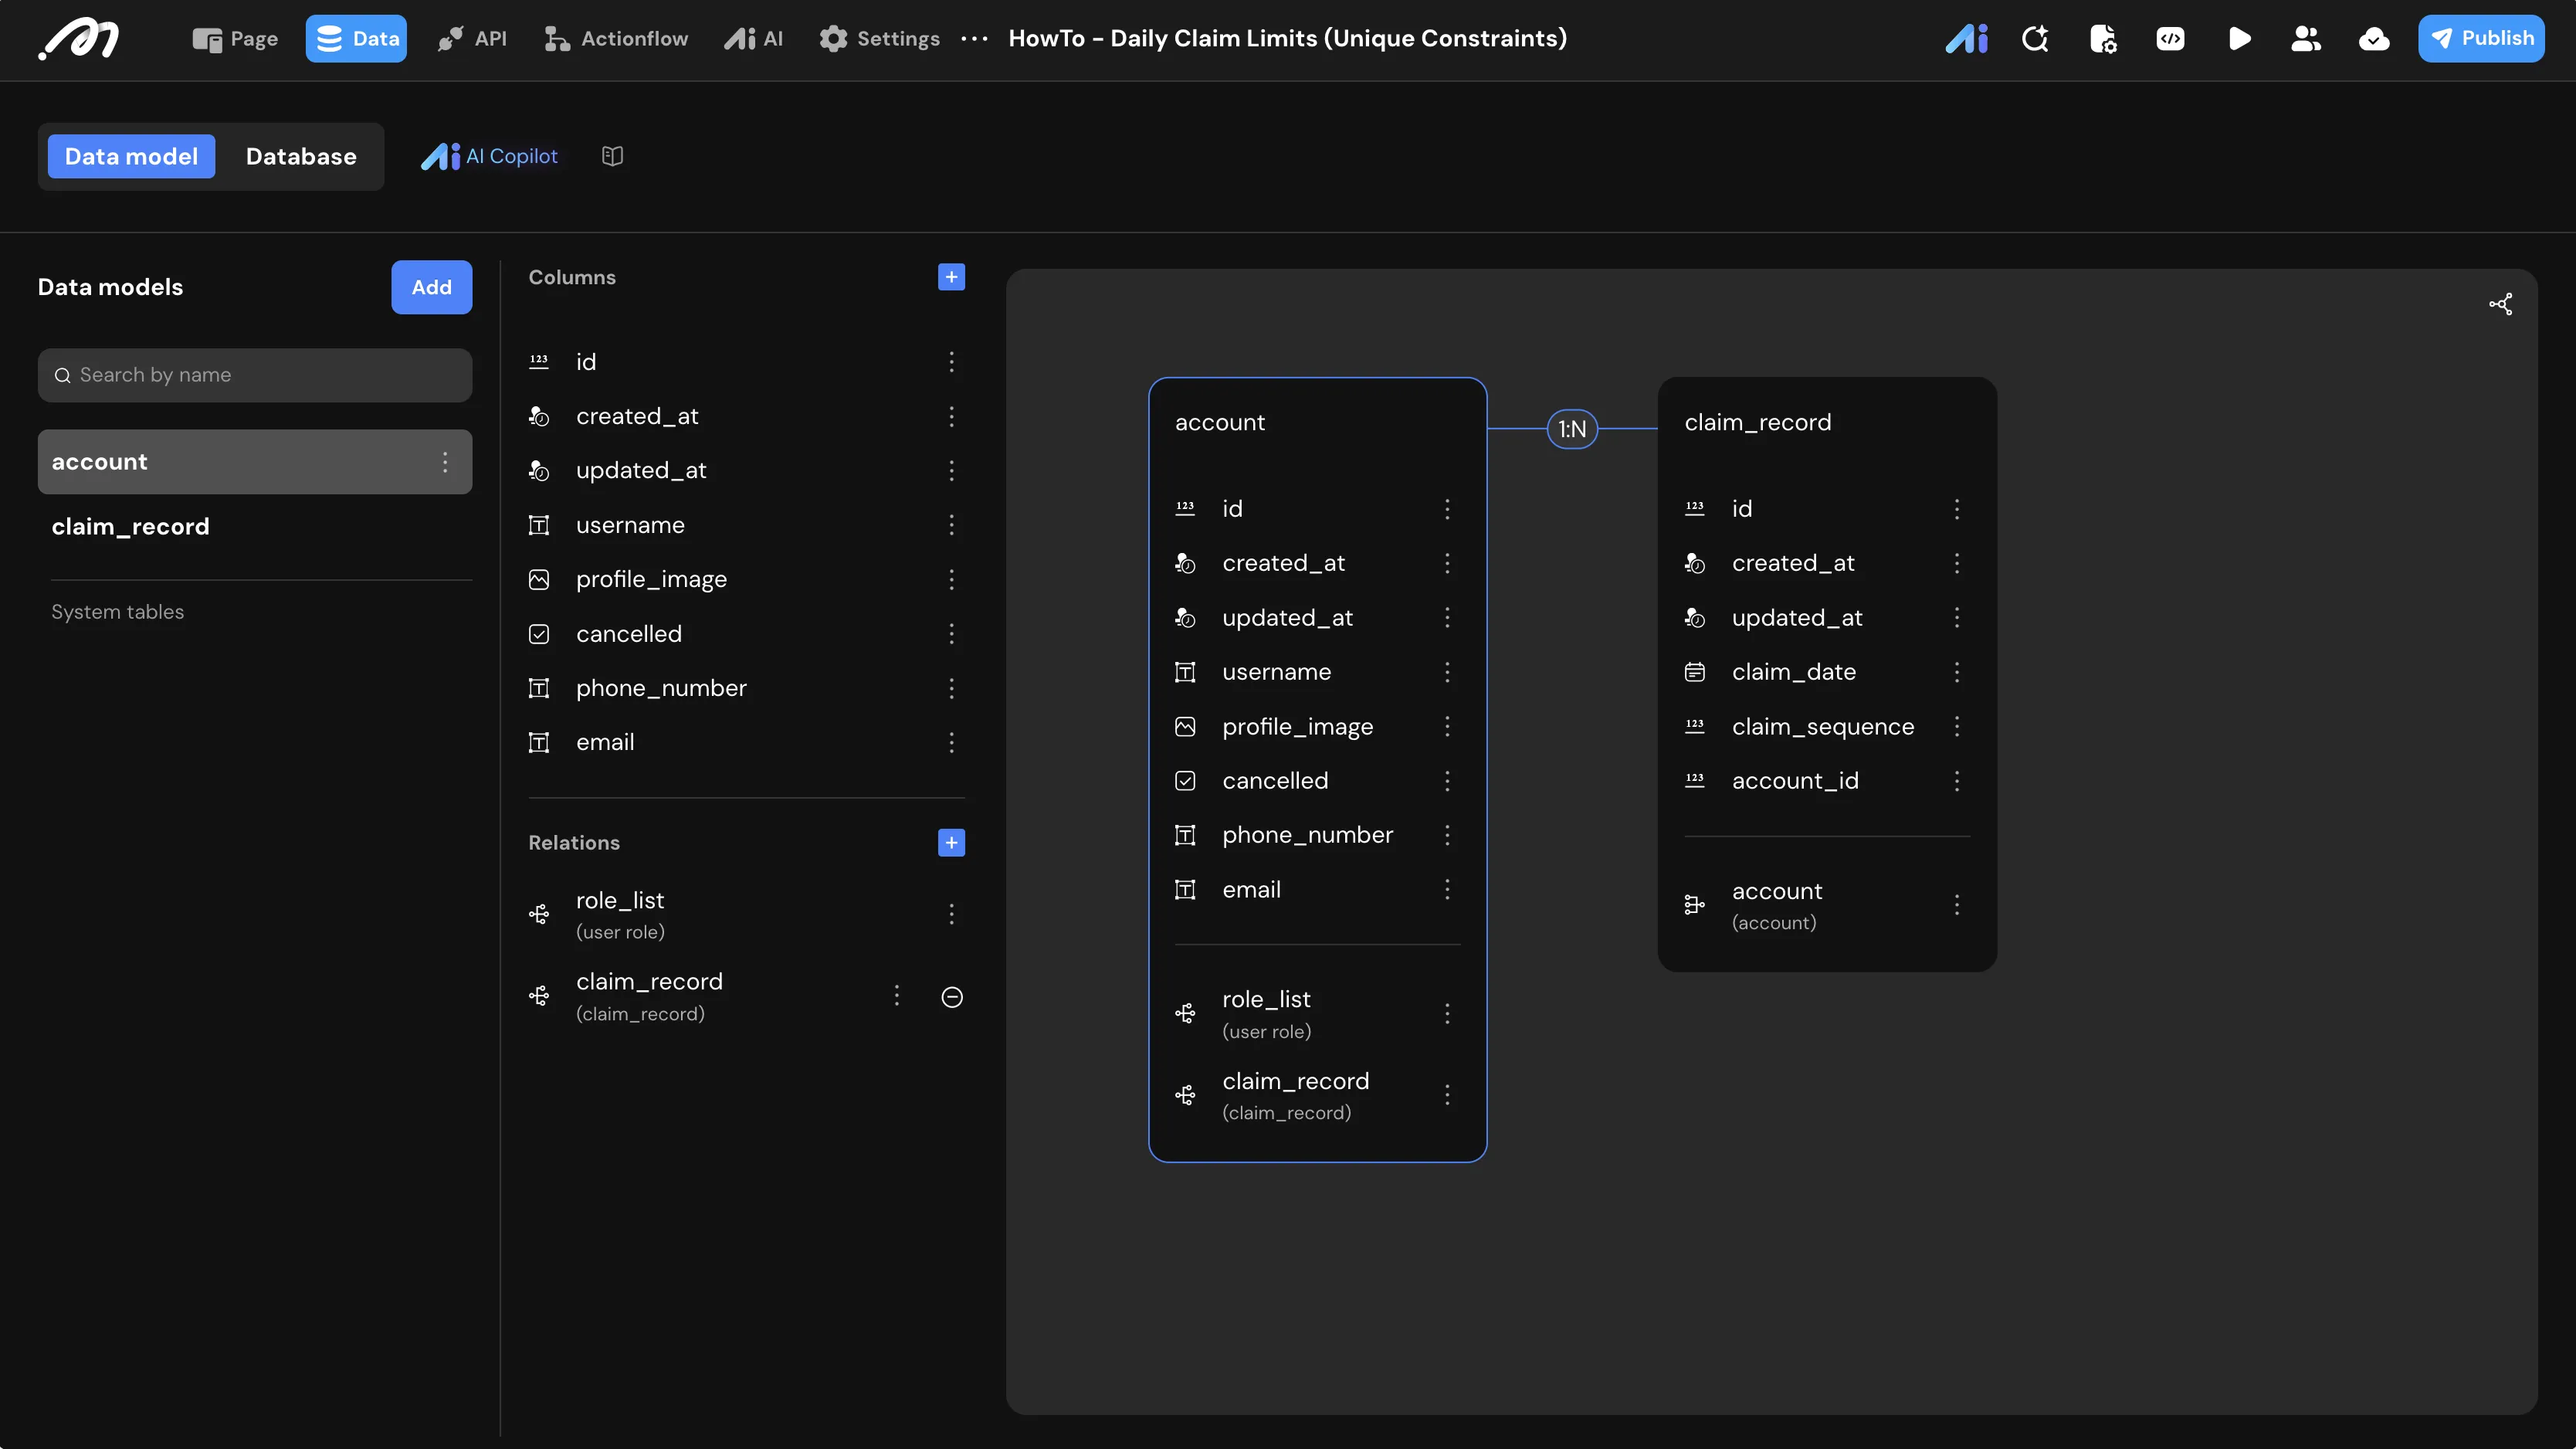
To implement a daily claim limit system, we need to establish a dedicated table in the database to store claim records.
Data Model
Table: claim_record
Logs every successful reward claim.
| Field Name | Type | Note |
|---|---|---|
| id | Bigint | Primary Key |
| claim_date | Date | The date the reward was claimed |
| claim_sequence | Bigint | The index of the claim for that day (1, 2, or 3) |
| account_id | Bigint | Foreign Key linked to the account table |
Database Constraints
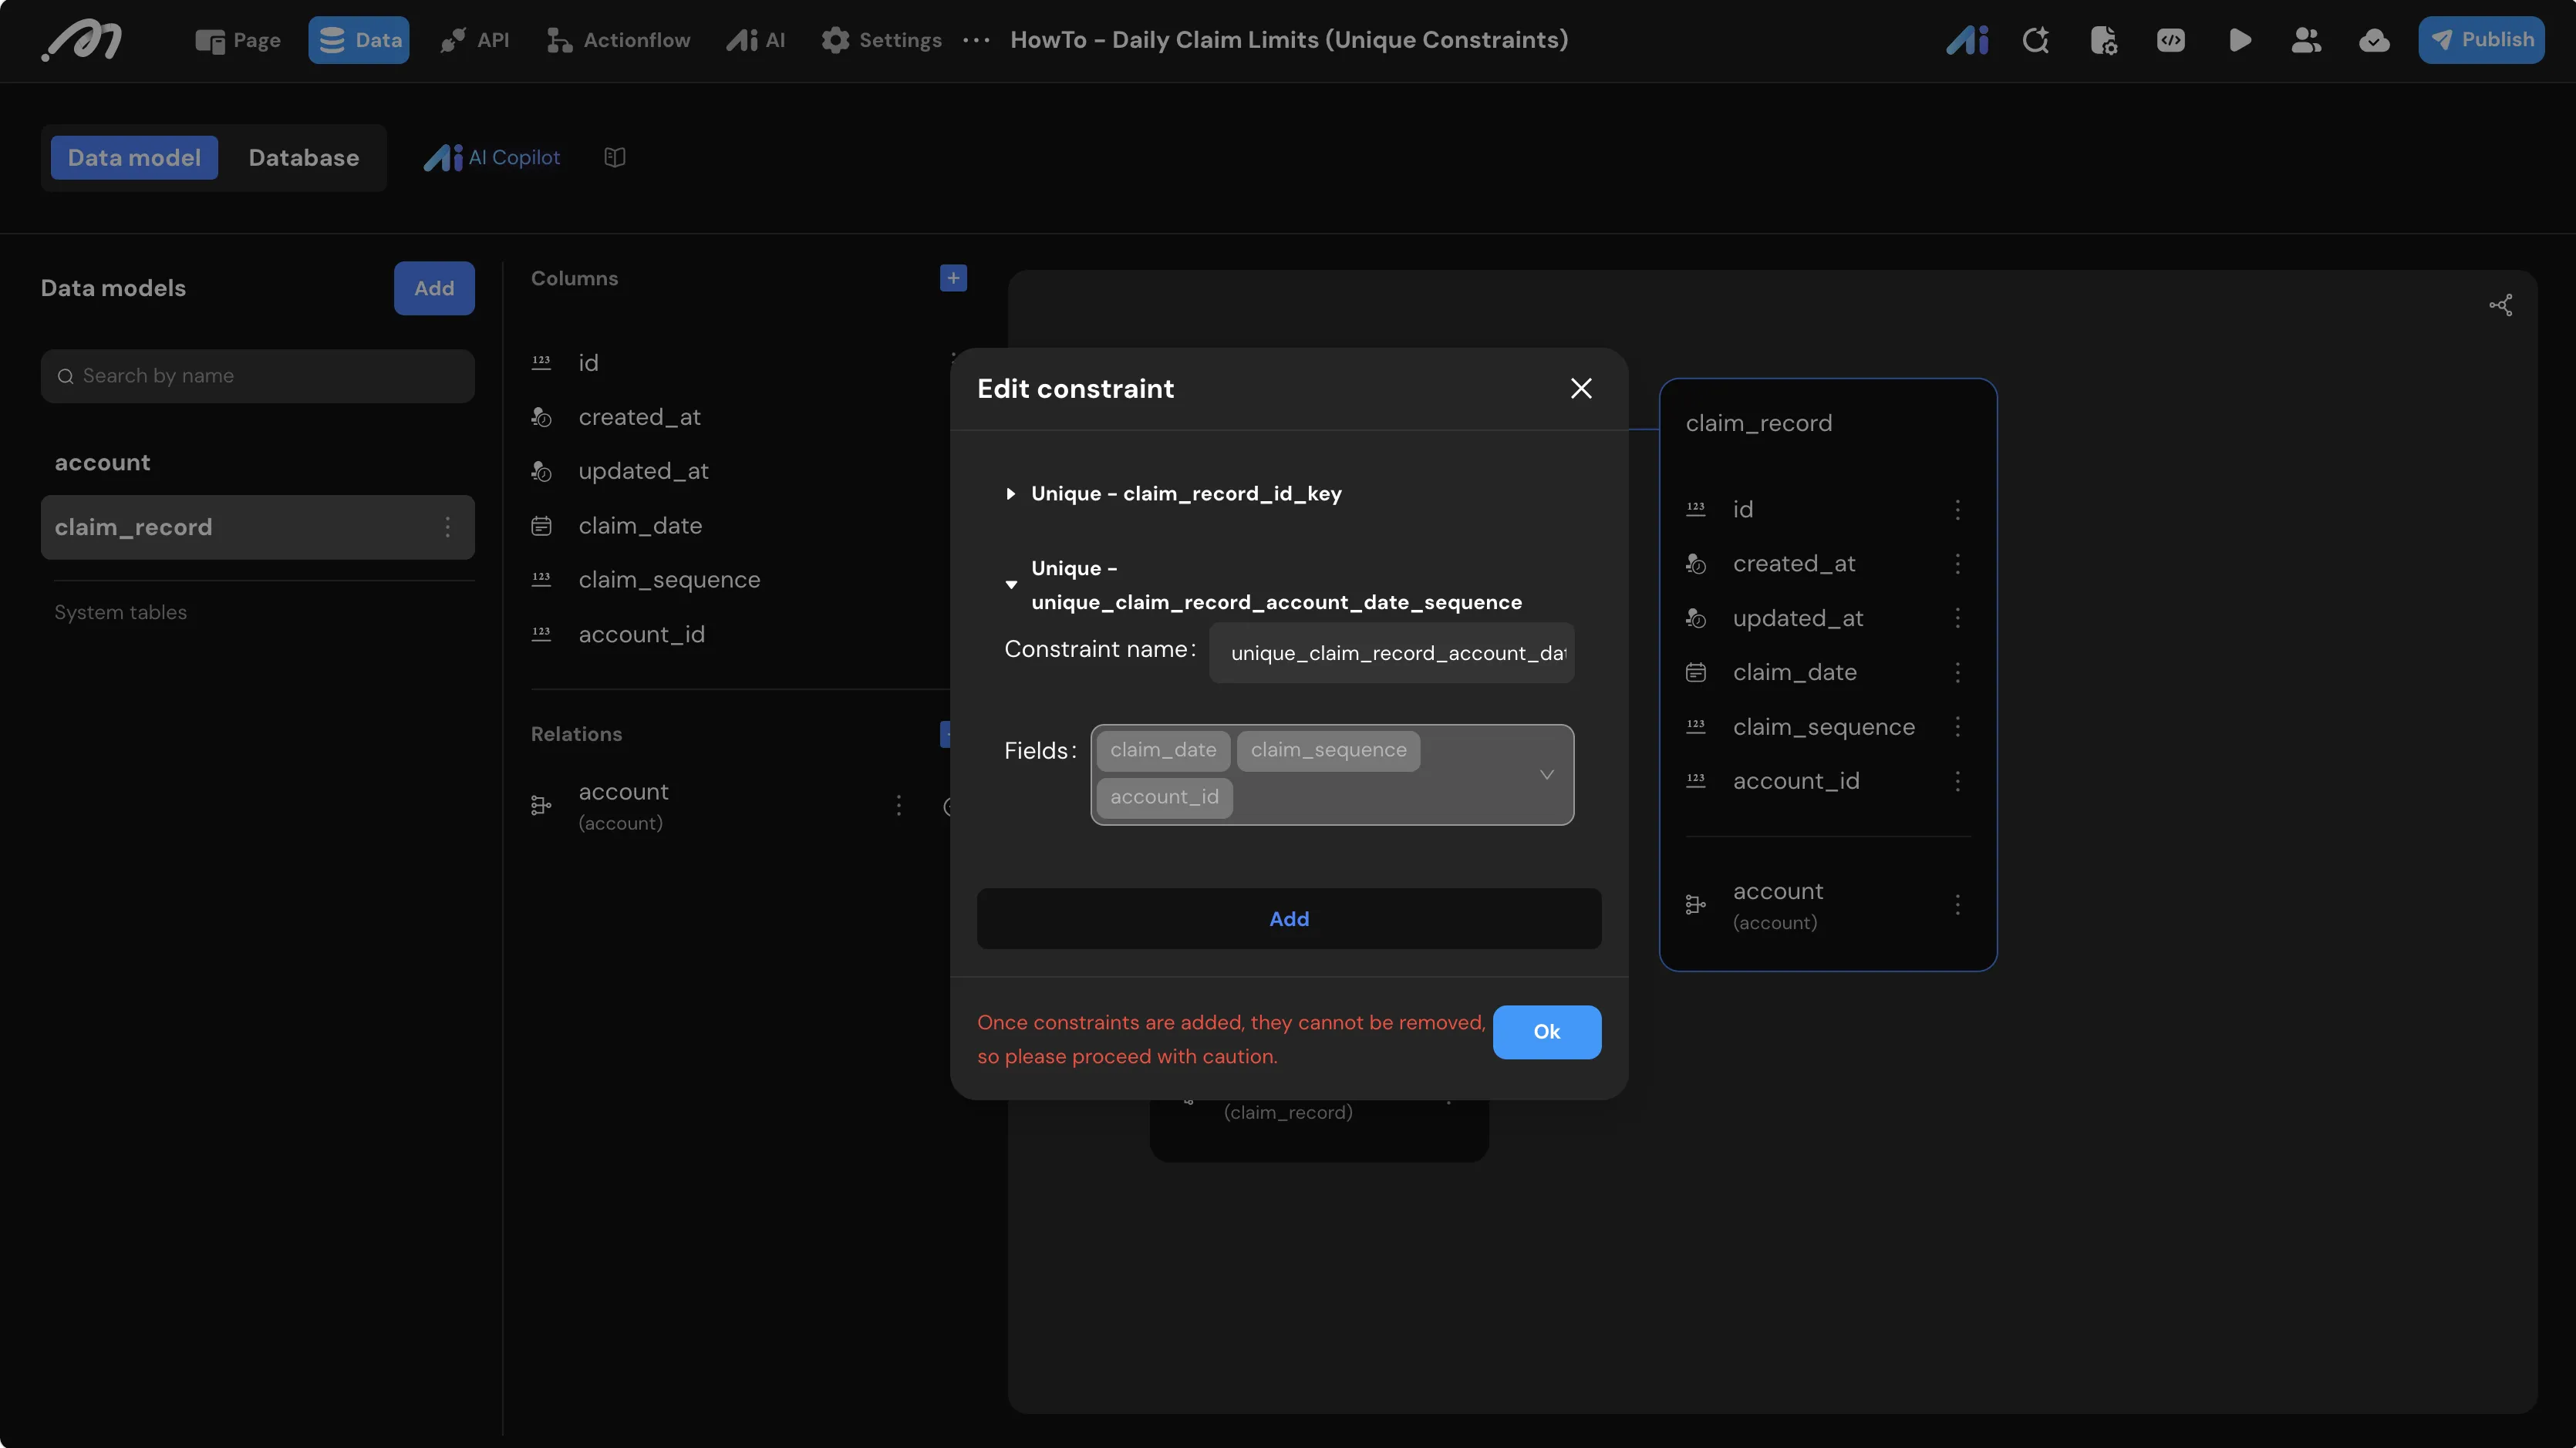
To ensure data integrity at the hardware level, we must prevent any duplicate entries for the same user on the same day with the same sequence number.
- Select Table: Select the
claim_recordtable. - New constraint: Click on the table settings and select Edit constraint.
- Composite unique columns: Add a new unique constraint named
unique_claim_record_account_date_sequence. - Fields: Select
claim_date,claim_sequence, andaccount_id. This ensures that the combination of these three fields must be unique across the entire database.
Logic & State Configuration
Actionflow: Claim Reward
This Actionflow validates and executes the reward claim.
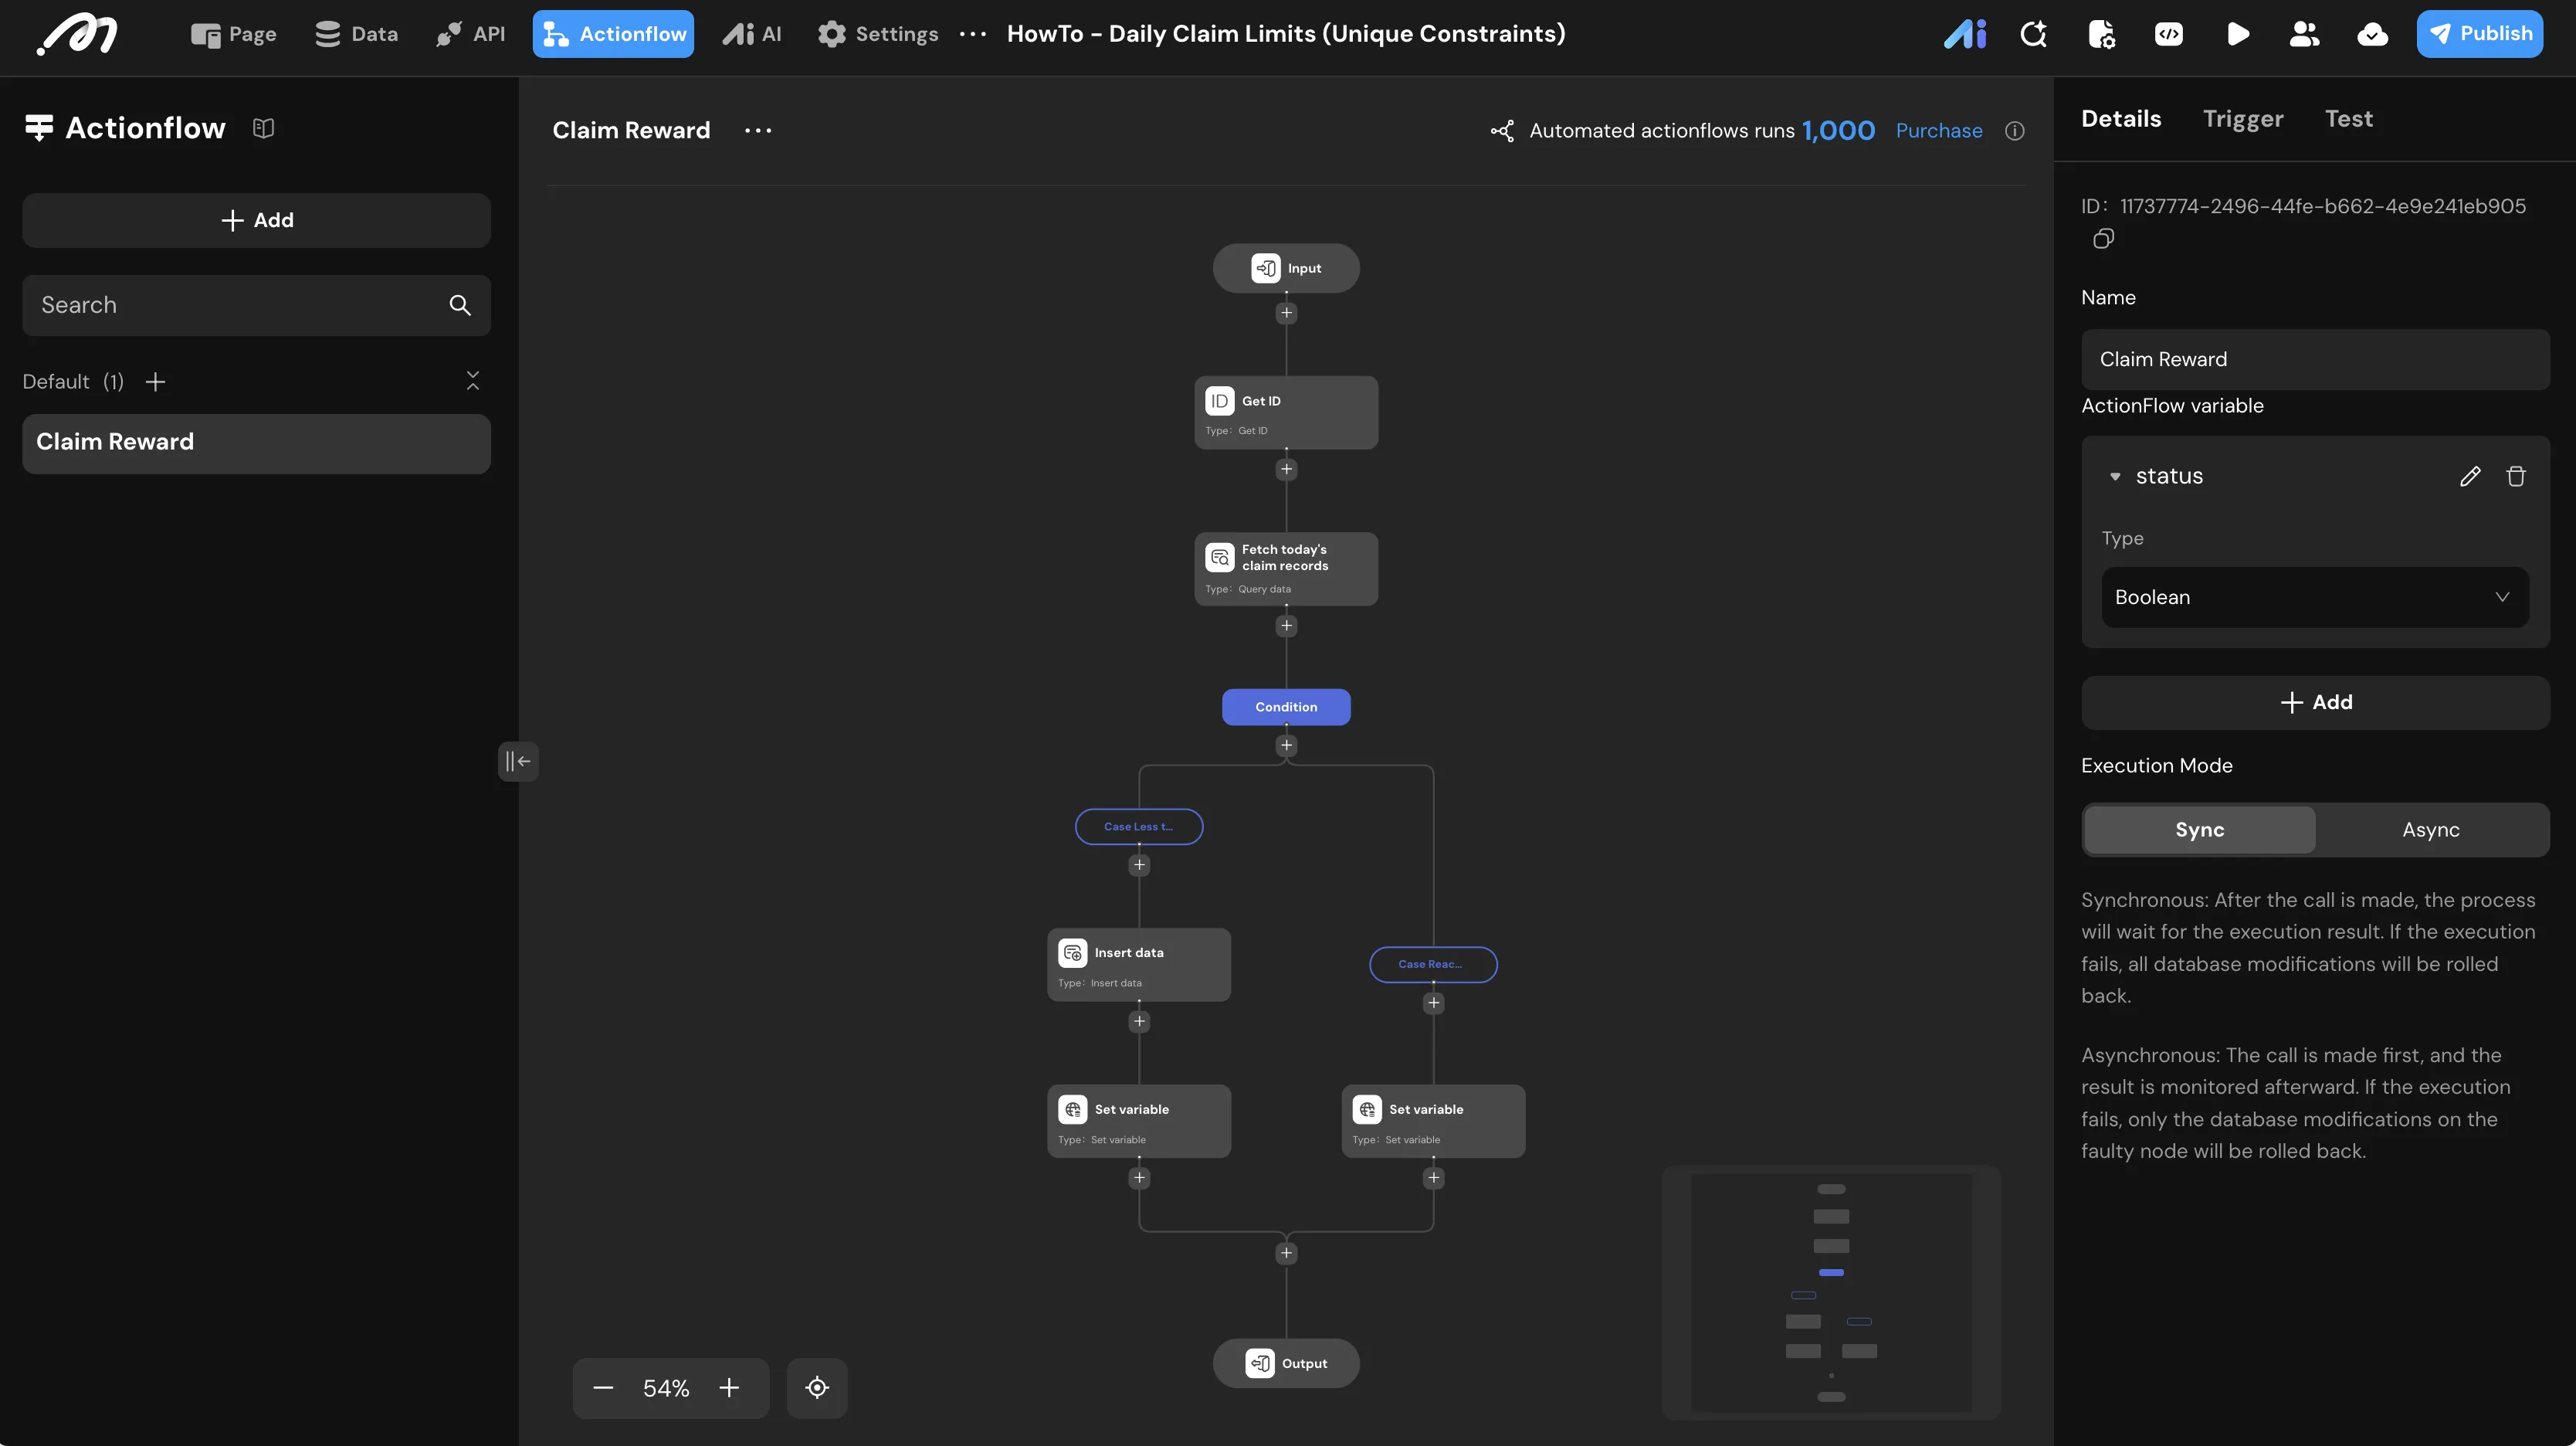
- Actionflow variable: Create a variable named
statuswith the type Boolean to return the result to the frontend. - Get ID: Add a Get ID node. Its output field is
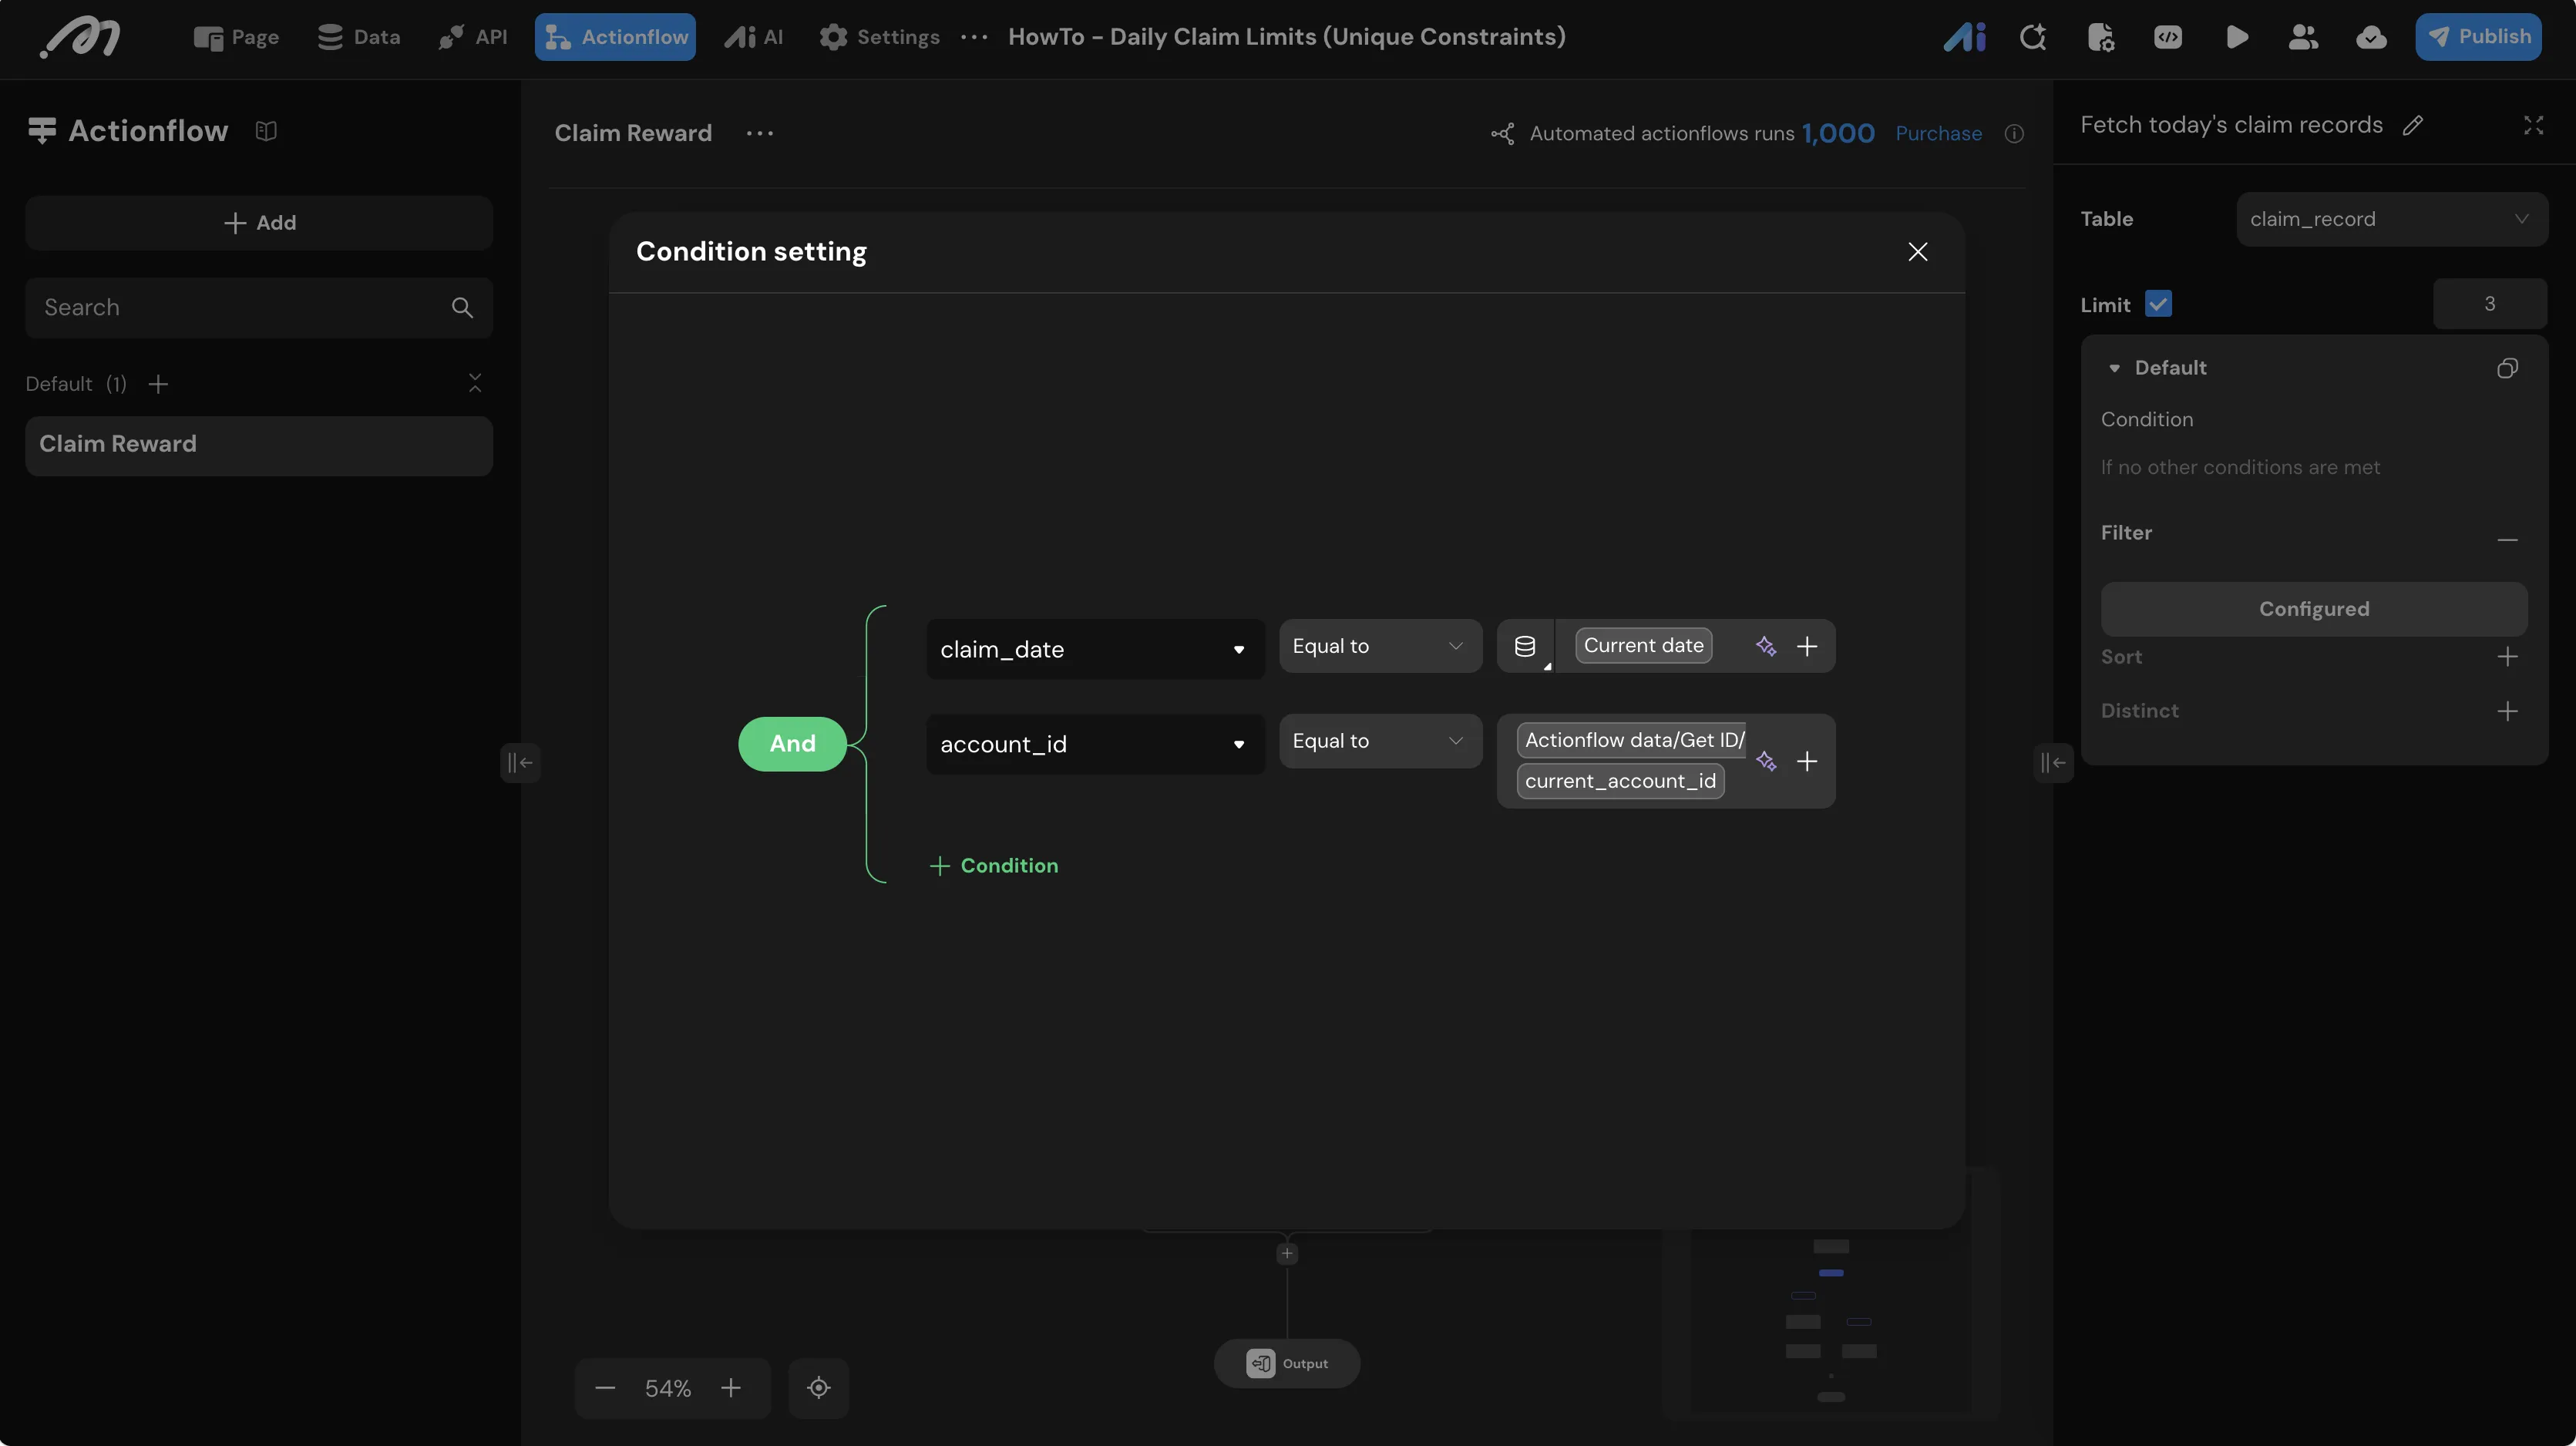
current_account_id. - Query data: Add a Query data node to fetch the user’s claims for the current day.
- Table:
claim_record. - Filter:
claim_dateEqual toCurrent date.account_idEqual tocurrent_account_id(from the Get ID node).
- Limit: Set to 3.
- Table:
- Condition: Add a Condition node to check the current claim count.
- Case 1 (Less than 3 times): Set the condition to
Actionflow data/Fetch today's claim records/CountLess than3.
- Case 1 (Less than 3 times): Set the condition to
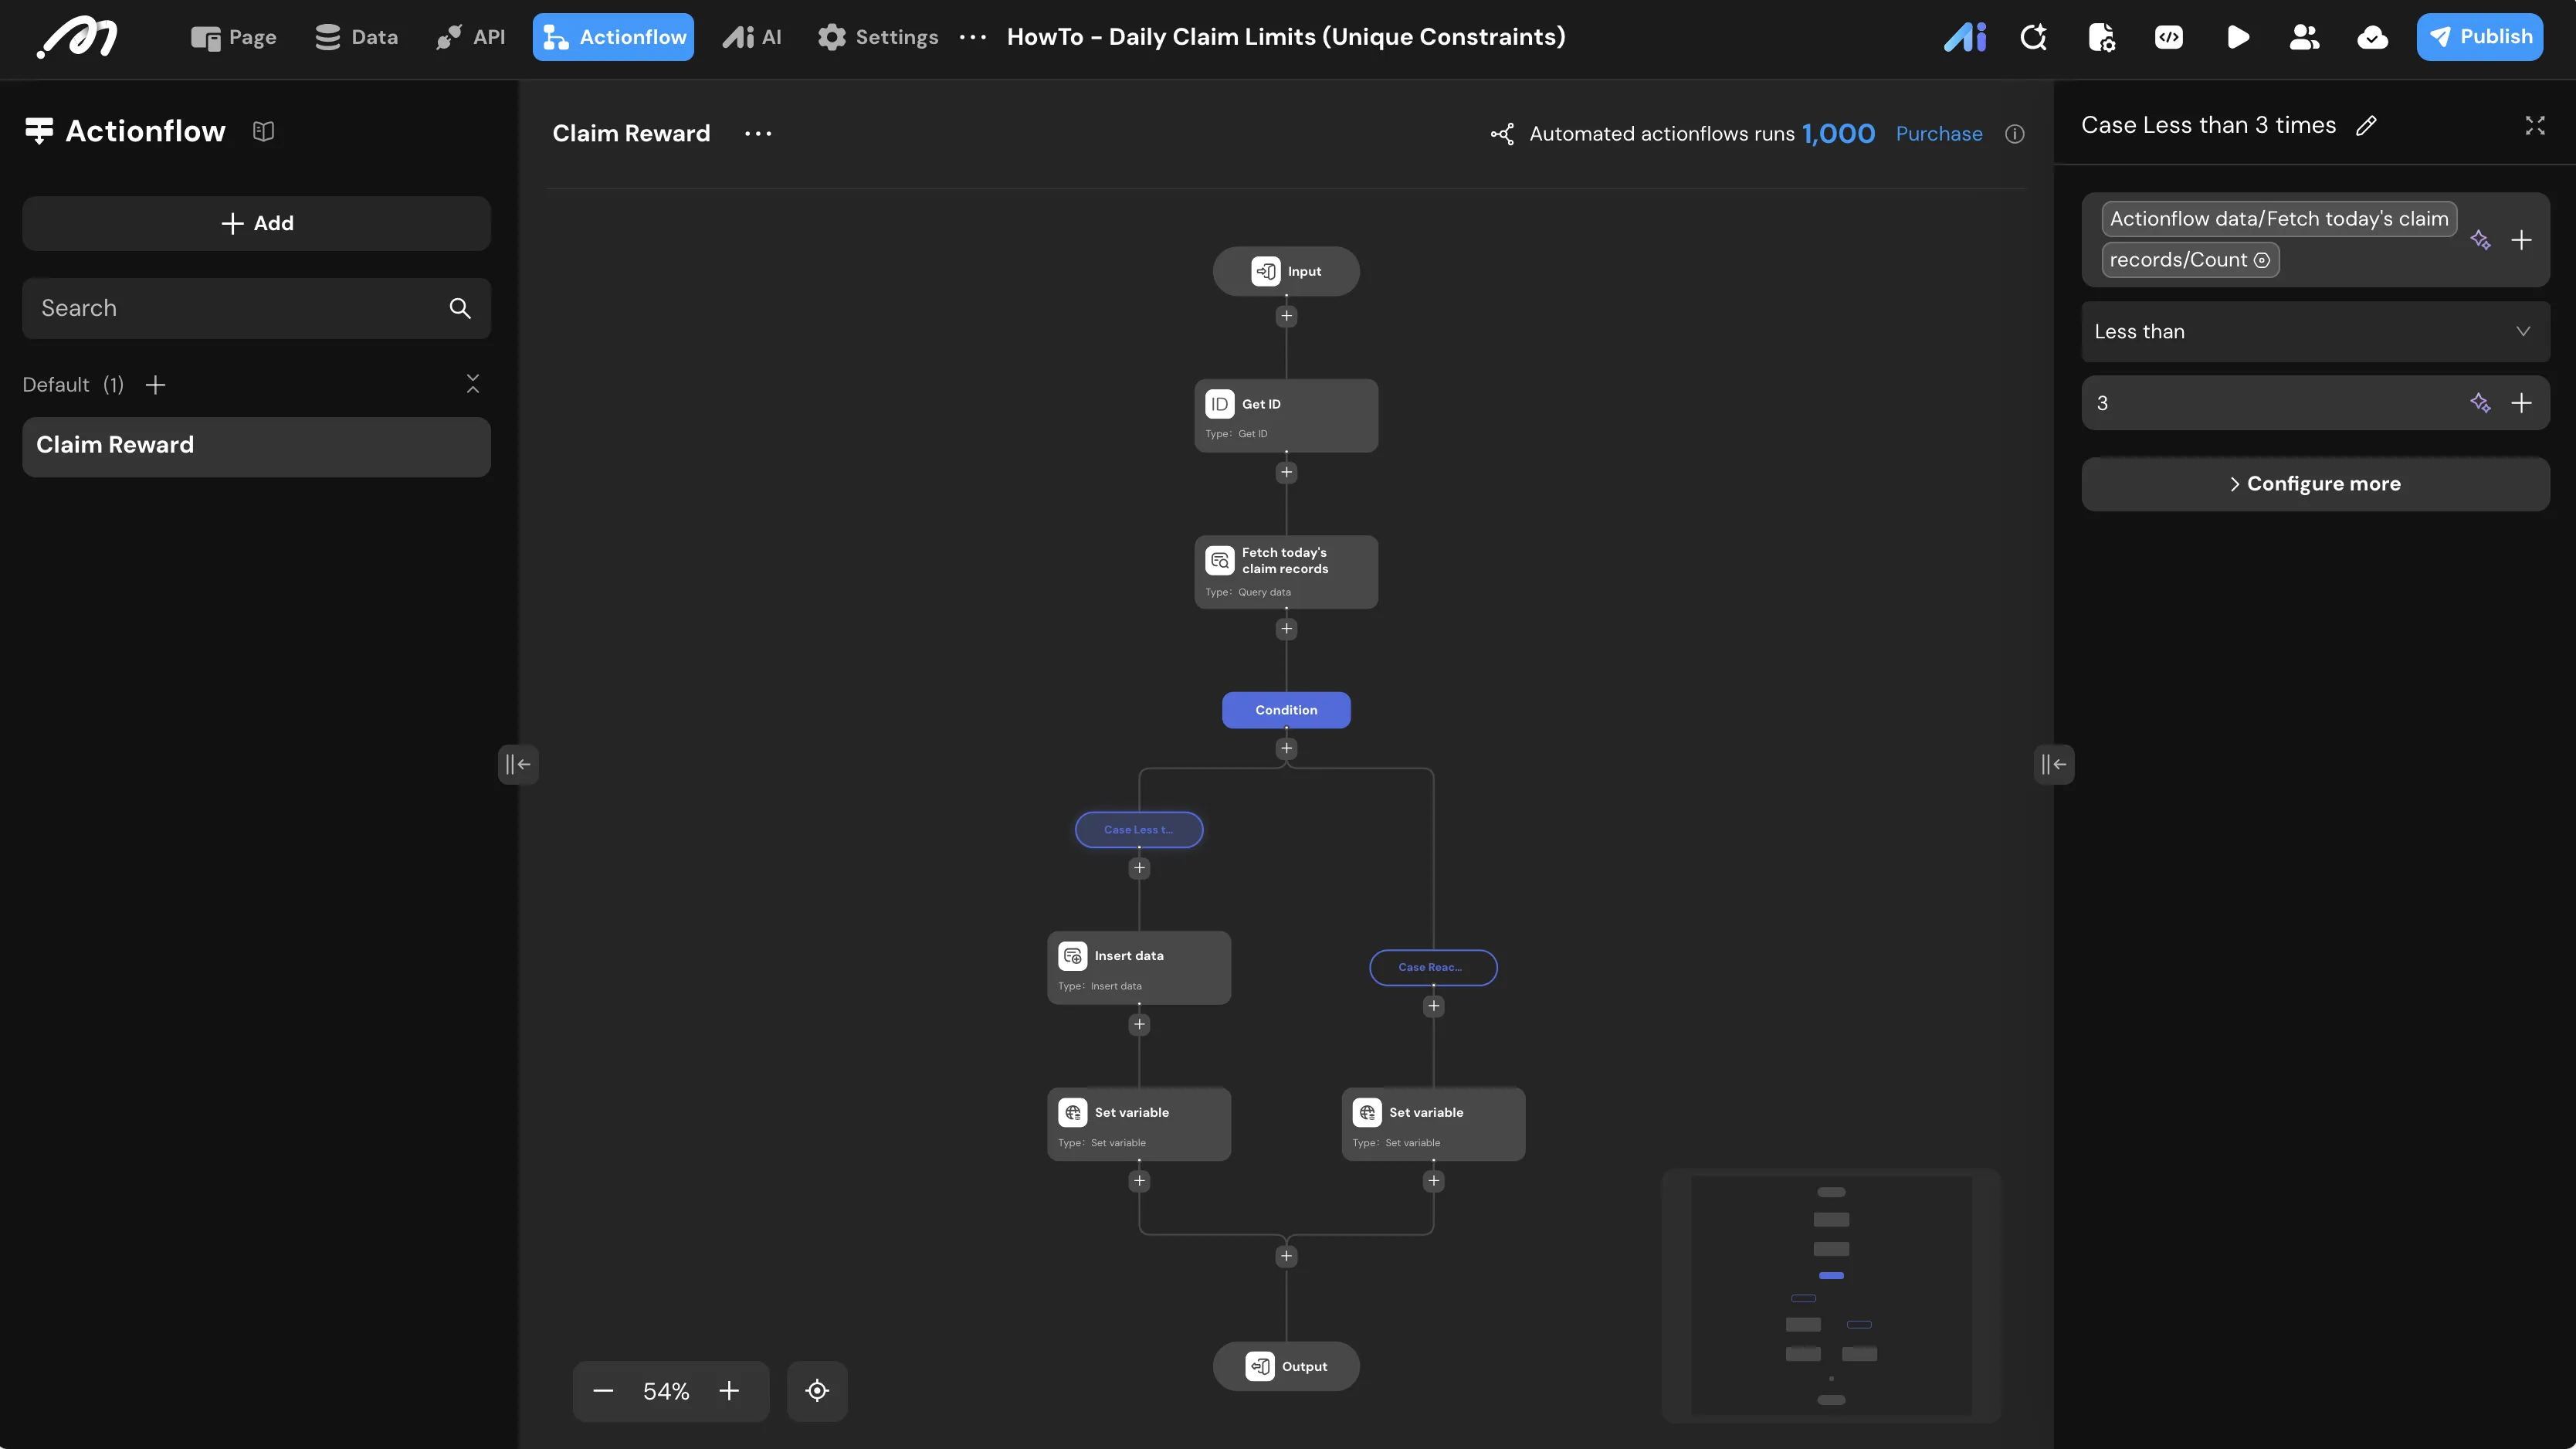
- Insert data: In the “Less than 3 times” branch, add an Insert data node.
- Table:
claim_record. - Parameters:
claim_date: Set toCurrent date.account_id: Set tocurrent_account_id.claim_sequence: Use a formula to calculate the next index:Actionflow data/Fetch today's claim records/Count + 1.
- Conflict resolution: Select the
unique_claim_record_account_date_sequenceconstraint and set the resolution to Do nothing. This silently ignores the request if a race condition occurs.
- Table:
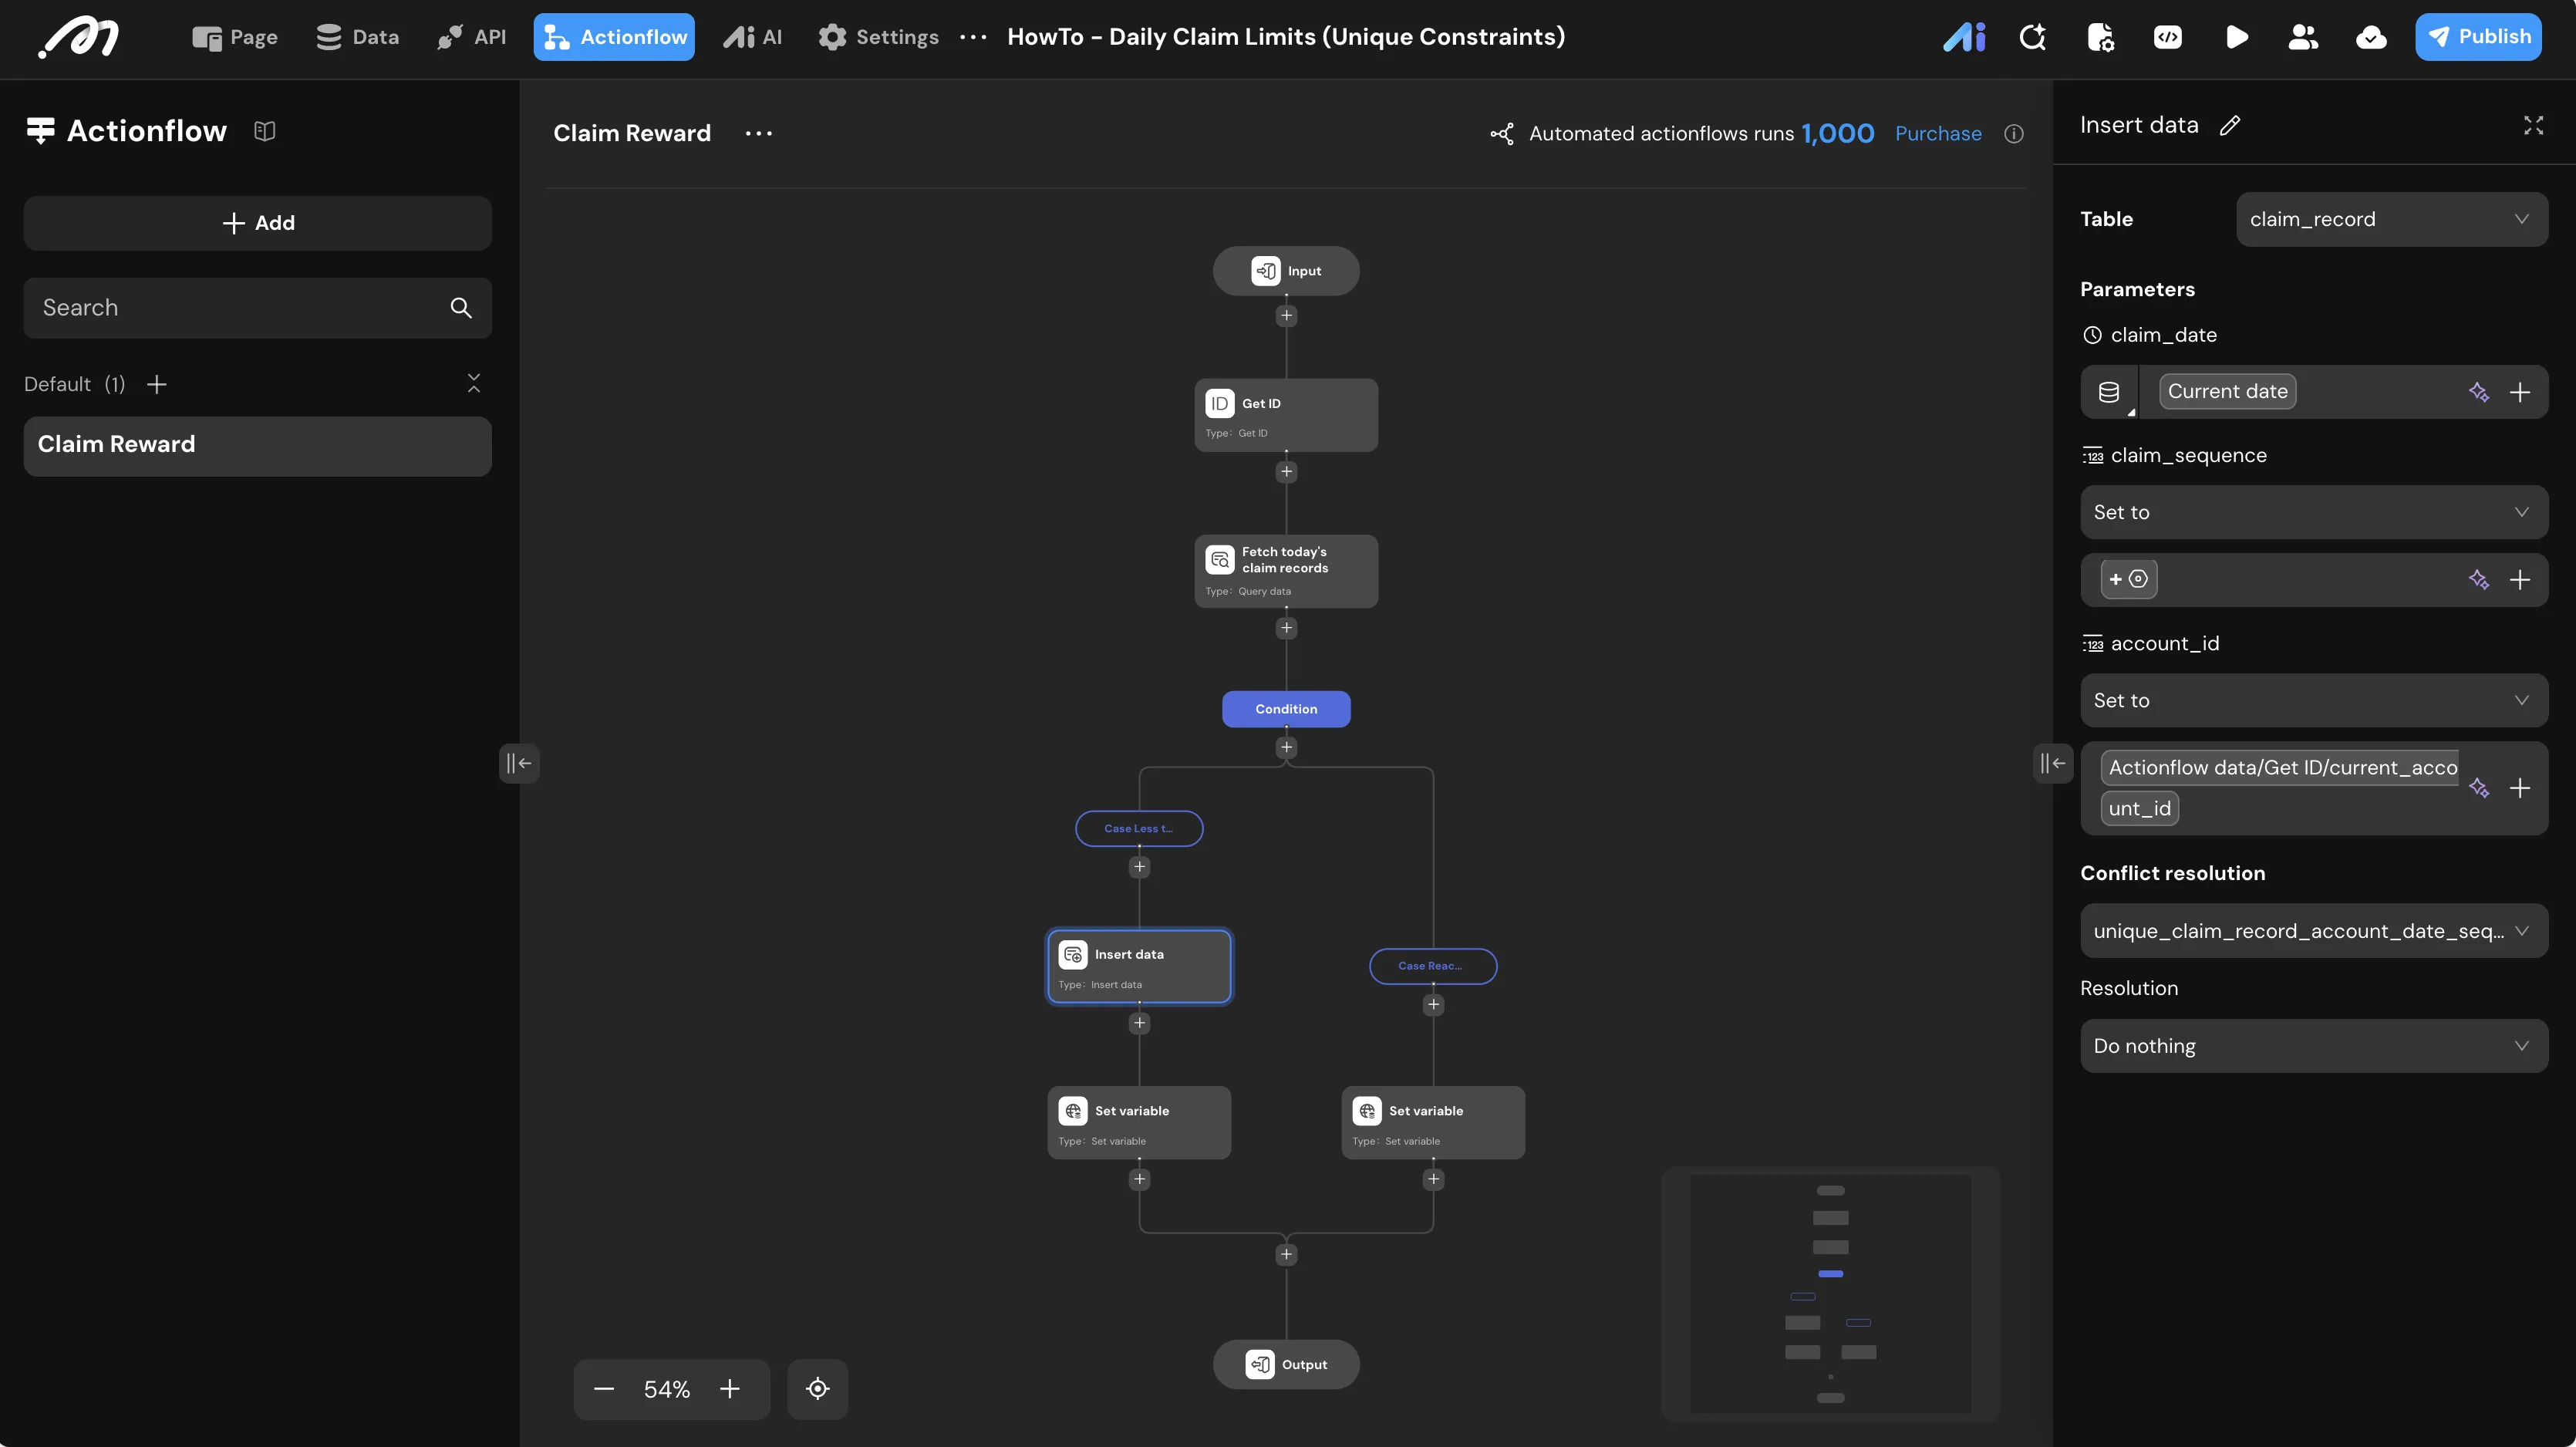
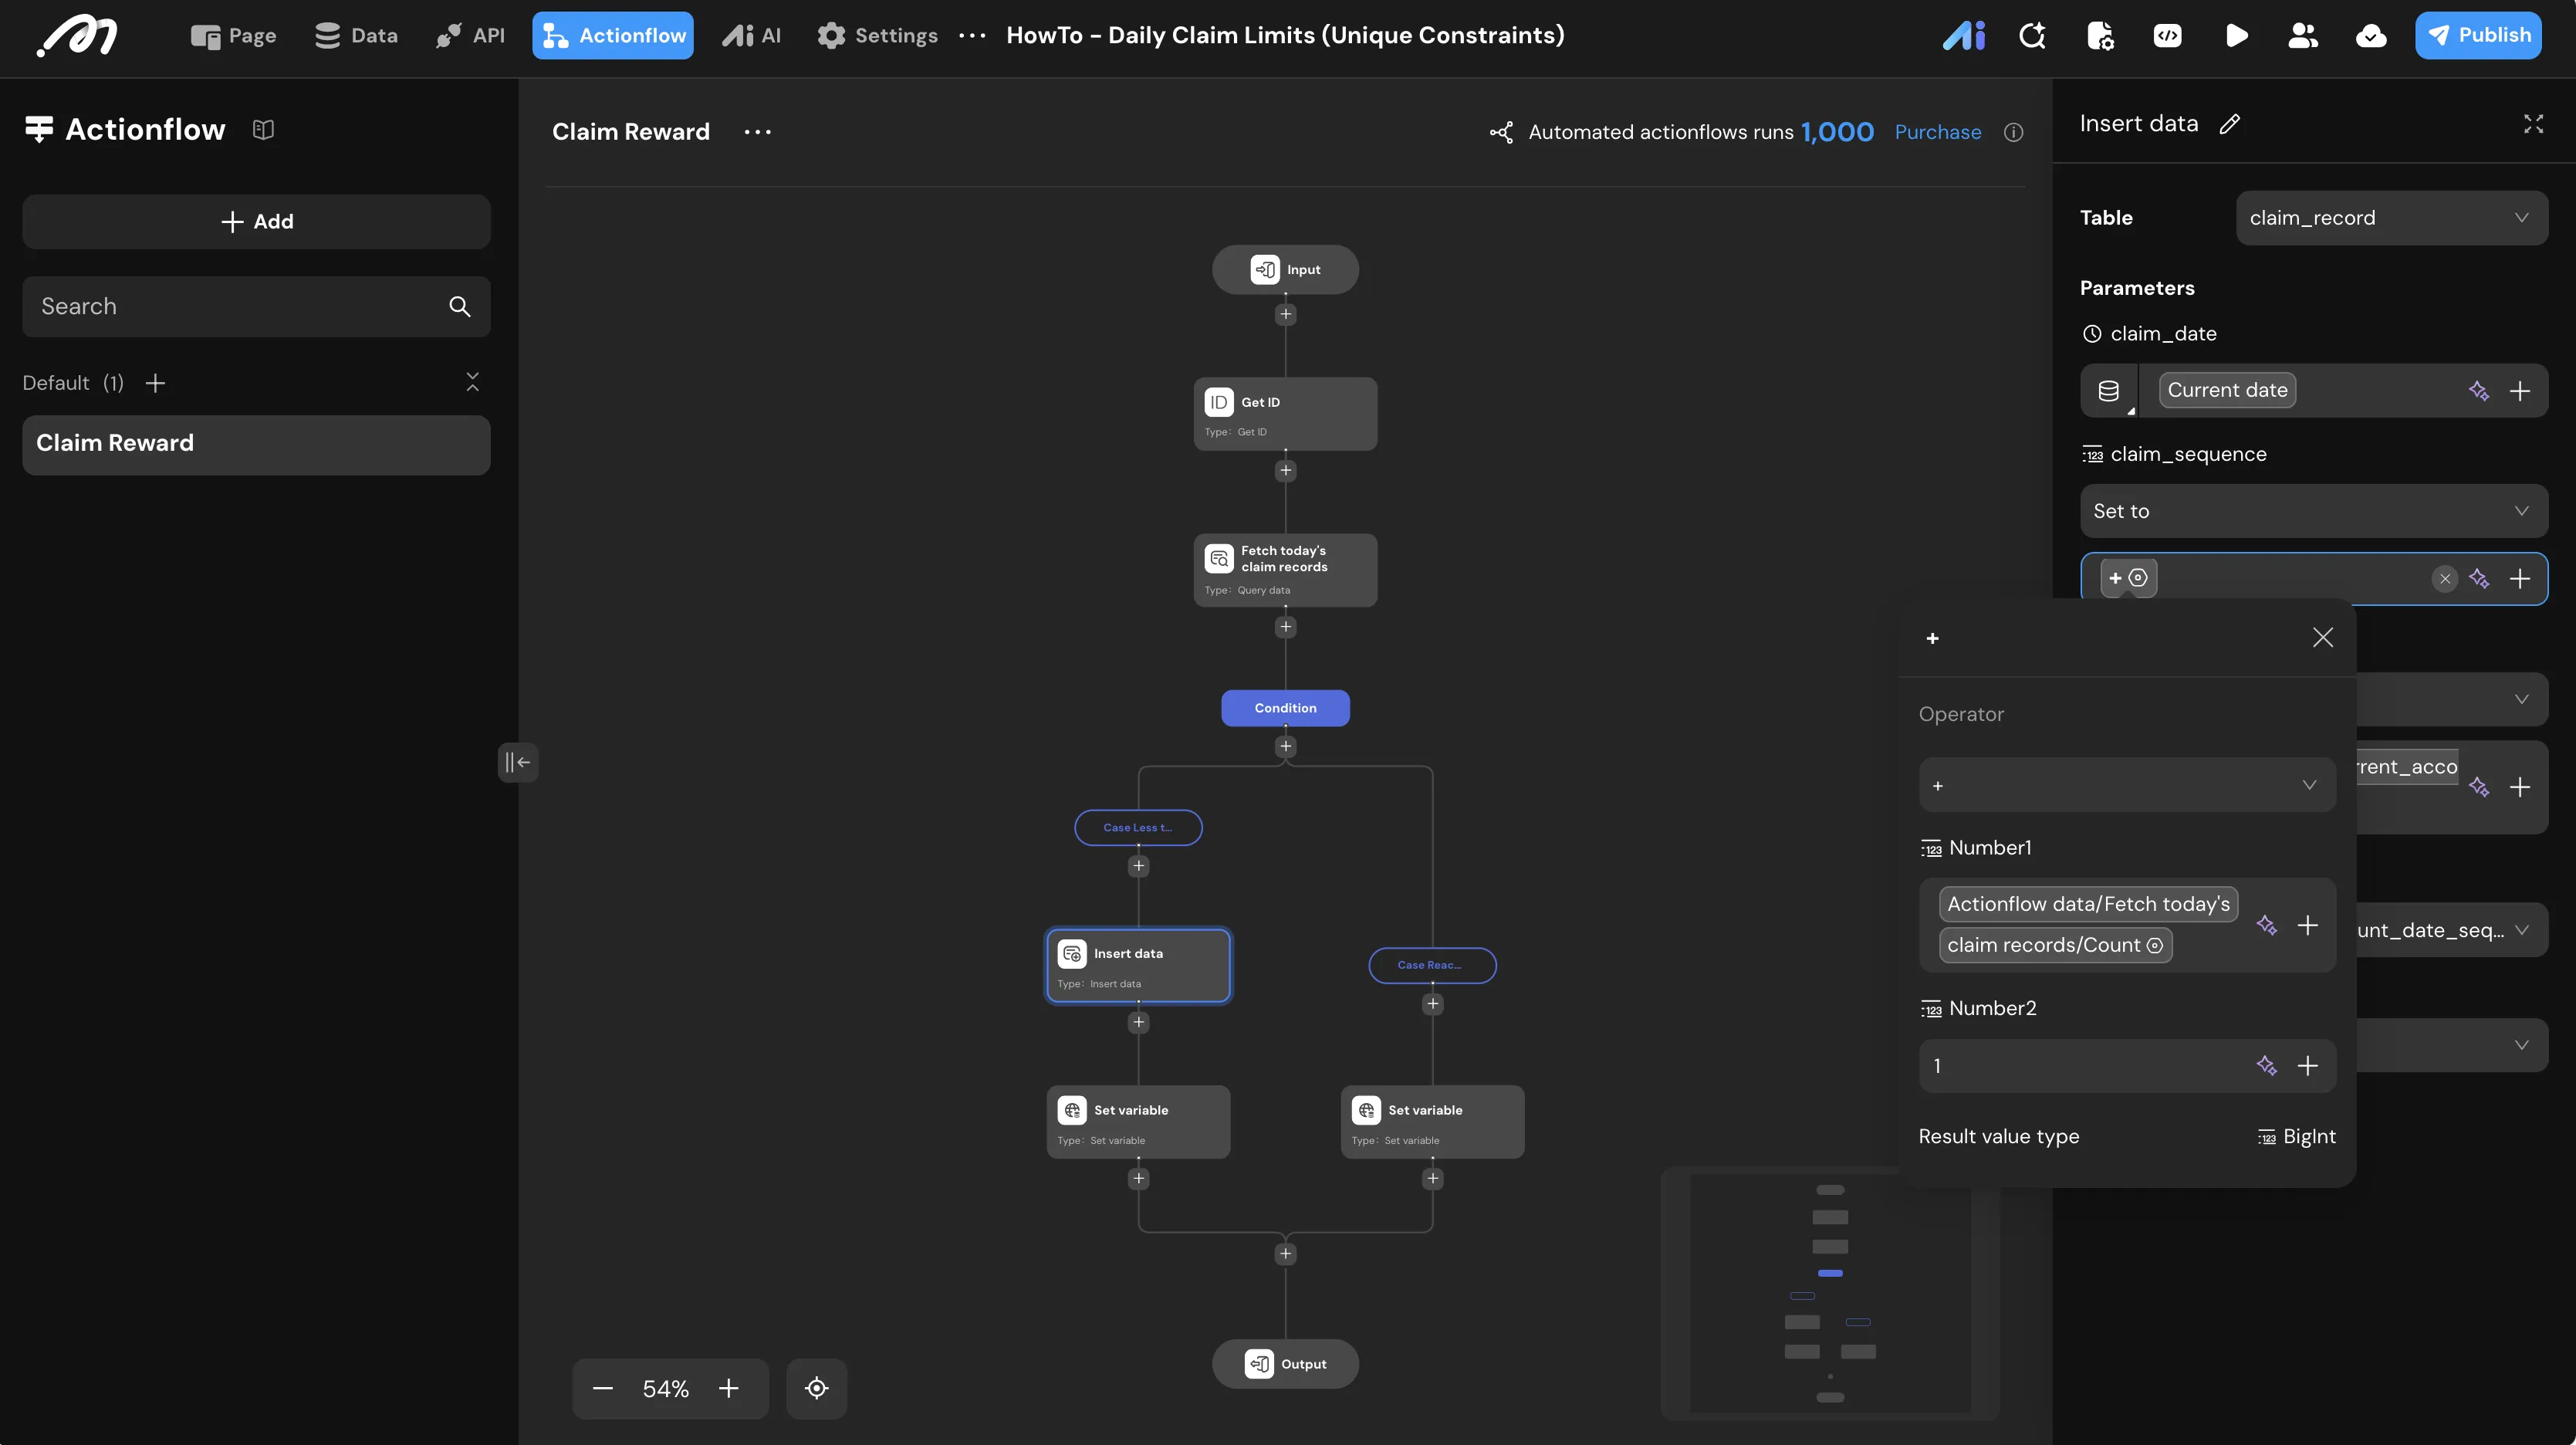
- Set variable (Less than 3 times): In the “Less than 3 times” branch, add a Set variable node after the insertion.
- Condition: Set the condition to
Actionflow data/Insert data/idIs not null.- Value: Set
statustoTrue.
- Value: Set
- Condition: Set the condition to
- Set variable (Reached 3 times): In the “3 times reached” branch, add a Set variable node.
- Value: Set
statustoFalse.
- Value: Set
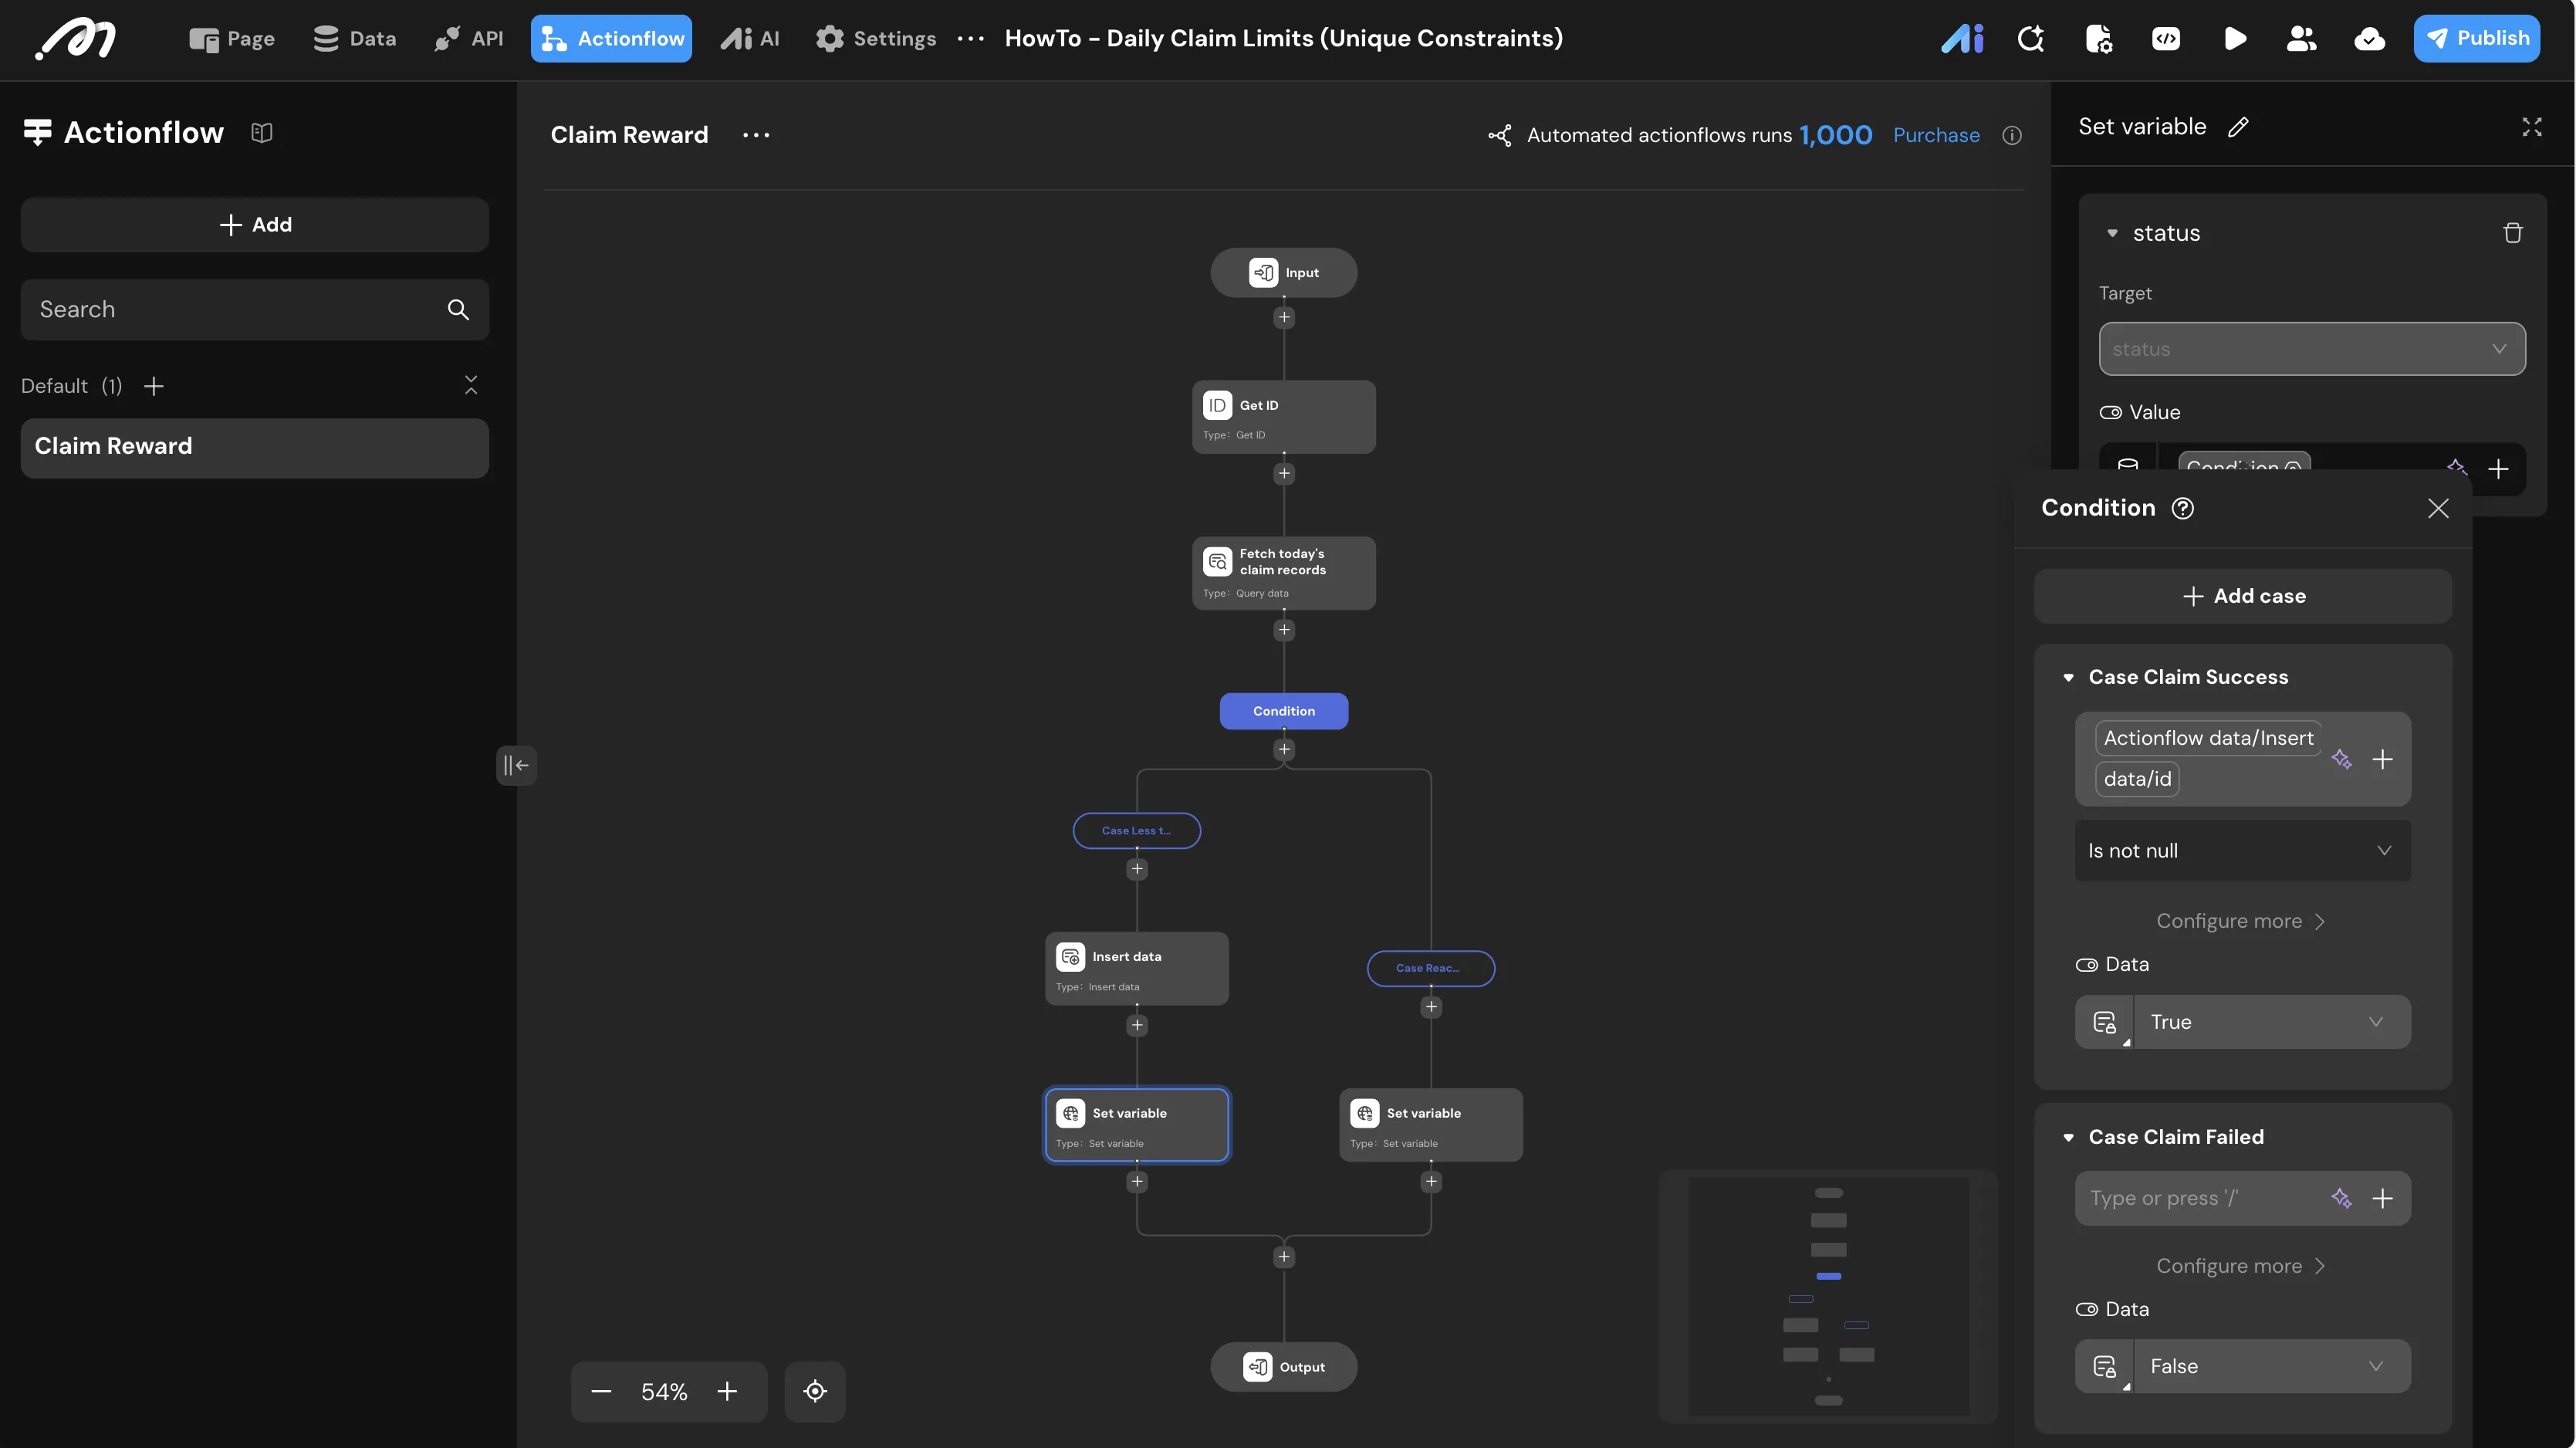
- Actionflow output: Configure the output to return the
statusvariable.
By setting the Conflict resolution to “Do nothing,” the Actionflow will not crash if a user clicks the button multiple times simultaneously. The database will simply reject the second request, and the status will return False.
UI Construction & Interaction
The frontend uses a Conditional View to dynamically switch between login prompts, active claim buttons, and disabled states based on the user’s real-time data.
1. Page Setup
- Create Page: In the Pages tab, click + and add a new page named
Page Daily Reward Claim. - Add Conditional View: Drag a Conditional View component onto the canvas. This will act as the container for the different reward states.
- Configure Cases: Rename the default cases in the Component Tree:
- Case 1:
Case Less than 3 times - Case 2:
Case Reached 3 times - Case 3:
Initializing
- Case 1:
2. Active Claim State (Less than 3 times)
- Add Button: Inside the
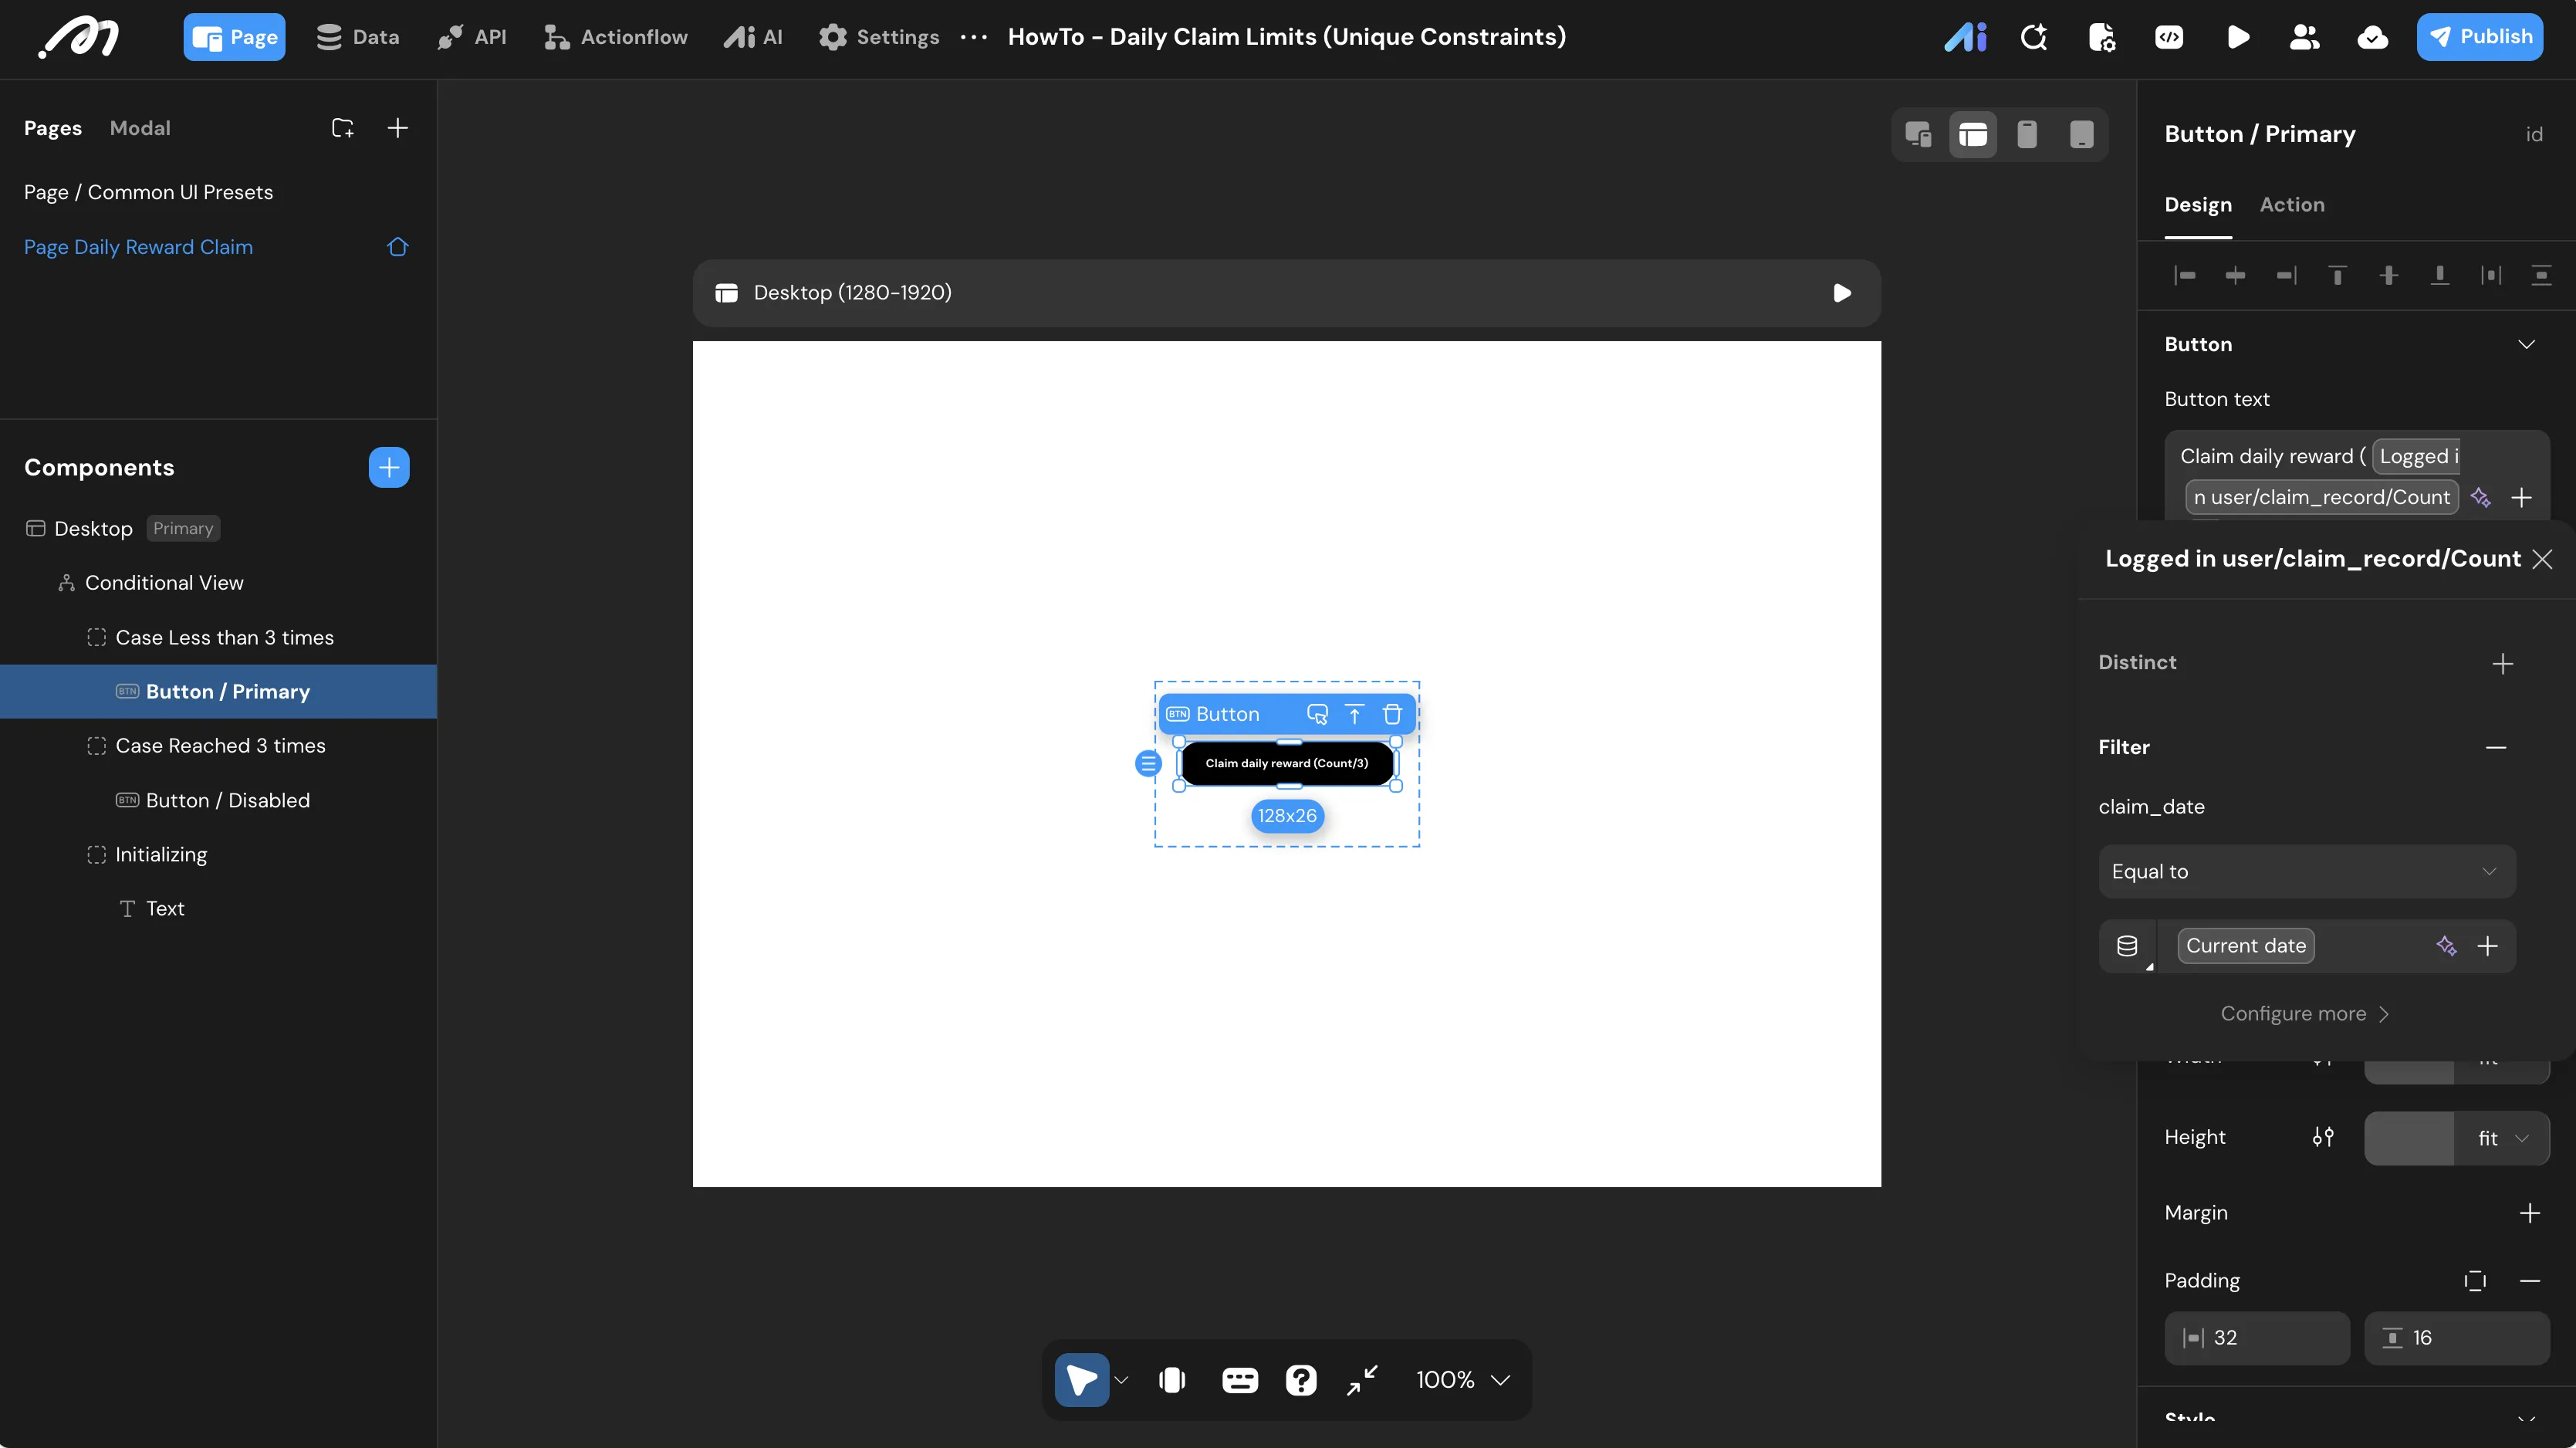
Case Less than 3 timescase, add a Button component. - Data Binding (Button Text): Click the Databinding icon next to the Button text field.
- Combine static text with dynamic data.
- Expression:
Claim daily reward (+Logged in user/claim_record/Count+/3) - Filter: In the databinding panel, add a filter to the
claim_recordrelation withclaim_dateequalsCurrent date, so the count only includes today’s records.
- Interaction (OnClick): Go to the Action tab of the button.
- Trigger:
OnClick-> Actionflow. - Select Actionflow: Choose
Claim Reward.
- Trigger:
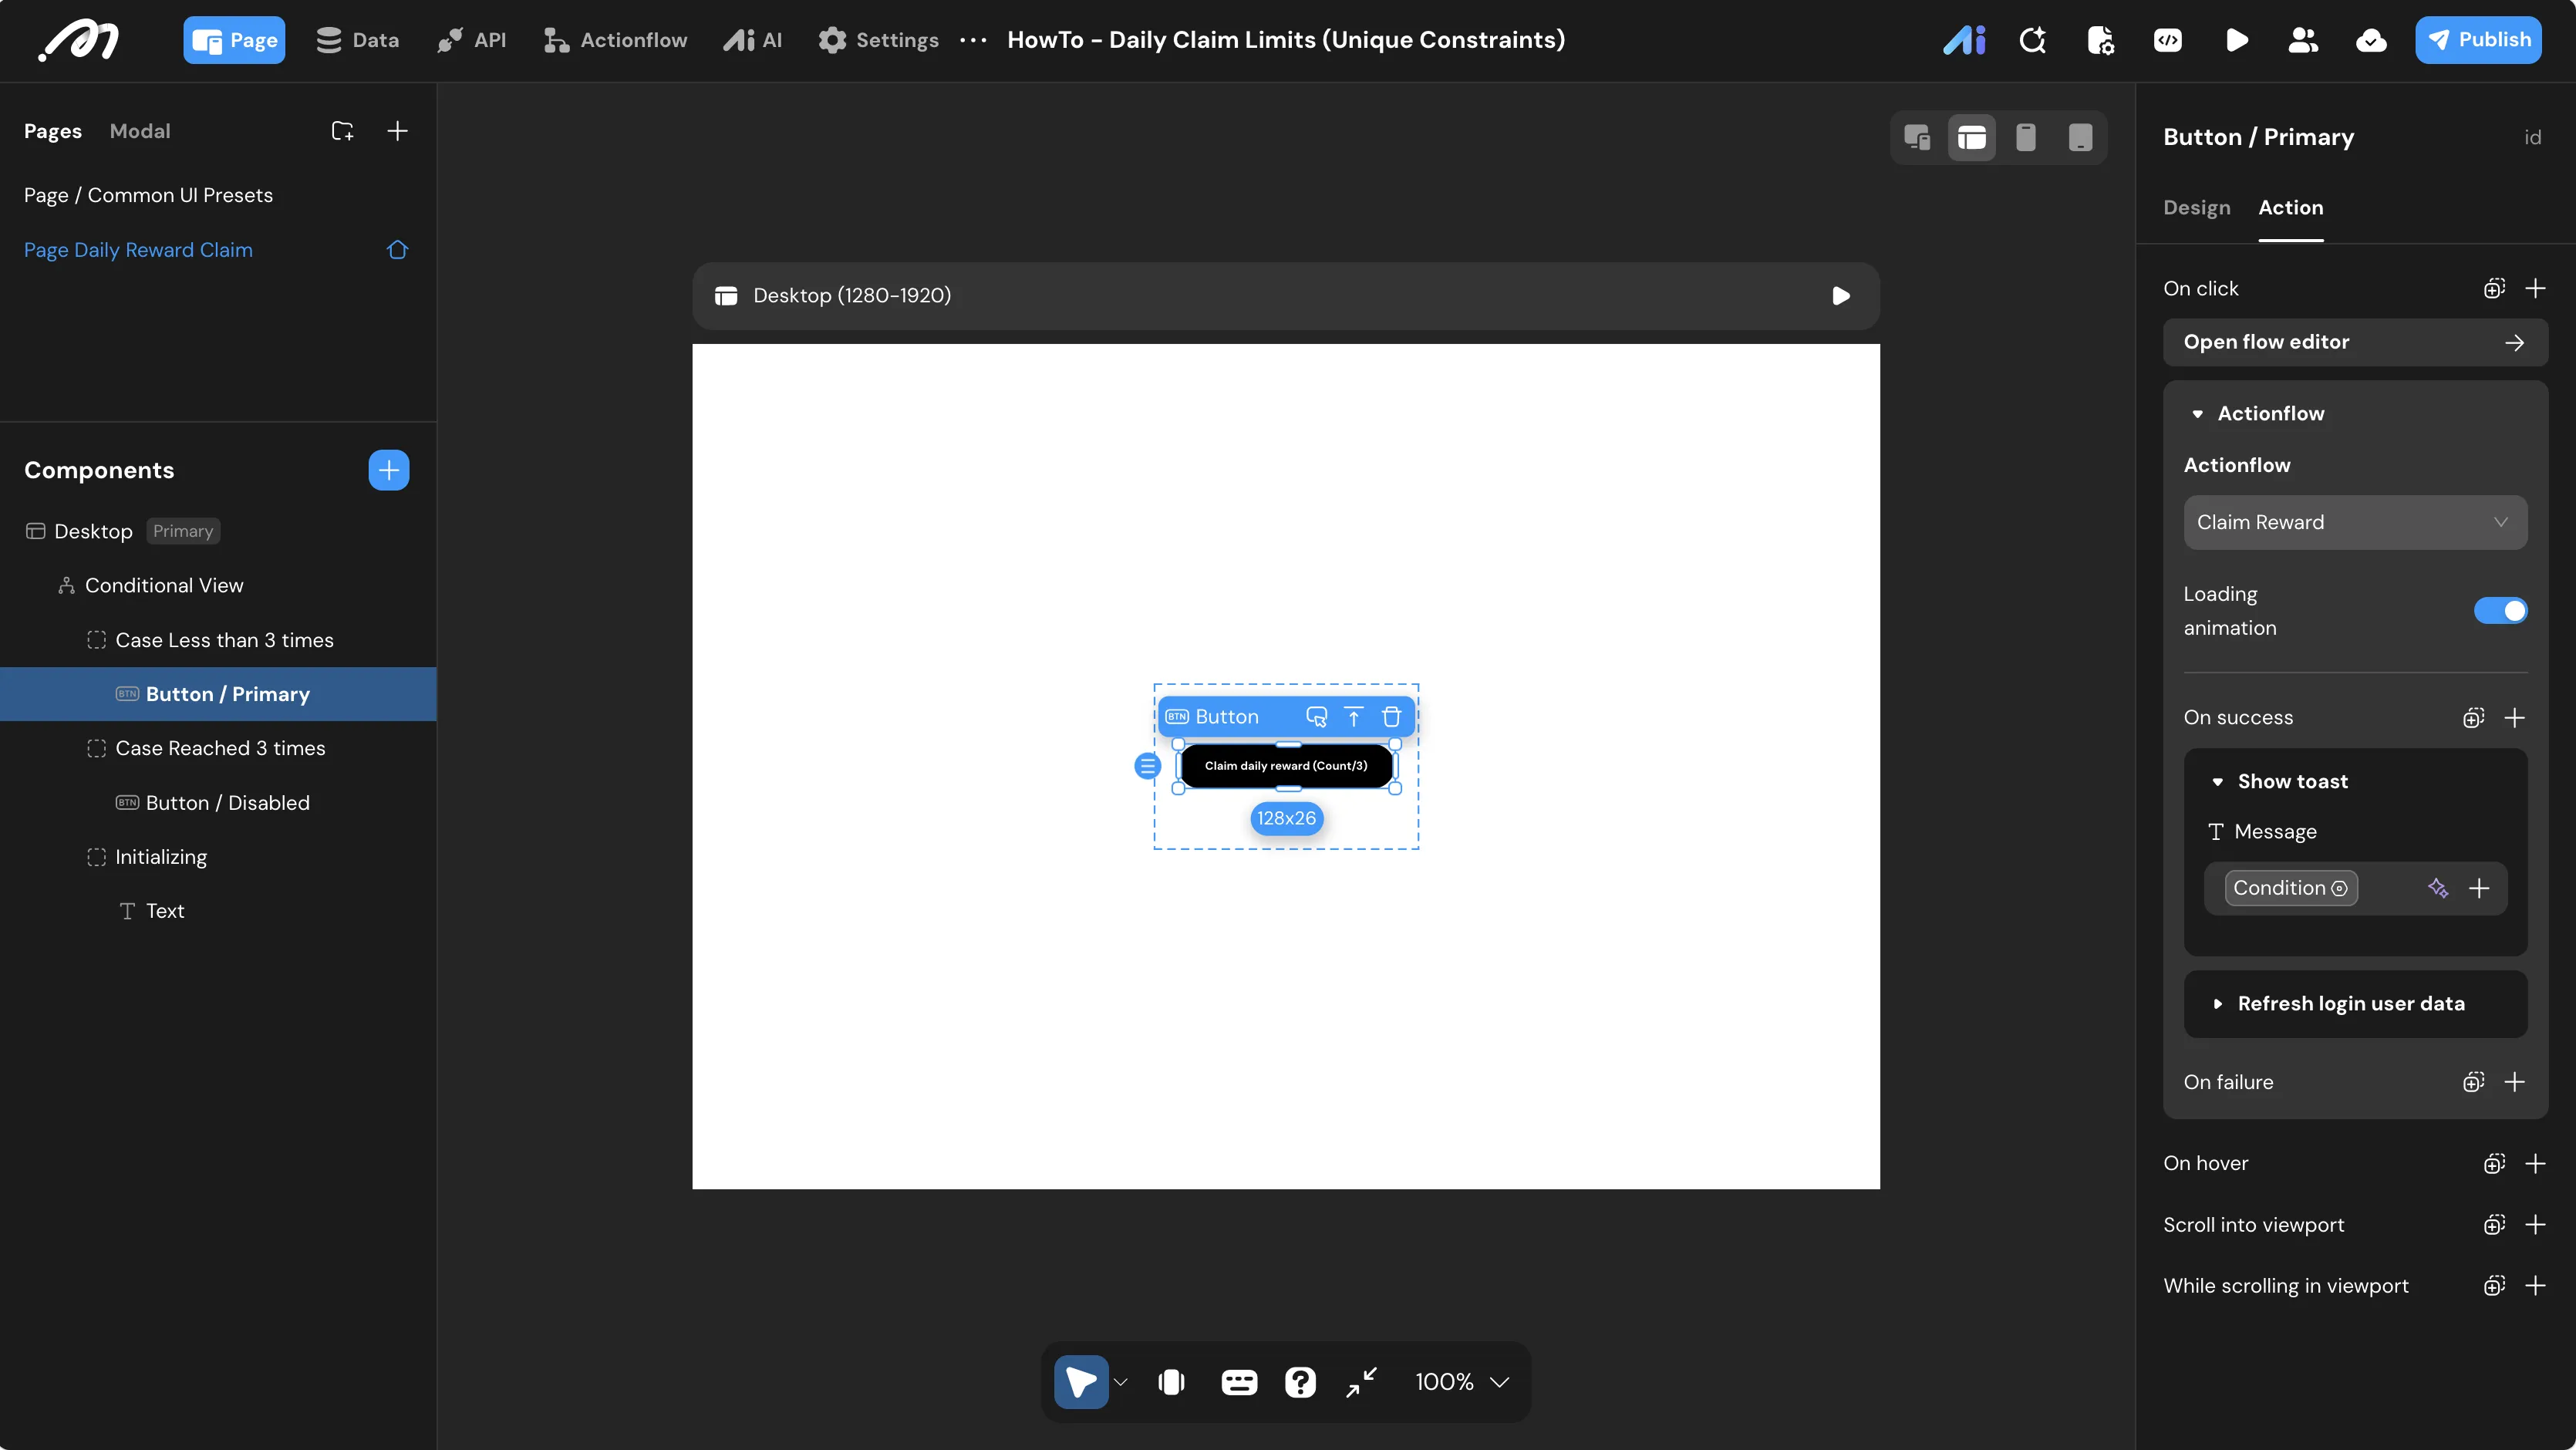
- Feedback Logic (On Success): Click + under On success and select Condition.
- Case Claim Success: Set the condition to
Action result/Actionflow/statusIs true.- Action: Show toast with the message “Claimed successfully”.
- Case Claim Failed: Set the condition to
Action result/Actionflow/statusIs false.- Action: Show toast with the message “Claim failed”.
- Case Claim Success: Set the condition to
- Data Refresh: Add a Refresh logged-in user data action at the end of the On success sequence. This ensures the UI counter and conditional view update immediately after a successful claim.

3. Limit Reached & Initializing States
- Disabled Button: In the
Case Reached 3 timescase, add a Button component.- Button text: Set to
Claim daily reward (3/3). - Interaction: Remove all actions to ensure it is non-interactive.
- Button text: Set to
- Login Prompt: In the
Initializingcase, add a Text component.- Content: Set to “Please log in first”.
4. Visibility Logic Configuration
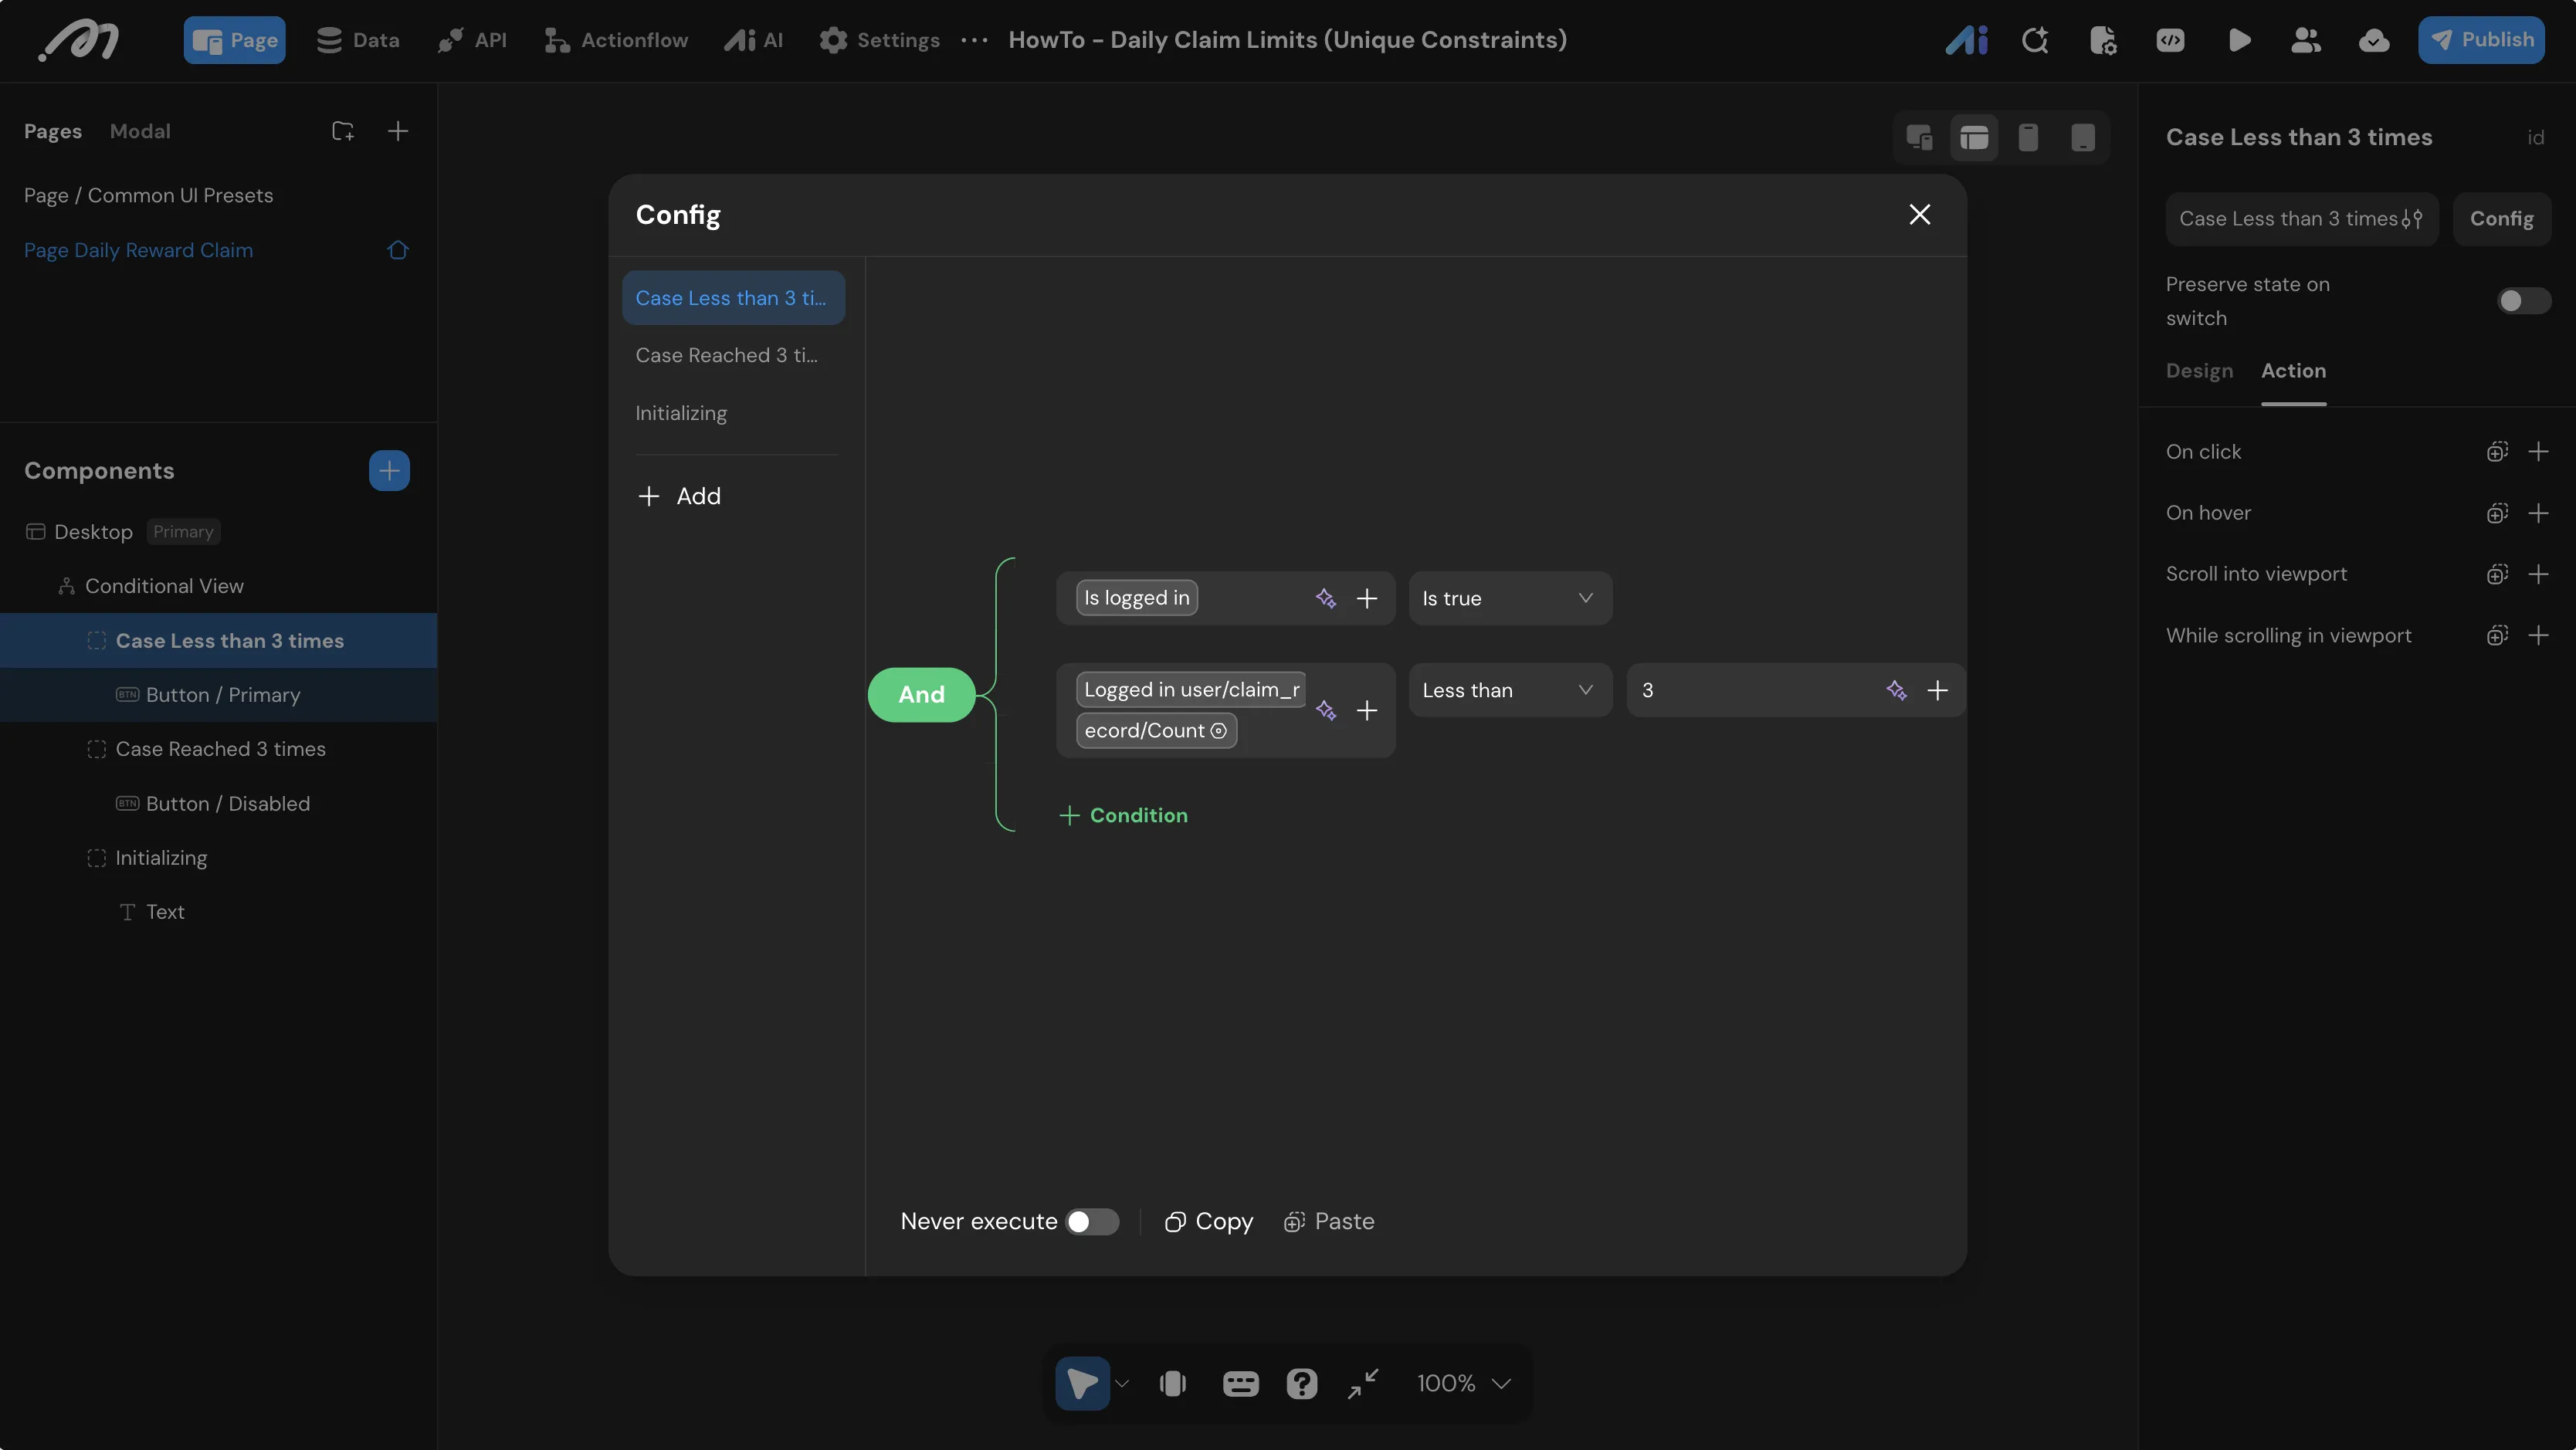
Select the Conditional View and click Config in the right panel to define when each case should be displayed.
- Case Less than 3 times:
- Condition:
AndGlobal/is logged inIs trueLogged in user/claim_record/Count(filtered by today’s date – apply the same filter as in the button binding) Less than3.
- Condition:
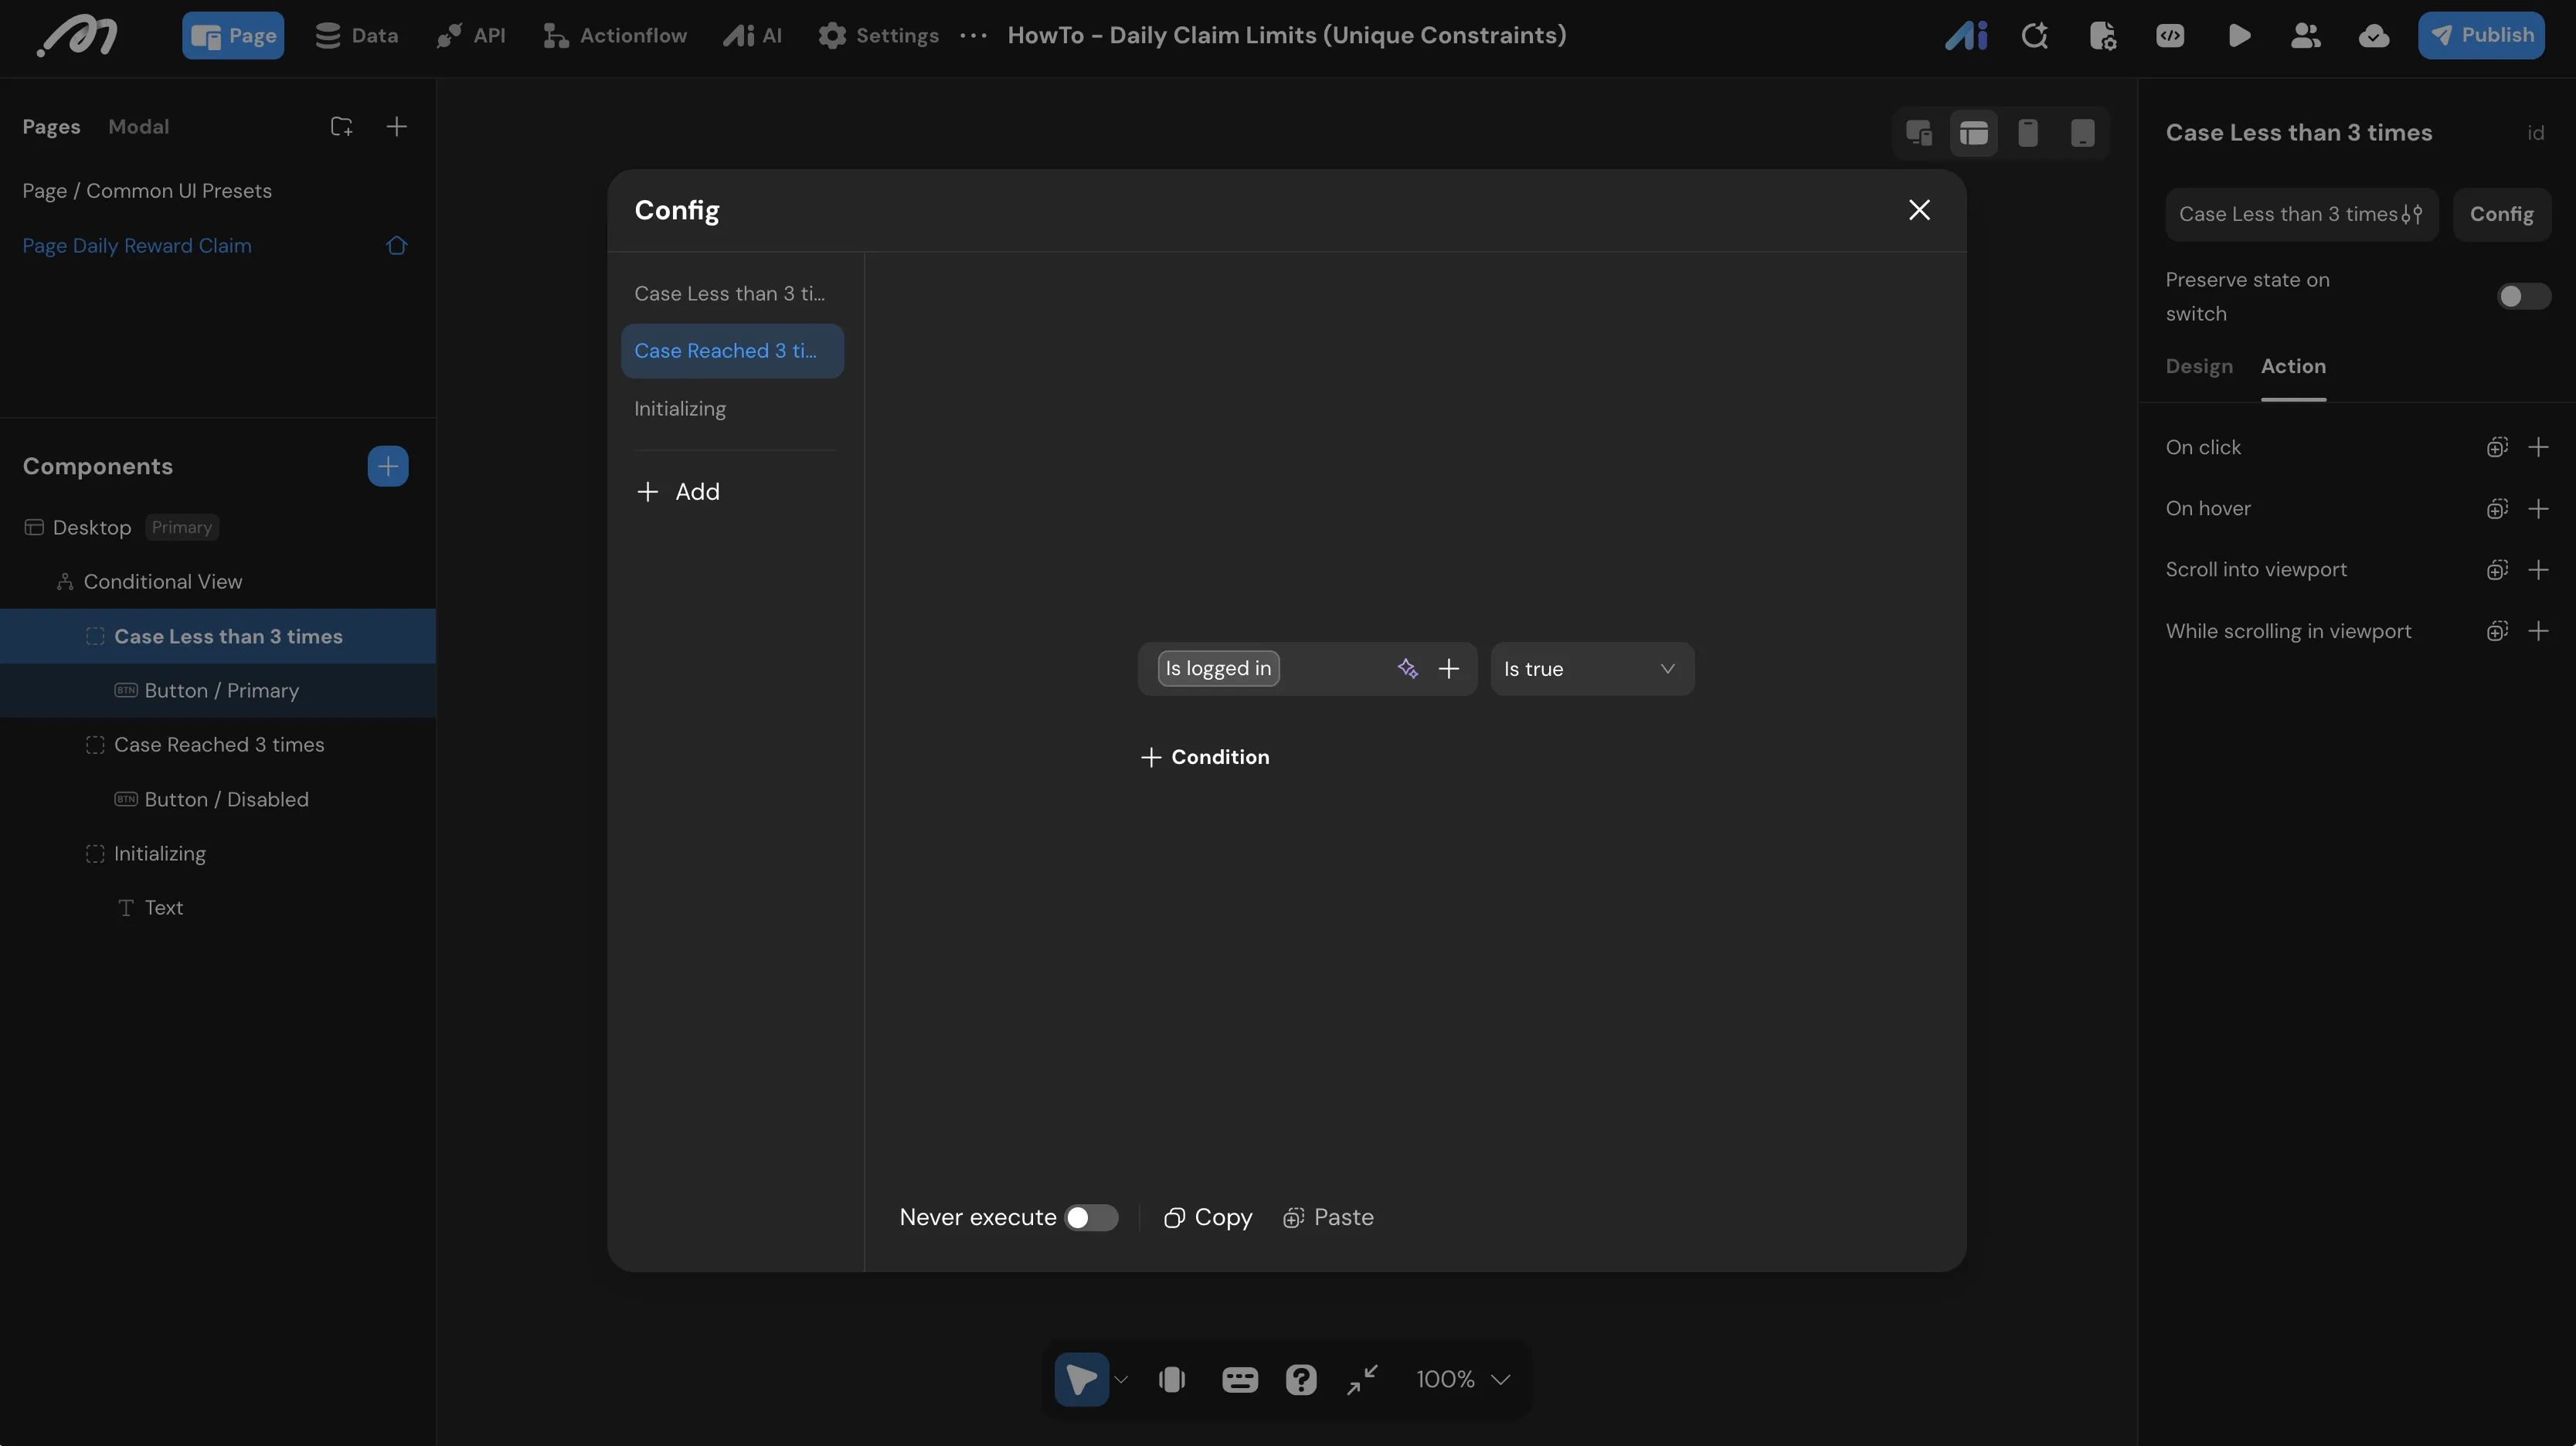
- Case Reached 3 times:
- Condition:
Global/is logged inIs true. (Since this is the second branch, it will only execute if the “Less than 3” condition fails.)
- Condition:
- Initializing:
- Displays when the user is not authenticated.
Verification
Step 1: Authentication Test
- Click Preview and use the Login simulation at the bottom of the screen.
- Select Restore user to logged out state.
- Expected Result: The page displays “Please log in first”.
Step 2: Claiming Rewards
- Use Login simulation -> Create new to log in as a test user.
- Click the “Claim daily reward (0/3)” button.
- Expected Result: A “Claimed successfully” toast appears, and the button text updates to “(1/3)”.
Step 3: Reaching the Daily Limit
- Click the button two more times.
- Expected Result: After the third claim, the button style changes to the Disabled state and displays “(3/3)”.
Step 4: Database Integrity Check
- Go to the Data Source tab and open the
claim_recordtable. - Expected Result: You should see exactly 3 records for the test user with sequence numbers 1, 2, and 3 under today’s date.
If you test this in a high-concurrency environment, you might see the Actionflow return “Claim failed.” This is precisely the unique constraint in action, preventing duplicate over-claiming records from being created.