Set Up the Database
Momen provides a PostgreSQL-backed relational database. This guide covers adding tables and fields, configuring relations between tables, unique constraints, data permissions, and vector storage.
Data model overview
Open the Data tab → Data model to view and edit your project’s data model.
The left sidebar lists every table in the project under two groups, Custom and System. Selecting a table shows its details on the right, organized into five tabs:
| Tab | Contents |
|---|---|
| Field | The table’s fields, and where you create, edit, and delete them. |
| Constraint | Unique constraints on the table — see Constraint settings. |
| Permission | CRUD permissions for the table — see Permission management. |
| Vector storage | Vector storage settings for text fields — see Set Up Vector Search. |
| Trigger | Triggers that reference this table. |
The icons to the right of the table name switch between the detail view and the relationship view. The detail view shows and edits a single table; the relationship view shows every table and how they relate.
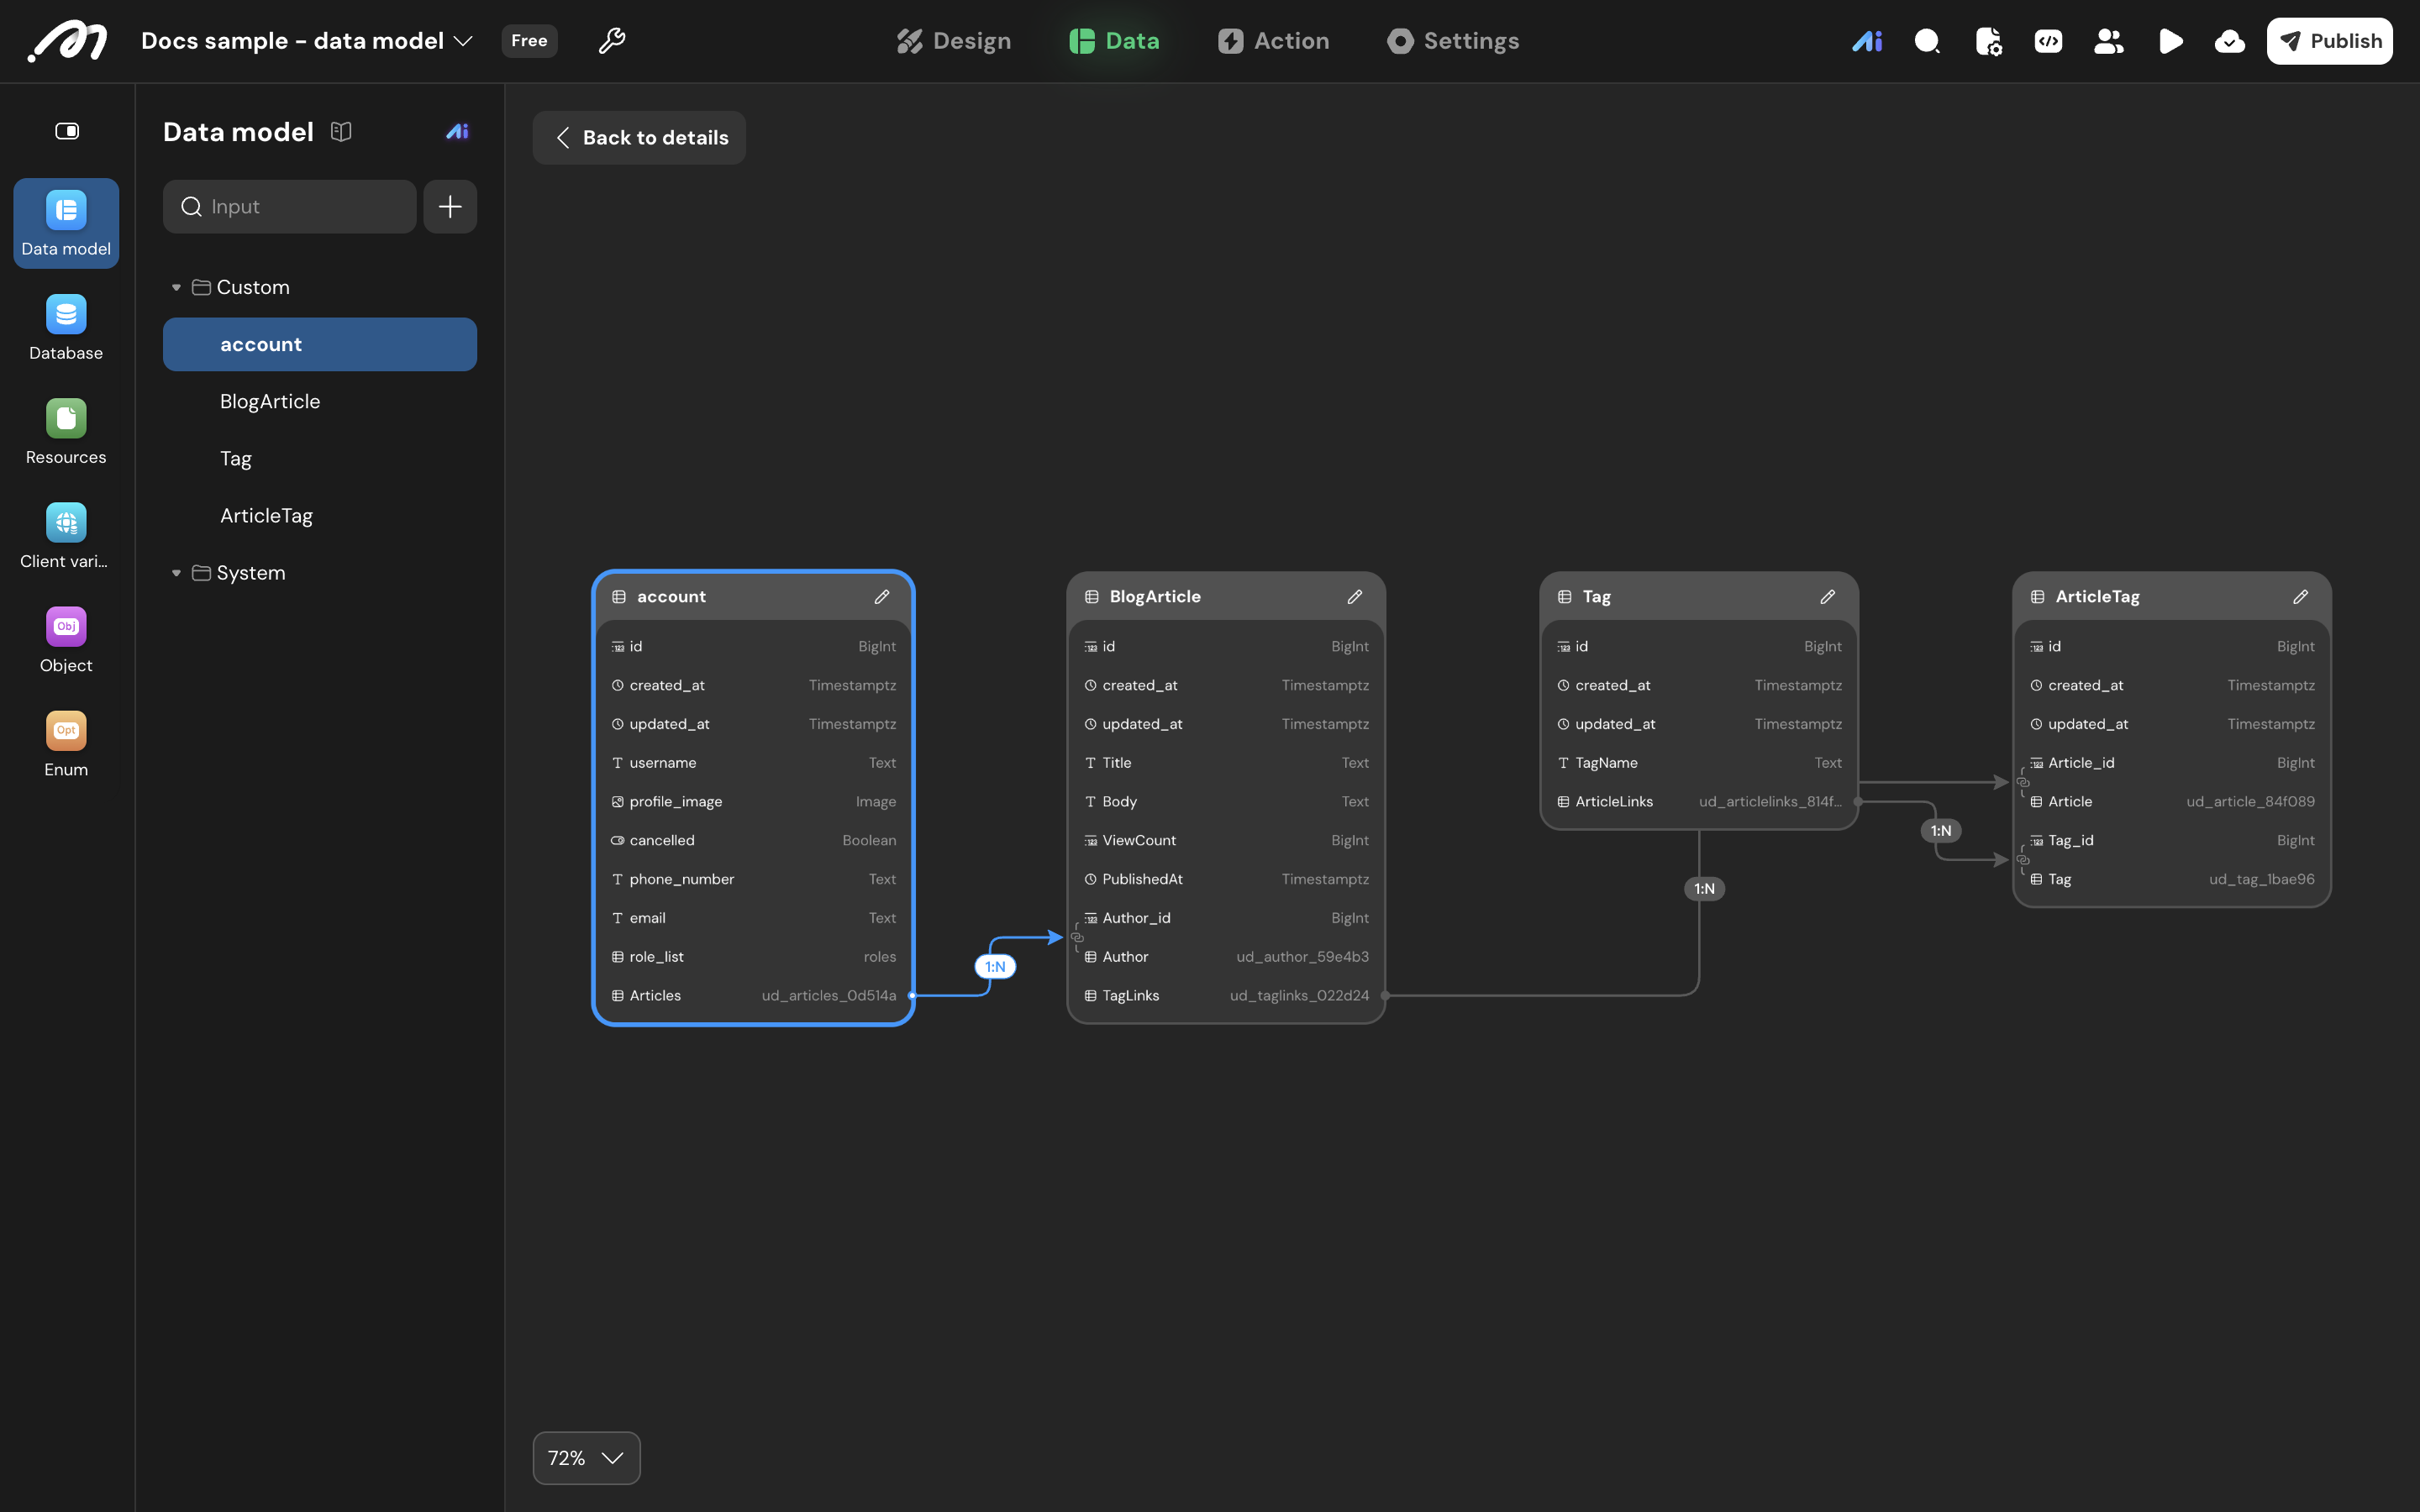
Table name, field name, and API name
Every table and every field carries two names:
- Table name / field name — the label shown in the editor, meant to be read by people. It must not contain spaces, must be unique, and is limited to 60 bytes (about 20 CJK characters or 60 Latin characters).
- API name — the unique identifier the system uses to access the table or field. It is generated from the table or field name when you create it and can be edited beforehand, but cannot be changed once created. An API name must start with a lowercase letter and may contain only lowercase letters, digits, and underscores (e.g.
blog_article), is limited to 63 characters, and cannot start withfz_(a prefix reserved for the system).
These strings cannot be used as API names:
add, alter, all, and, any, as, asc, between, case, check, column, constraint, create, database, default, delete, desc, distinct, drop, exec, from, having, in, index, join, like, limit, not, or, procedure, rownum, select, set, table, top, union, unique, update, values, view, where, bigint, timestamp, timestamptz, timetz, date, numeric, uuid, jsonb
System tables and system fields
Besides your own tables and fields, a project also contains system tables and system fields maintained by platform features.
System tables
System tables are maintained by platform features. Except for the account table, system table API names start with fz_, and they do not accept custom fields or structural changes. No system table can be deleted.
| Name | API name | Purpose |
|---|---|---|
| account | account | Account records. Supports custom fields and relations. The real credentials used for sign-in live in an internal credential table; the matching fields on the account table are synced copies you can use in your app. |
| role table | fz_permission_role | The roles defined in the project. |
| user role | fz_account_has_permission_role | Which accounts hold which roles. |
| conversation | fz_conversation | AI agent conversations. |
| message | fz_message | Messages within a conversation. |
| message_content | fz_message_content | The content of a message (text, image, JSON, and so on). |
| tool_usage_record | fz_tool_usage_record | Requests and responses of AI agent tool calls. |
| province | fz_province | Province data. |
| city | fz_city | City data. |
| district | fz_district | District data. |
| audit record | fz_audit_record | Records of admin operations. |
The login password, along with the username, email, and phone number used to verify sign-in, are all stored in an internal credential table that is not exposed and cannot be accessed by your app. The identically named username, email, and phone number fields on the account table are synced copies maintained by the platform, meant for querying and display; rewriting a copy does not change the user’s sign-in credentials.
The remaining system tables are written by their platform features. Running an AI agent, for example, produces conversation and message records. You cannot add rows to these tables by hand in the database editor.
System fields
Every table — custom and system alike — is created with three system-managed fields. Momen maintains them directly; they cannot be edited, deleted, or renamed.
| Field | API name | Type | Behavior |
|---|---|---|---|
id | id | BigInt | The row’s primary key, guaranteeing uniqueness. Auto-incremented on every insert. |
created_at | created_at | Timestamptz | When the row was first inserted into the database. |
updated_at | updated_at | Timestamptz | When the row was last updated. Maintained by the database whenever the data actually changes. |
The database guarantees that id is unique and increasing, but not contiguous. All of the following create gaps:
- Deleting a row — ids of new rows skip the deleted one
- Transactional tasks — ids consumed during the transaction are not returned on rollback
- Bulk imports — ids are pre-allocated for every row, so skipped rows or a failed, rolled-back import leave gaps
For that reason, do not use id as a user-facing order number or membership number that must be contiguous or follow a fixed format. It remains fine for referencing rows and querying specific records.
Configure tables
Add table
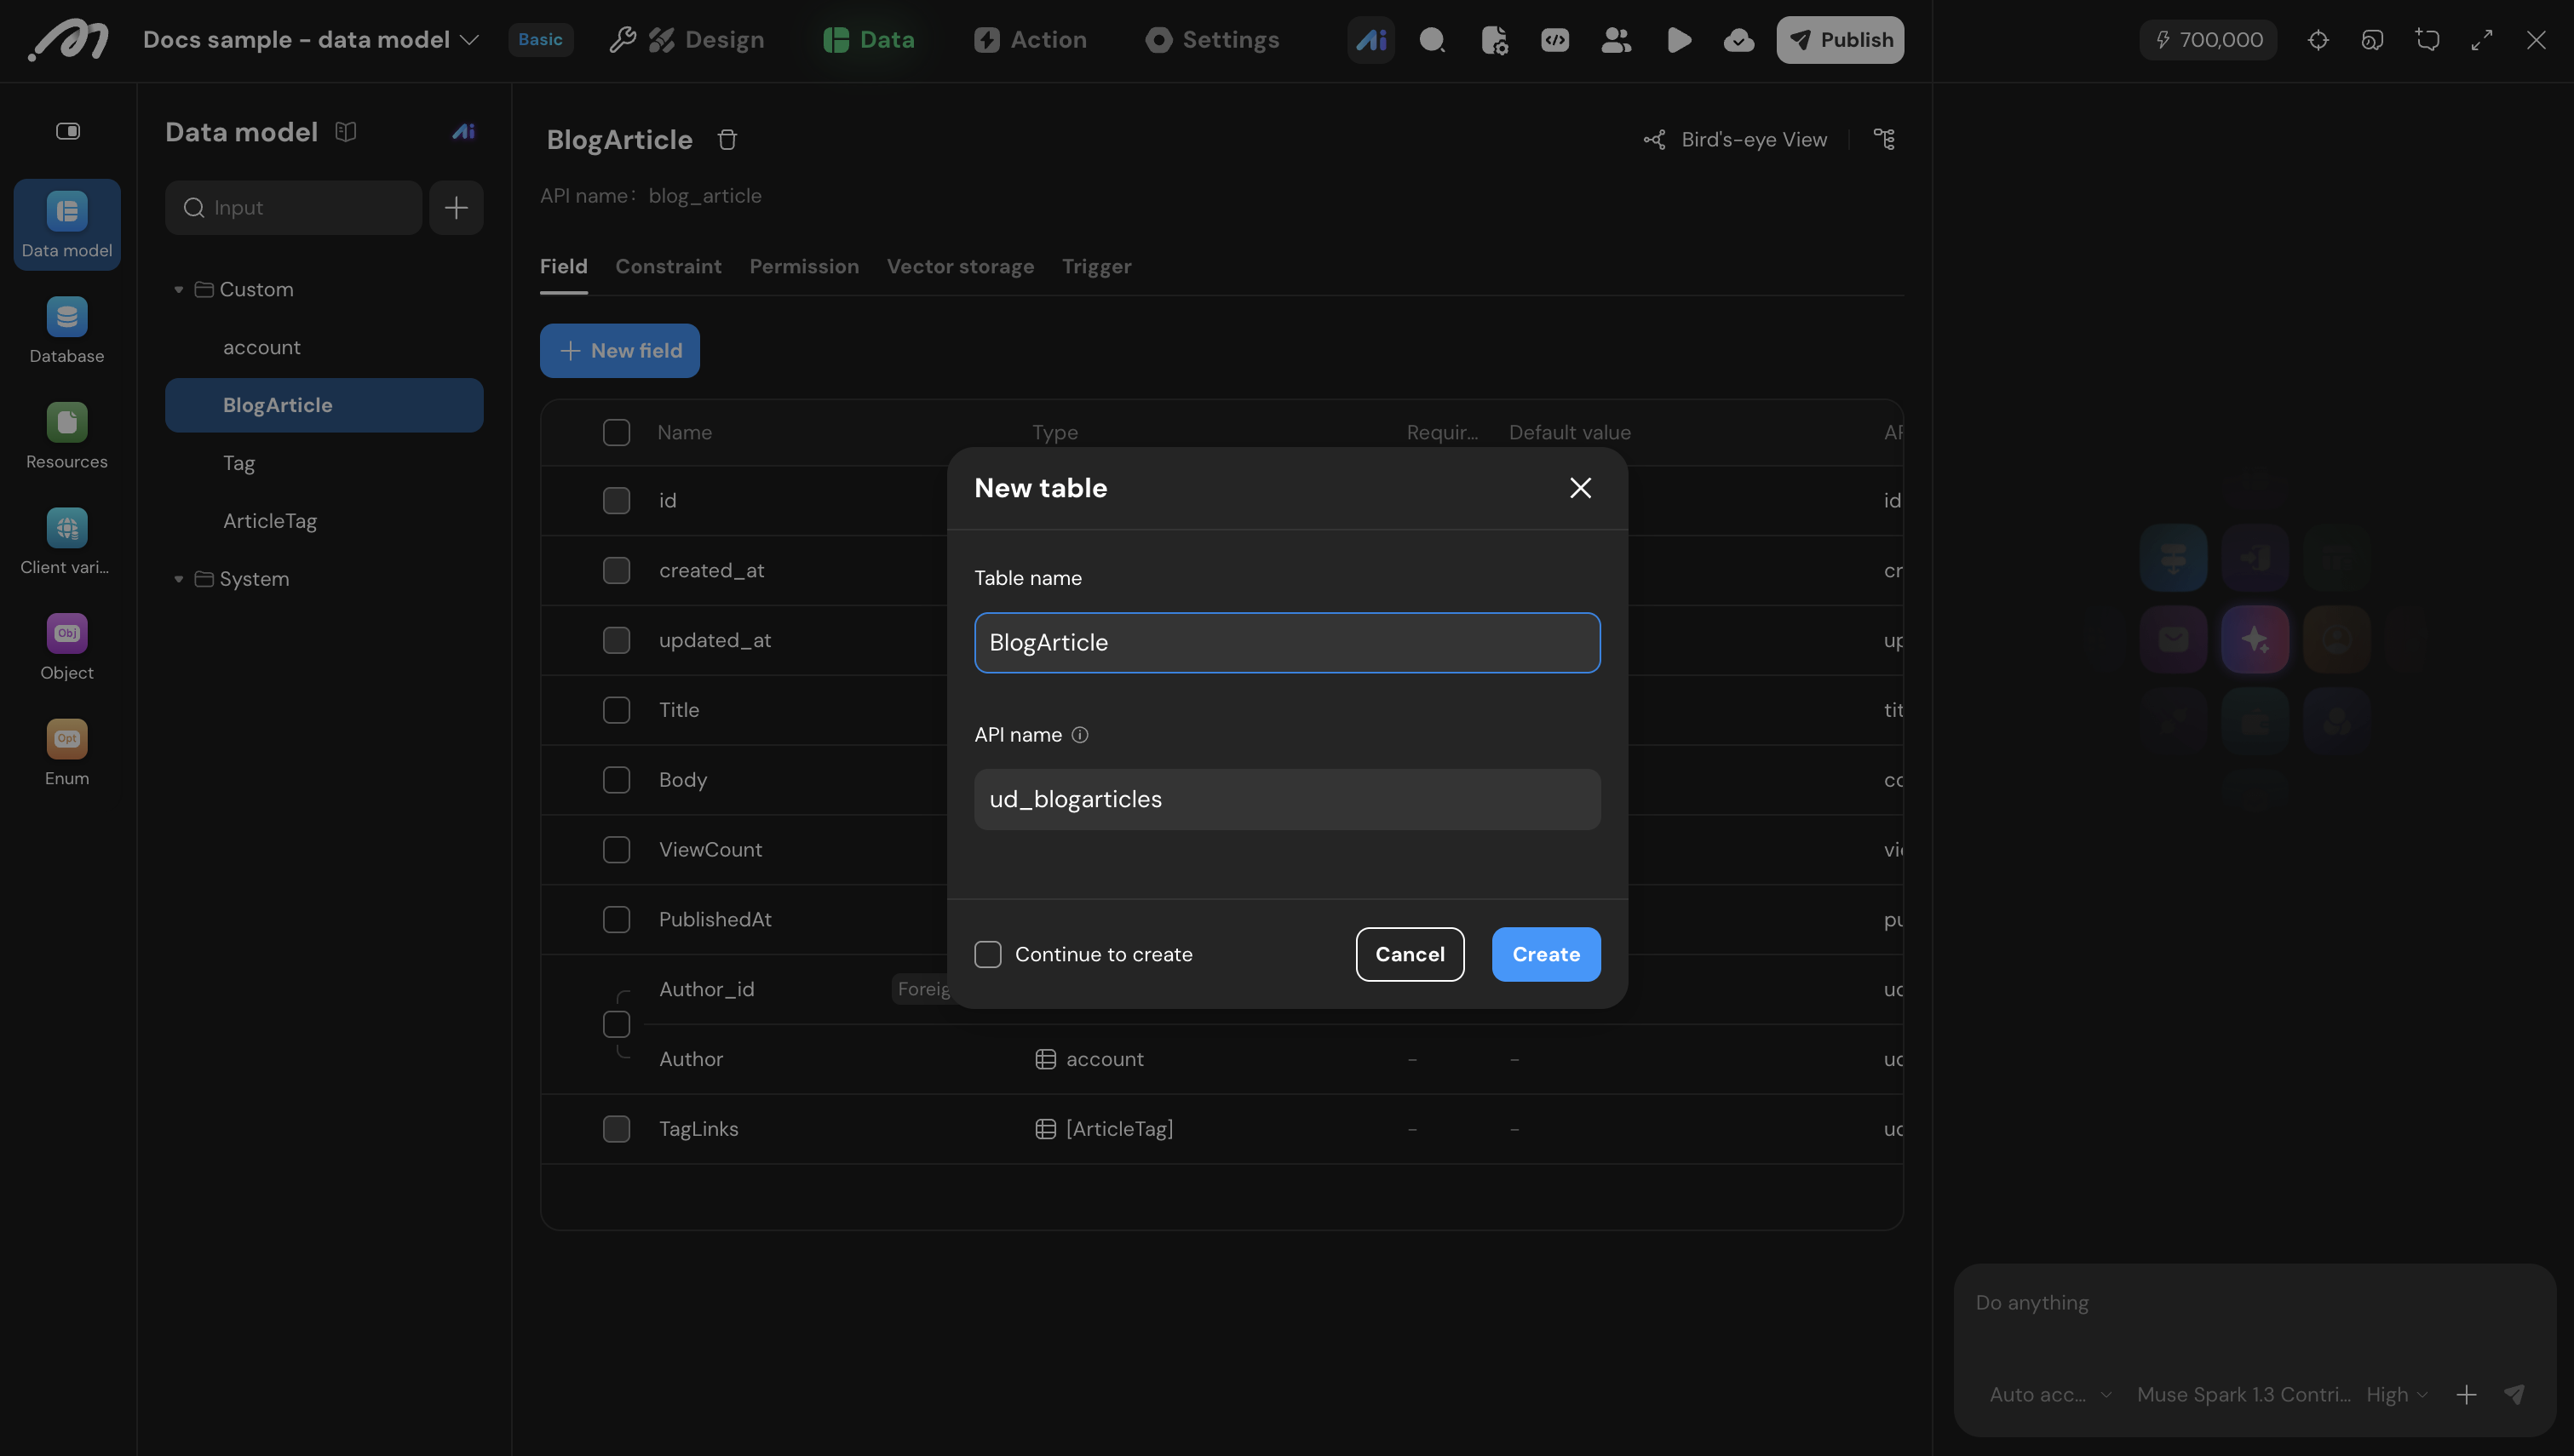
Click + to the right of the search box in the sidebar to open New table, then configure:
- Table name — the name shown in the editor.
- API name — the unique identifier the system uses to access the table. Generated from the table name by default and cannot be changed after creation.
- Continue to create — keep the dialog open after clicking Create, so you can add several tables in a row.
Add fields
Select a table, open the Field tab, and click New field. A configuration panel opens on the right. Configure:
- Name — the name shown in the editor.
- Type — pick from the Basic, Relation, and Enum groups. Basic types include Text, Decimal, BigInt, Boolean, Timestamptz, Timetz, Date, JSON, Image, Video, and Function — see Data Types for the full reference.
- Required — when on, the field cannot be empty.
- Default value — the value written when a new row leaves the field empty.
- API name — the field’s unique identifier. Generated from the name by default and cannot be changed after creation.
- Continue to create — keep the panel open after saving, so you can add several fields in a row.
The field list also shows each field’s type, required flag, default value, and API name. Changes that are not yet synced are marked with a dot at the start of the row, and the table header shows a Not synchronized badge.
Turning Required on for a field that is already synced and has no default value opens an Input default value dialog; you must supply a default before you can continue. After syncing the backend, every existing empty value in that field is automatically updated to this default.
Momen uses Decimal for precise numbers. Custom code (JavaScript) or float APIs can introduce precision loss (e.g. 0.1 + 0.2 → 0.30000000000000004) if written back to the database.
Add relations
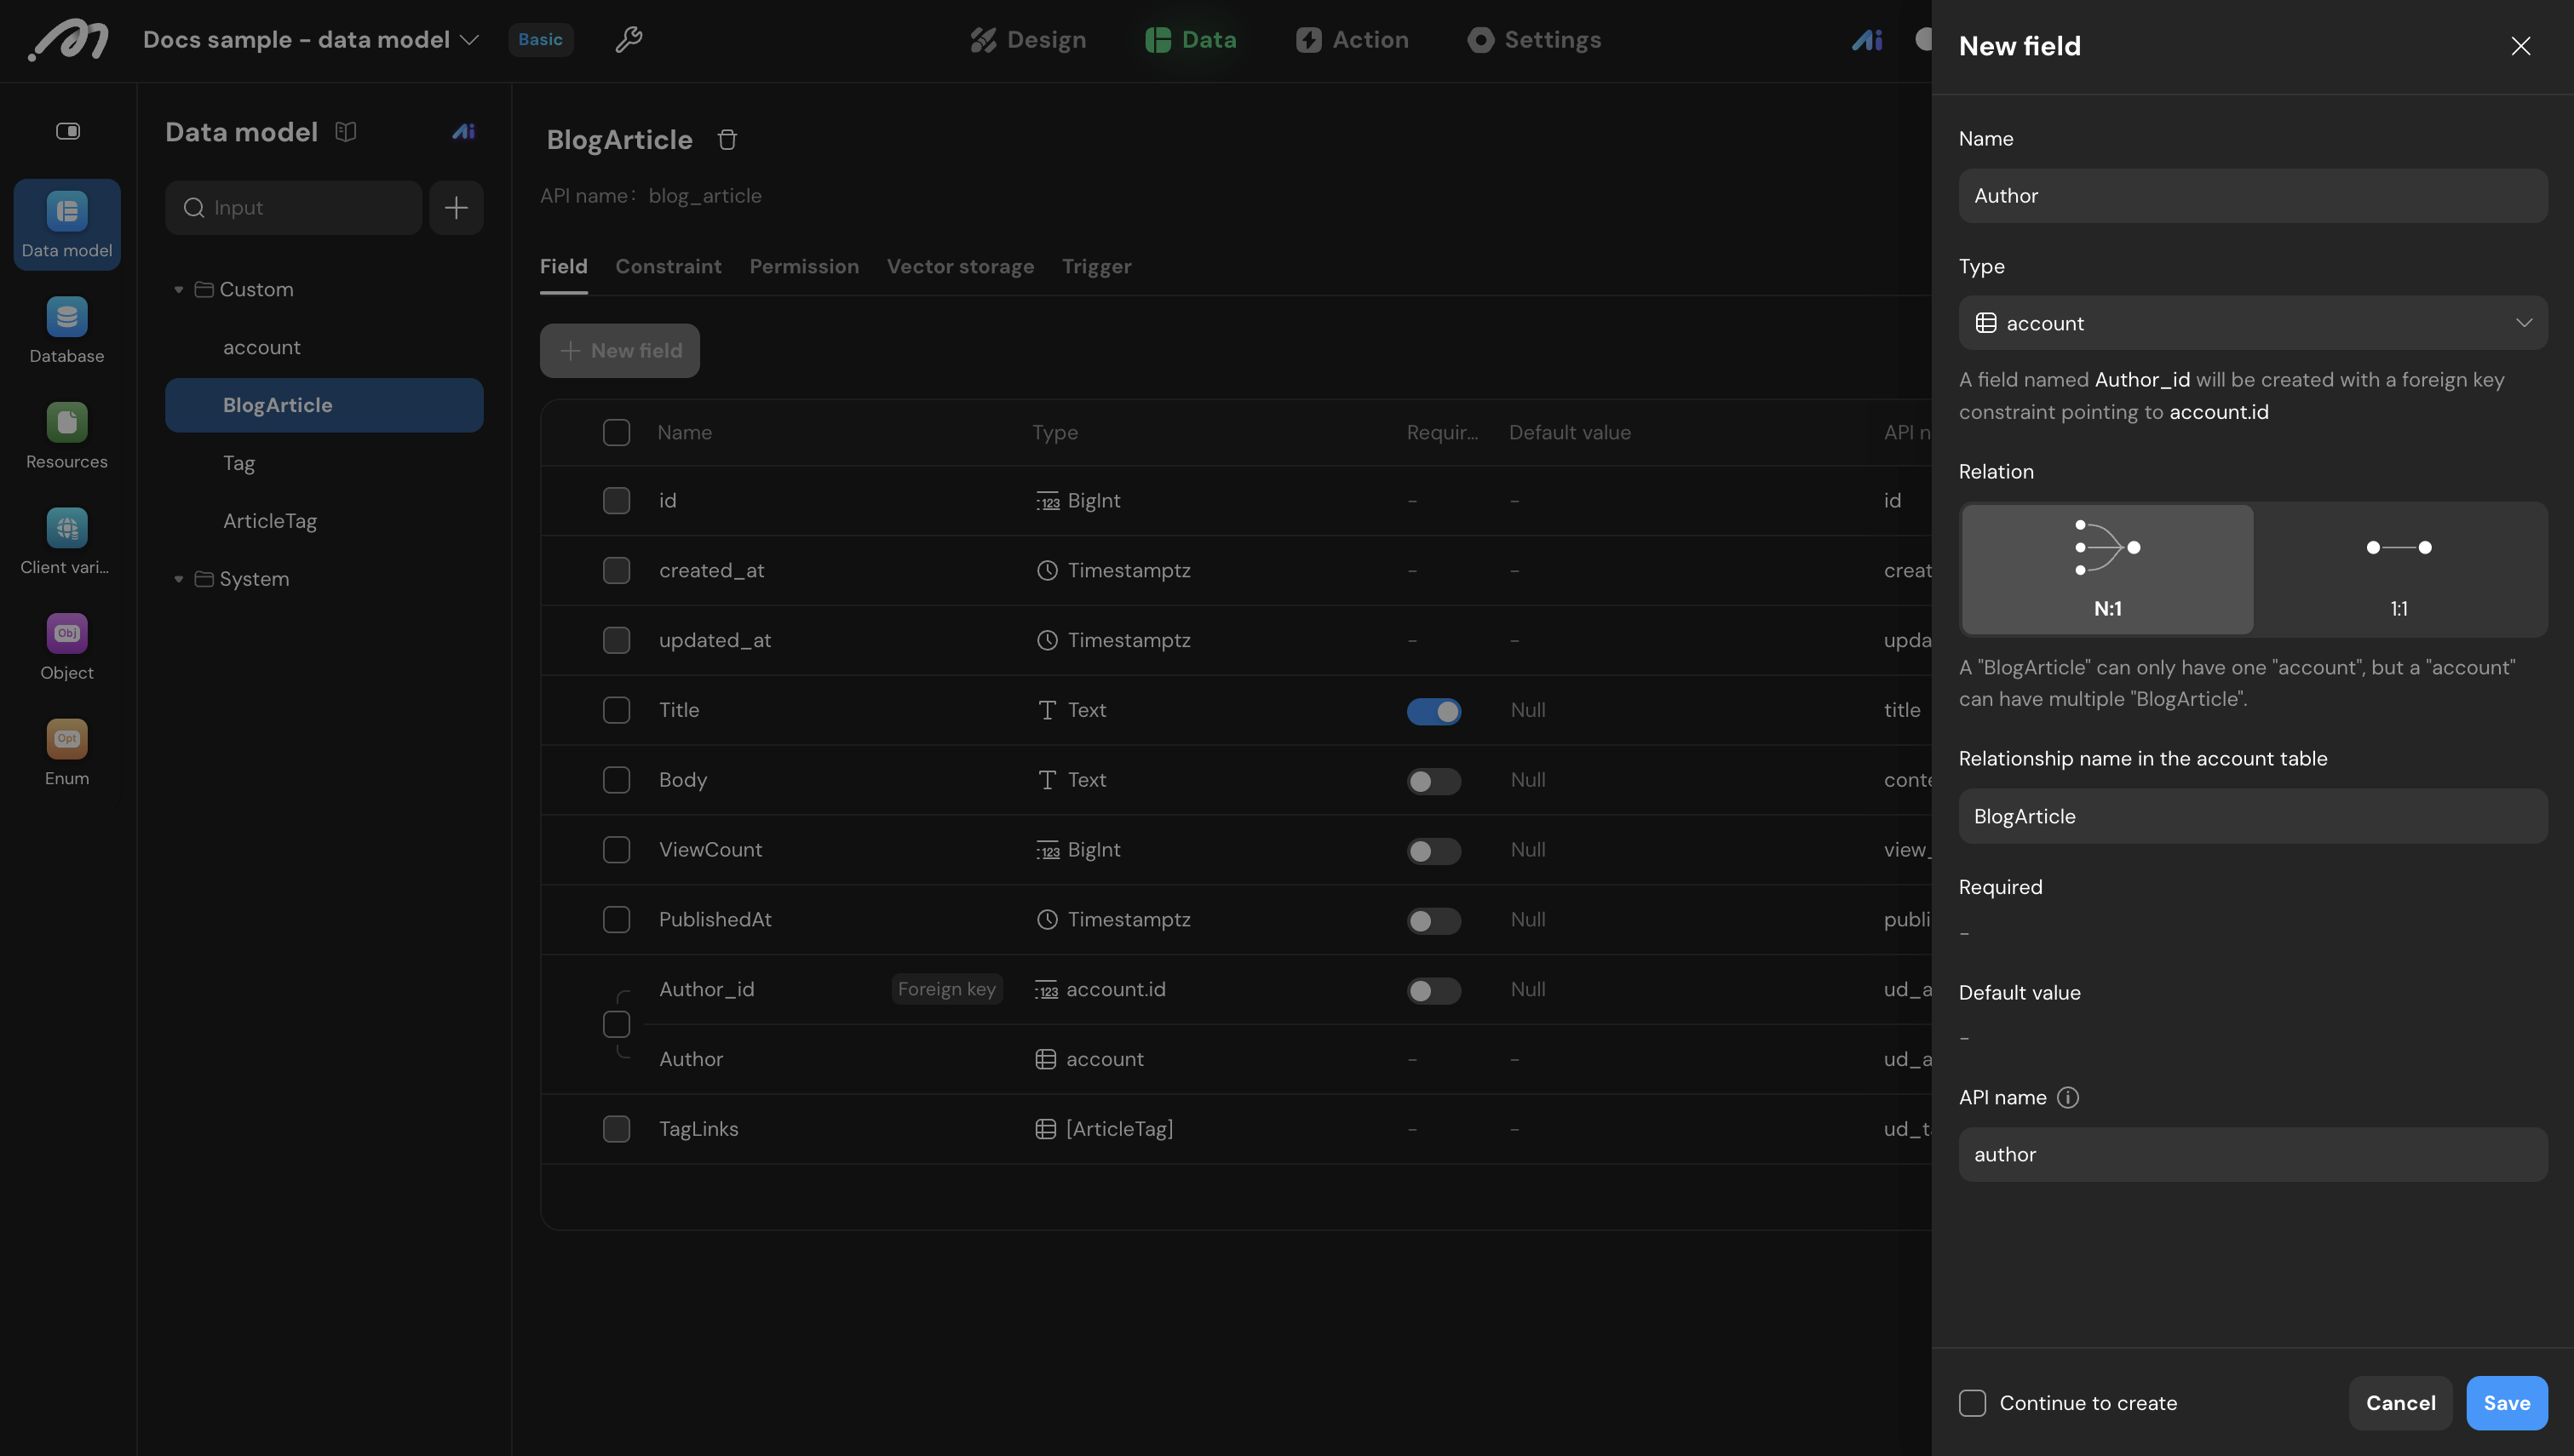
When creating a field, switch its Type to Relation and pick the target table. For example, relate the “BlogArticle” table to the “account” table to record each article’s author.
Configure:
- Name — the name of this relation in the current table (e.g.
Author). - Type — the target table of the relation.
- Relation — N:1 or 1:1. The panel then spells out what the relation means in one sentence, e.g. “A BlogArticle can only have one account, but an account can have multiple BlogArticle”.
- Relationship name in the target table — the name the reverse relation takes in the target table (e.g.
Articlesin the account table).
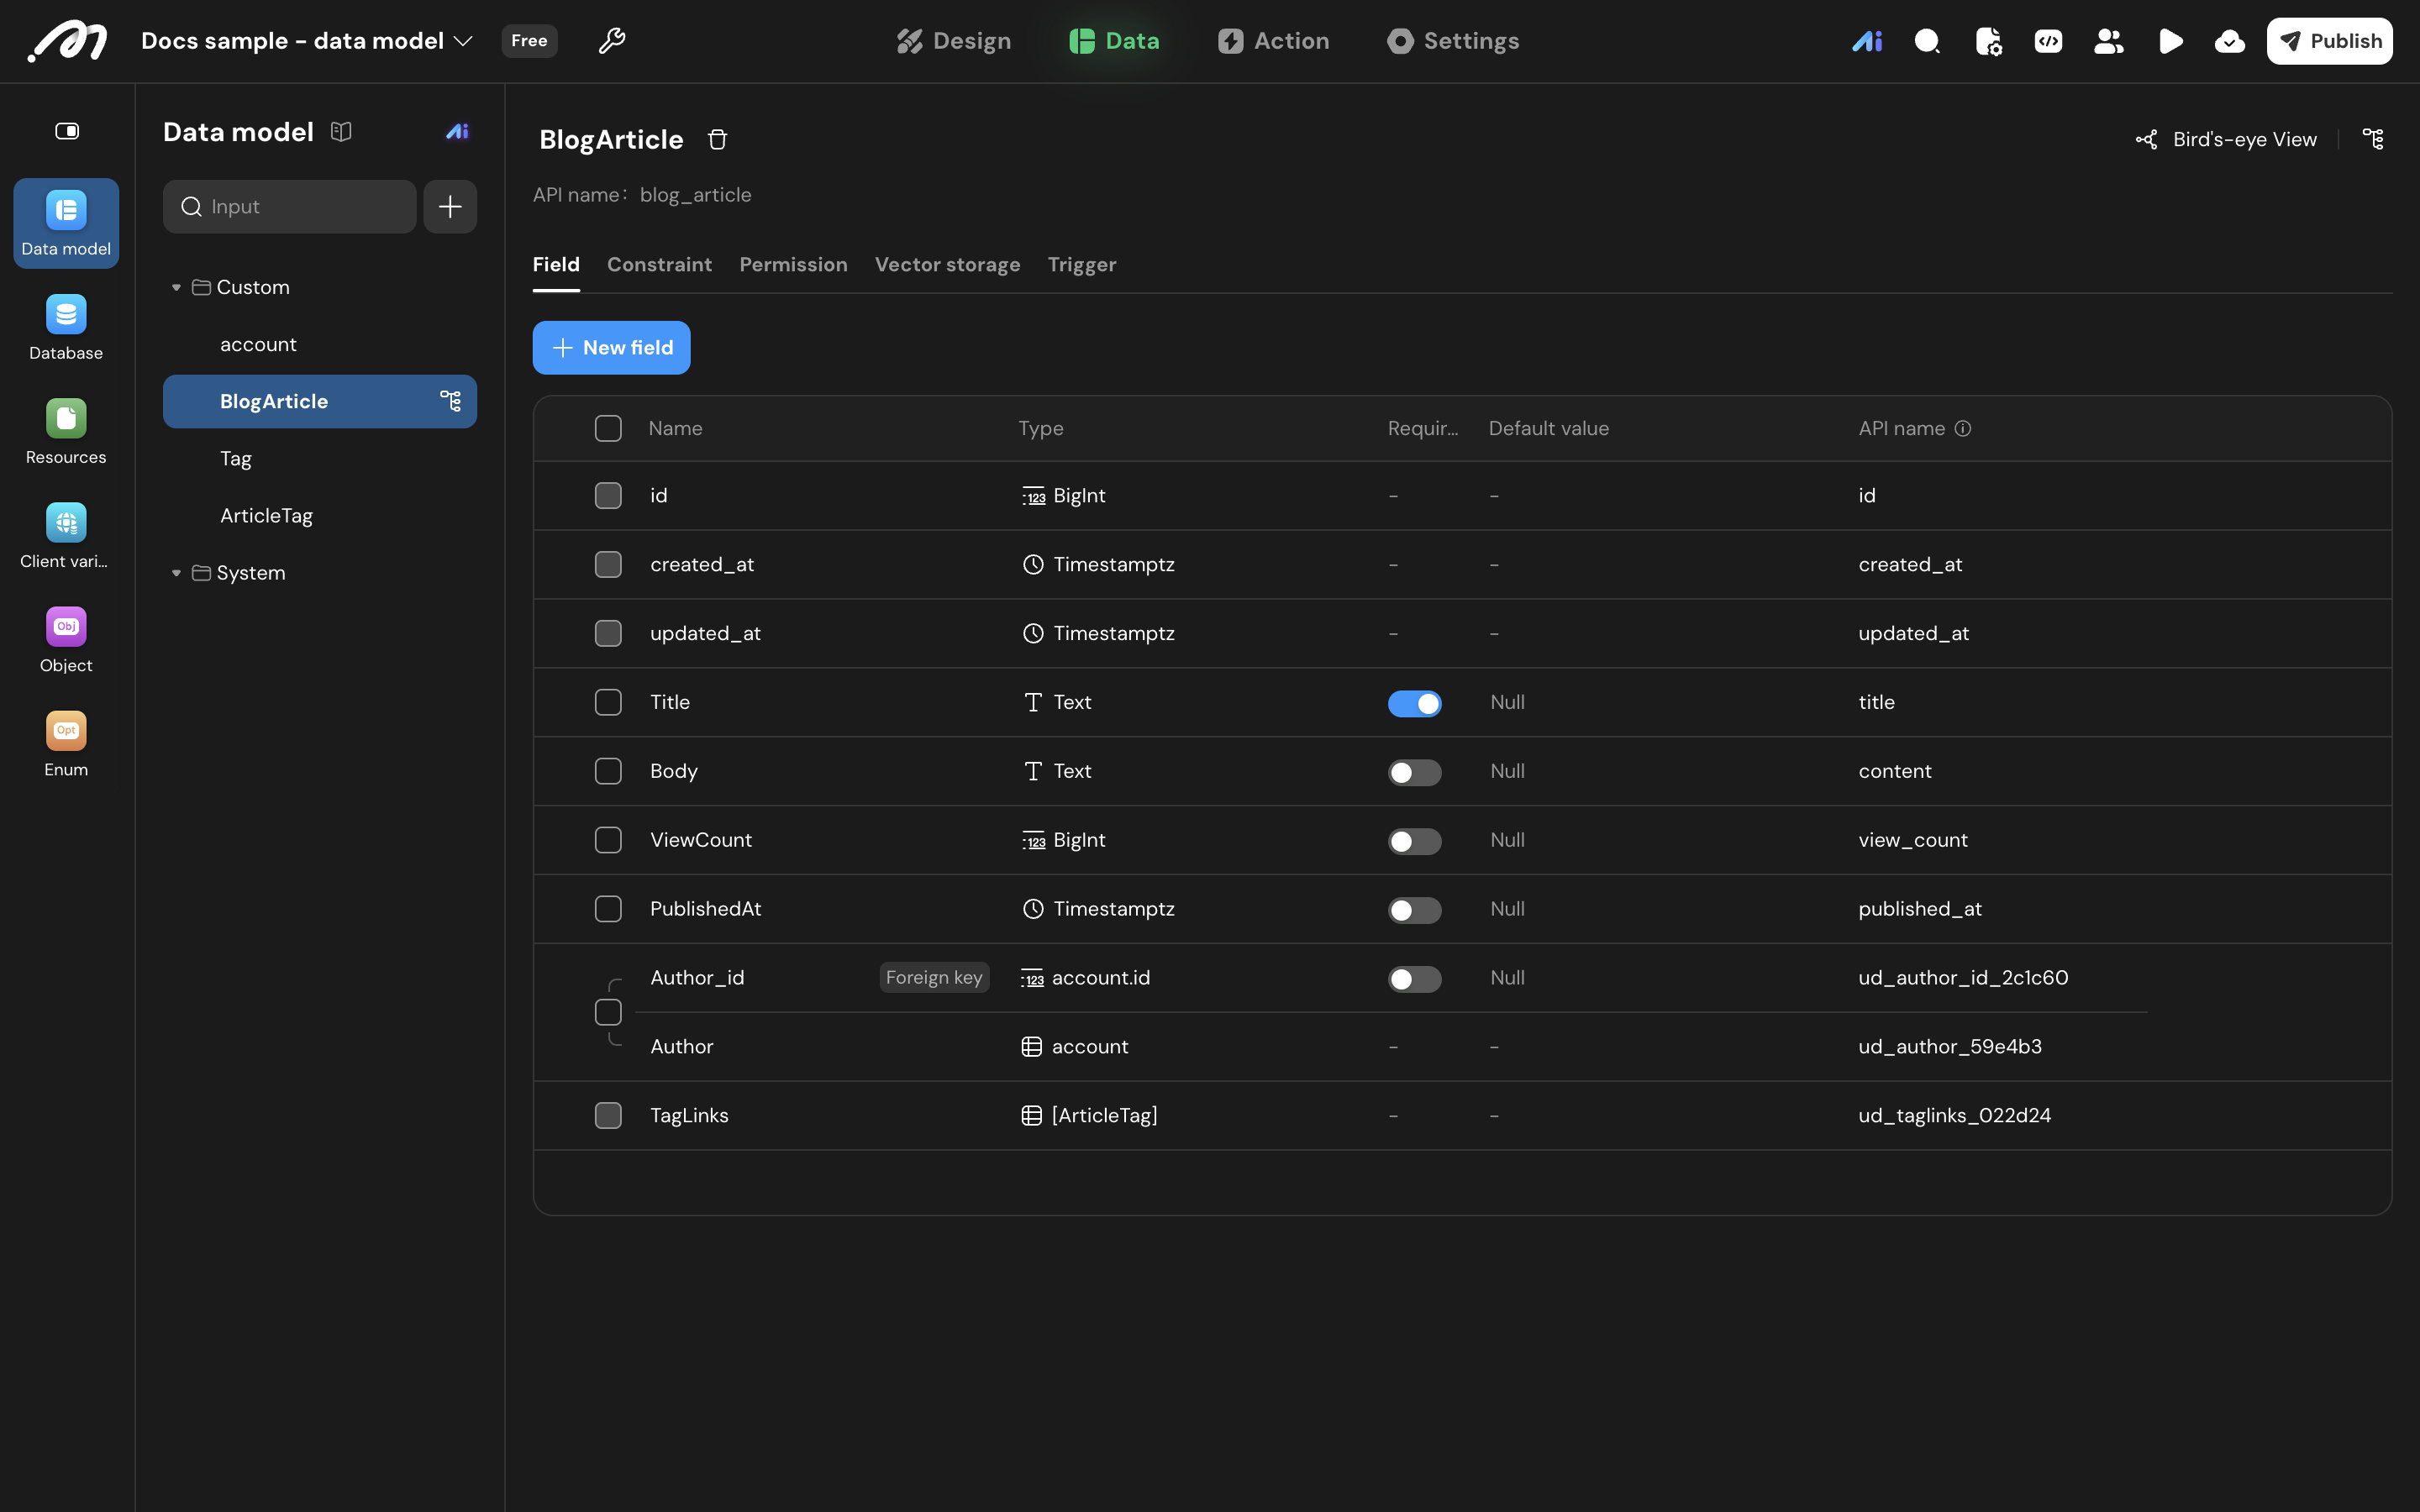
On save, a foreign key field named <Name>_id is created in the current table with a foreign key constraint pointing to <target table>.id. In the field list, the foreign key and the relation field appear grouped, with the foreign key tagged Foreign key.
Many-to-many relations need a junction table: create one, then add an N:1 relation from it to each of the two tables. See Relational Data Modeling for the modeling approach.
Sync changes
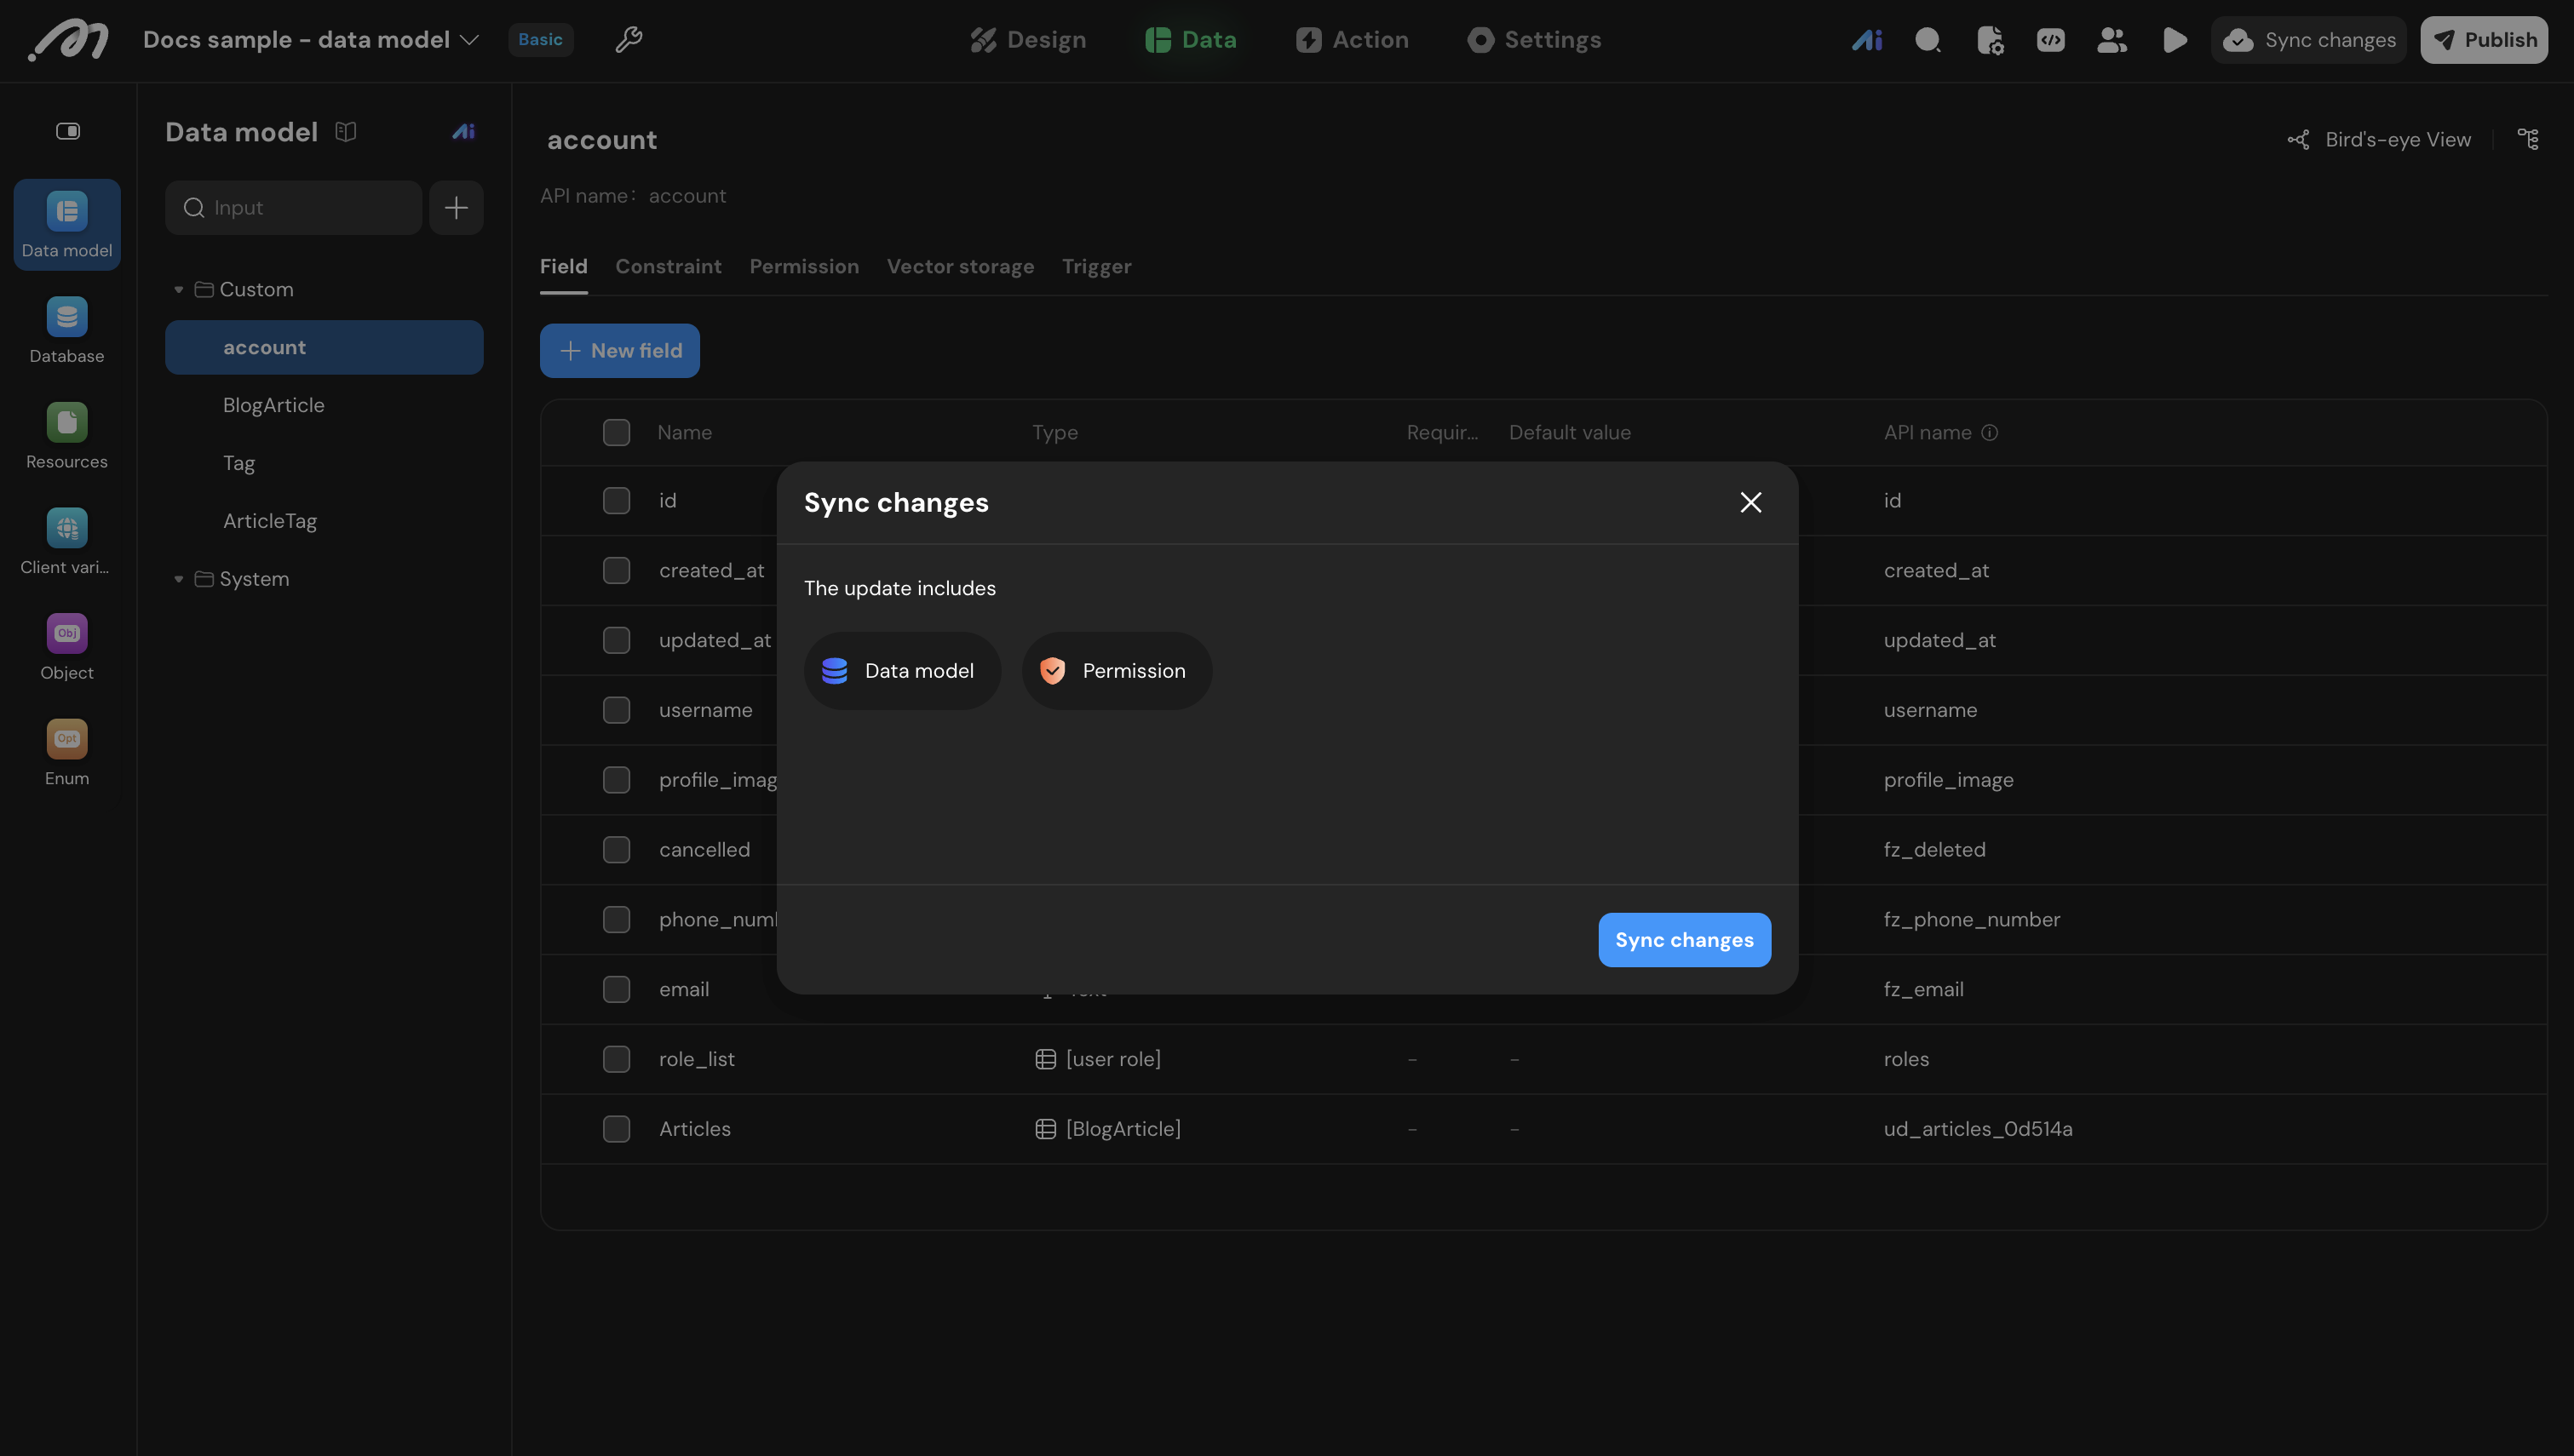
- Once tables, fields, and relations are configured, click Sync changes in the top bar.
- The dialog lists what the update includes (e.g. Data model, Permission); confirm by clicking Sync changes.
- Schema changes take effect only after the sync completes, and the Not synchronized badge clears.
If the project is already published, schema changes can break online requests or destroy data — proceed carefully. Once you delete a field or a table and sync, its data is deleted.
Constraint settings
Unique constraints prevent duplicate values on a single field or on a combination of fields.
Open constraint settings
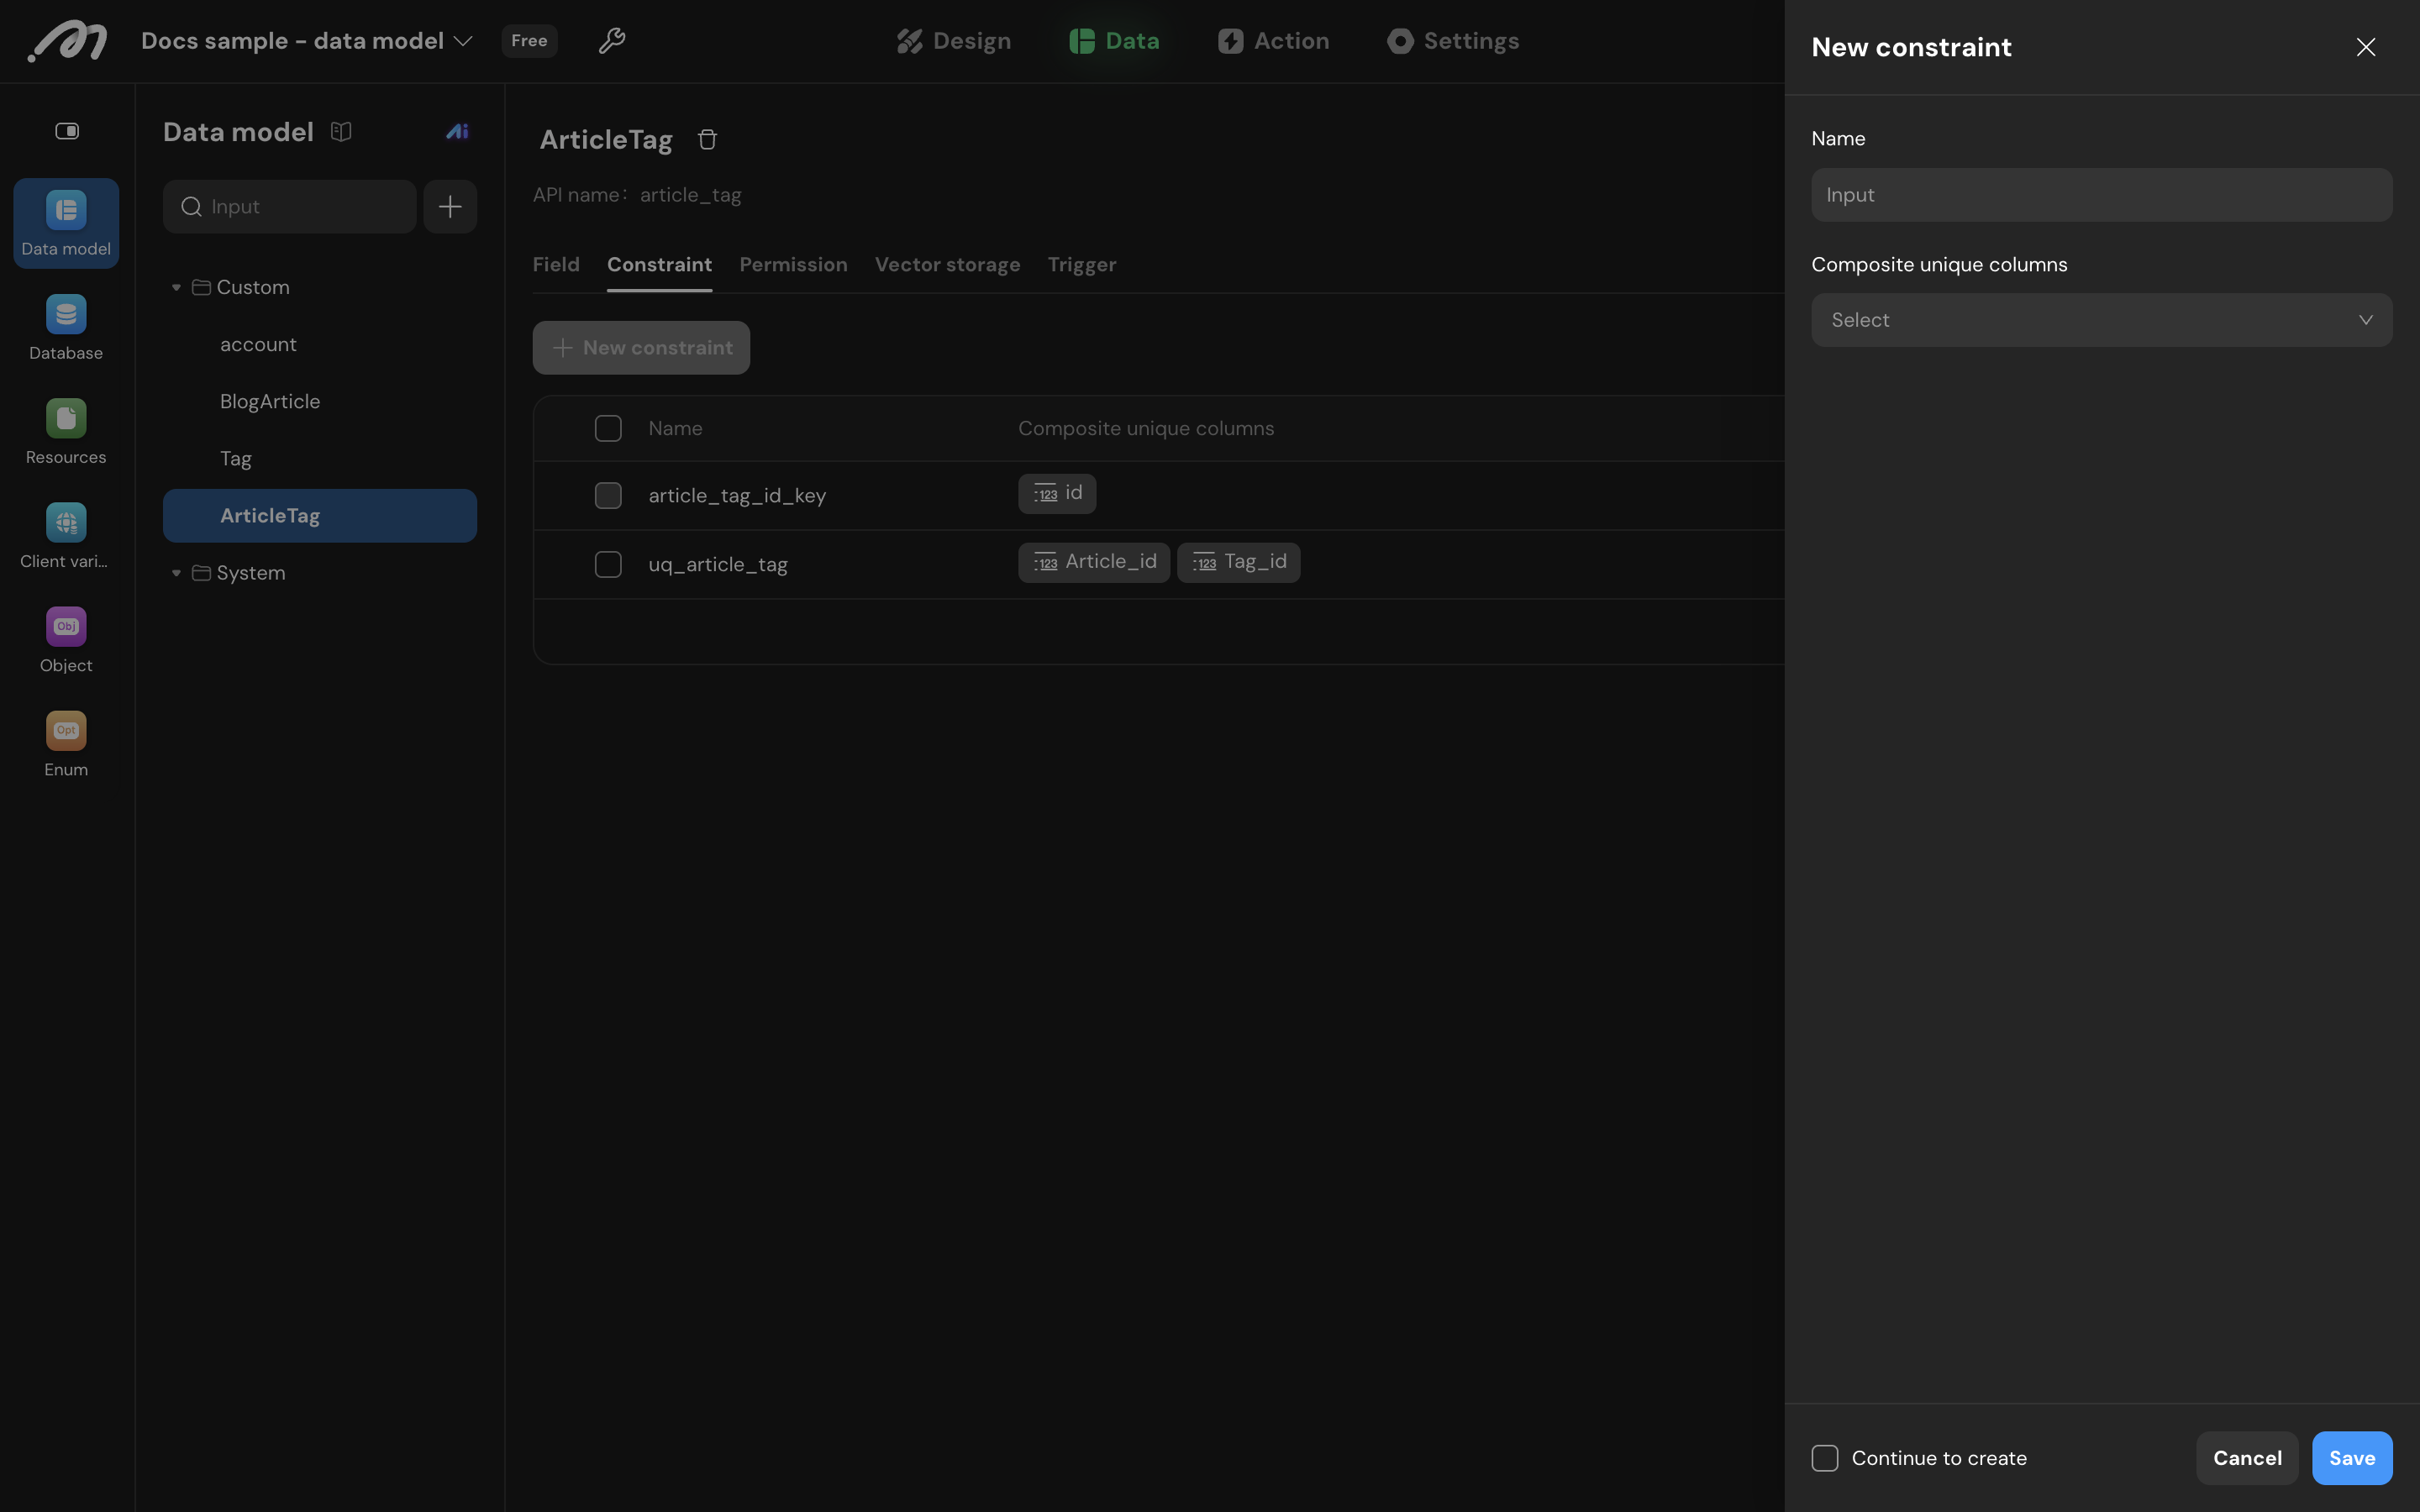
Select a table and switch to Constraint. Every table has a default constraint on id (e.g. article_tag_id_key) that cannot be deleted.
Add constraint
Click New constraint and fill in:
- Name — the constraint name. Must use lowercase letters and underscores and be unique within the project, e.g.
uq_article_tag. - Composite unique columns — the fields covered by the constraint. One field means single-column uniqueness; several fields mean composite uniqueness.
For example, combining “Title” and “Author” stops one author from posting two articles with the same title, while different authors can still reuse a title.
Sync changes
- After saving the constraint, click Sync changes.
- The combined content of the constrained fields in any single row cannot exceed 8,191 bytes. UTF-8 characters take a varying number of bytes, so the number of characters you can enter is not fixed.
- If the table already contains duplicate rows that violate the constraint, the sync fails. Clean up the conflicting data in Manage Data Records first, then sync again.
- If a constrained field has a default value, that default can conflict with the constraint; the editor warns you when saving.
- Constraints cannot be edited after syncing. To change one, delete the original constraint, sync, then create a new one.
Permission management
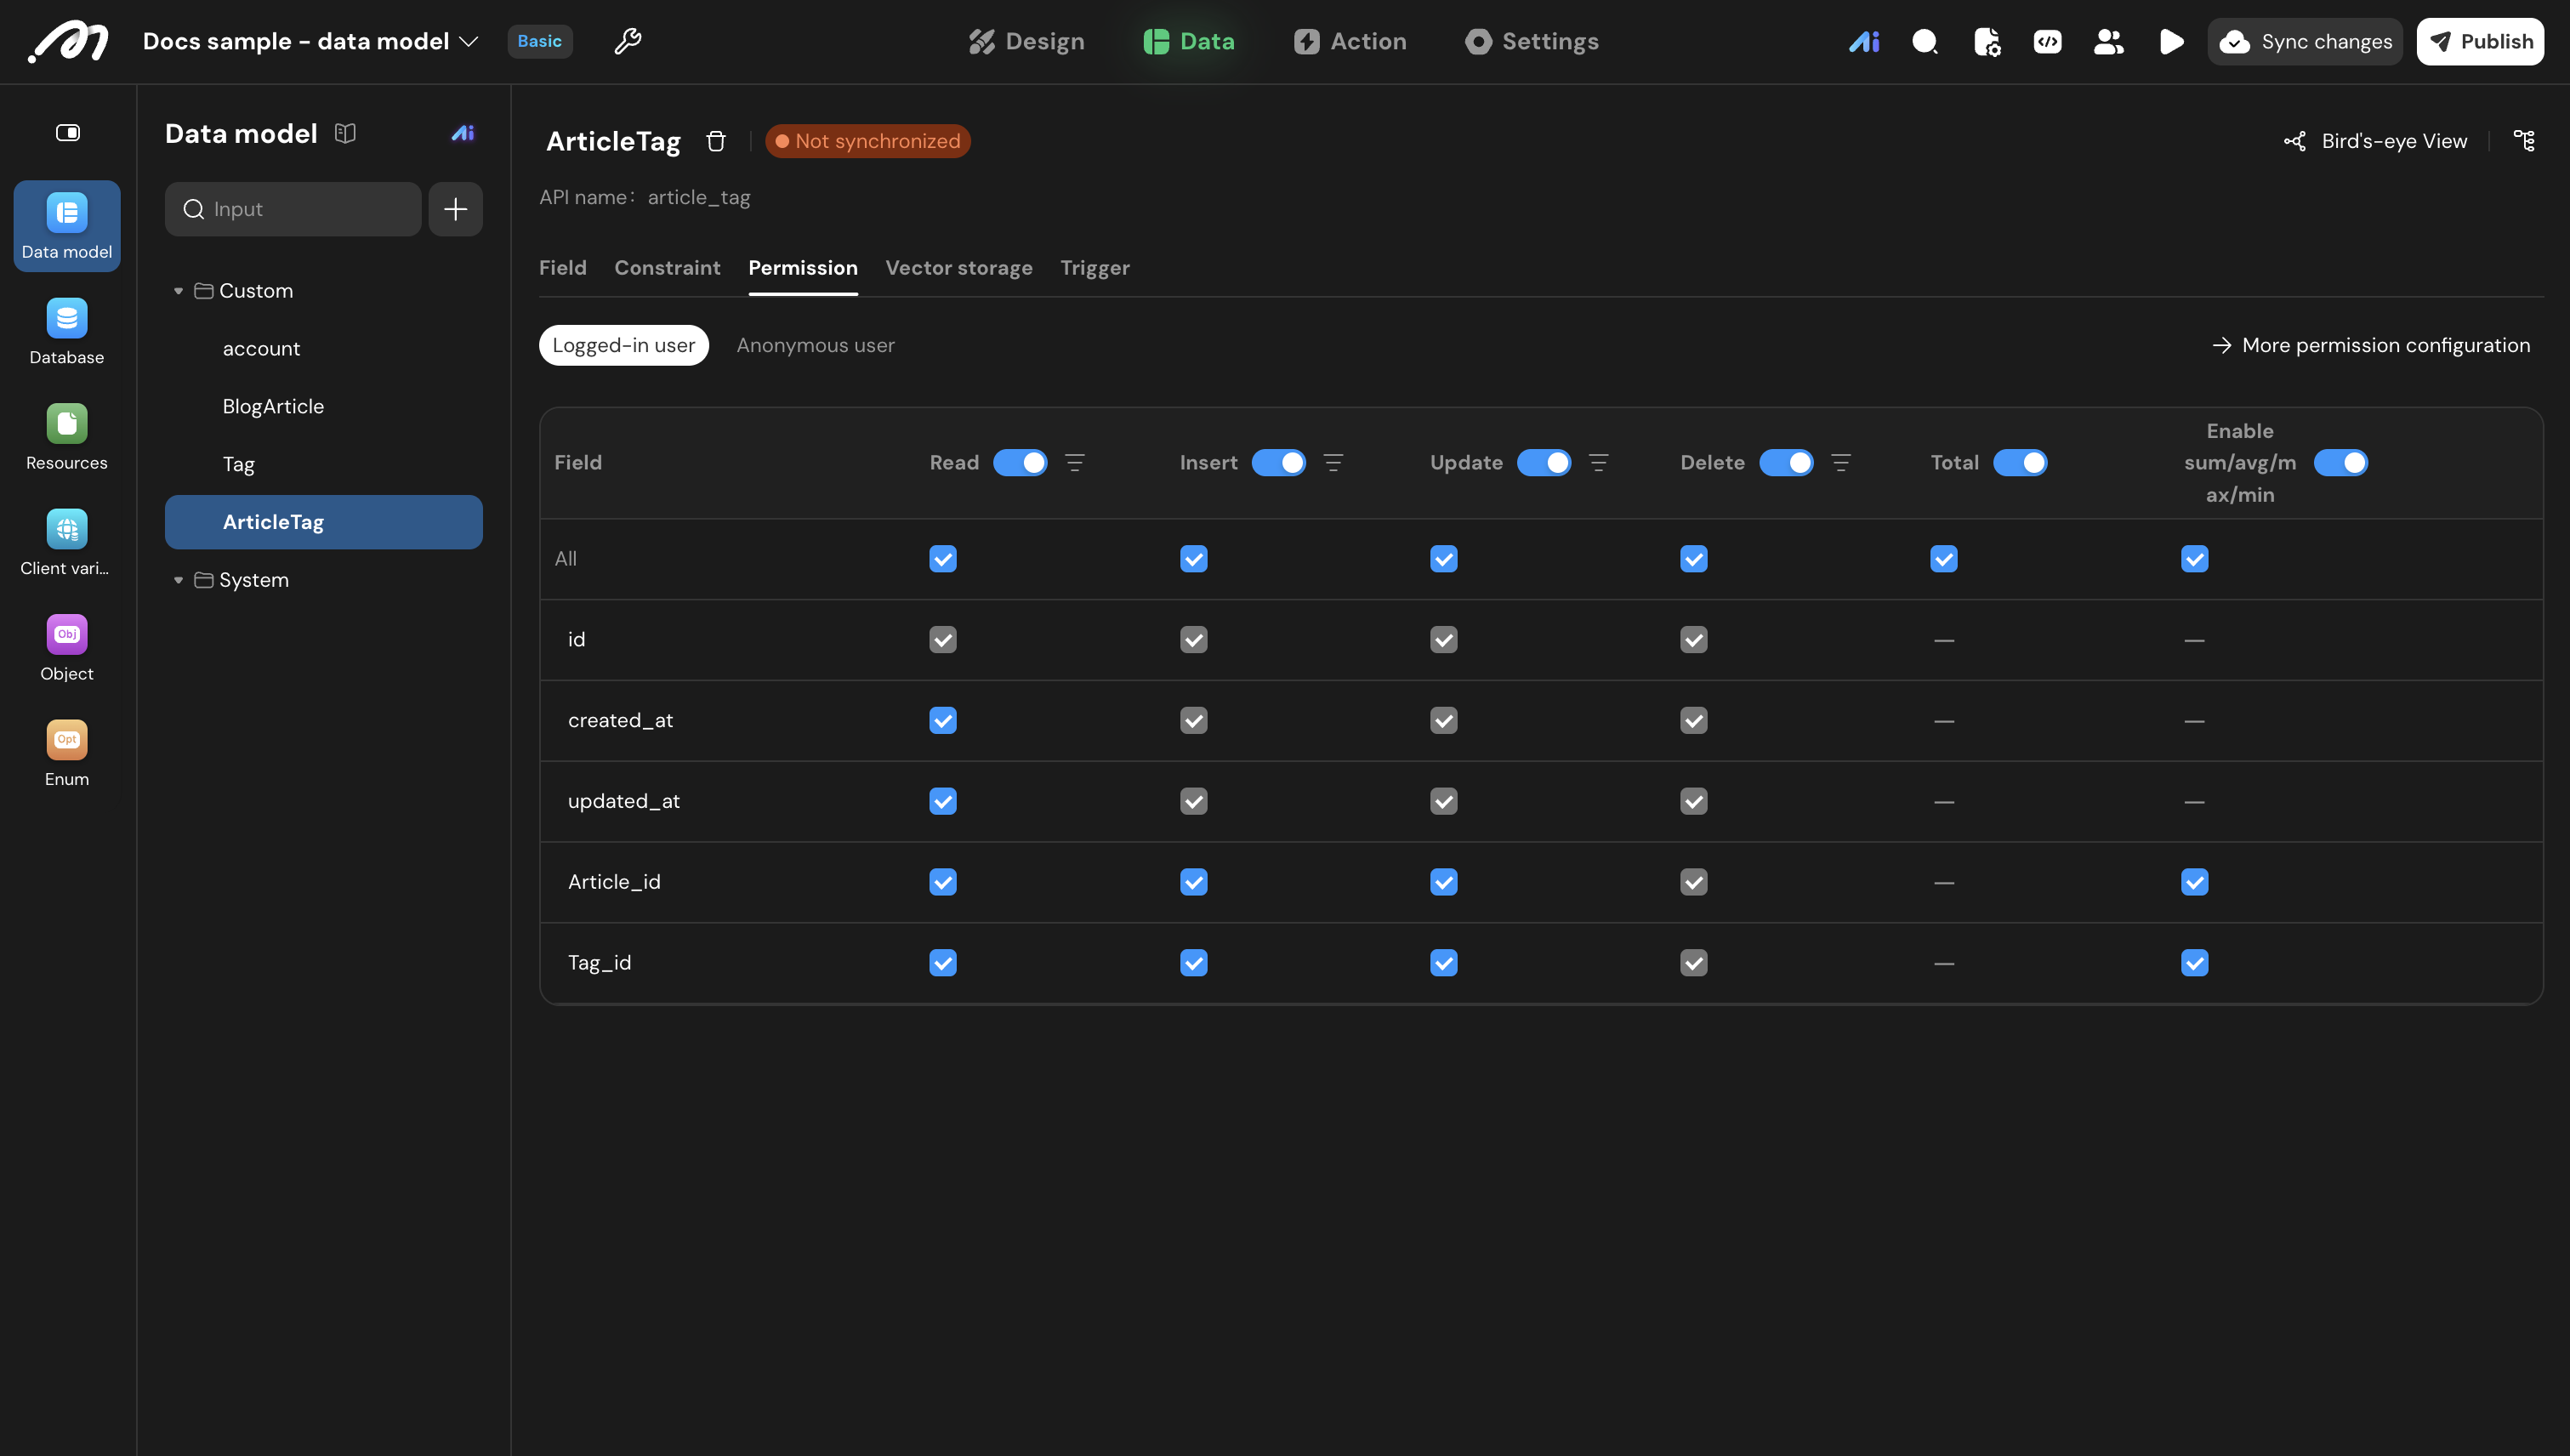
Momen controls which data each user can read or operate on through role permissions and data permissions. Table-level permissions are configured directly on the data model’s Permission tab:
- Tabs at the top switch between roles (Logged-in user, Anonymous user, …), configuring that role’s permissions on this table.
- The grid lists every field against Read, Insert, Update, Delete, Total, and Enable sum/avg/max/min. Tick fields individually, or use the column-header toggles to switch a whole column on or off.
- The funnel icon next to each operation configures the row filter for that operation (data permissions).
- More permission configuration at the top right opens the full permissions page.
Permission changes also take effect online only after Sync changes. For the full permission configuration, read Permissions.
Vacuum full
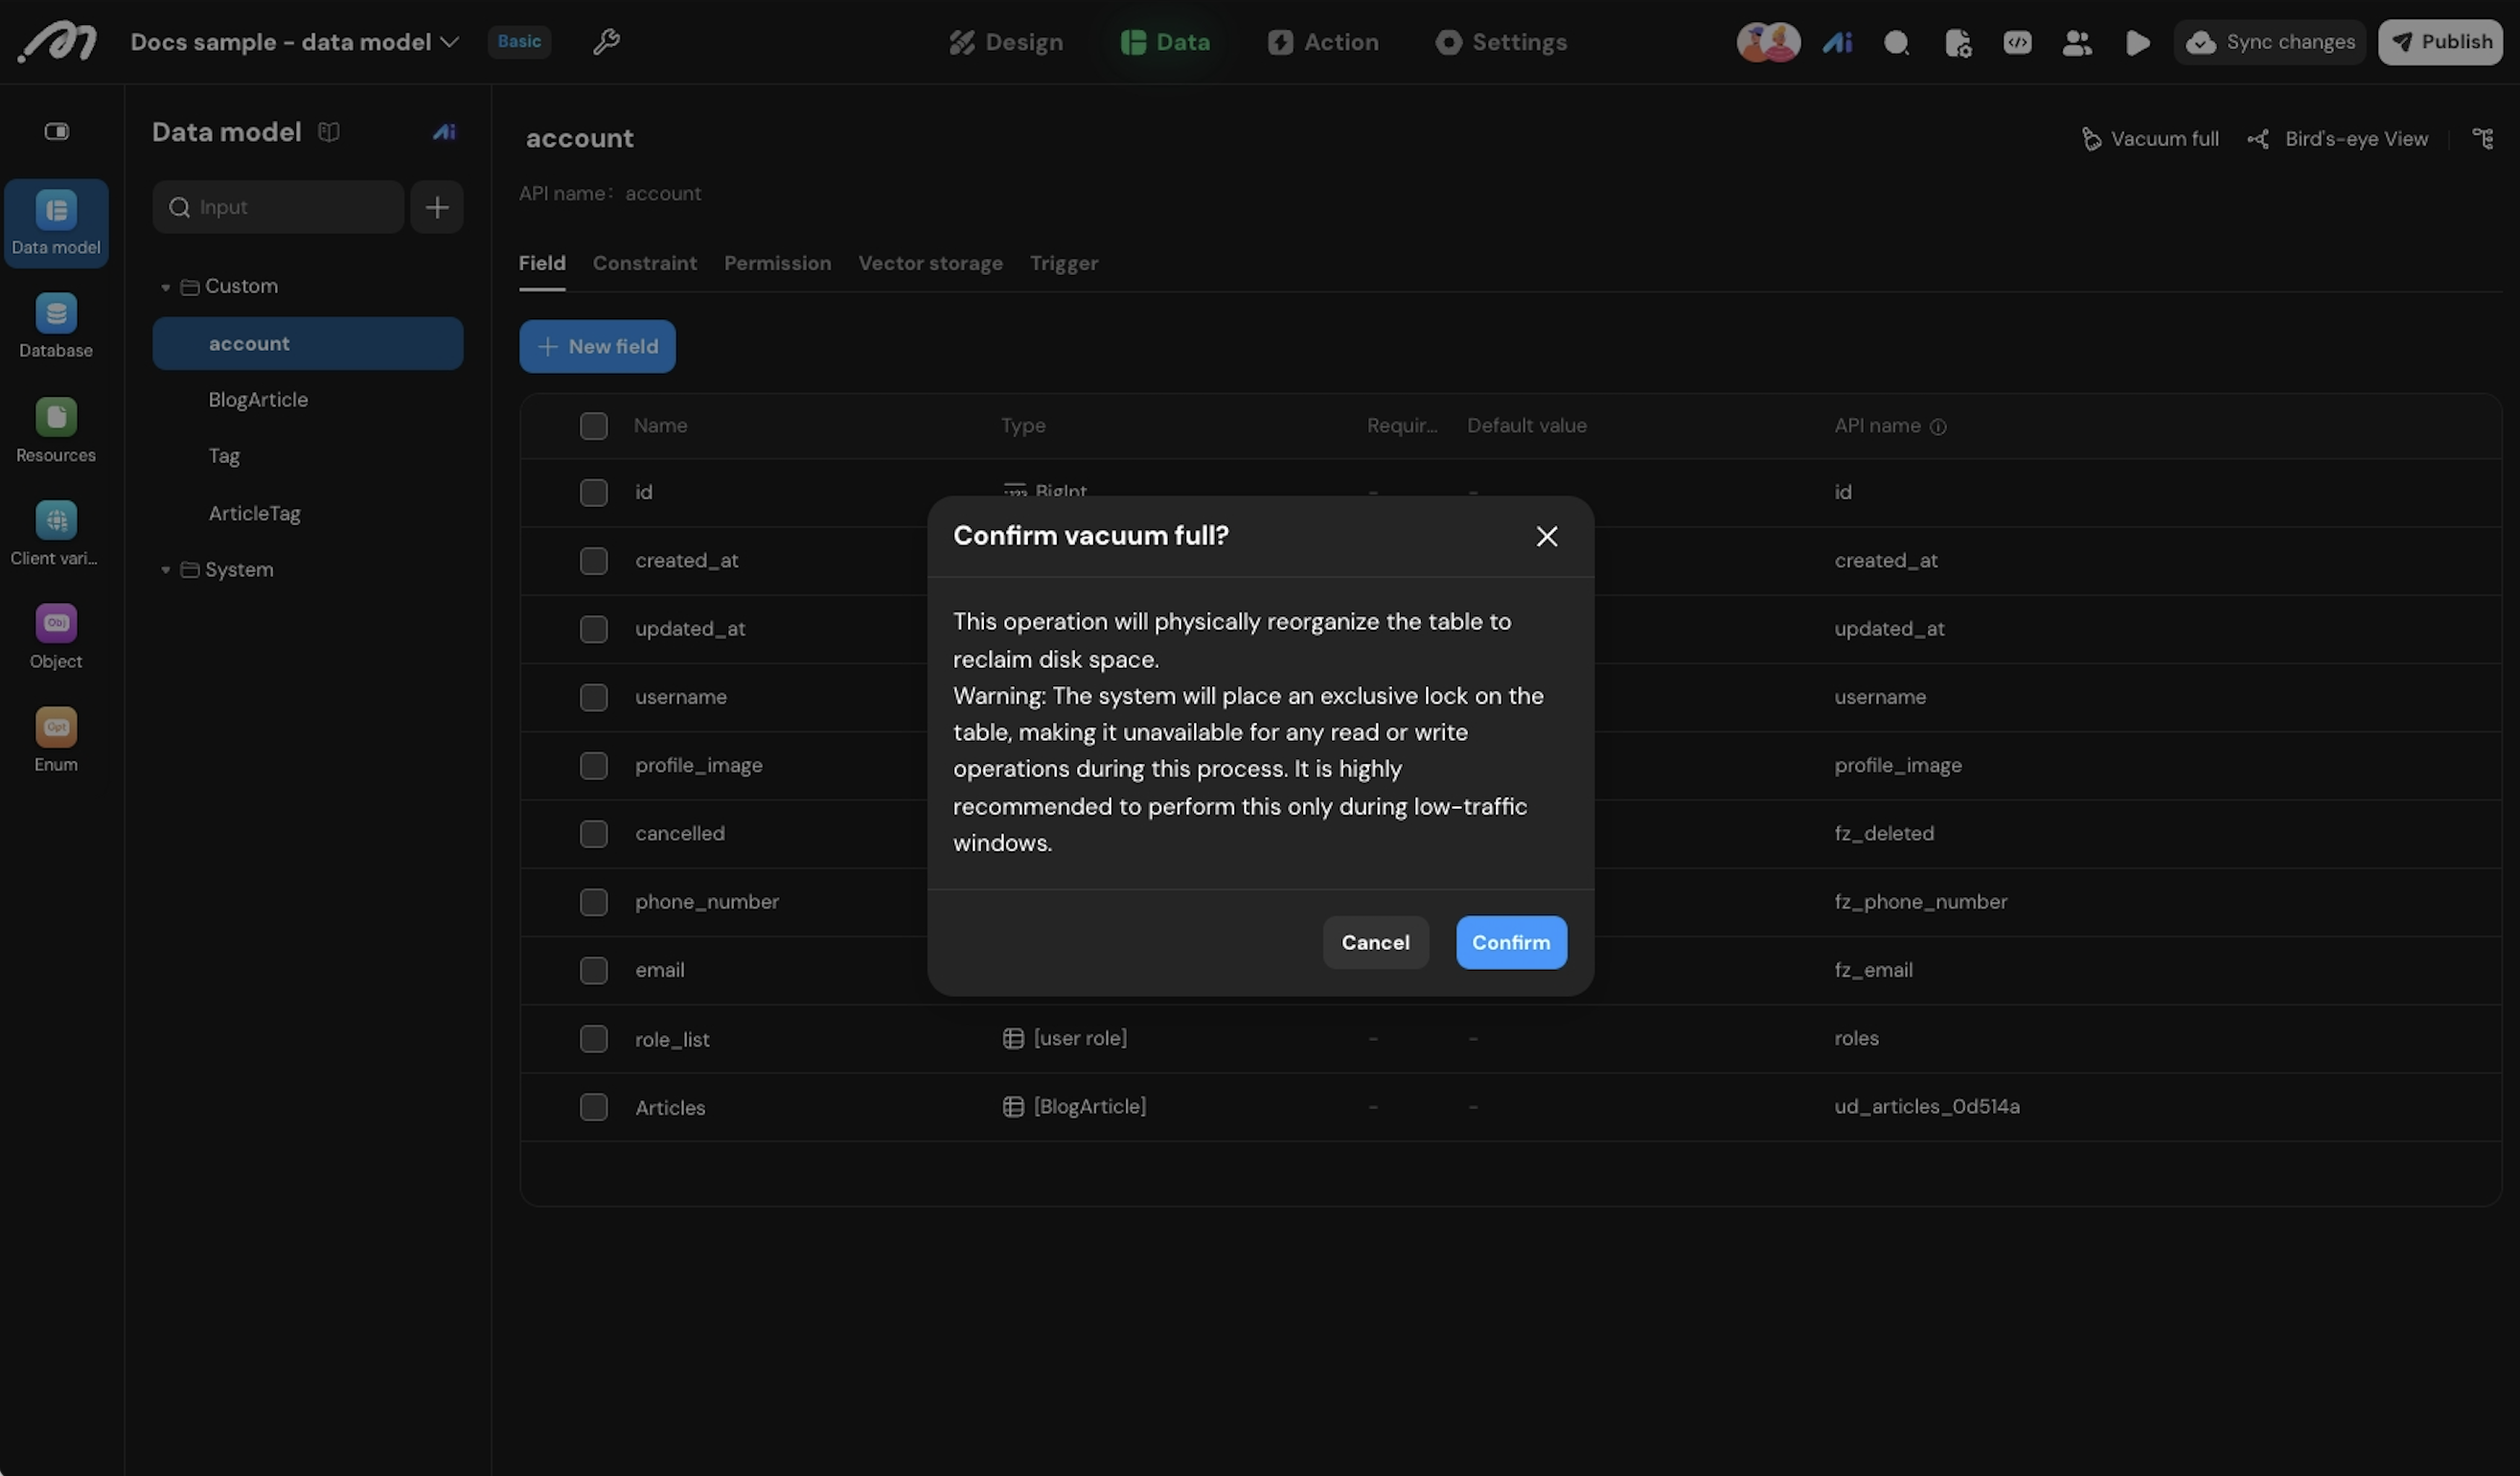
After large deletes or updates, PostgreSQL does not release the disk space right away. Vacuum full, to the right of the table name, physically reorganizes the table to reclaim that storage.
The table is locked while the operation runs: all reads and writes (submitting data, querying, and so on) are unavailable until it finishes. Run it only during low-traffic windows.