Manual Draft Saving for Forms
Demo Project
https://editor.momen.app/tool/X57jbwZwmMV/WEB?code=bV7jVSBmP7Ko5&ref=0562398
Introduction
- Goal: Build a form system where users can save incomplete data as drafts and resume editing later before final submission.
- Core Logic: Use a
statusfield (Draft/Submitted/Deleted) to track each record’s state, and a page variableform_idto control the UI mode:-1means creating a new record, any other value means editing an existing draft. - Use Cases: Job applications, insurance claim forms, multi-page questionnaires, or any workflow where users may need to return later to complete their input.
Steps
This tutorial uses pre-styled layout blocks from the “Common UI Presets ” template page. These preset elements provide basic styling and layout only; they contain no conditional logic, data bindings, or Actionflows. You can copy them directly to skip manual styling and focus on the core logic.
Setup
Data Model
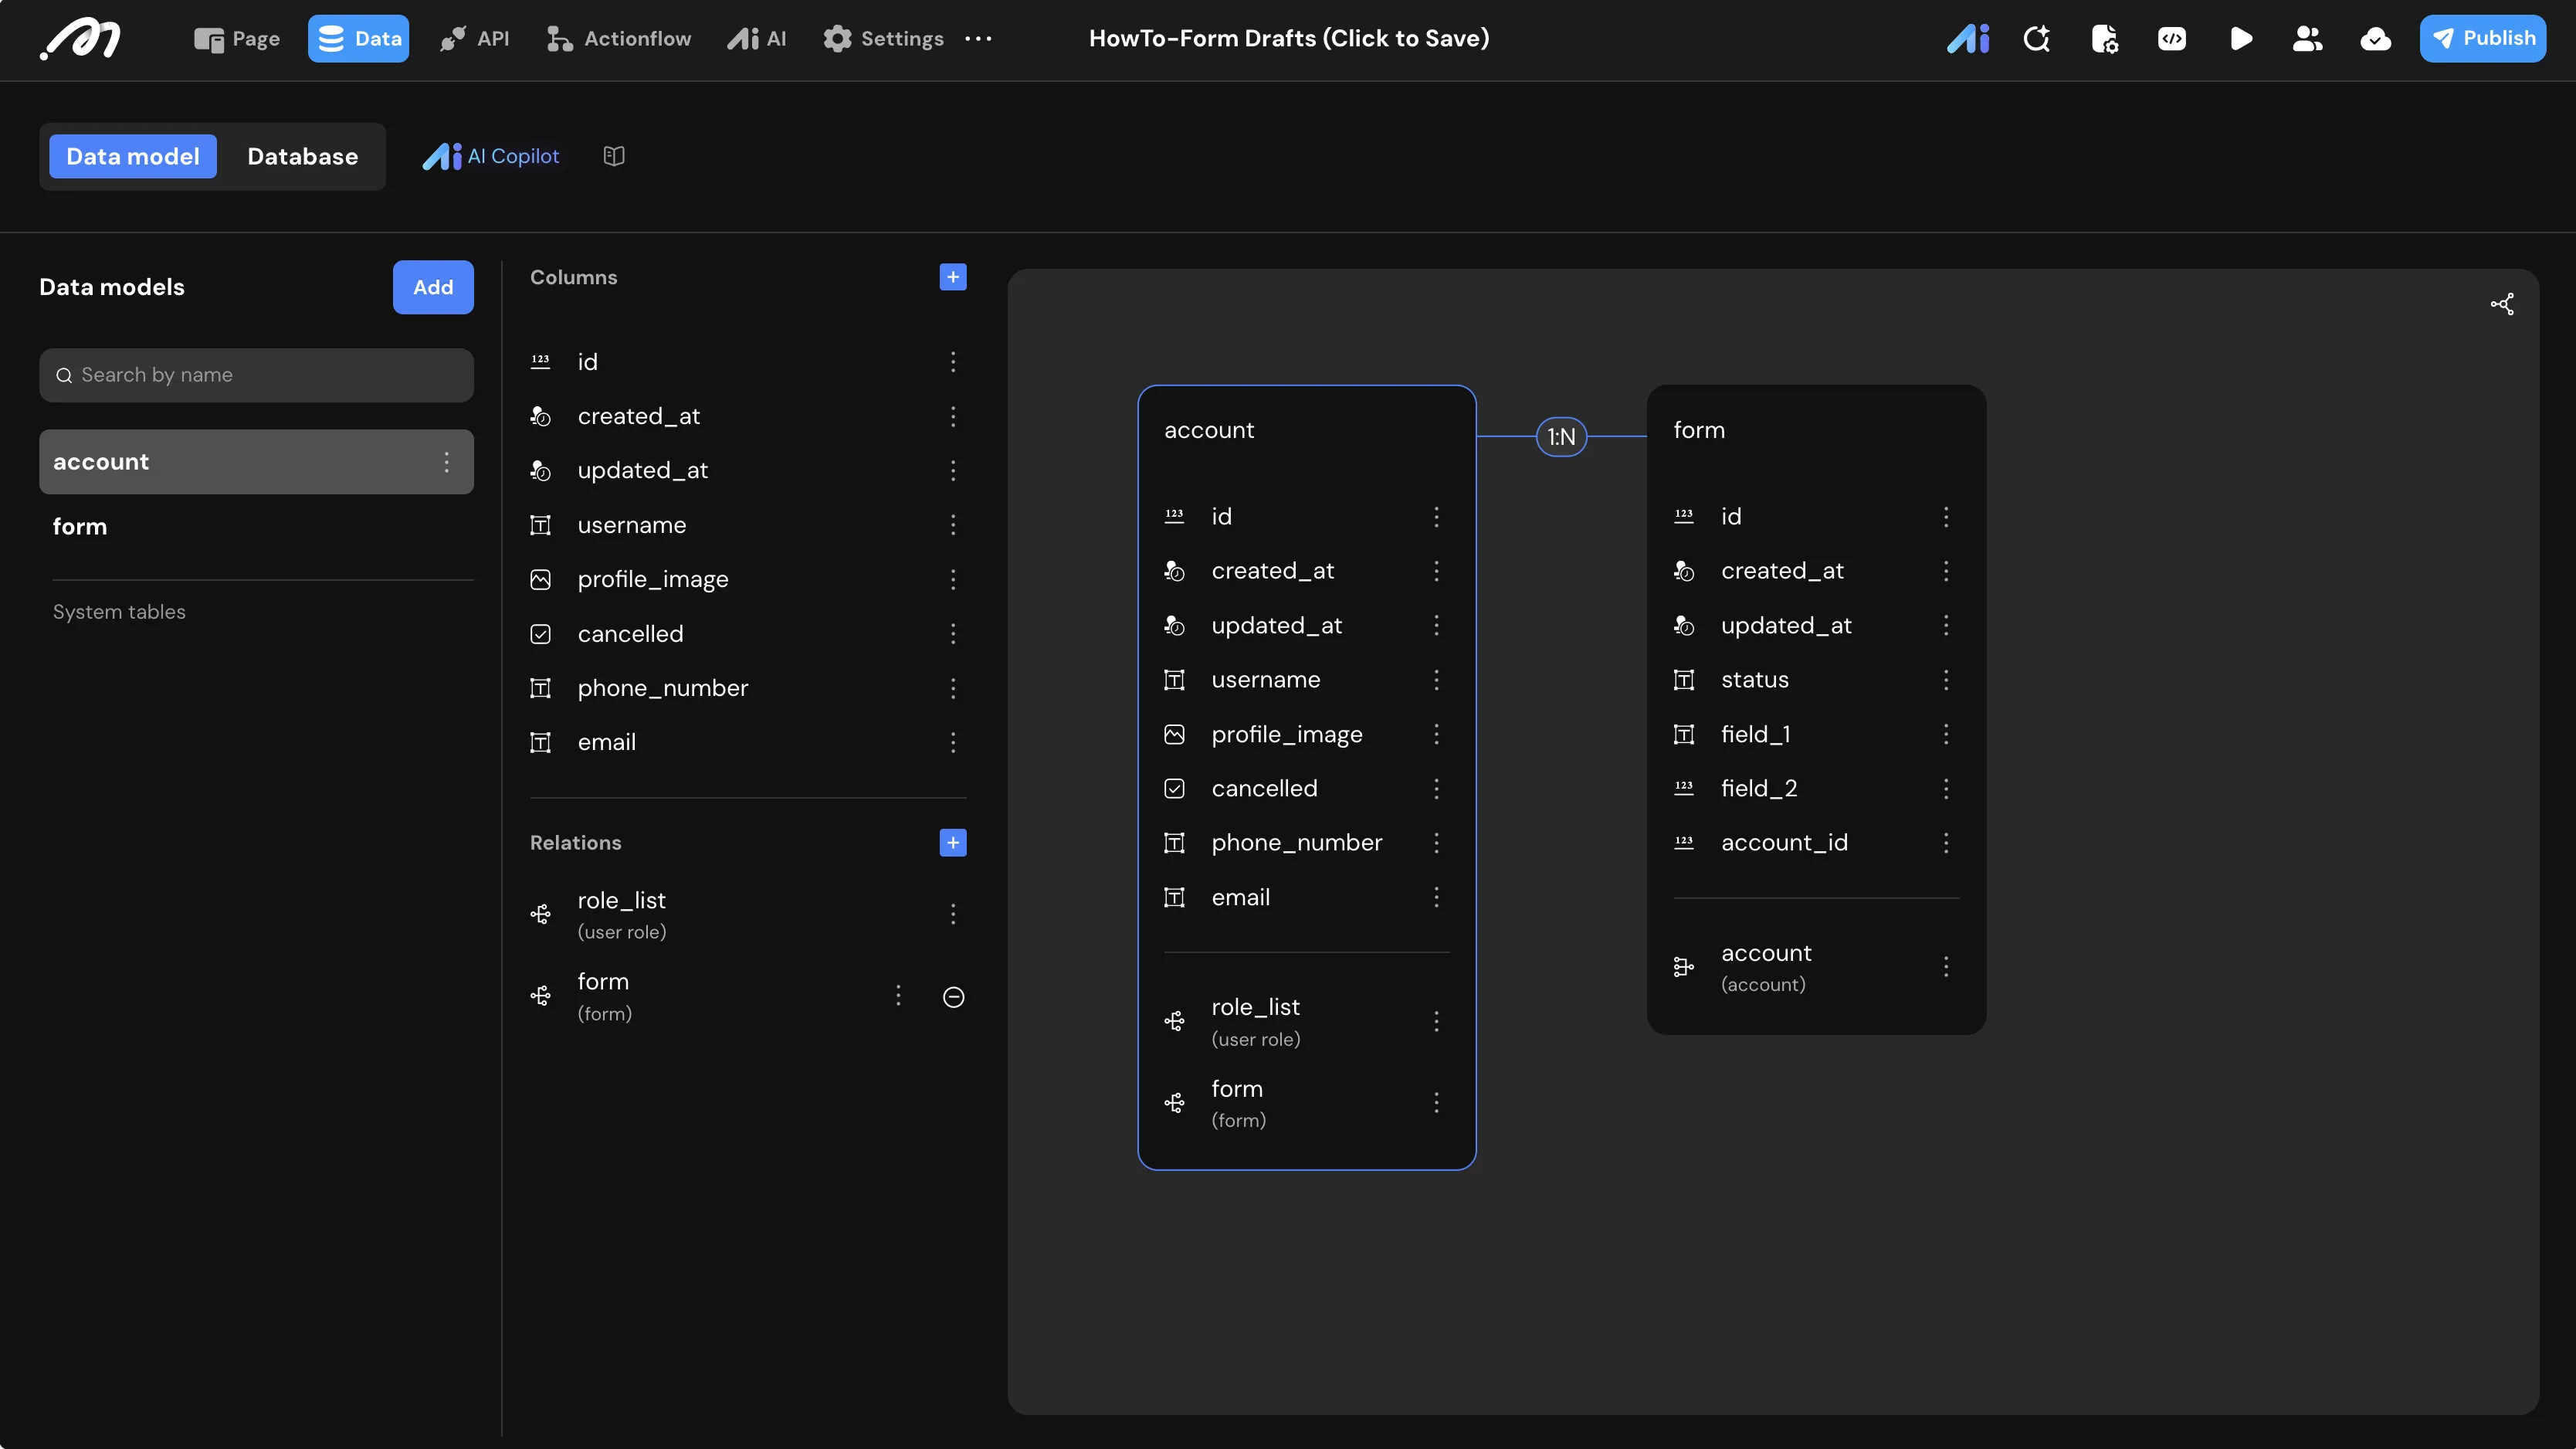
Table: form — stores draft and submitted records.
| Field Name | Type | Note |
|---|---|---|
| id | Bigint | Auto-generated, unique identifier (system column) |
| created_at | Timestamp | Auto-generated (system column) |
| updated_at | Timestamp | Auto-generated (system column) |
| status | Text | Form state: Draft, Submitted, or Deleted |
| field_1 | Text | Custom business field |
| field_2 | Bigint | Custom business field |
| account_id | Bigint | Foreign key linking to the account table |
Page Entry Logic
- In the left sidebar, click the Pages tab and add a page named
Page Form Drafts. - Drag a Button onto the canvas. Change the button text to
Createand rename the component toButton Create. - Select
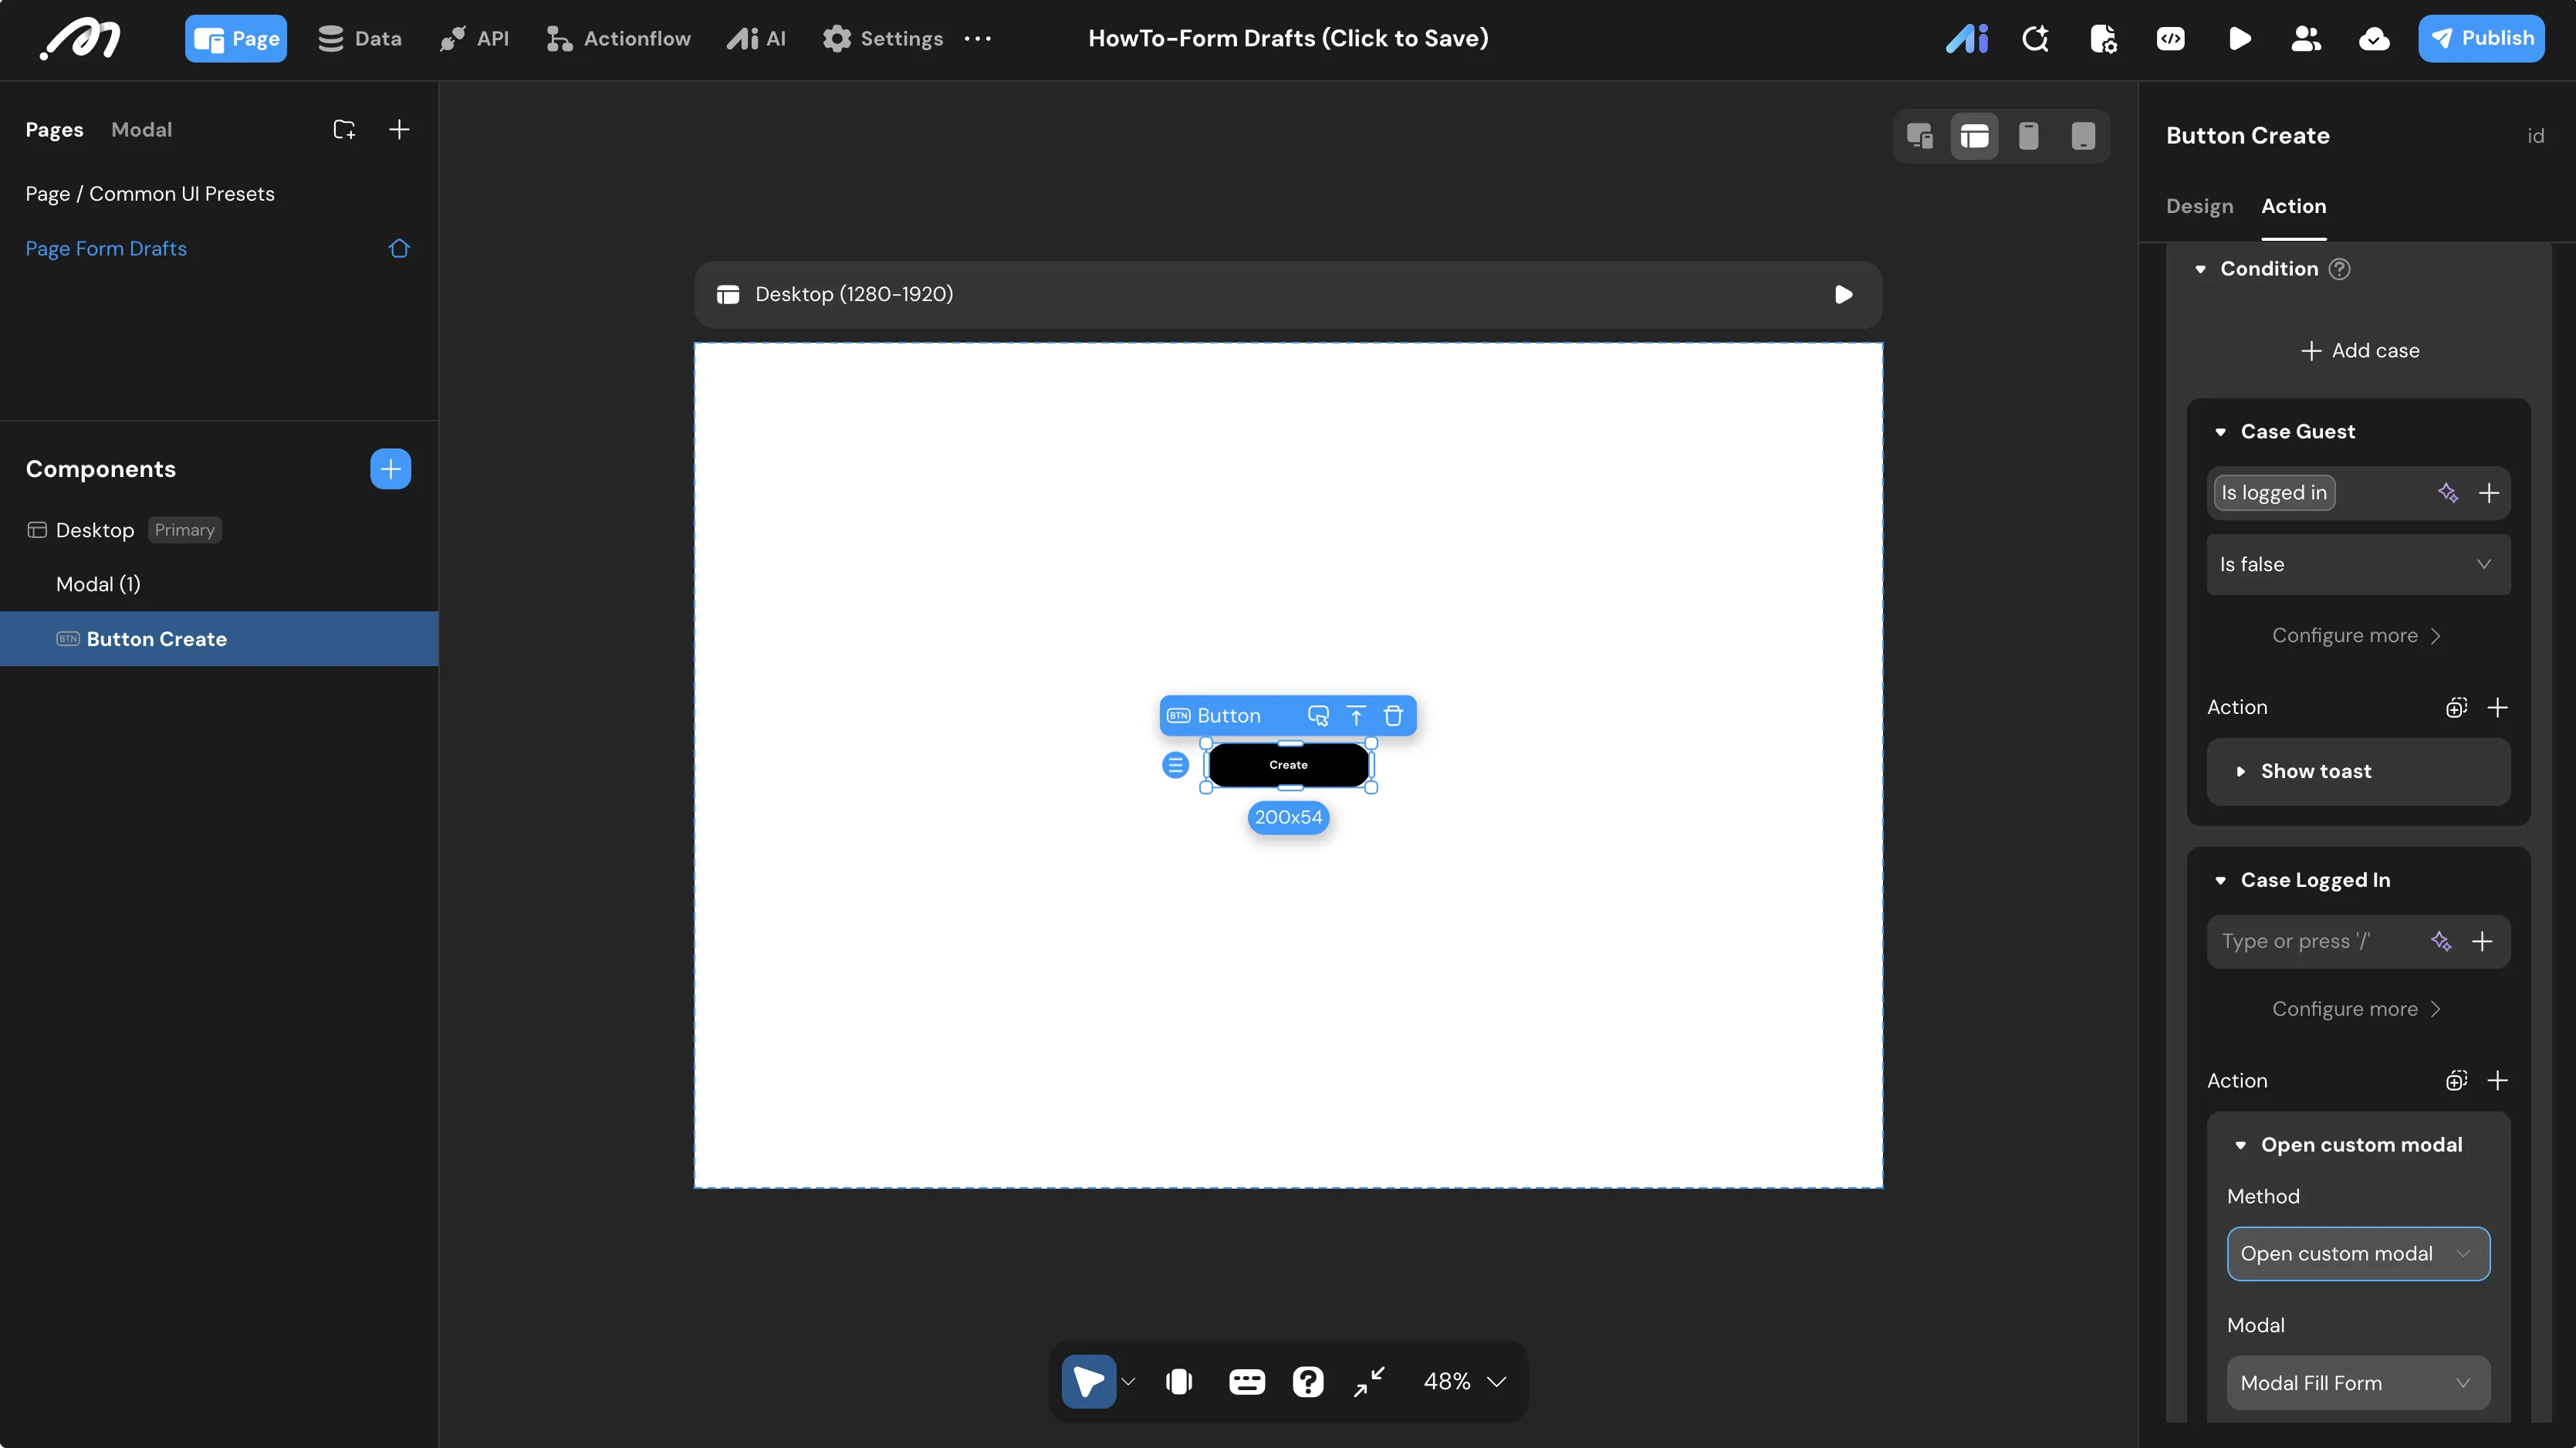
Button Createand add an action underOnClick. - Configure the logic flow:
- Add a Condition node.
- Case: Guest — If
getIsLoggedInisIs false, add a Show toast action:Please log in first. - Case: Logged In — Add an Open custom modal node targeting
Modal Fill Form.
Modal UI Builder
The modal is the workspace for filling out forms. A page variable tracks whether the user is creating a new record or editing an existing draft.
- Click the Modal tab in the left sidebar and create a modal named
Modal Fill Form. - Select the root container of
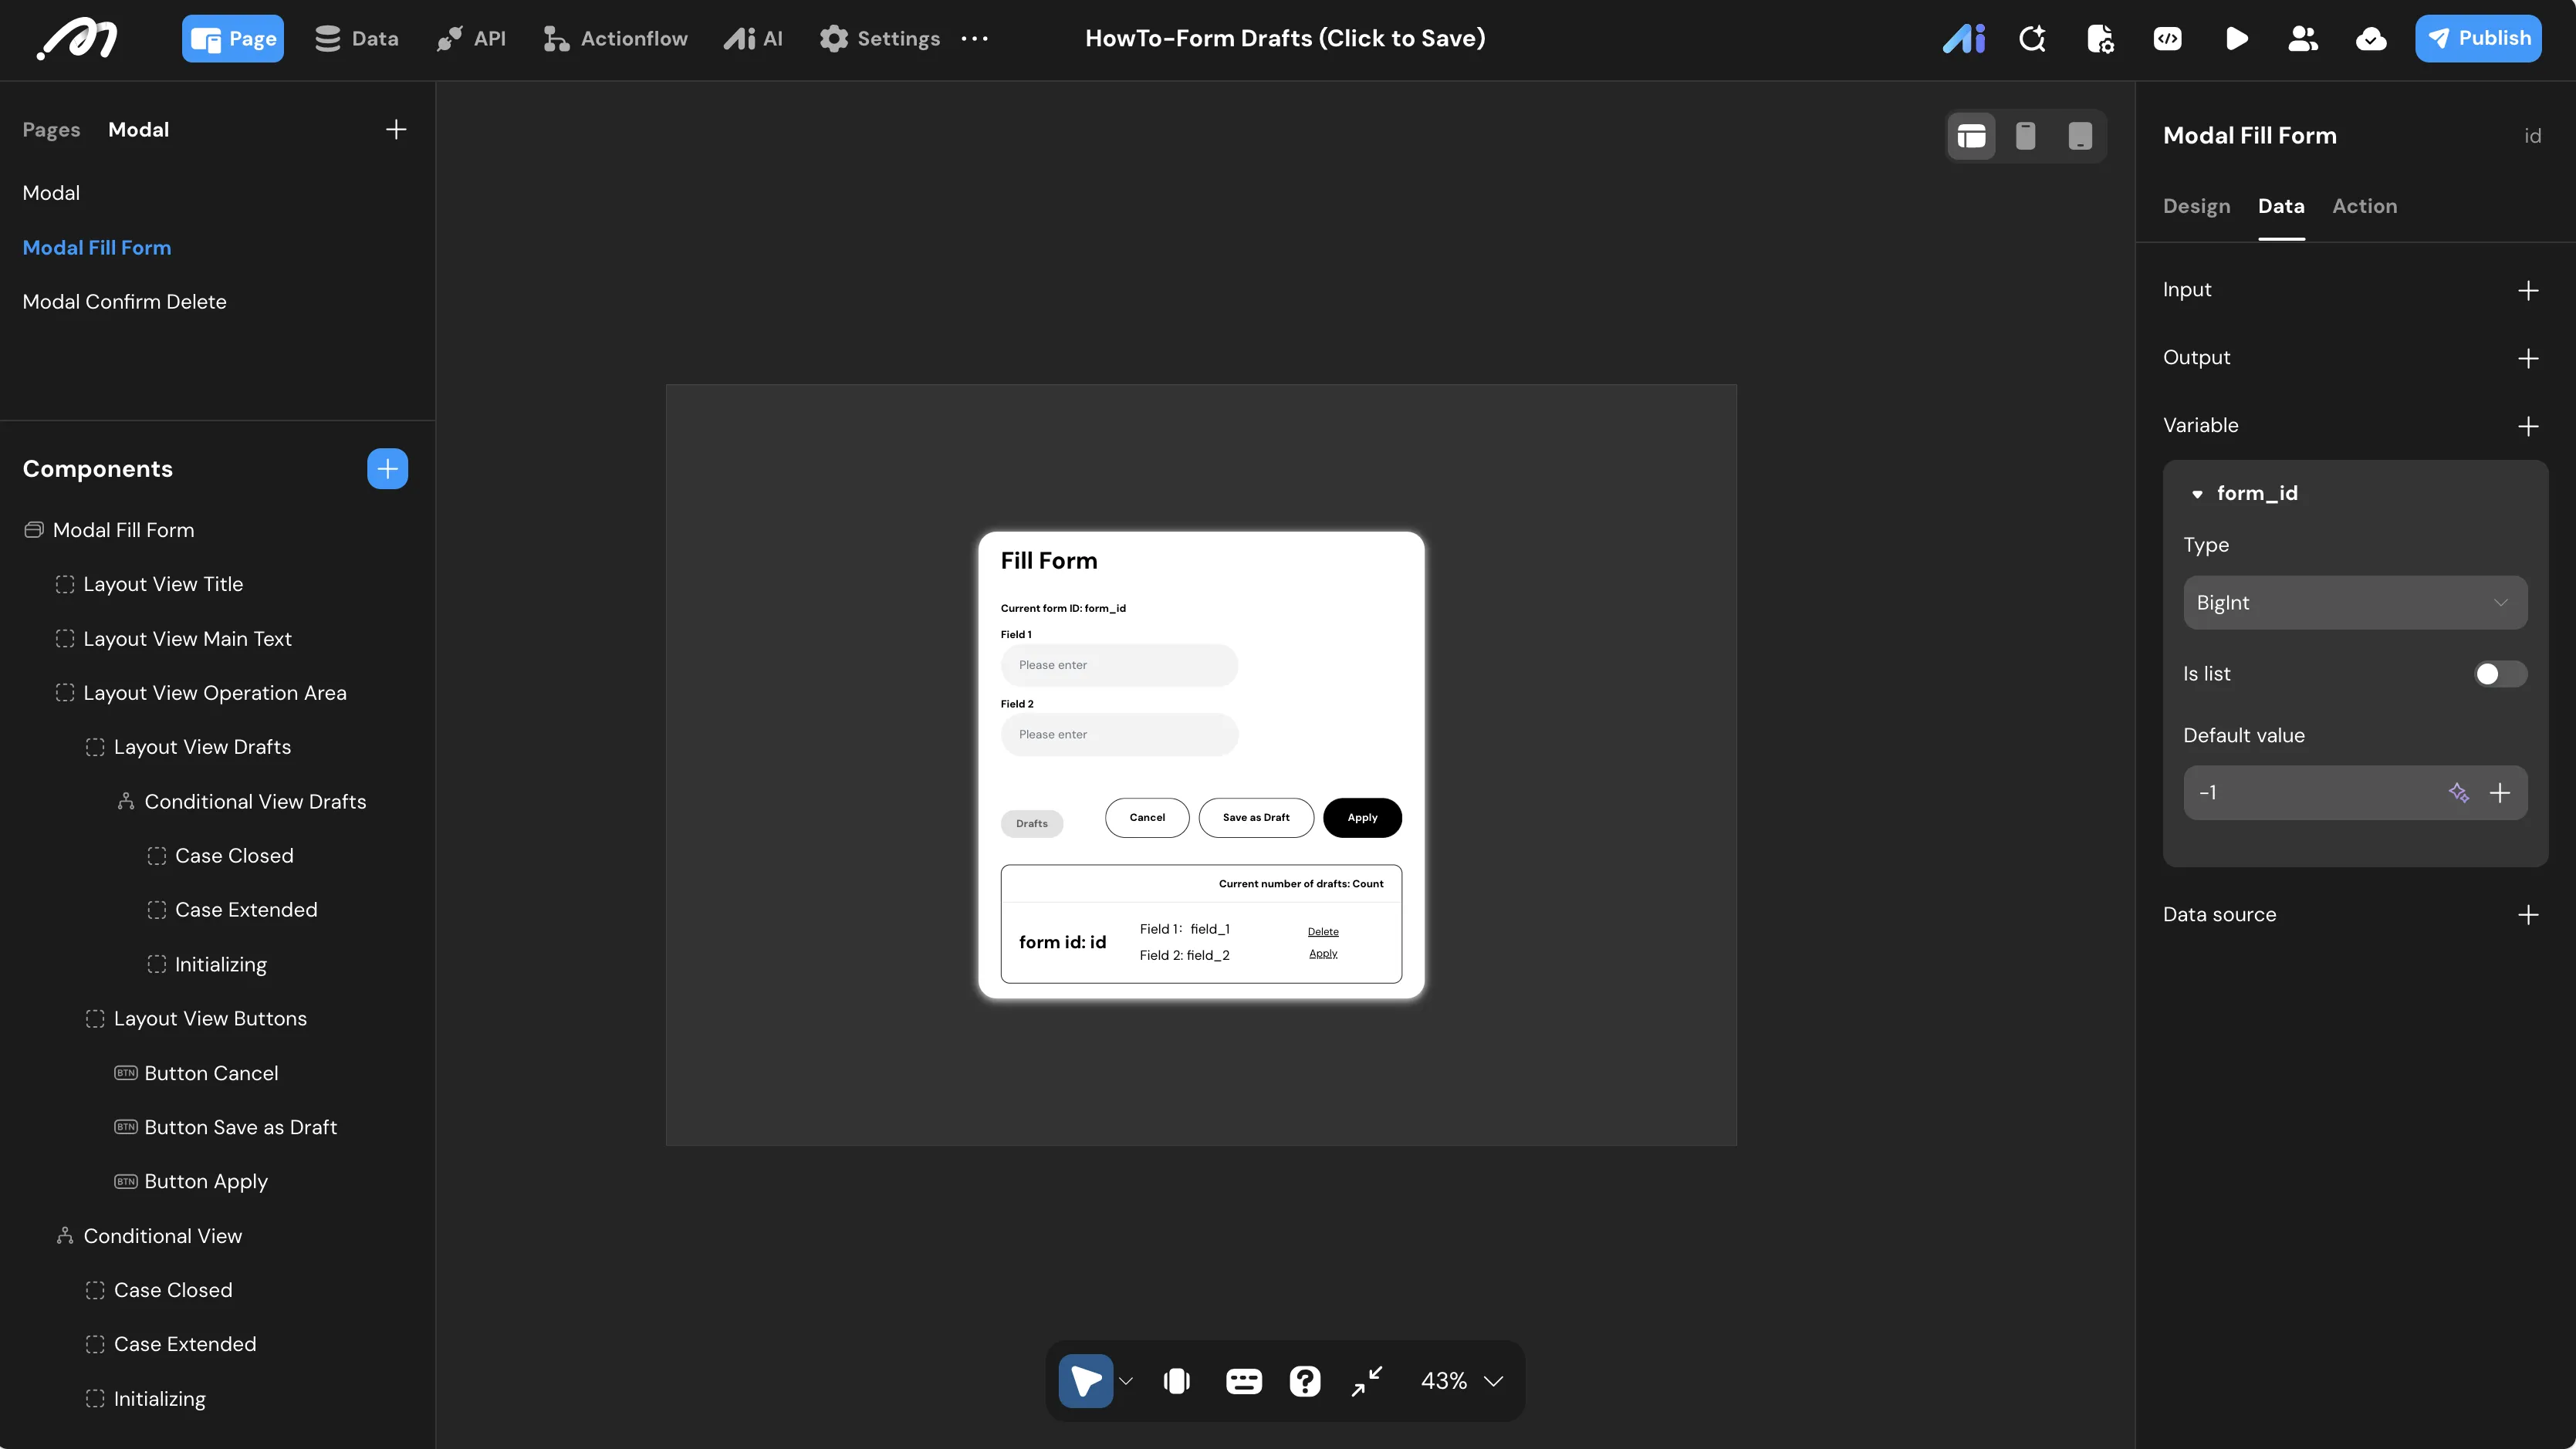
Modal Fill Form, go to the Data tab in the right sidebar, and click + next to Variable. - Set Name to
form_id, Type toBigint, and Default value to-1.
form_id controls the form mode. -1 means “Create Mode”. When an existing draft is loaded, this variable holds the actual record ID, switching the form to “Edit Mode”.
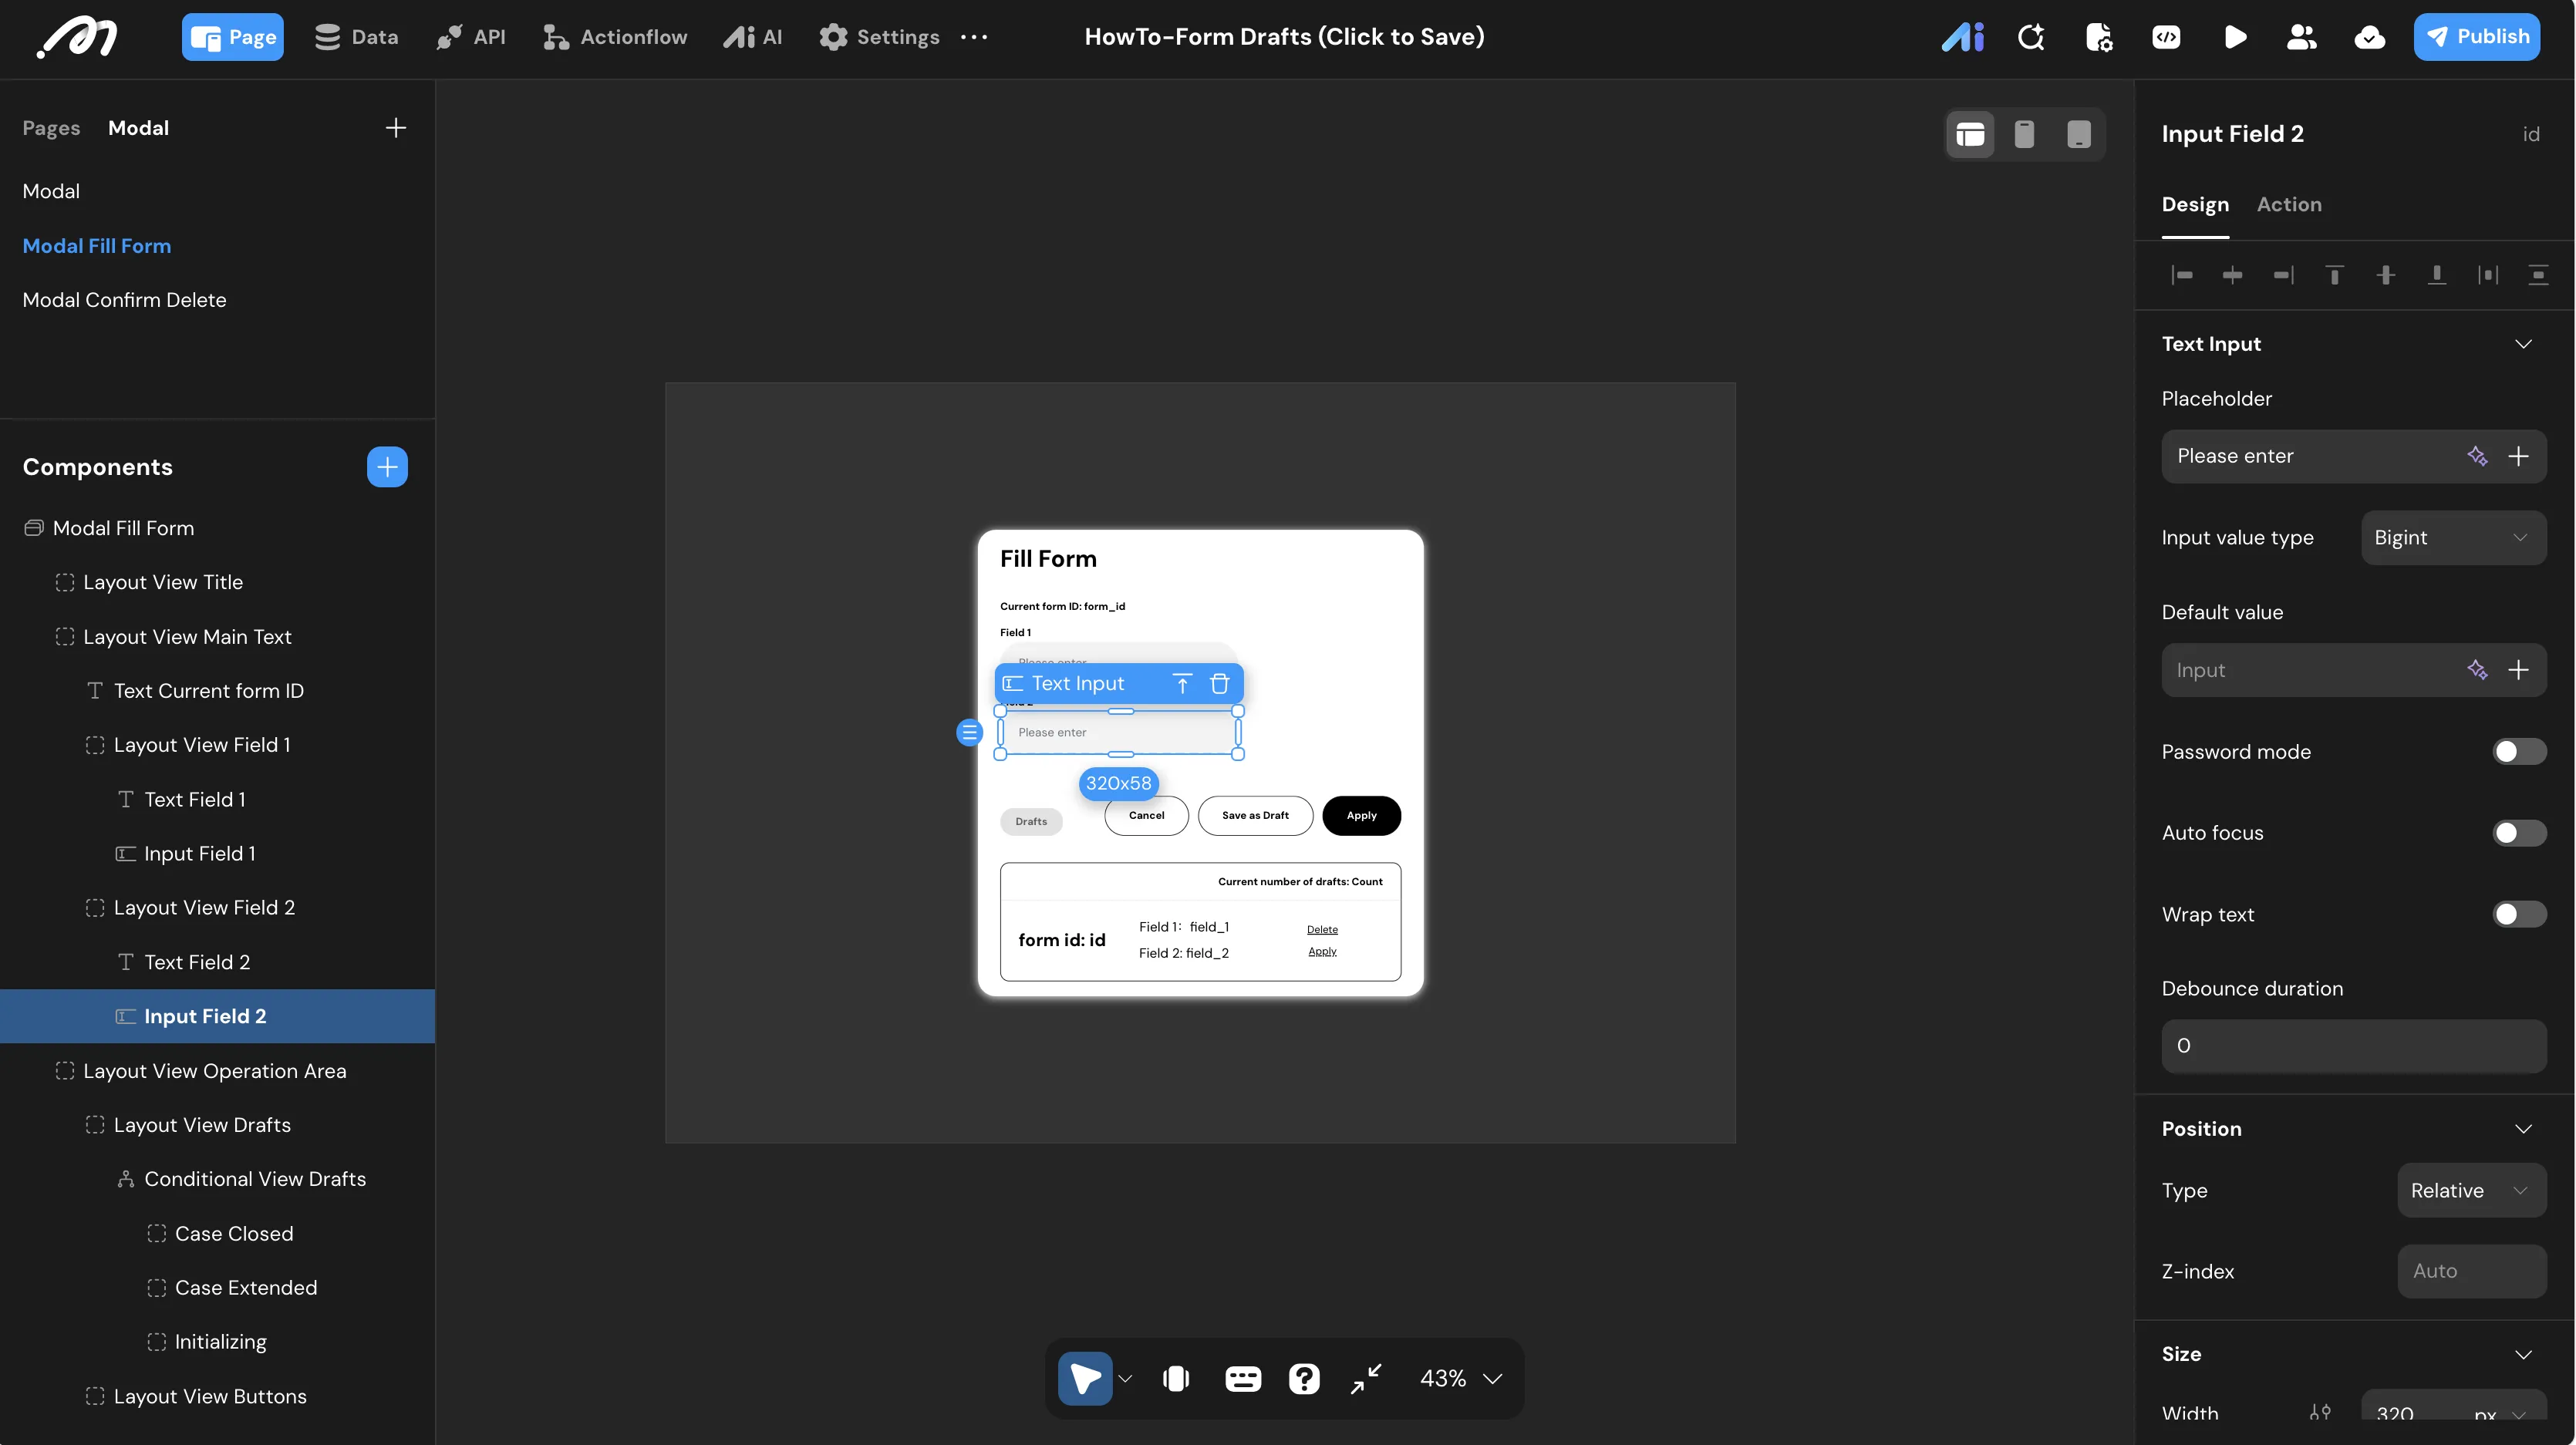
- Drag two Text Input components onto the modal canvas:
- Rename the first input to
Input Field 1and set its type toText. - Rename the second input to
Input Field 2and set its type toBigint.
- Rename the first input to
- Select the
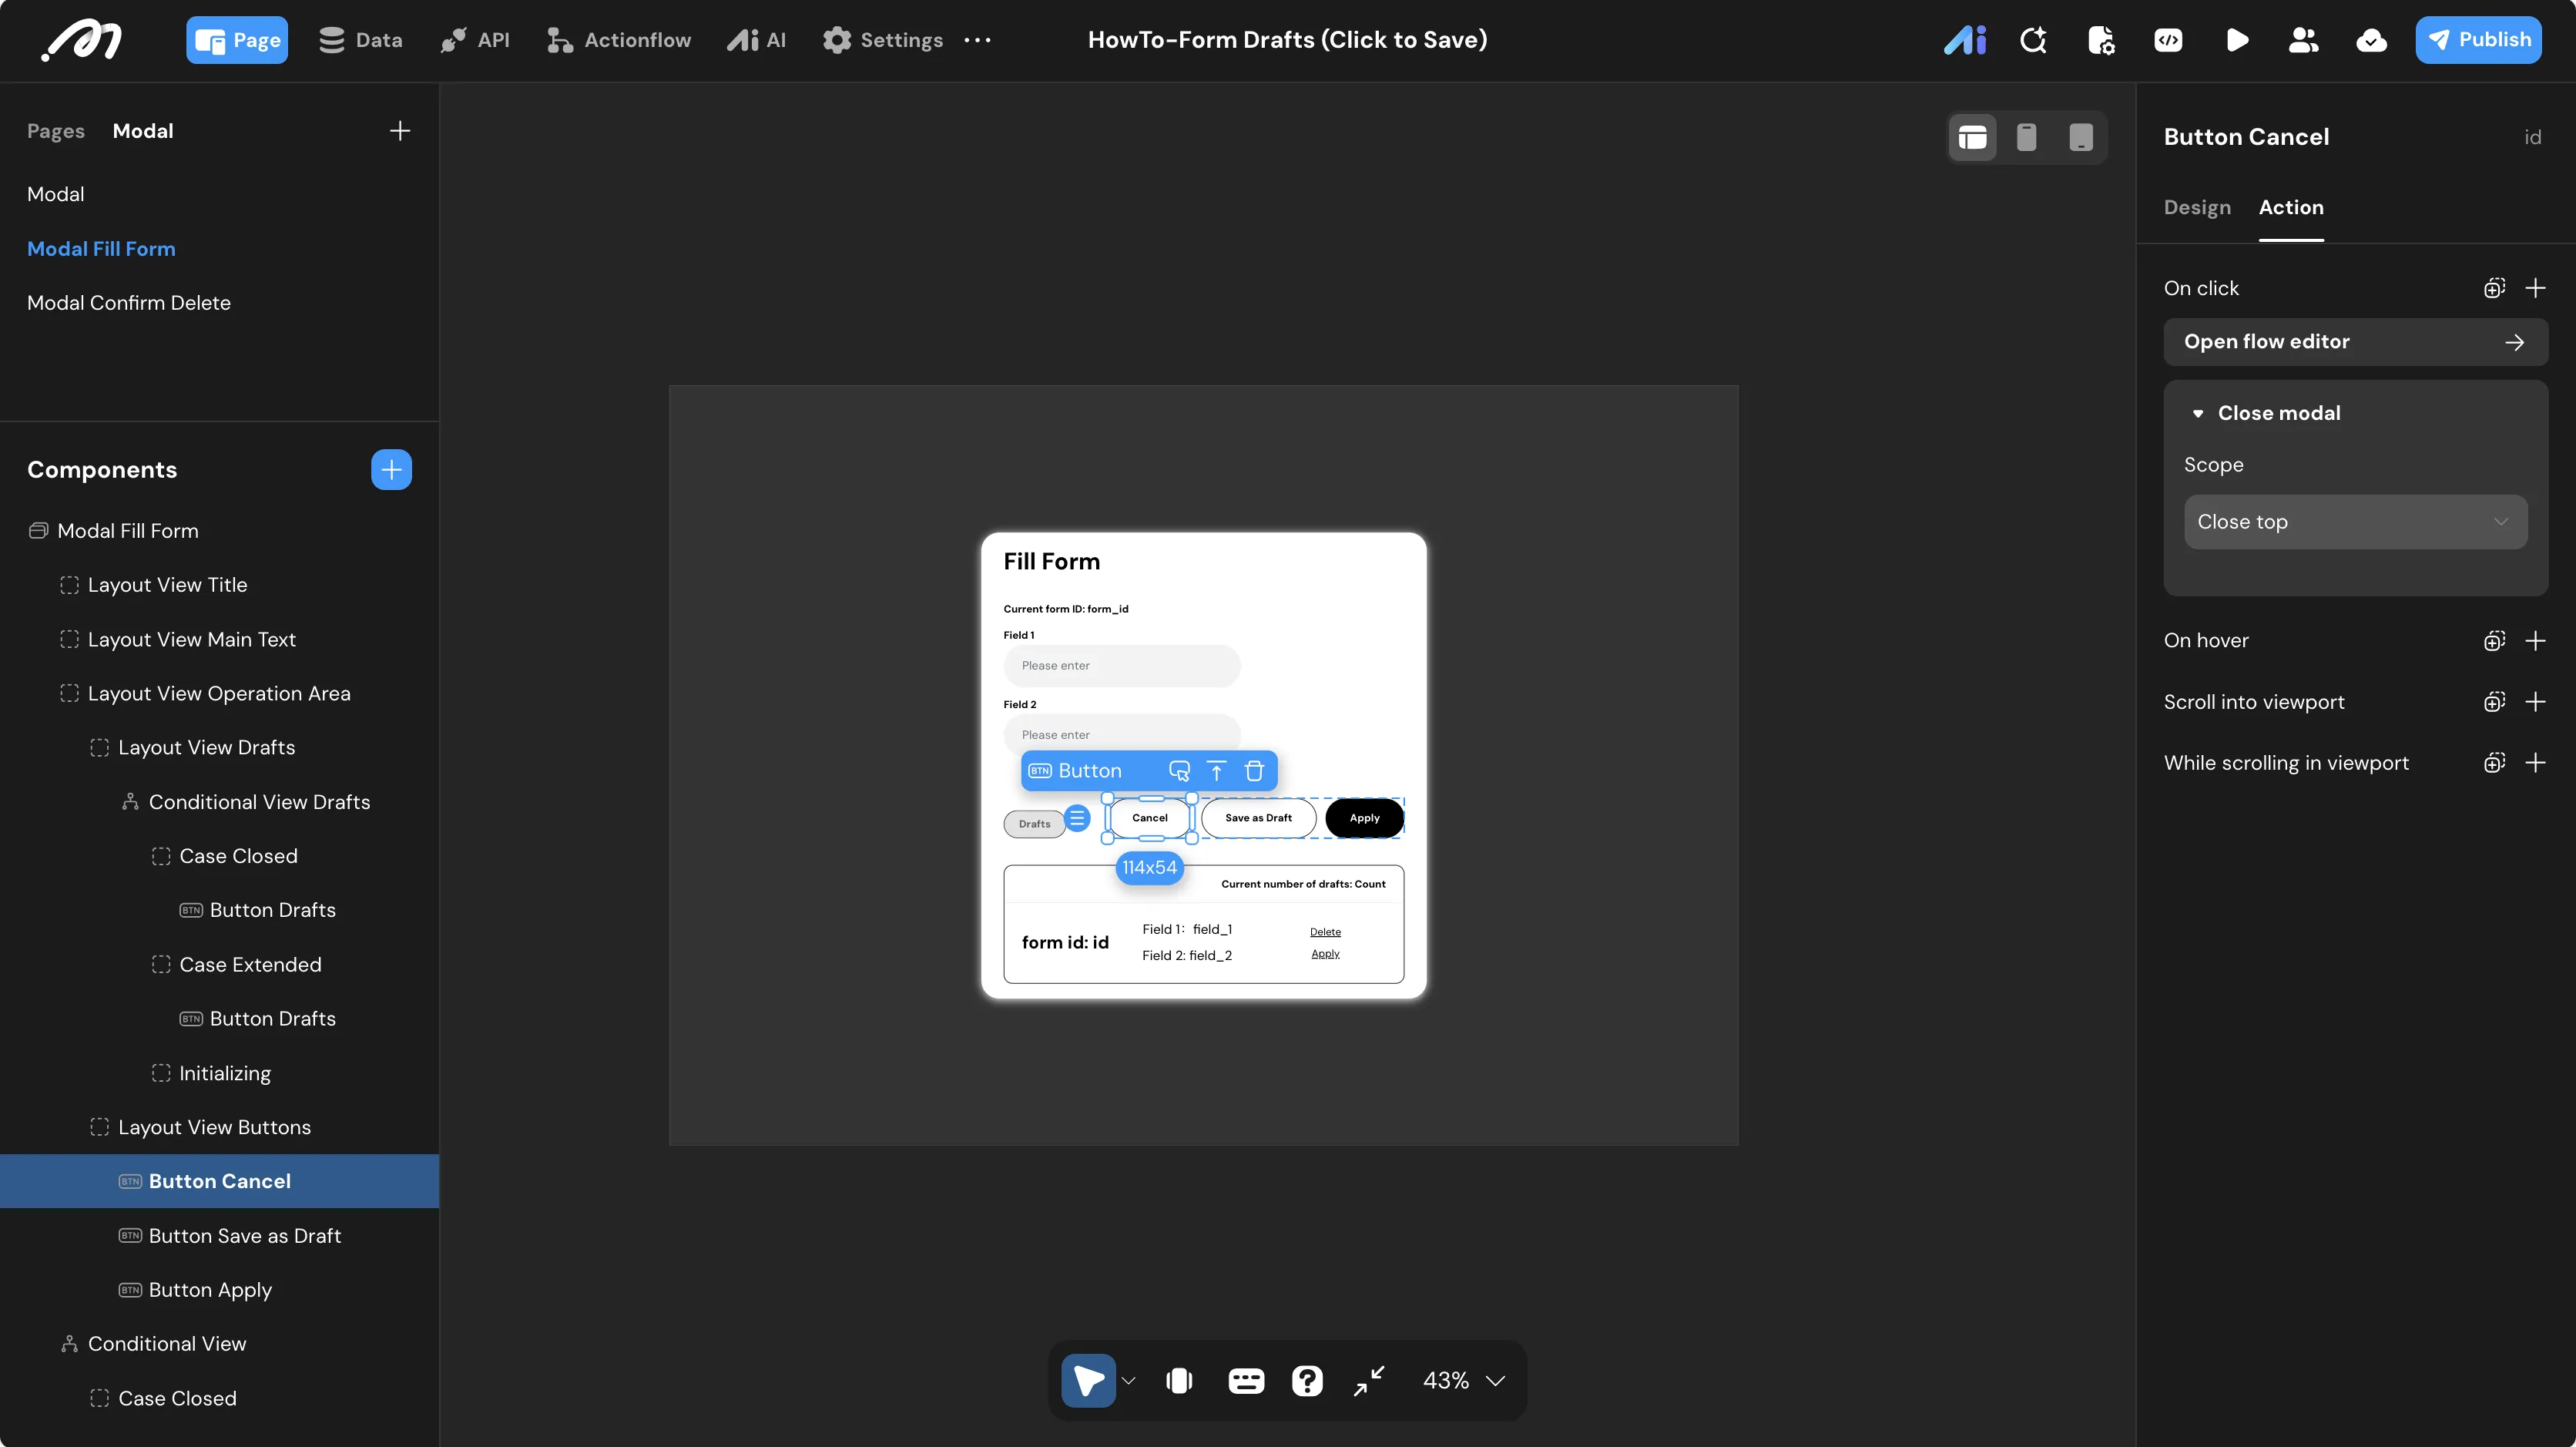
Button Cancelcomponent. Under itsOnClickconfiguration, add a Close modal node and set Scope toClose top.
Draft List & Actions
Draft List Components
Now that the modal is configured, return to the main page to build the draft list. The list will show all drafts belonging to the logged-in user.
- Select the
Text Current number of draftscomponent. Bind its Content toLogged in user/form/Countand add a local filter:status Equal to 'Draft'.
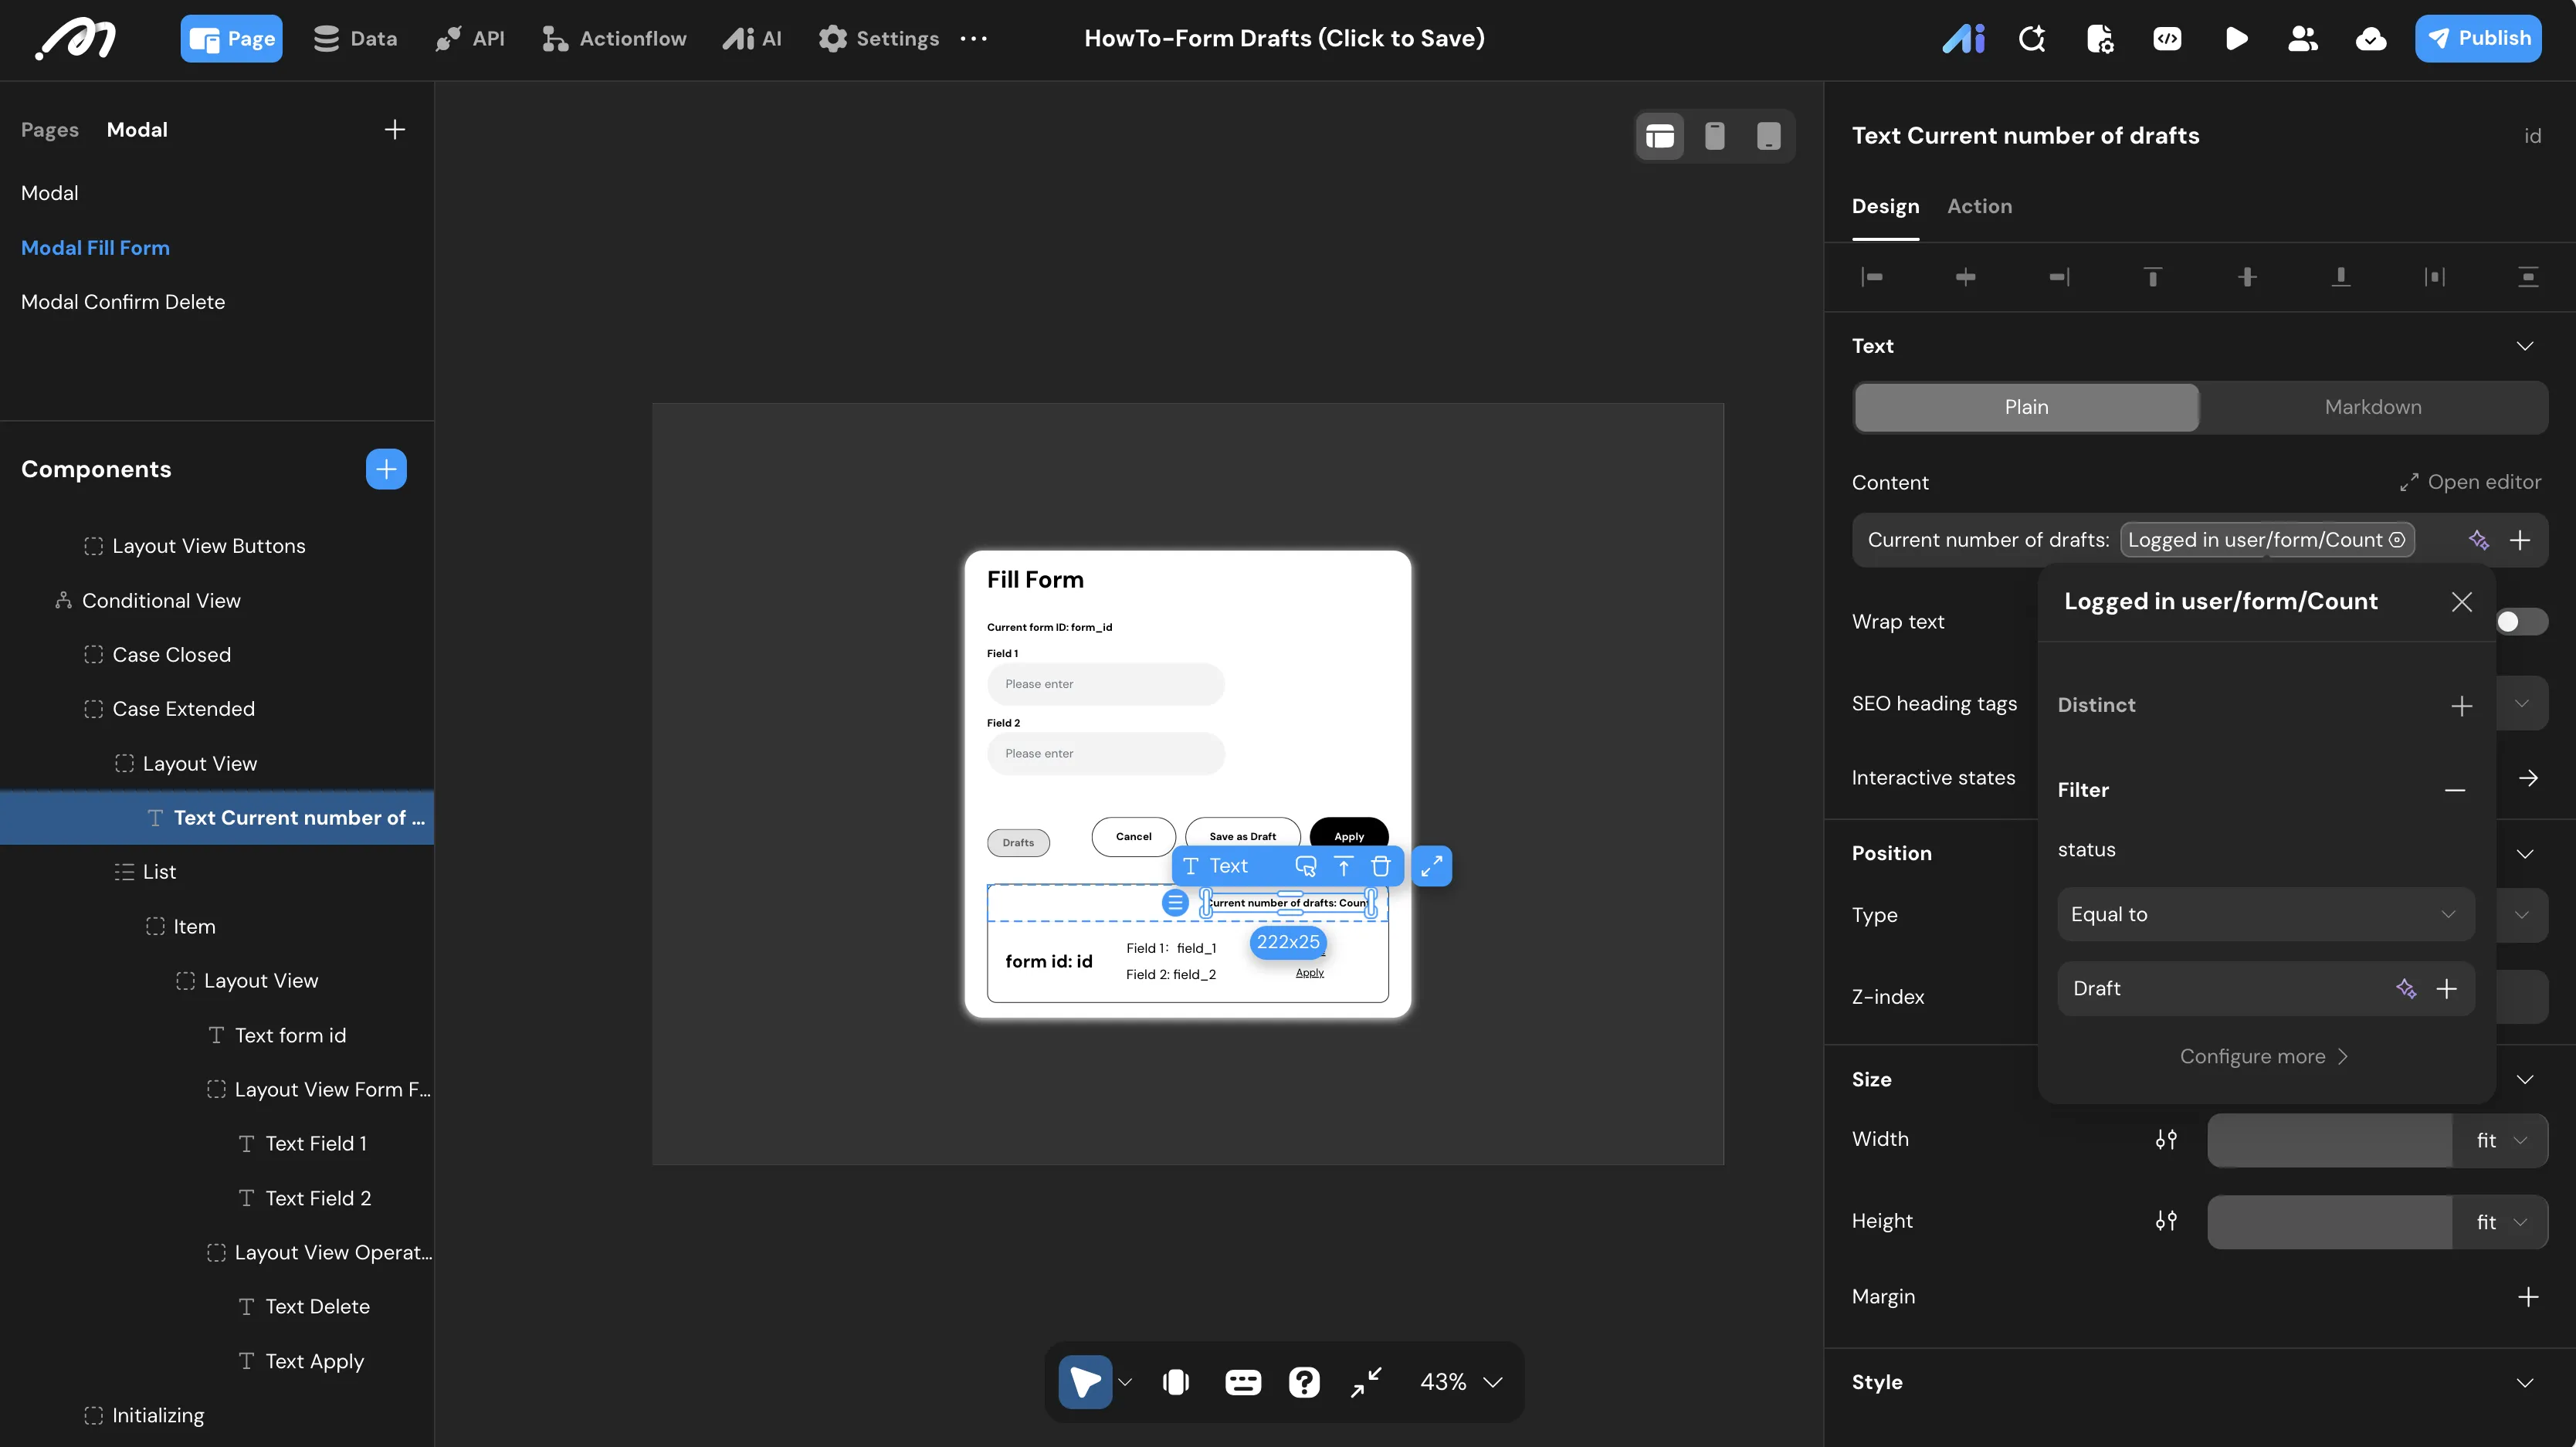
Logged in user/form/Count is evaluated when user data loads or refreshes. The draft list uses the Subscription request type, which automatically keeps the UI in sync with database changes.
- Drag a List component onto the canvas and rename it to
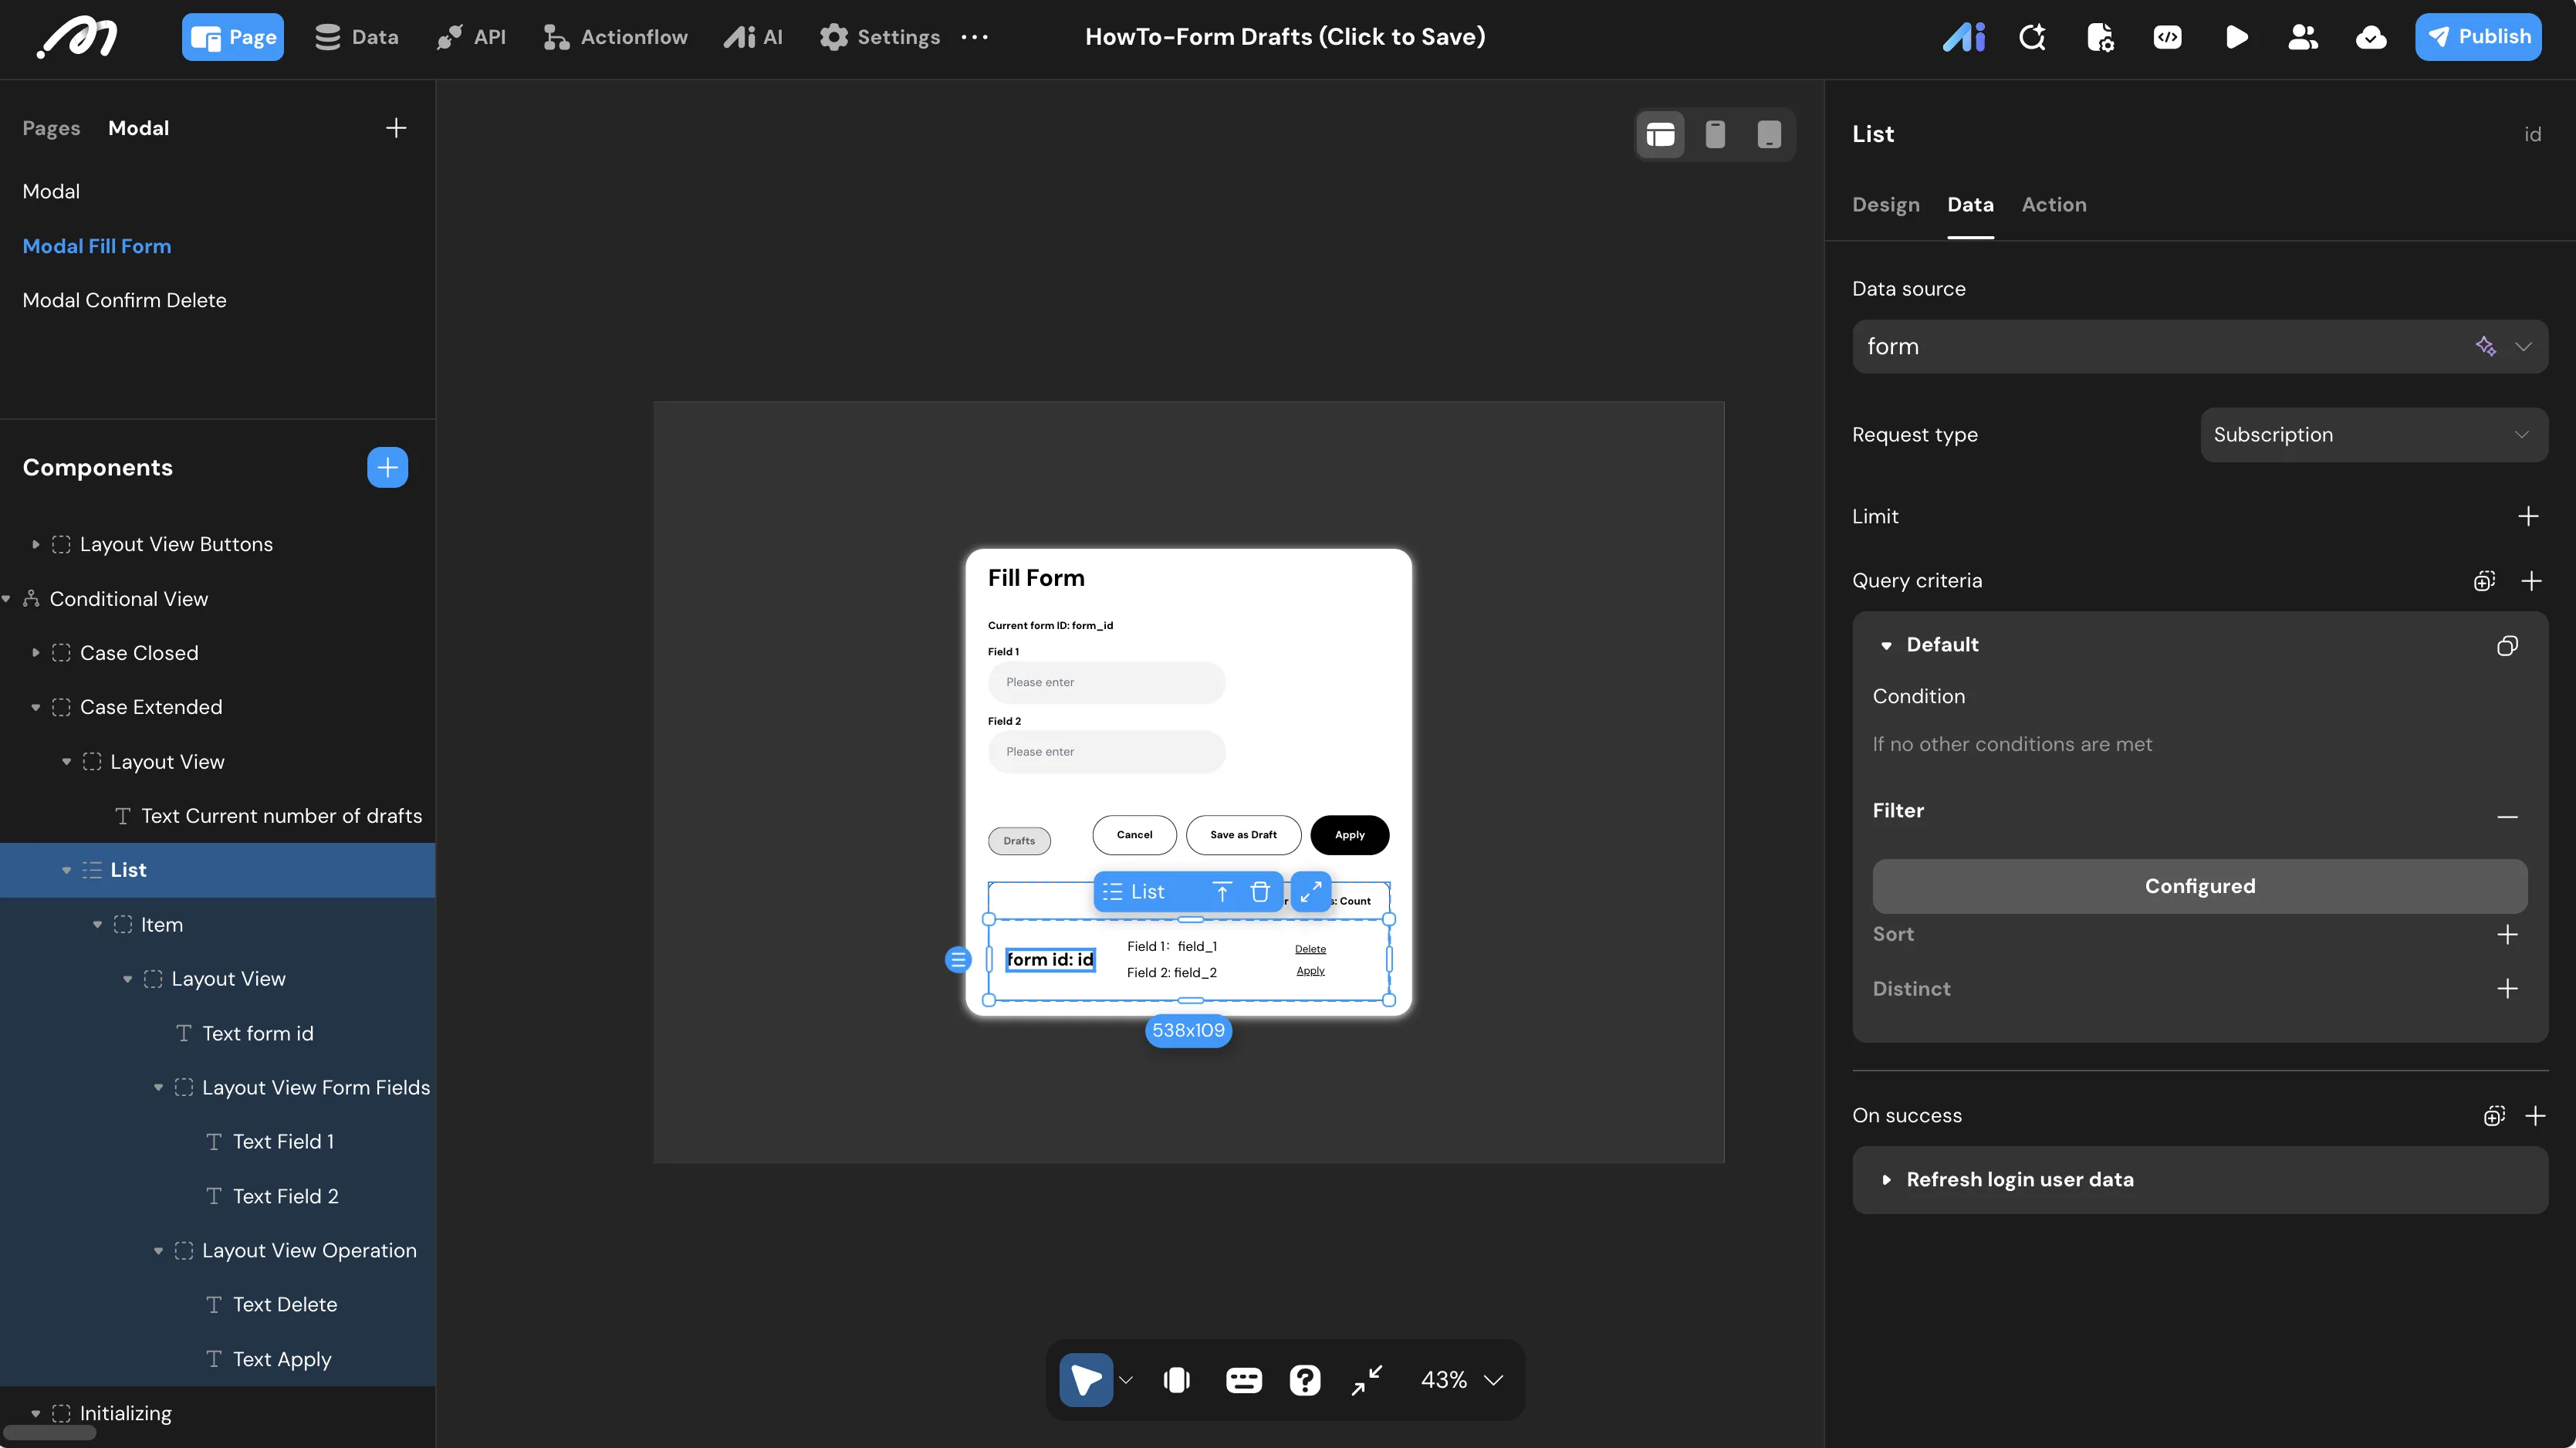
List Drafts. Set its Data source to theformtable and toggle Request type toSubscriptionfor real-time syncing.
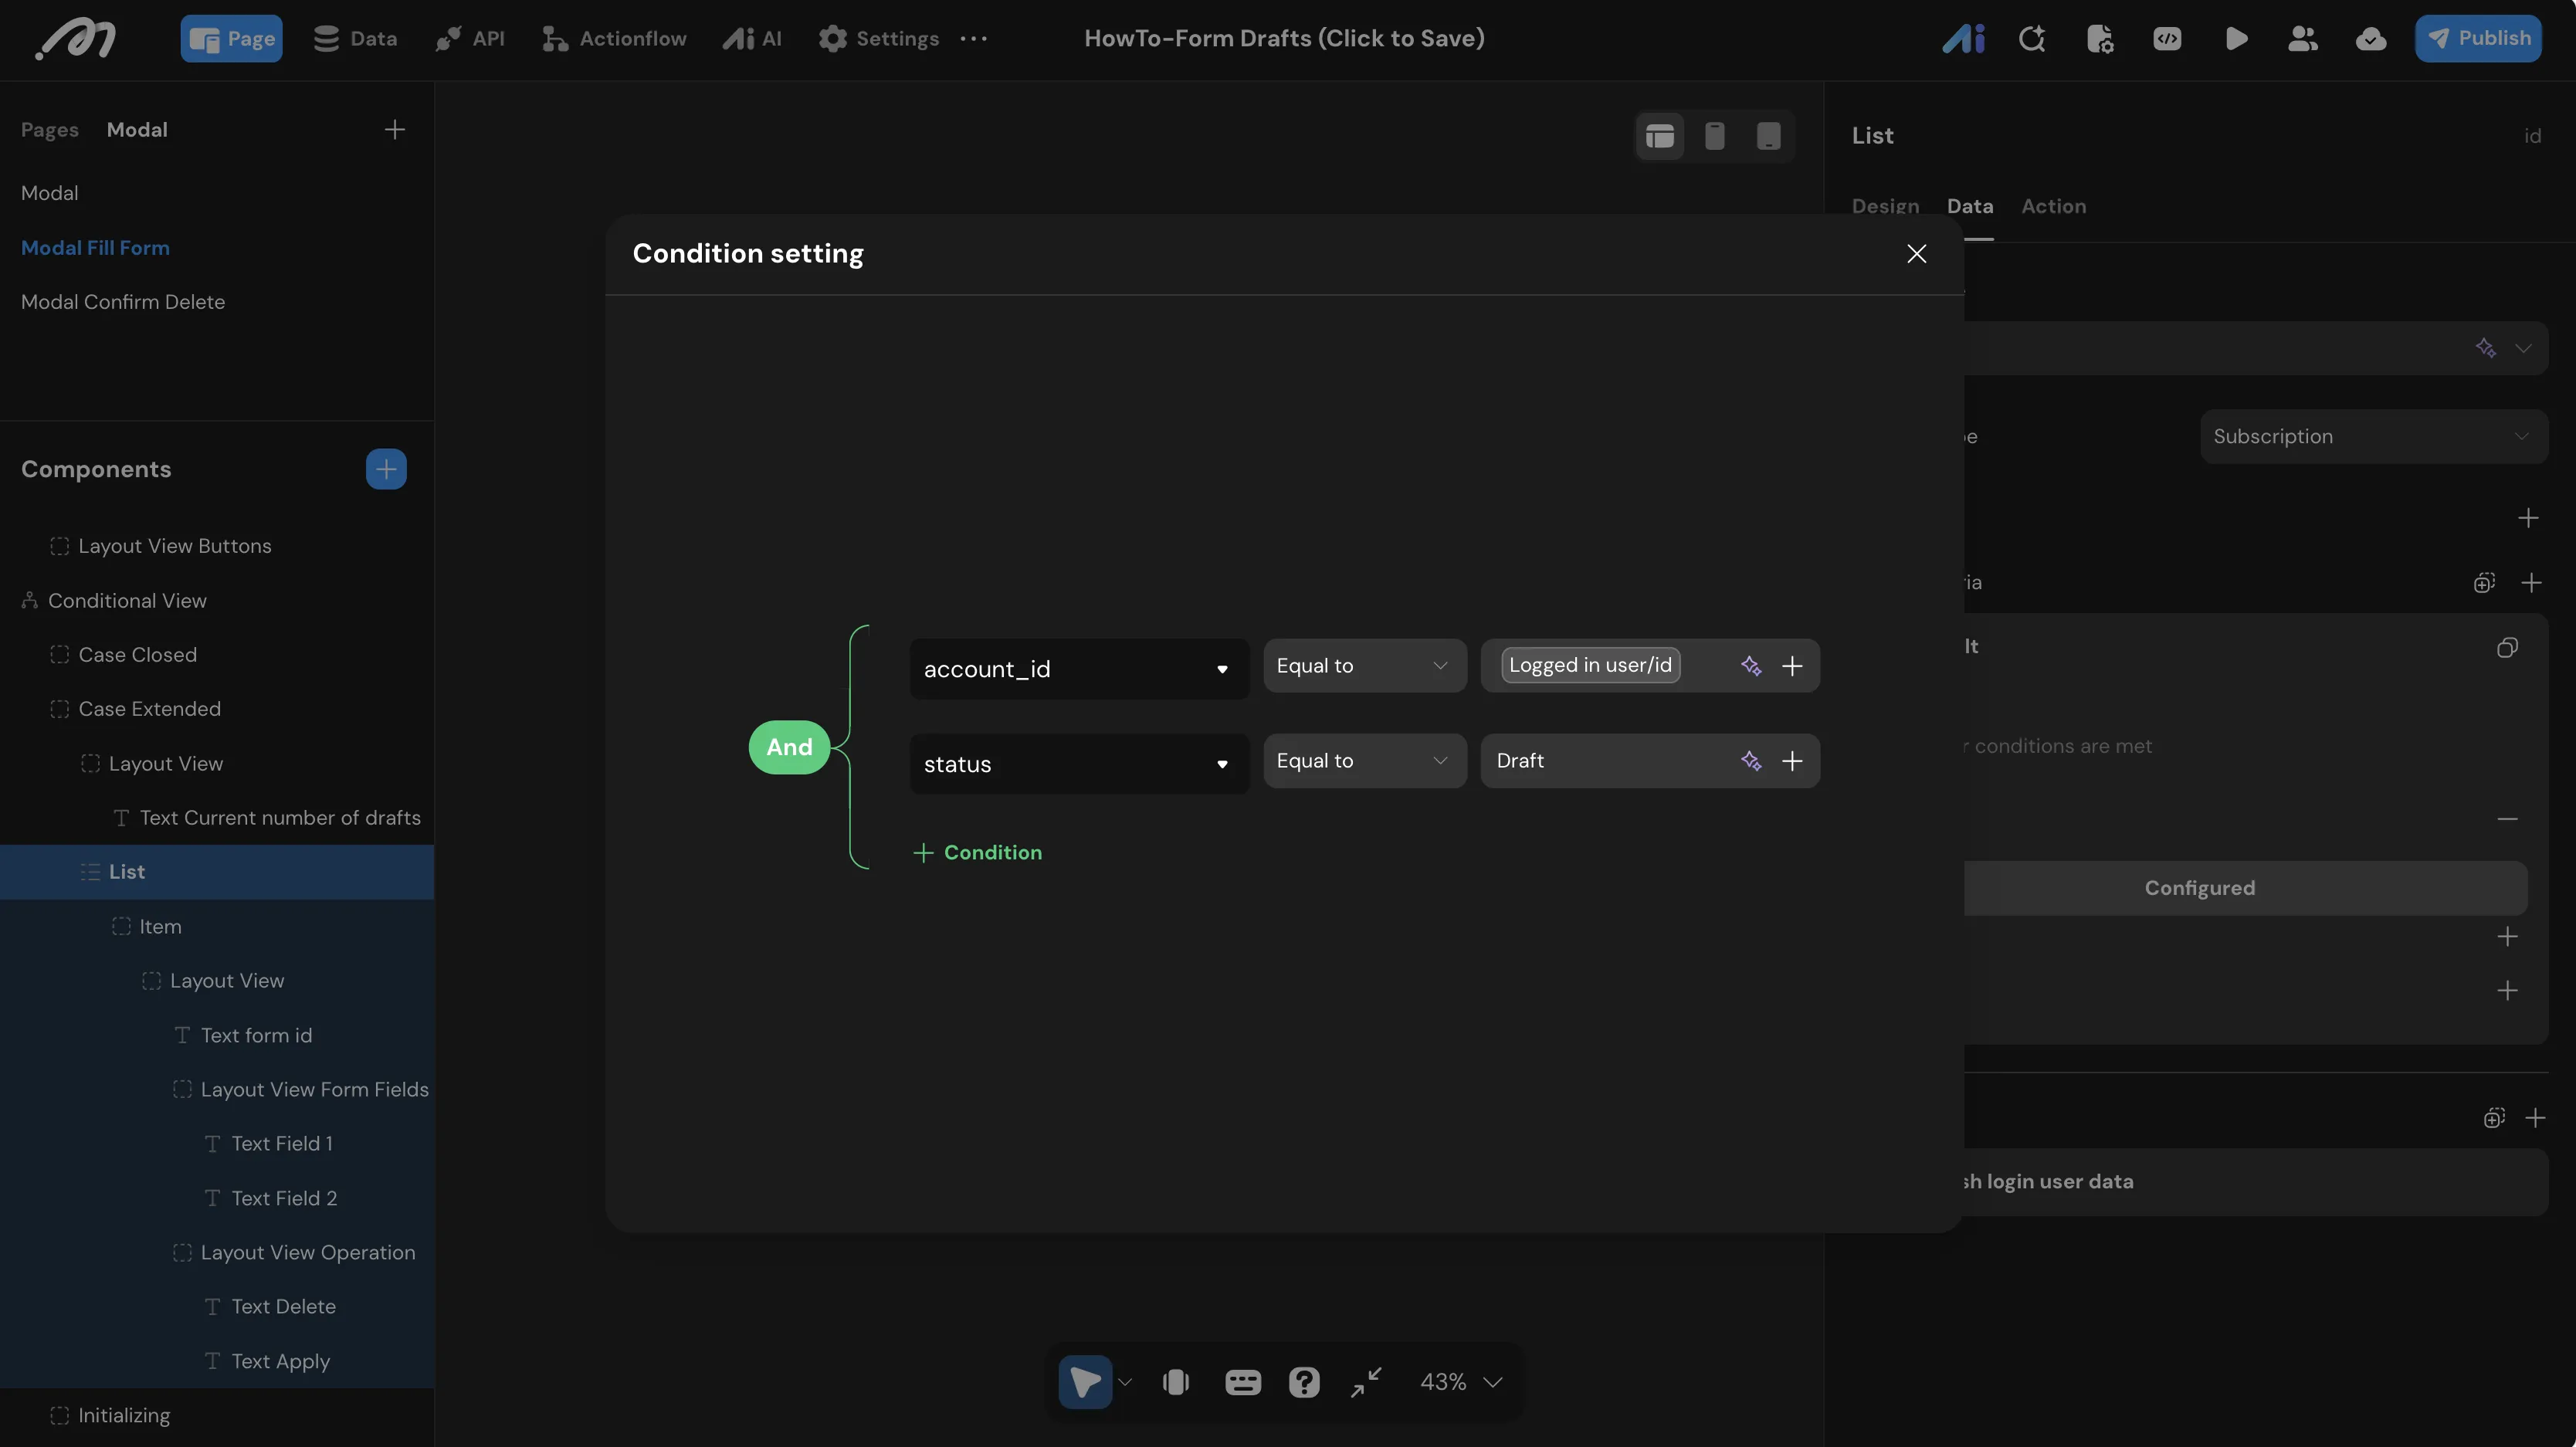
- Open the Query criteria panel for the list and add two filter rules combined with an
Andoperator:account_id Equal to Logged in user/idstatus Equal to 'Draft'
Interactive View Toggles
The draft list is placed inside a conditional view container that can be expanded or collapsed.
- Select
Button Draftsinside theCase Closedstate of theConditional View Draftscontainer. - Add a Switch conditional view action under its
OnClickevent. TargetConditional View Draftsand set Switch toCase Extended.
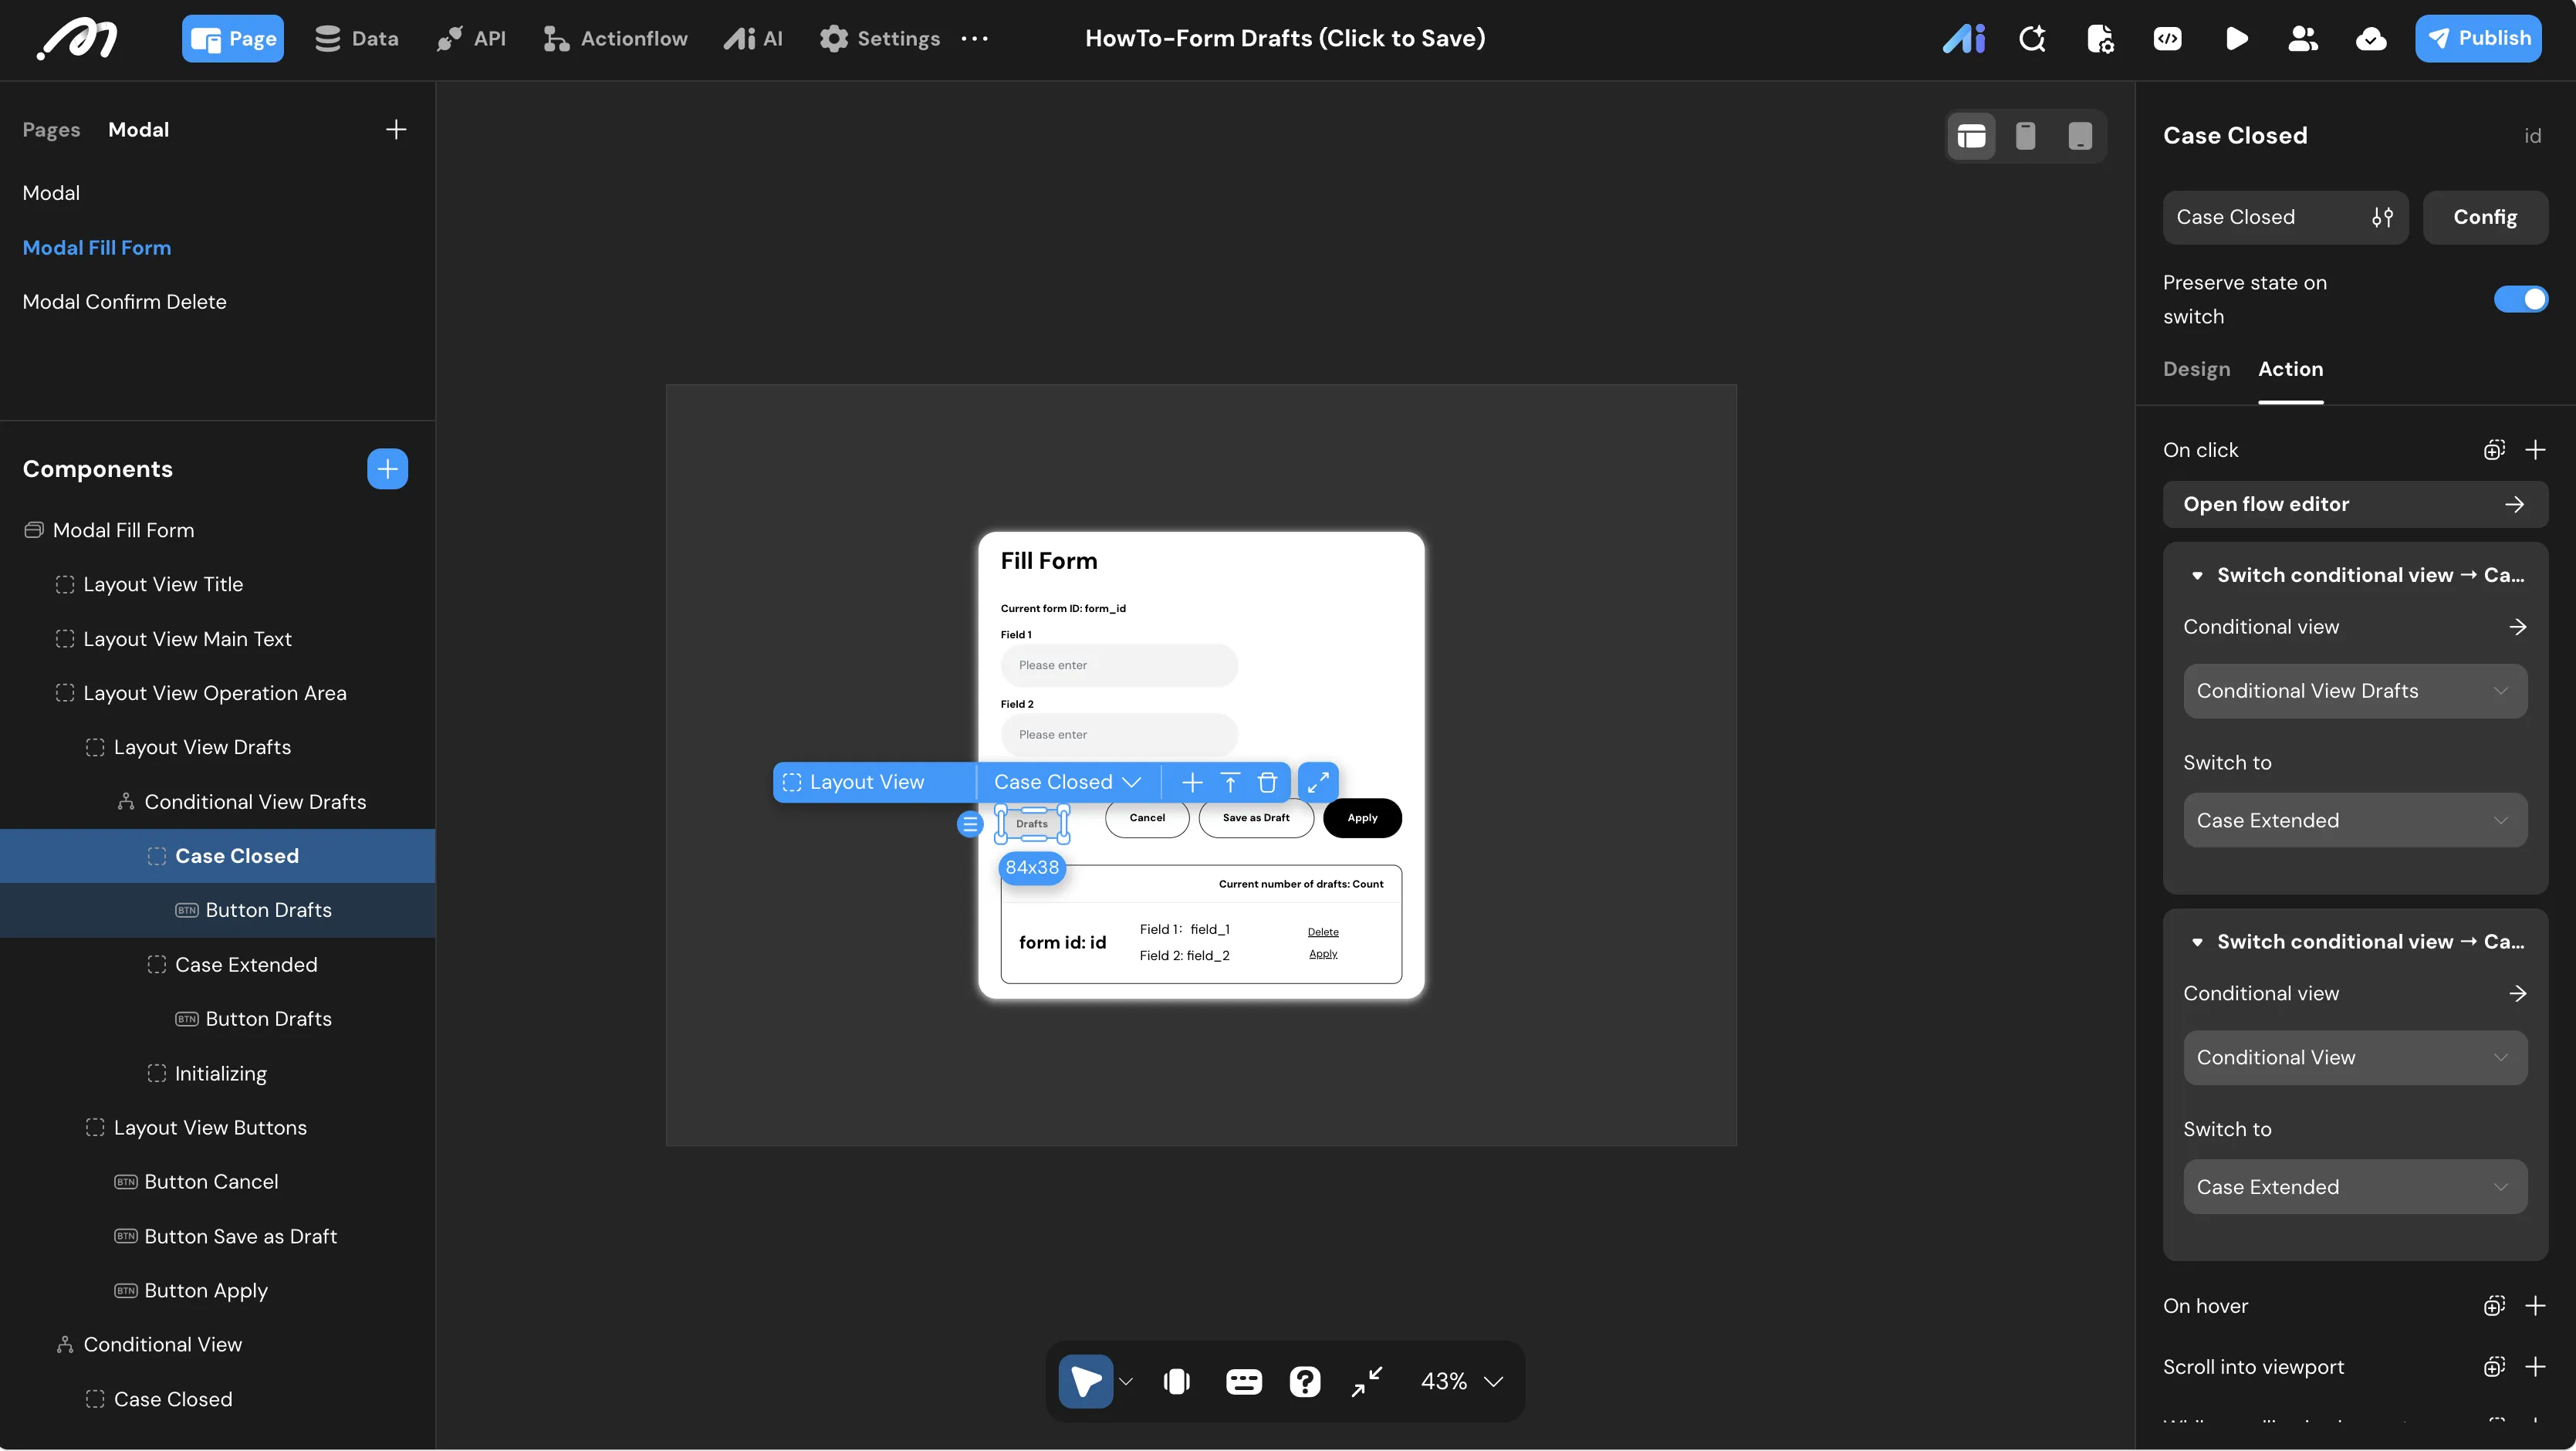
- Switch the container to
Case Extended, select its internalButton Drafts, and add a Switch conditional view action under itsOnClickevent, setting the target back toCase Closed.
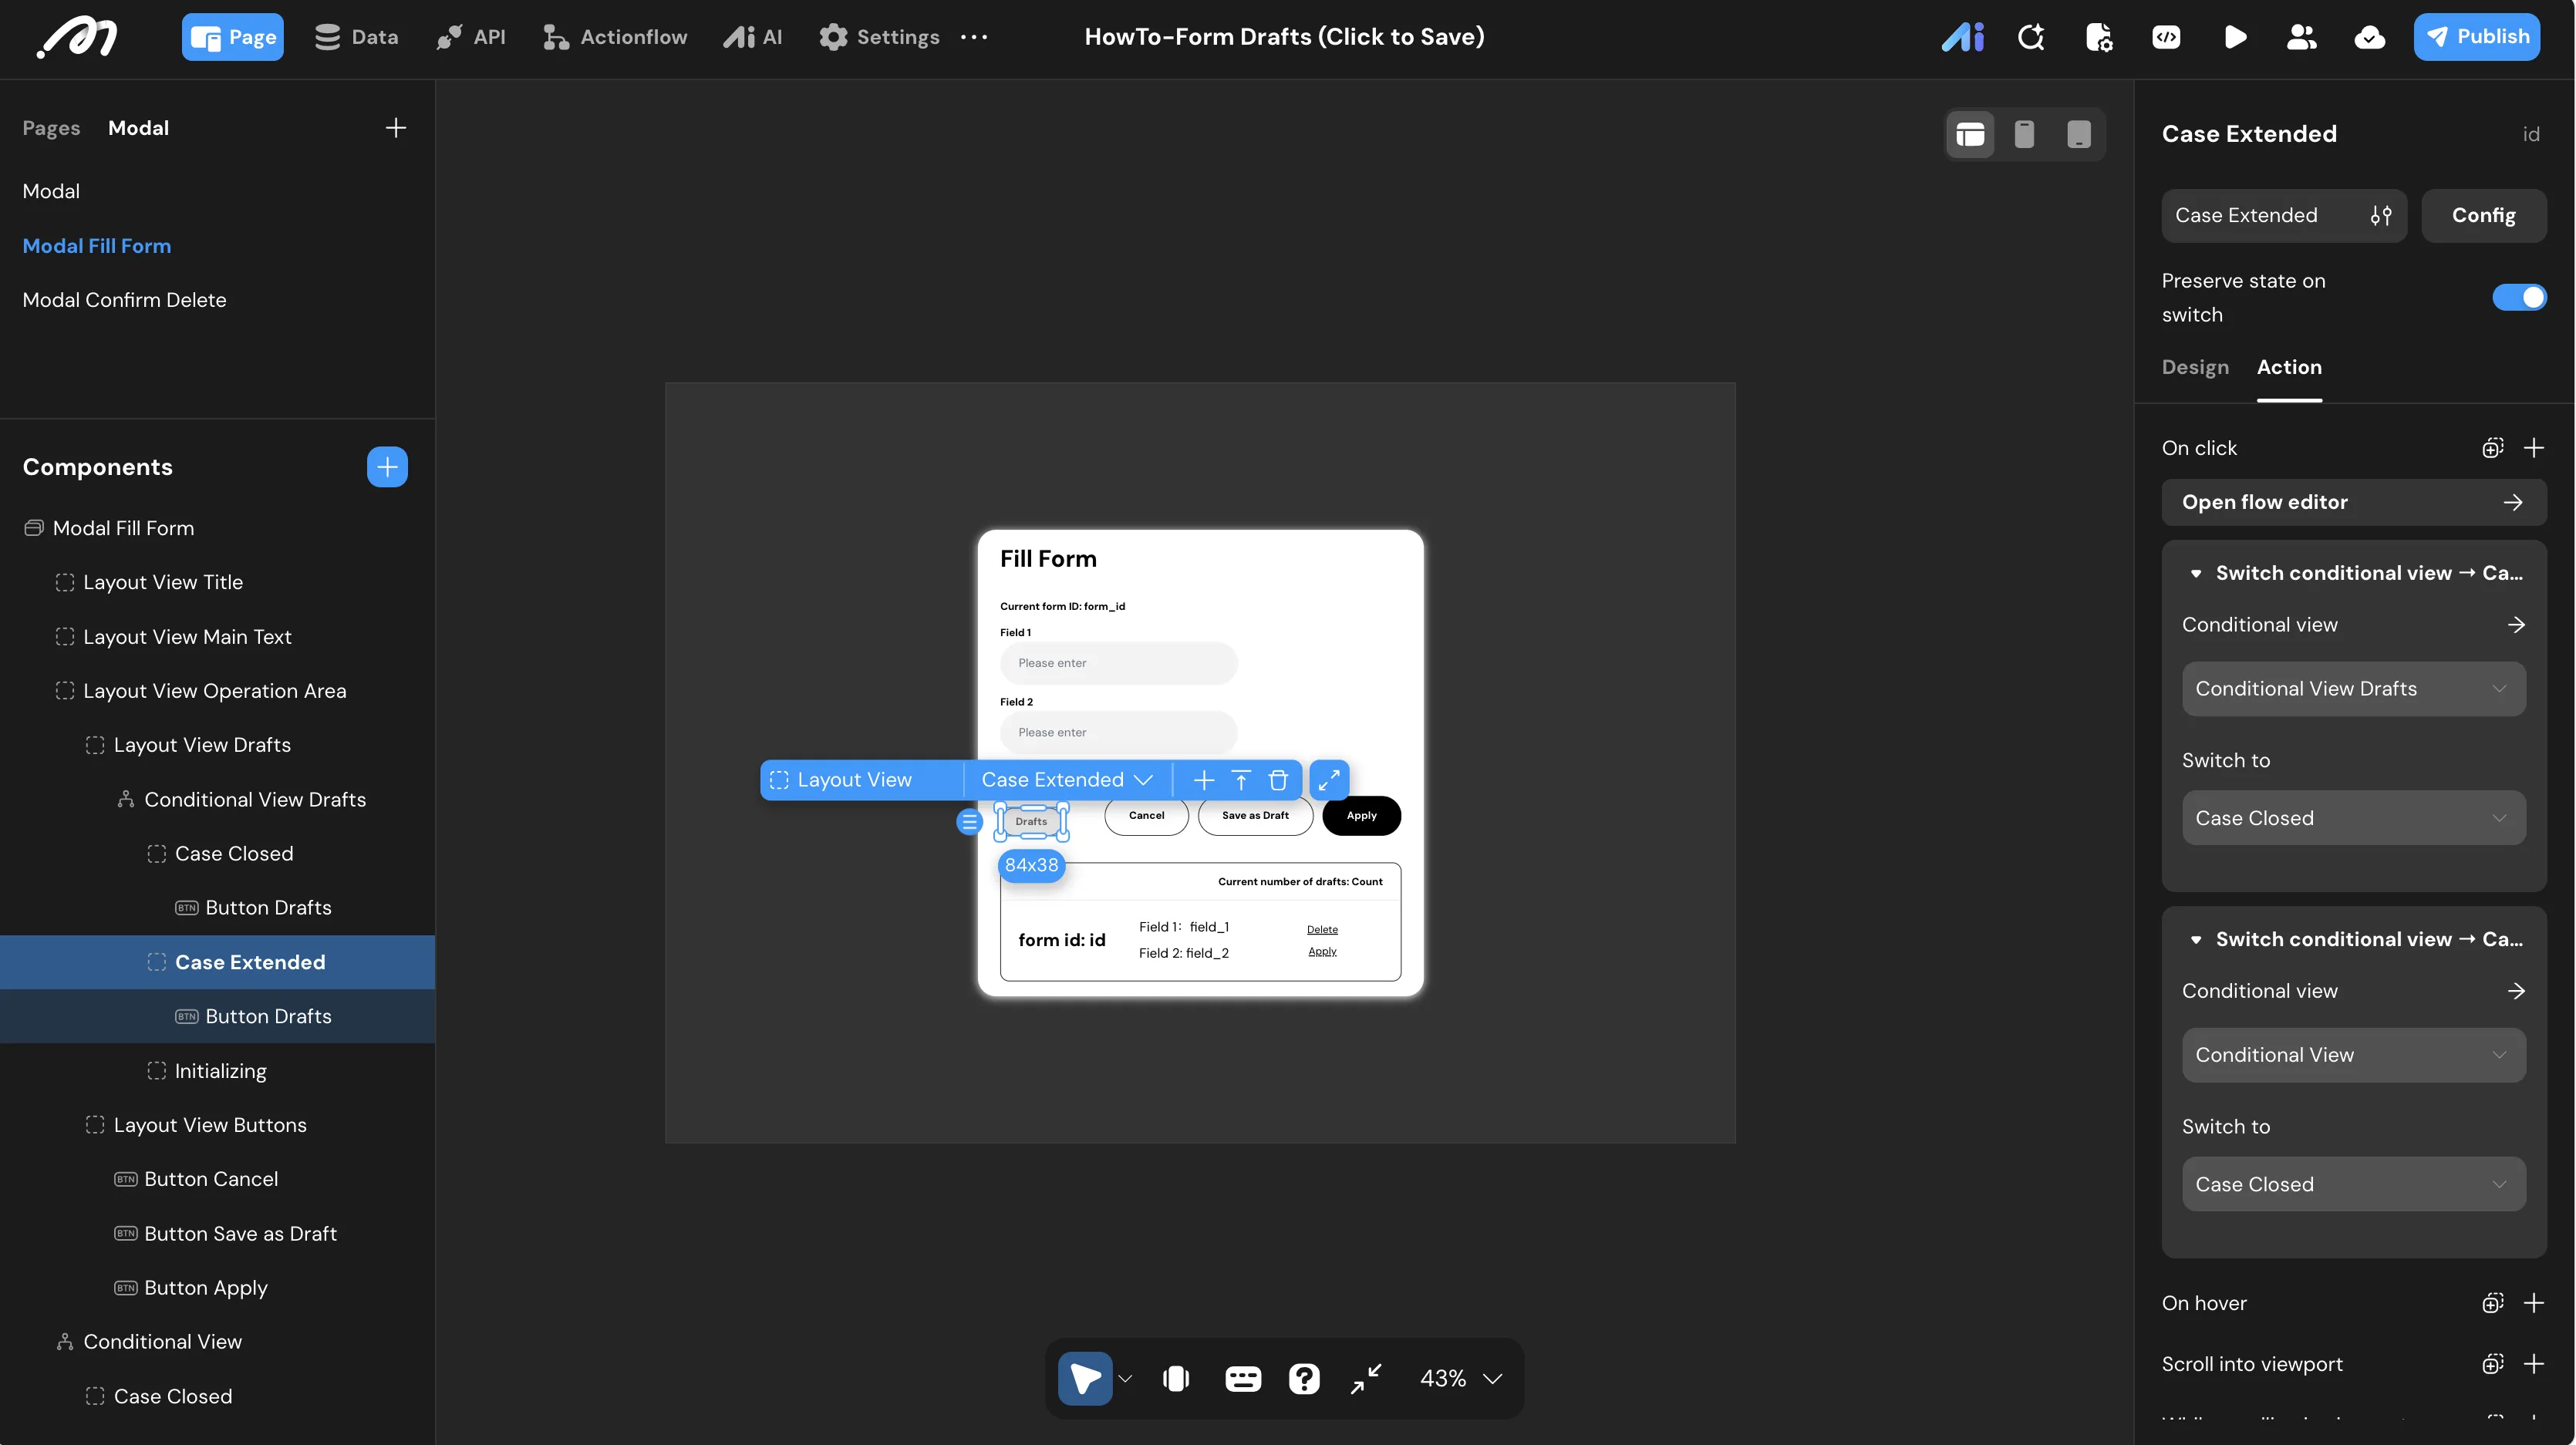
Save as Draft Actionflow
The “Save as Draft” logic validates that at least one field is filled, then inserts a new draft record and updates the form_id variable so the user can continue editing.
- Select
Button Save as Draft.
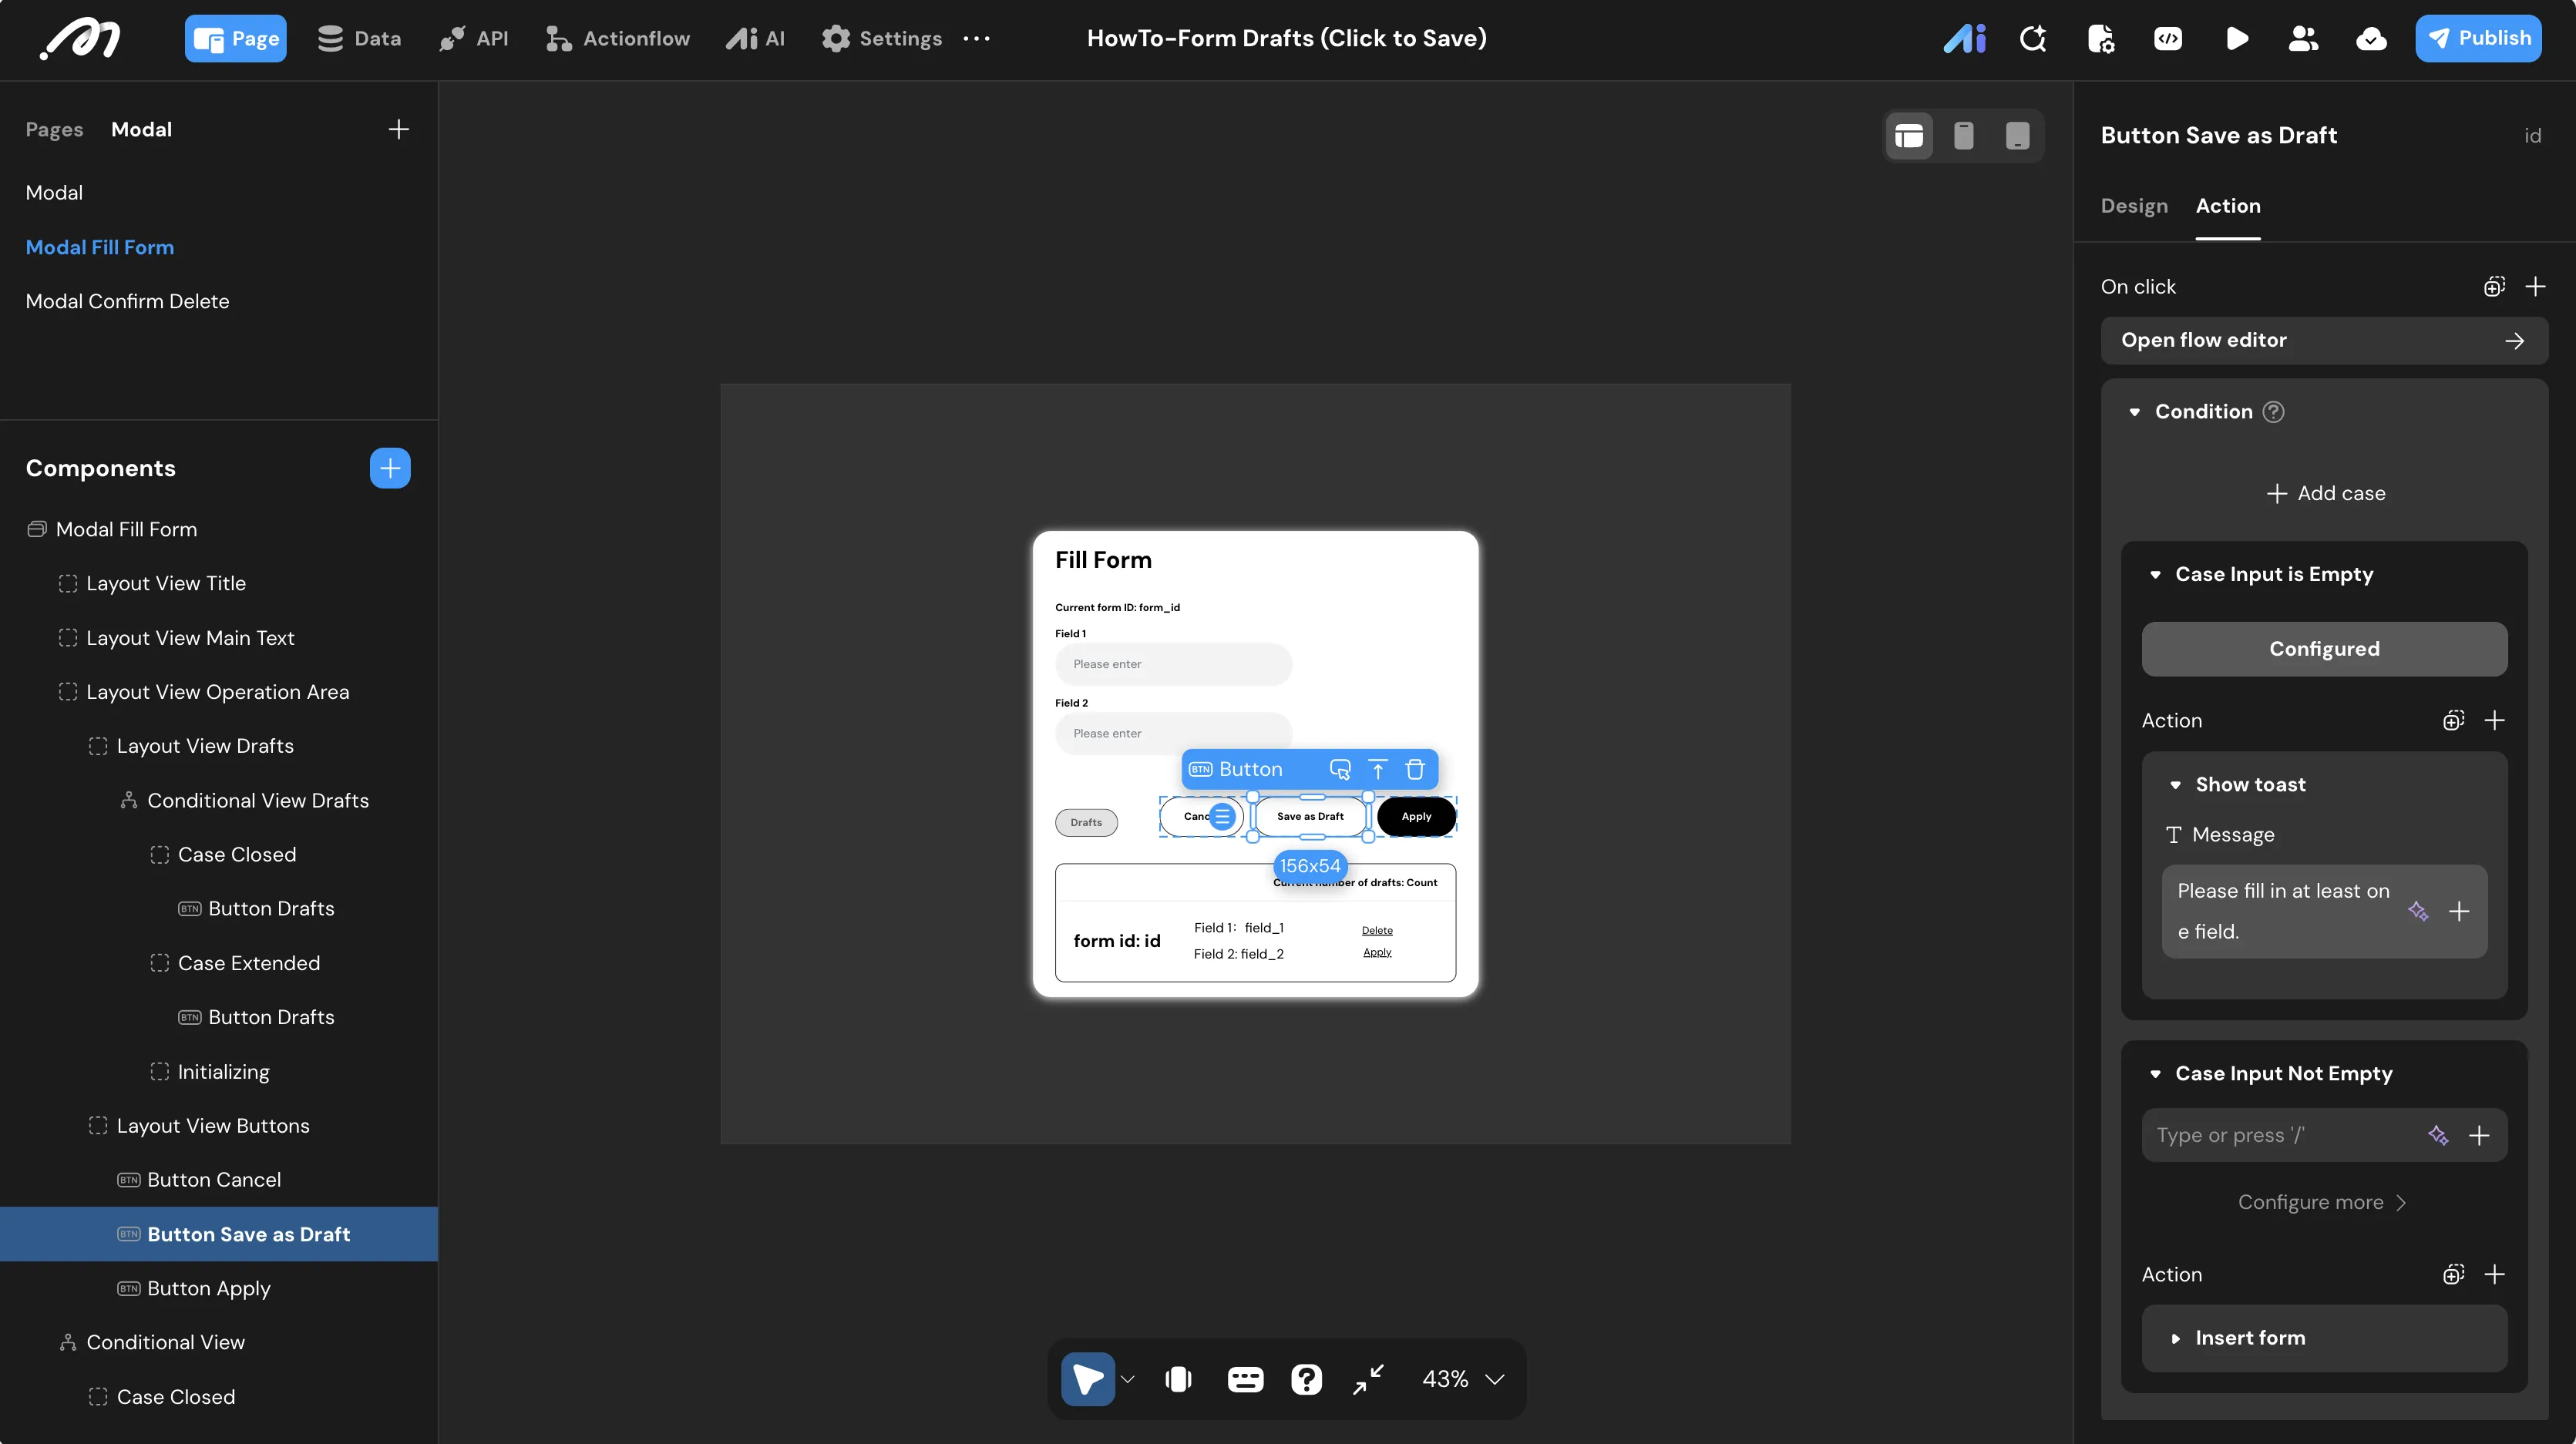
- Add a Condition node for input validation:
- Name the branch
Case: Input Emptyand use theAndoperator. - Rule:
Input Field 1/ValueIs nullAndInput Field 2/ValueIs null. - Add a Show toast node inside this branch:
Please fill in at least one field.
- Name the branch
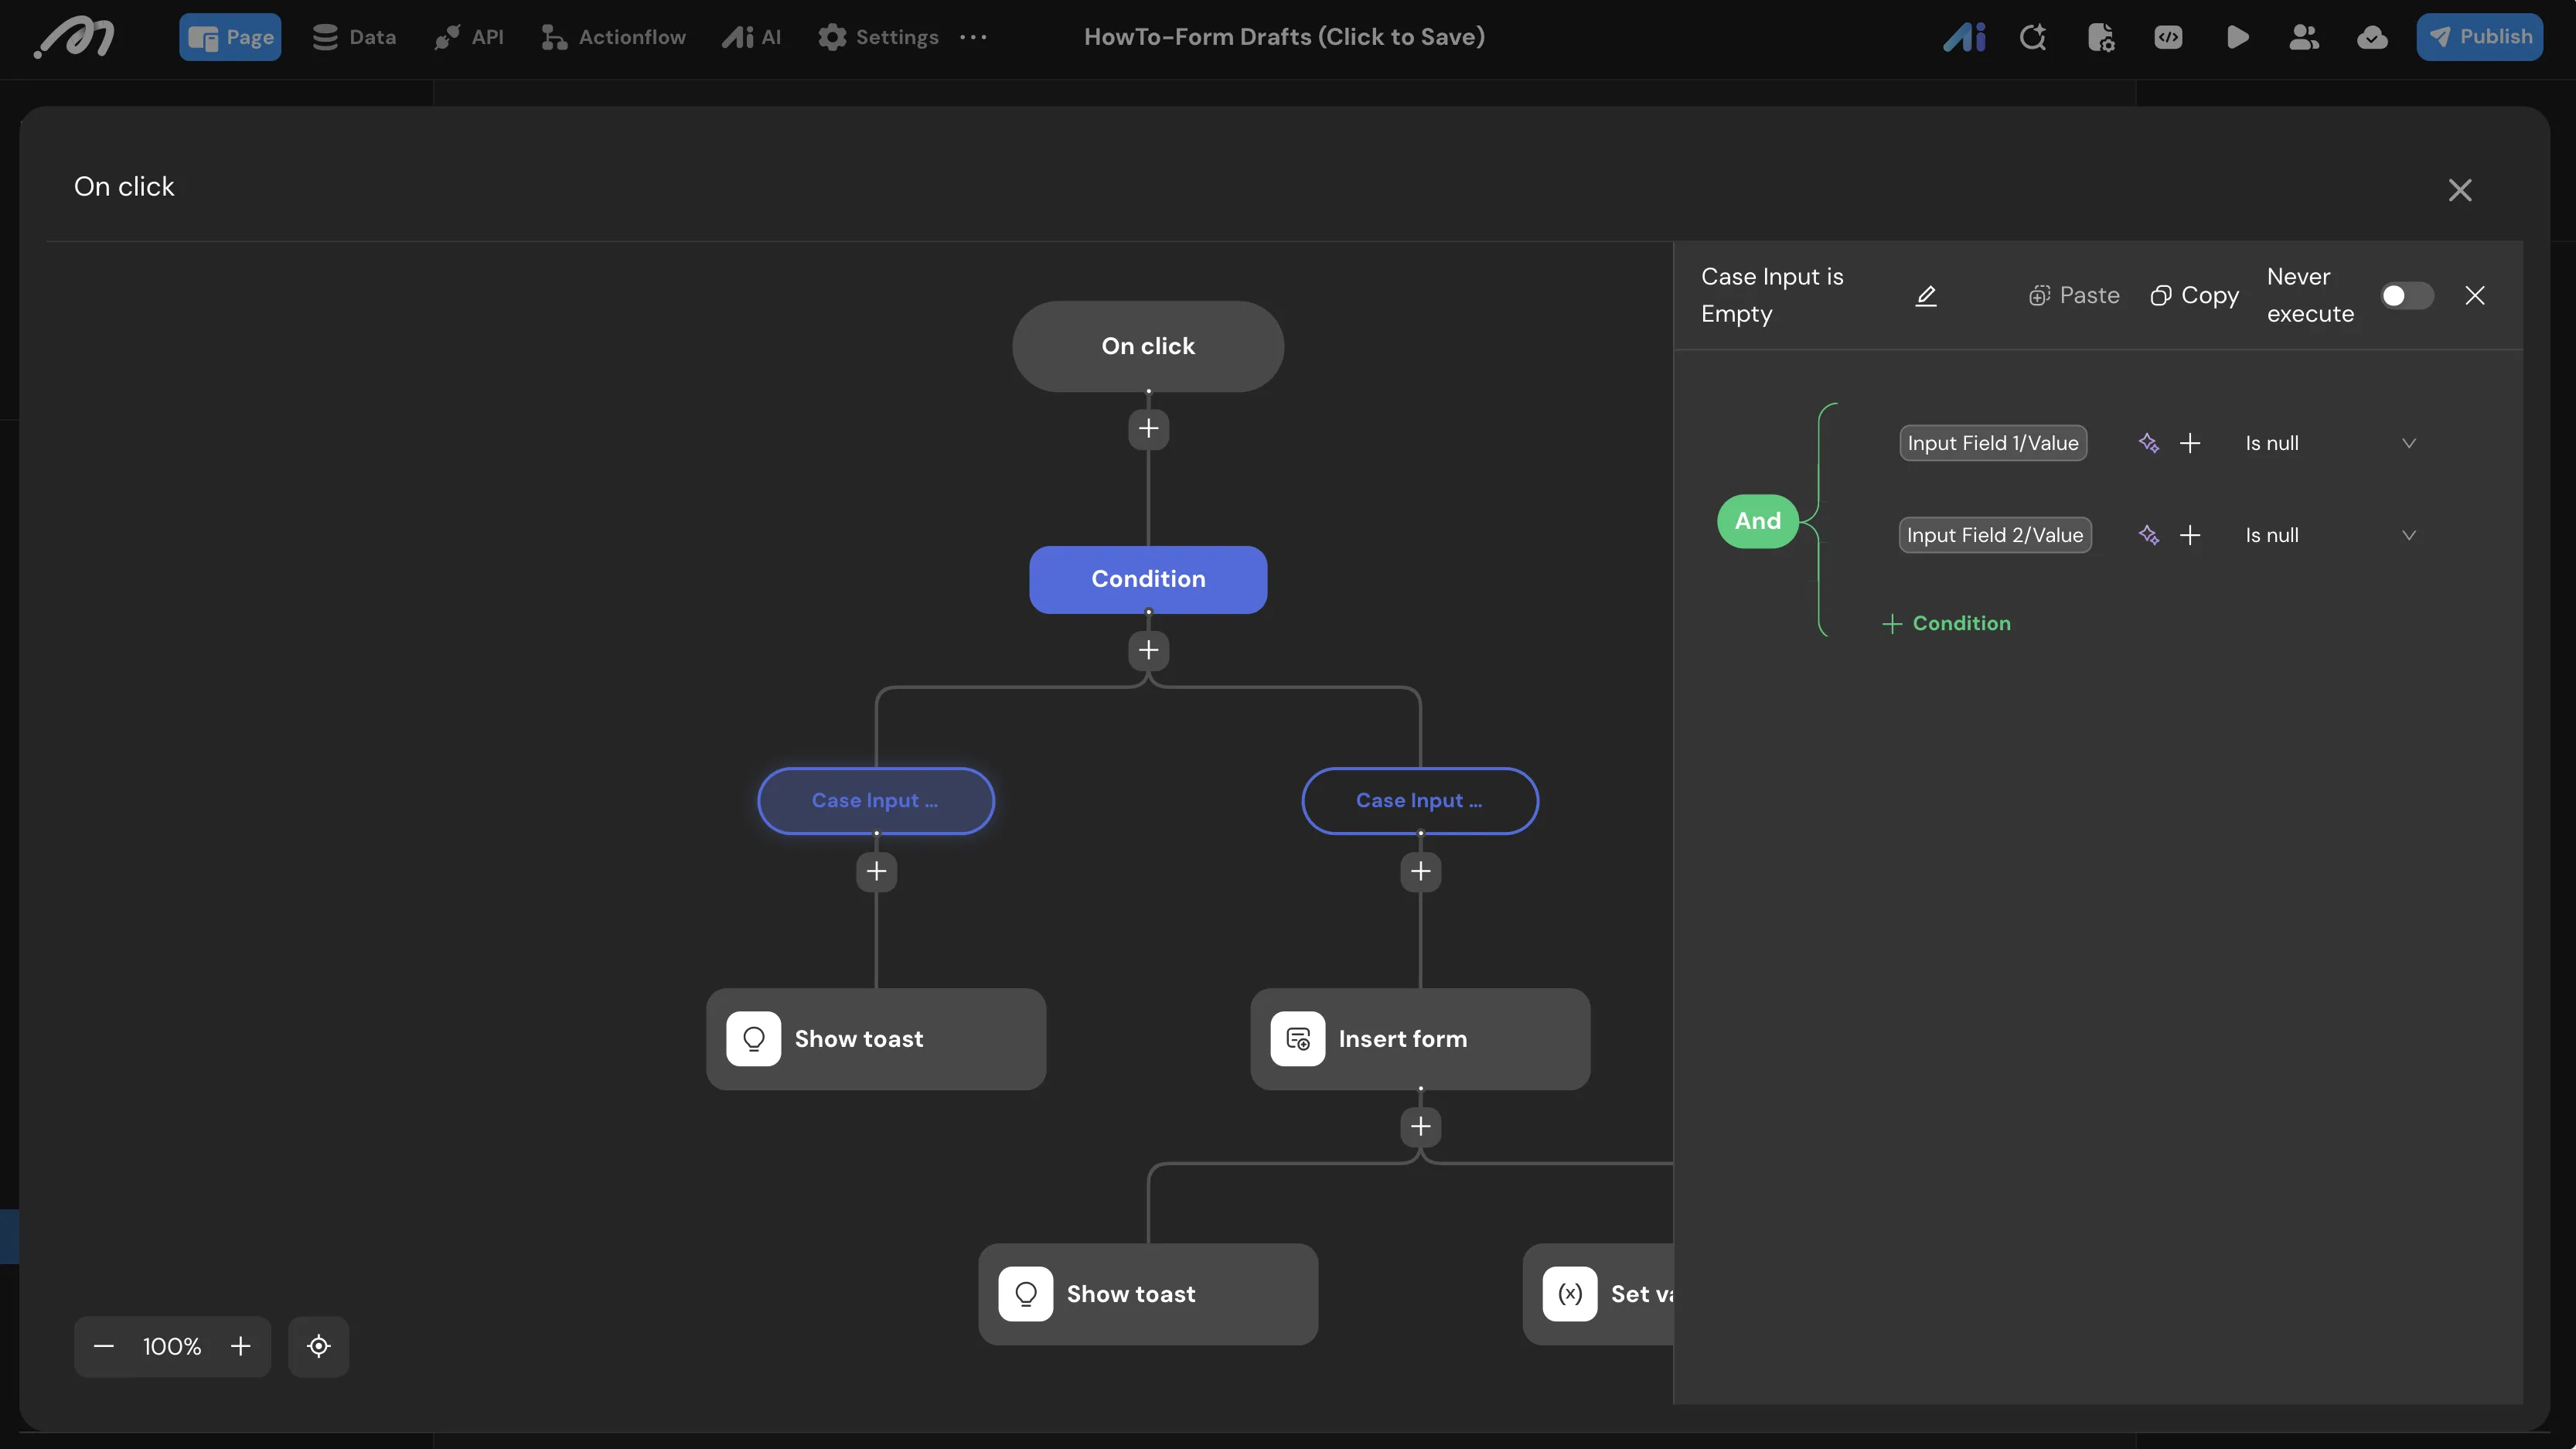
- In the
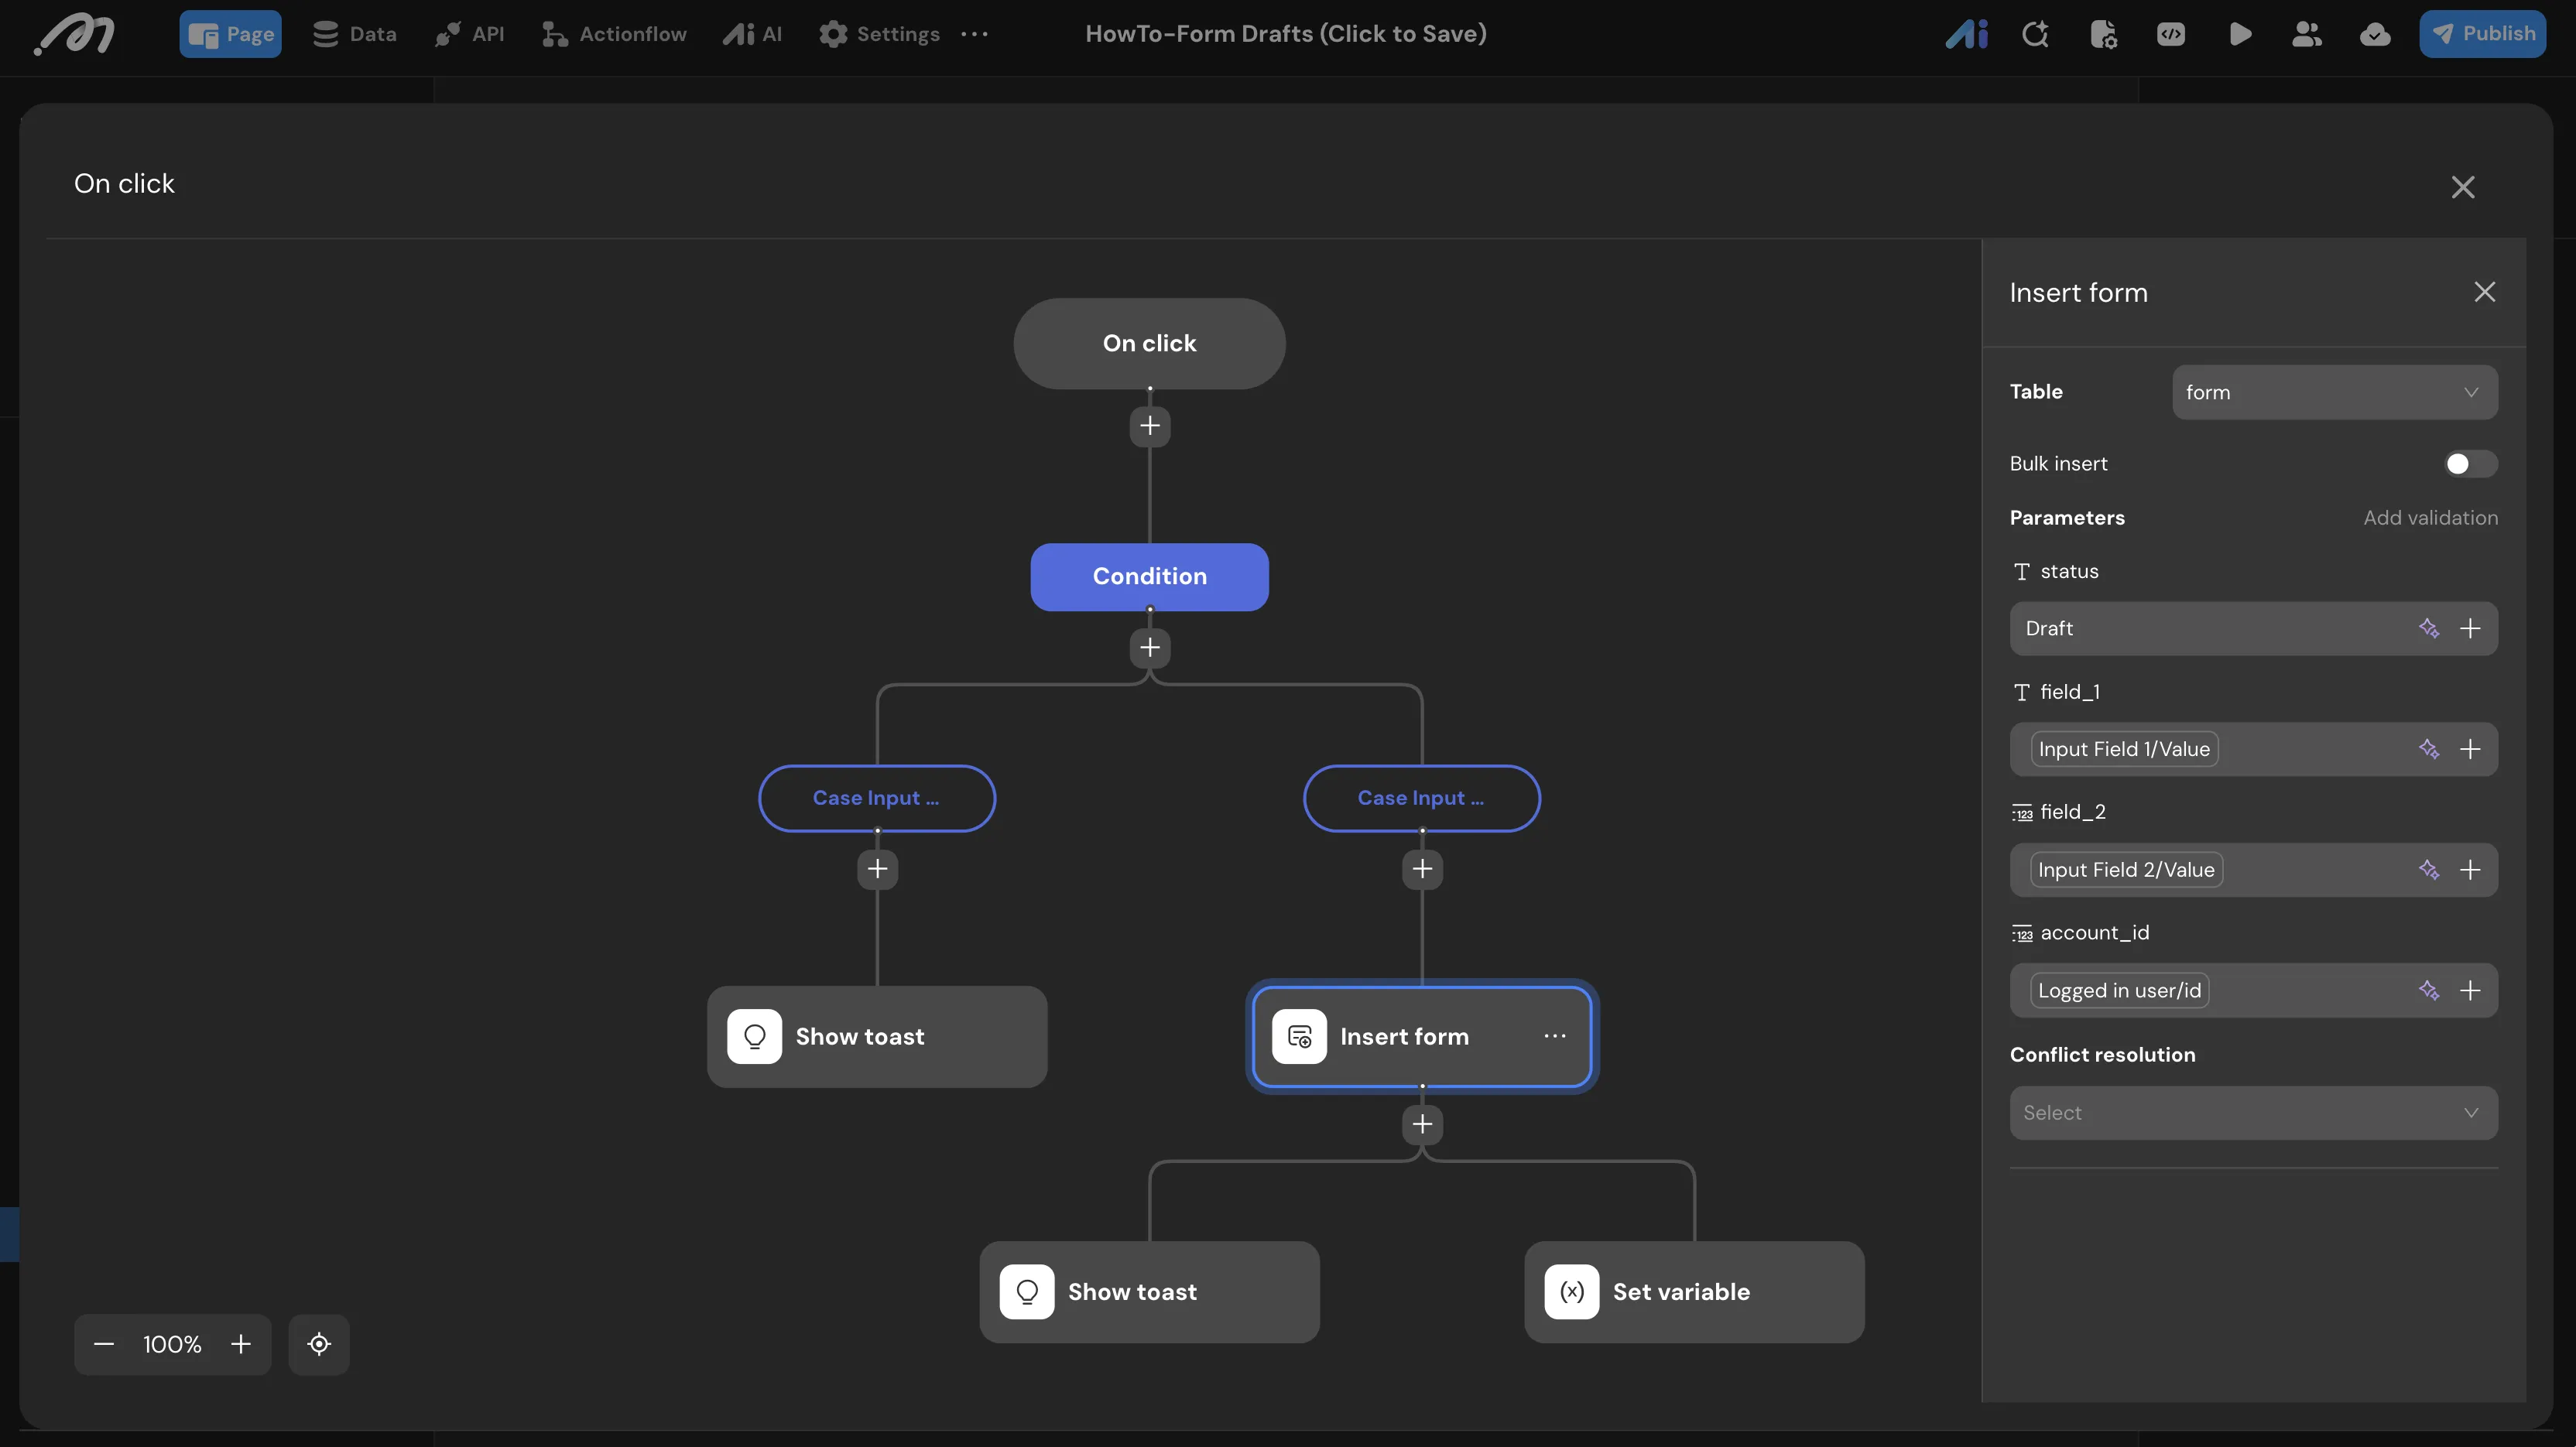
Case: Input Not Emptybranch, add an Insert form node:- Target Table:
form. - Parameters: Set
statustoDraft. Bindfield_1toInput Field 1/Valueandfield_2toInput Field 2/Value. Bindaccount_idtoLogged in user/id.
- Target Table:
- After the
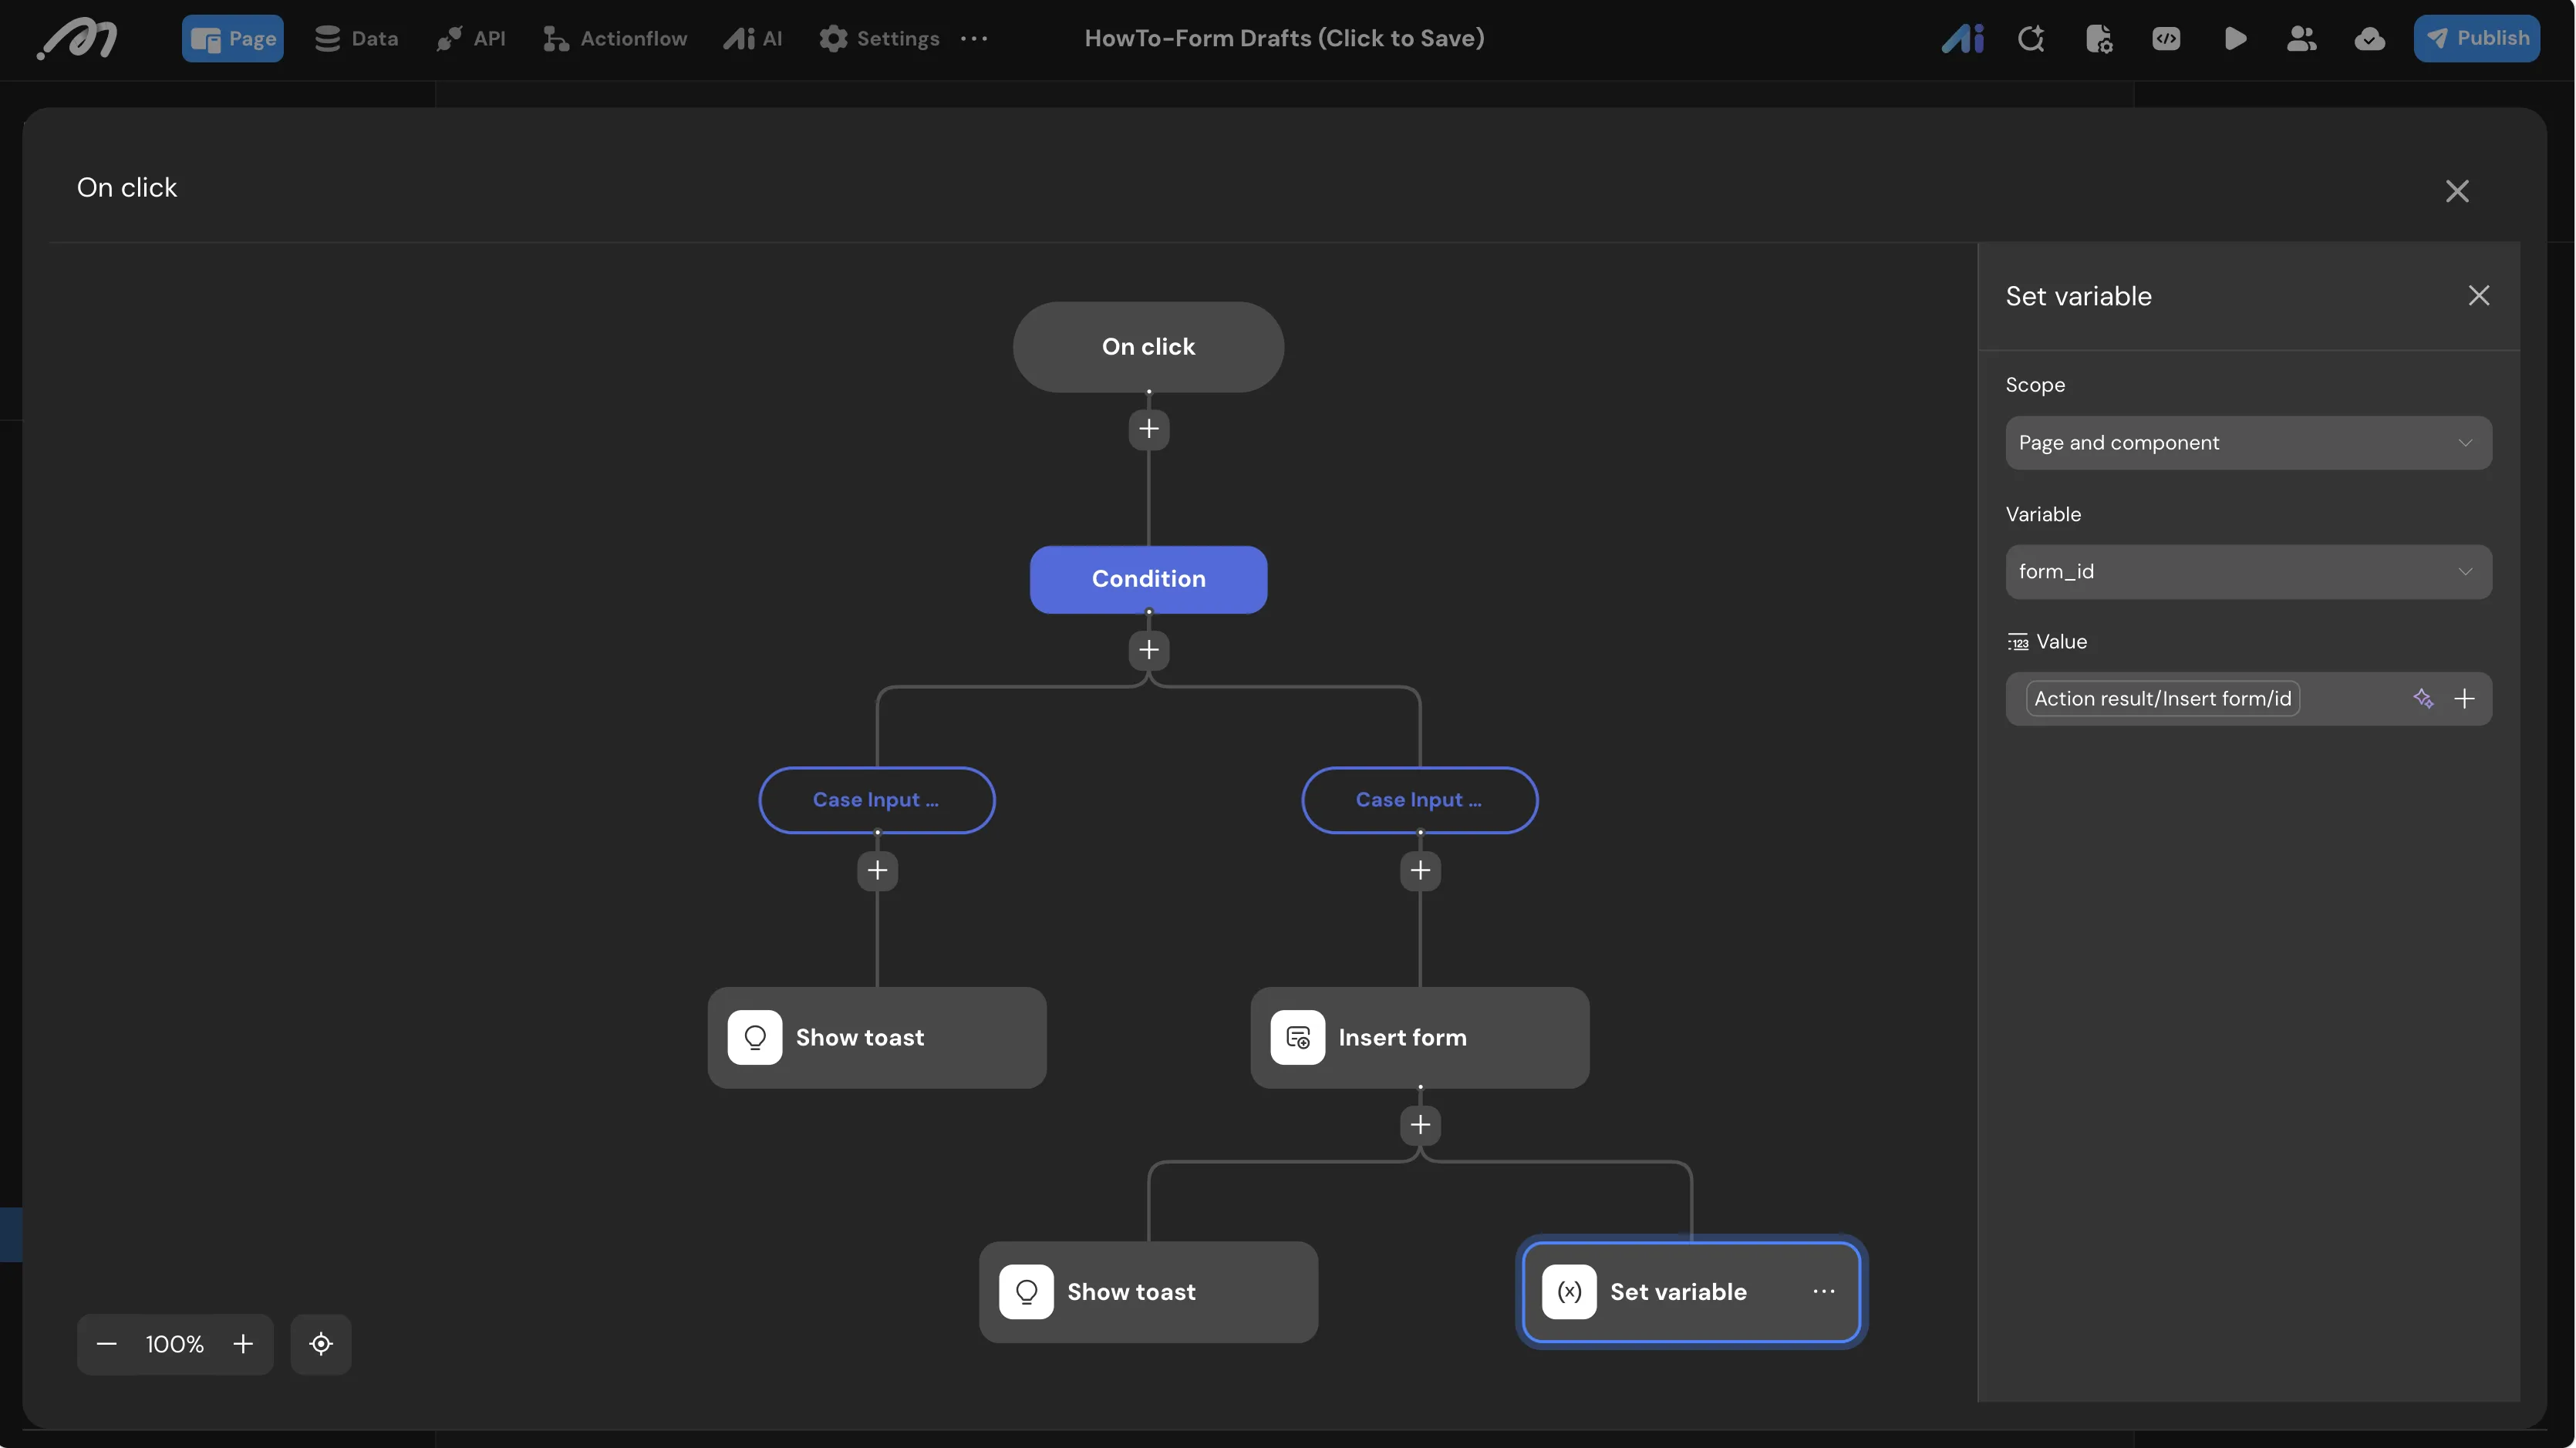
Insert formnode, add a Set variable node:- Scope:
Page and component - Target Variable:
form_id - Value: Bind to
Action result/Insert form/id
- Scope:
- Add a Show toast node:
Draft saved successfully.
Submitting the Form
The “Apply” button determines whether to insert a new submitted record or update an existing draft, based on the form_id variable.
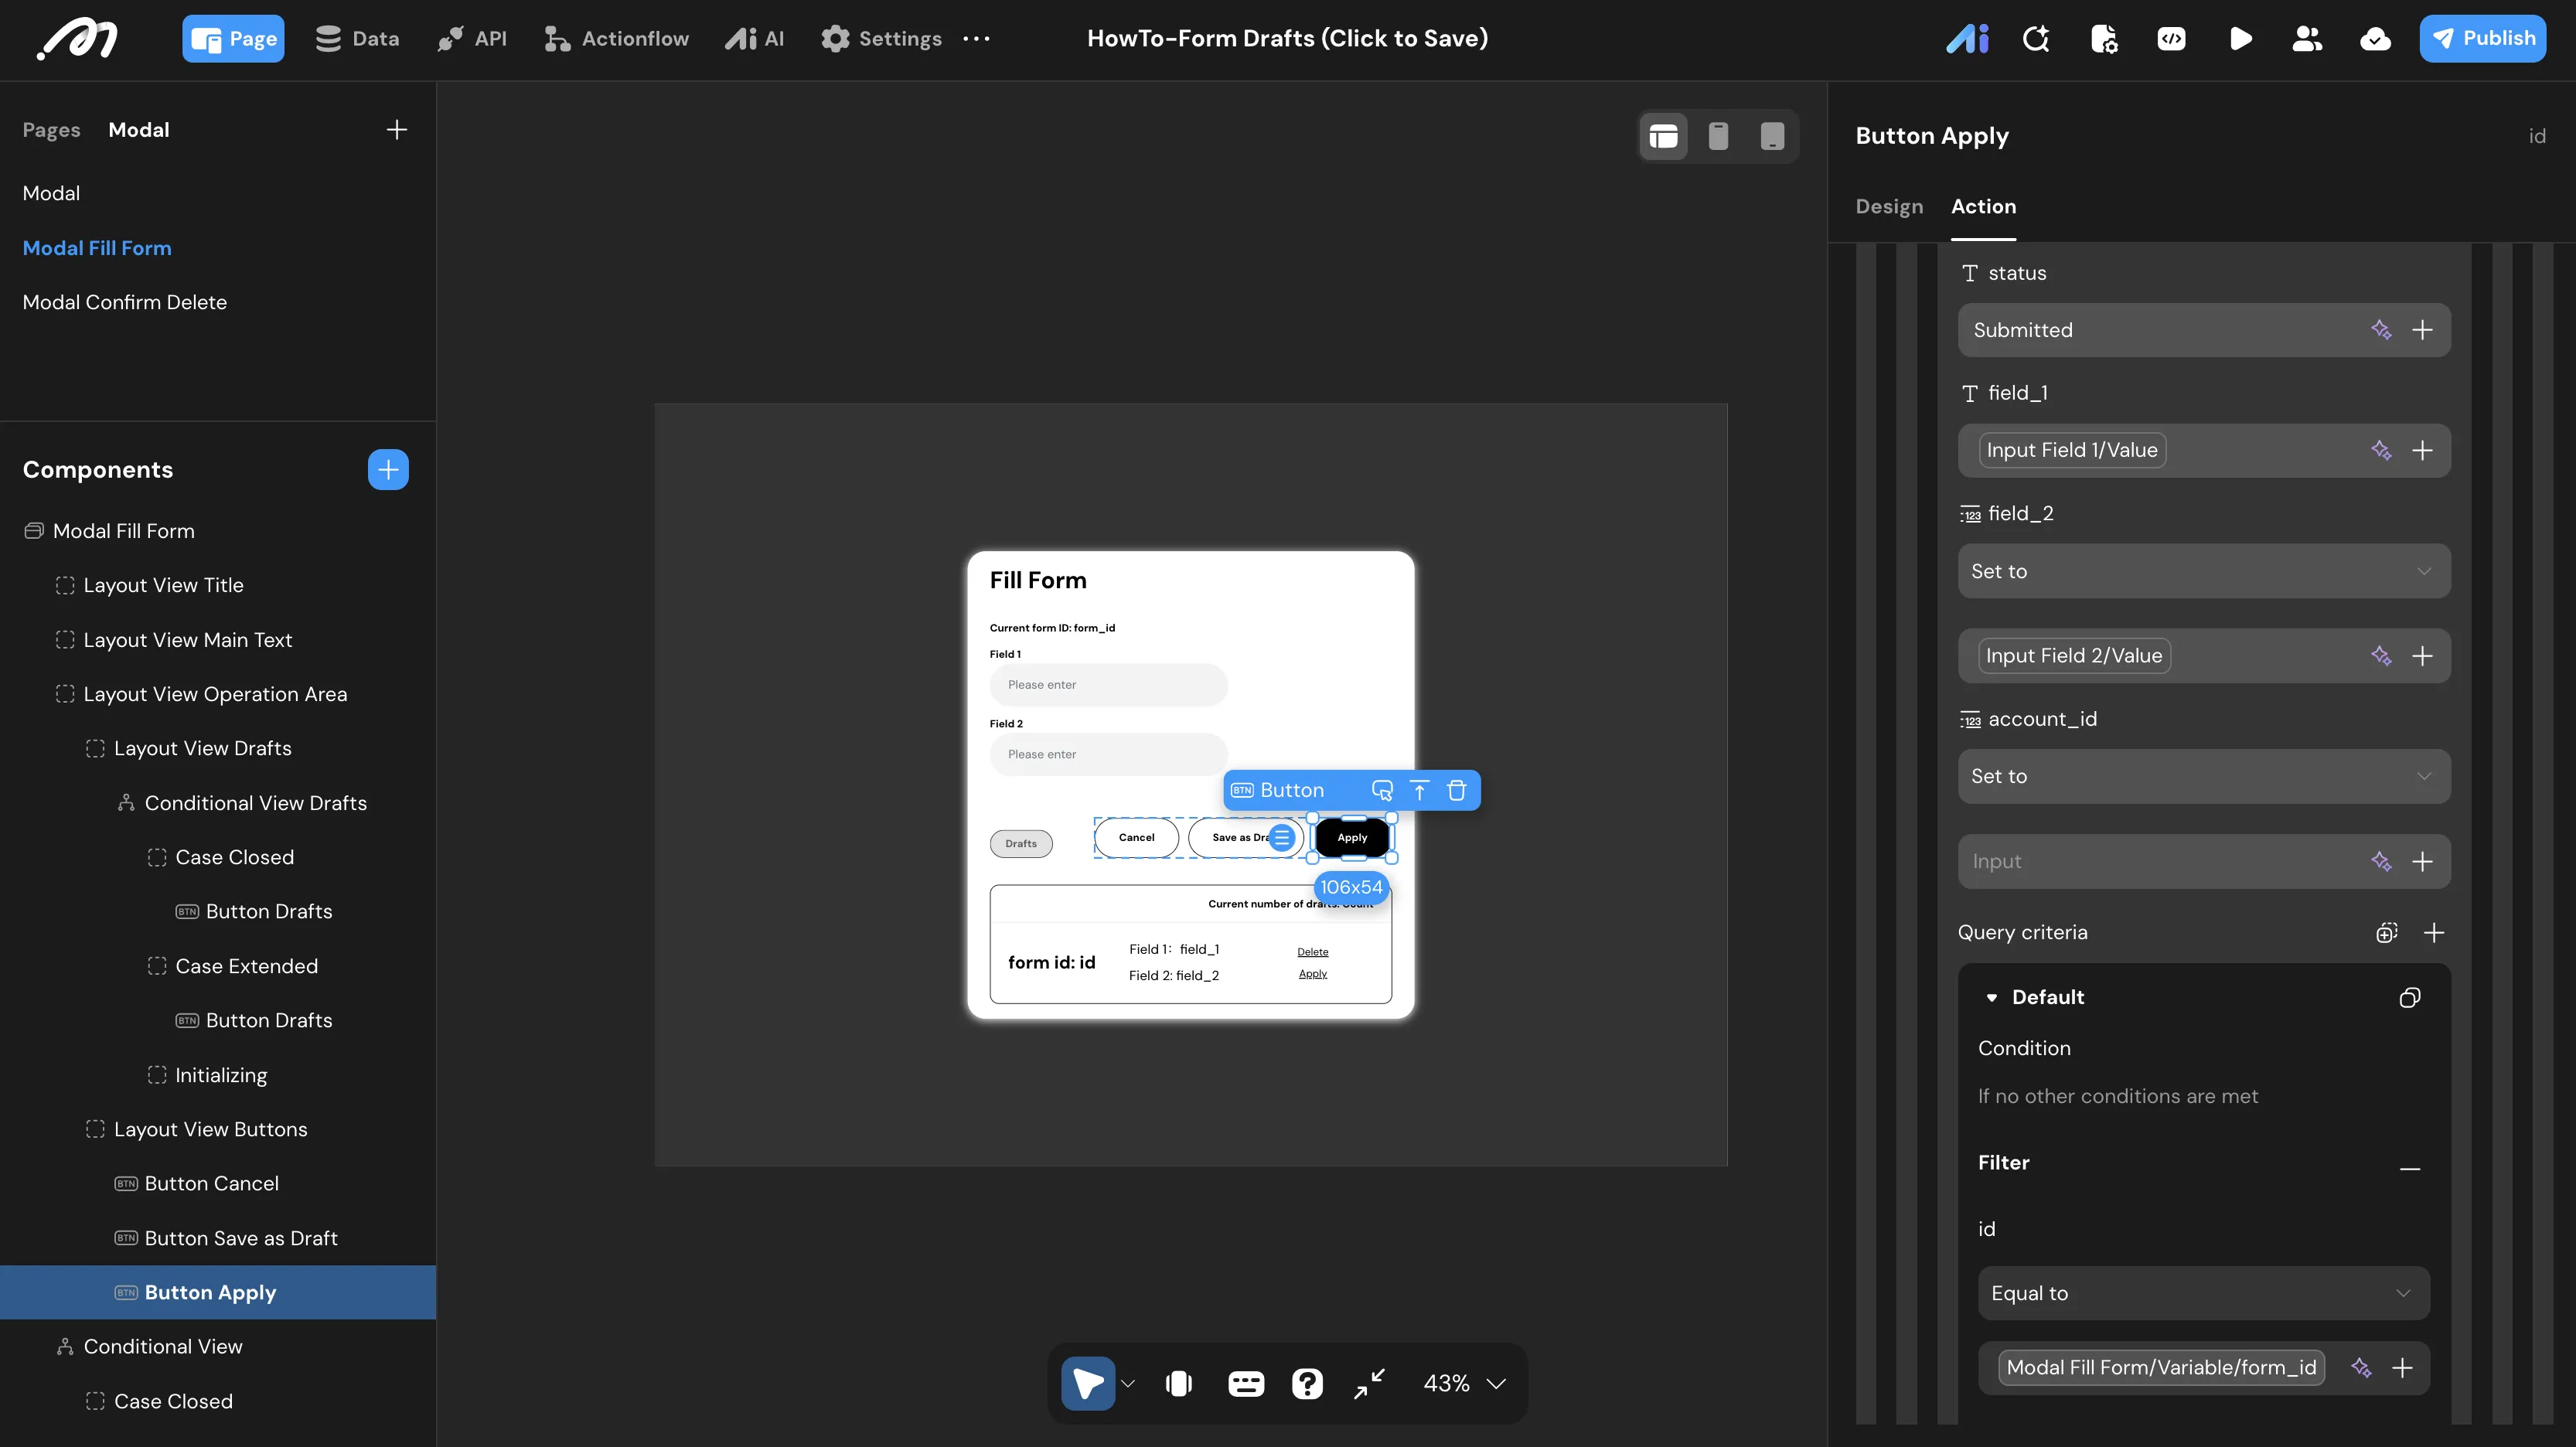
- Select
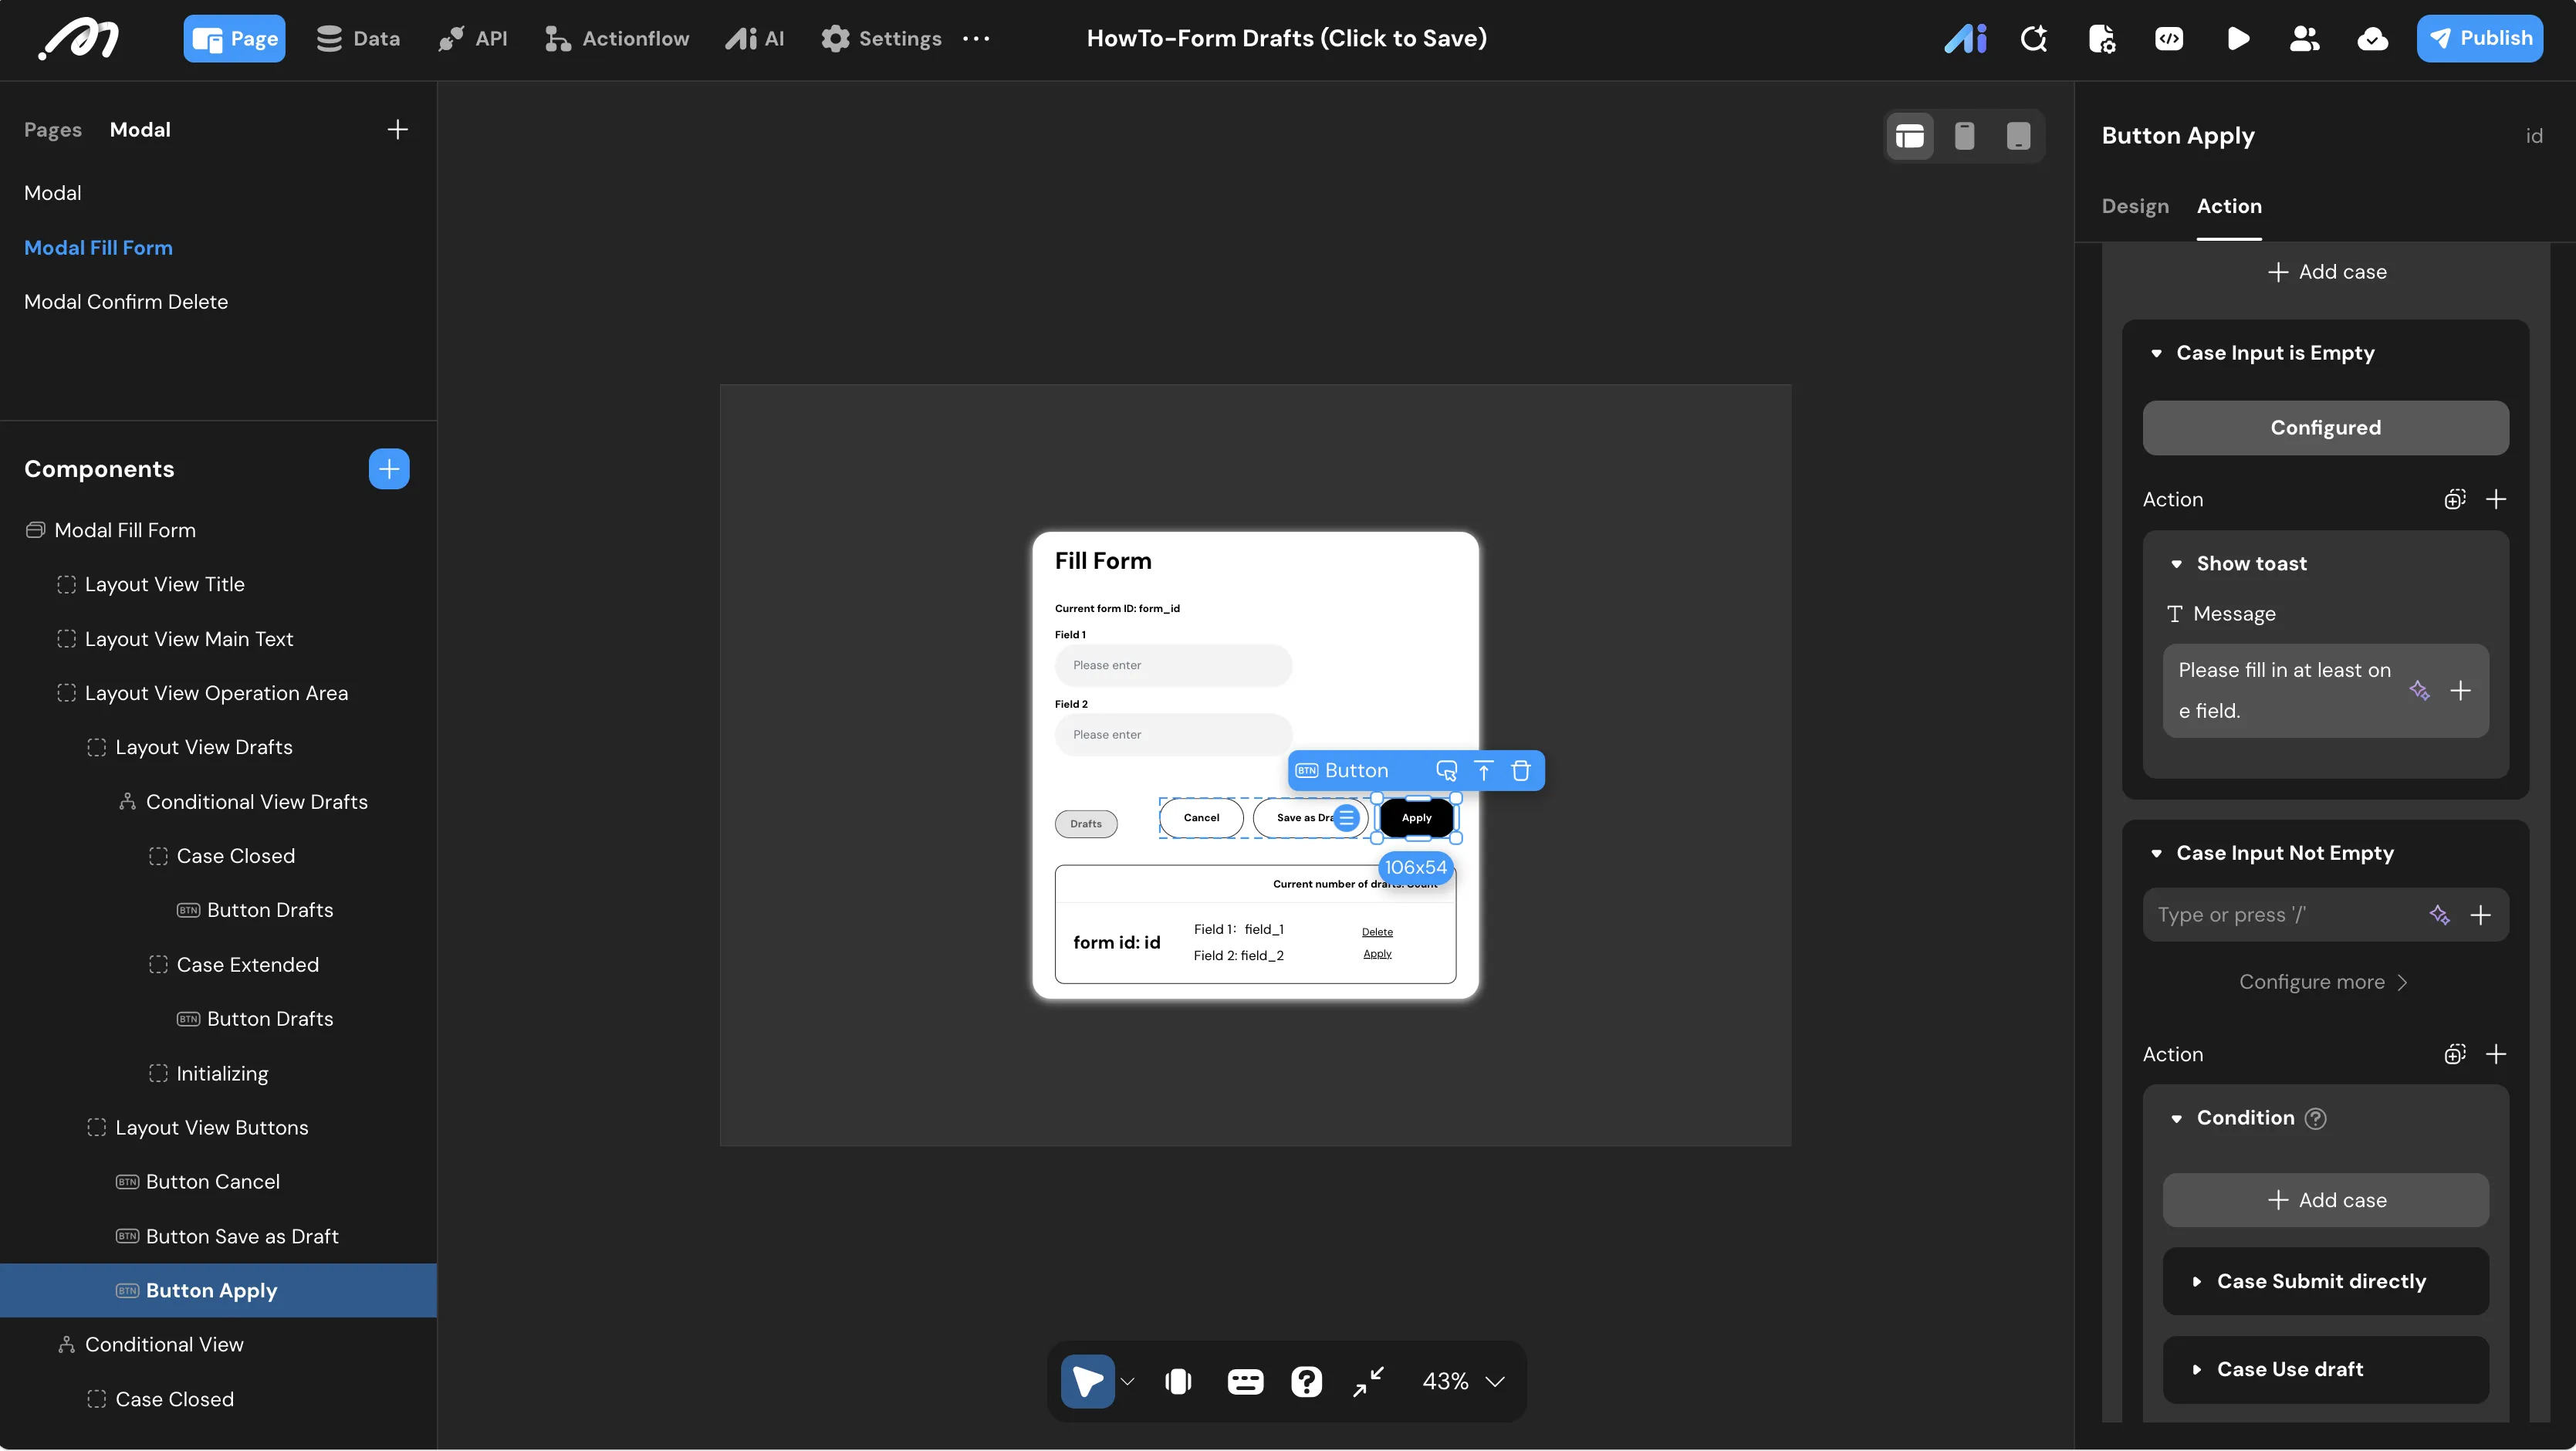
Button Applyand enter itsOnClickaction flow. - Add an input validation check using the same logic as the draft phase (at least one field must be filled). Under the
Case: Input Not Emptybranch, add a nested Condition node.
- Name the branch
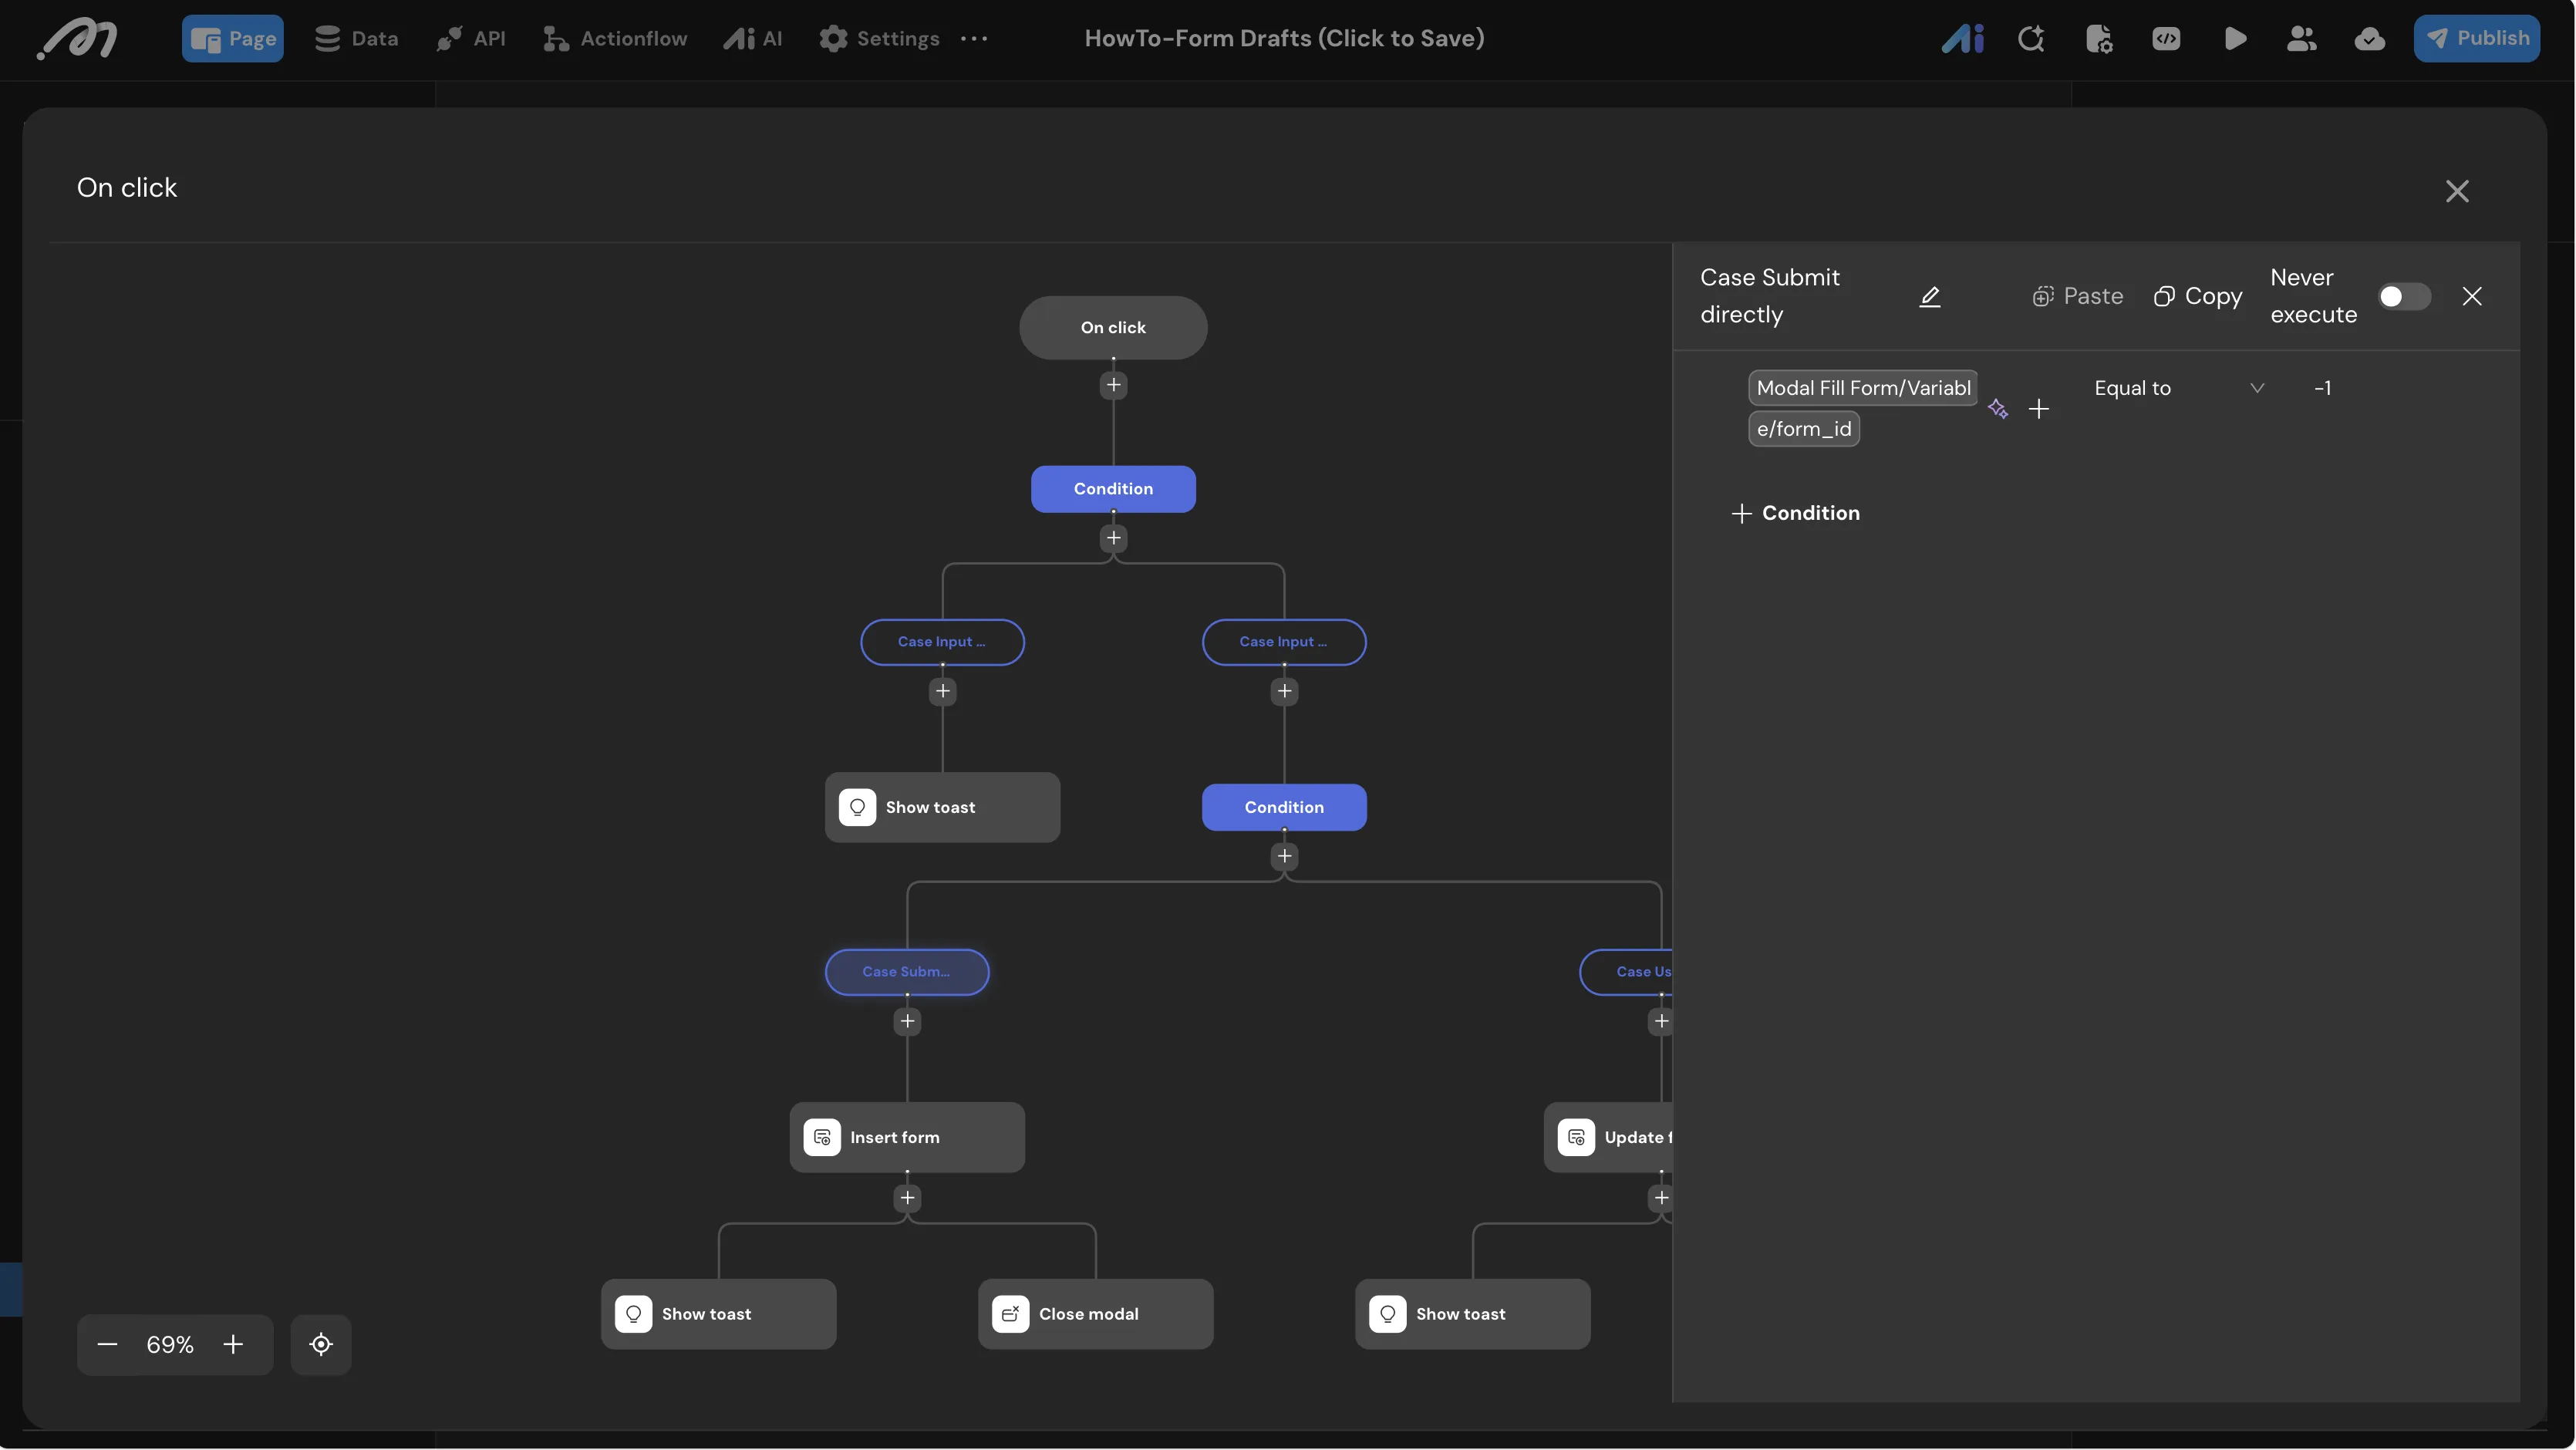
Case: New Submissionand set the expression:Modal Fill Form/Variable/form_idEqual to-1.
- Path 1: New Submission (
form_id == -1):- Add an Insert form node targeting the
formtable. SetstatustoSubmittedand map the input fields to their corresponding database columns.
- Add an Insert form node targeting the
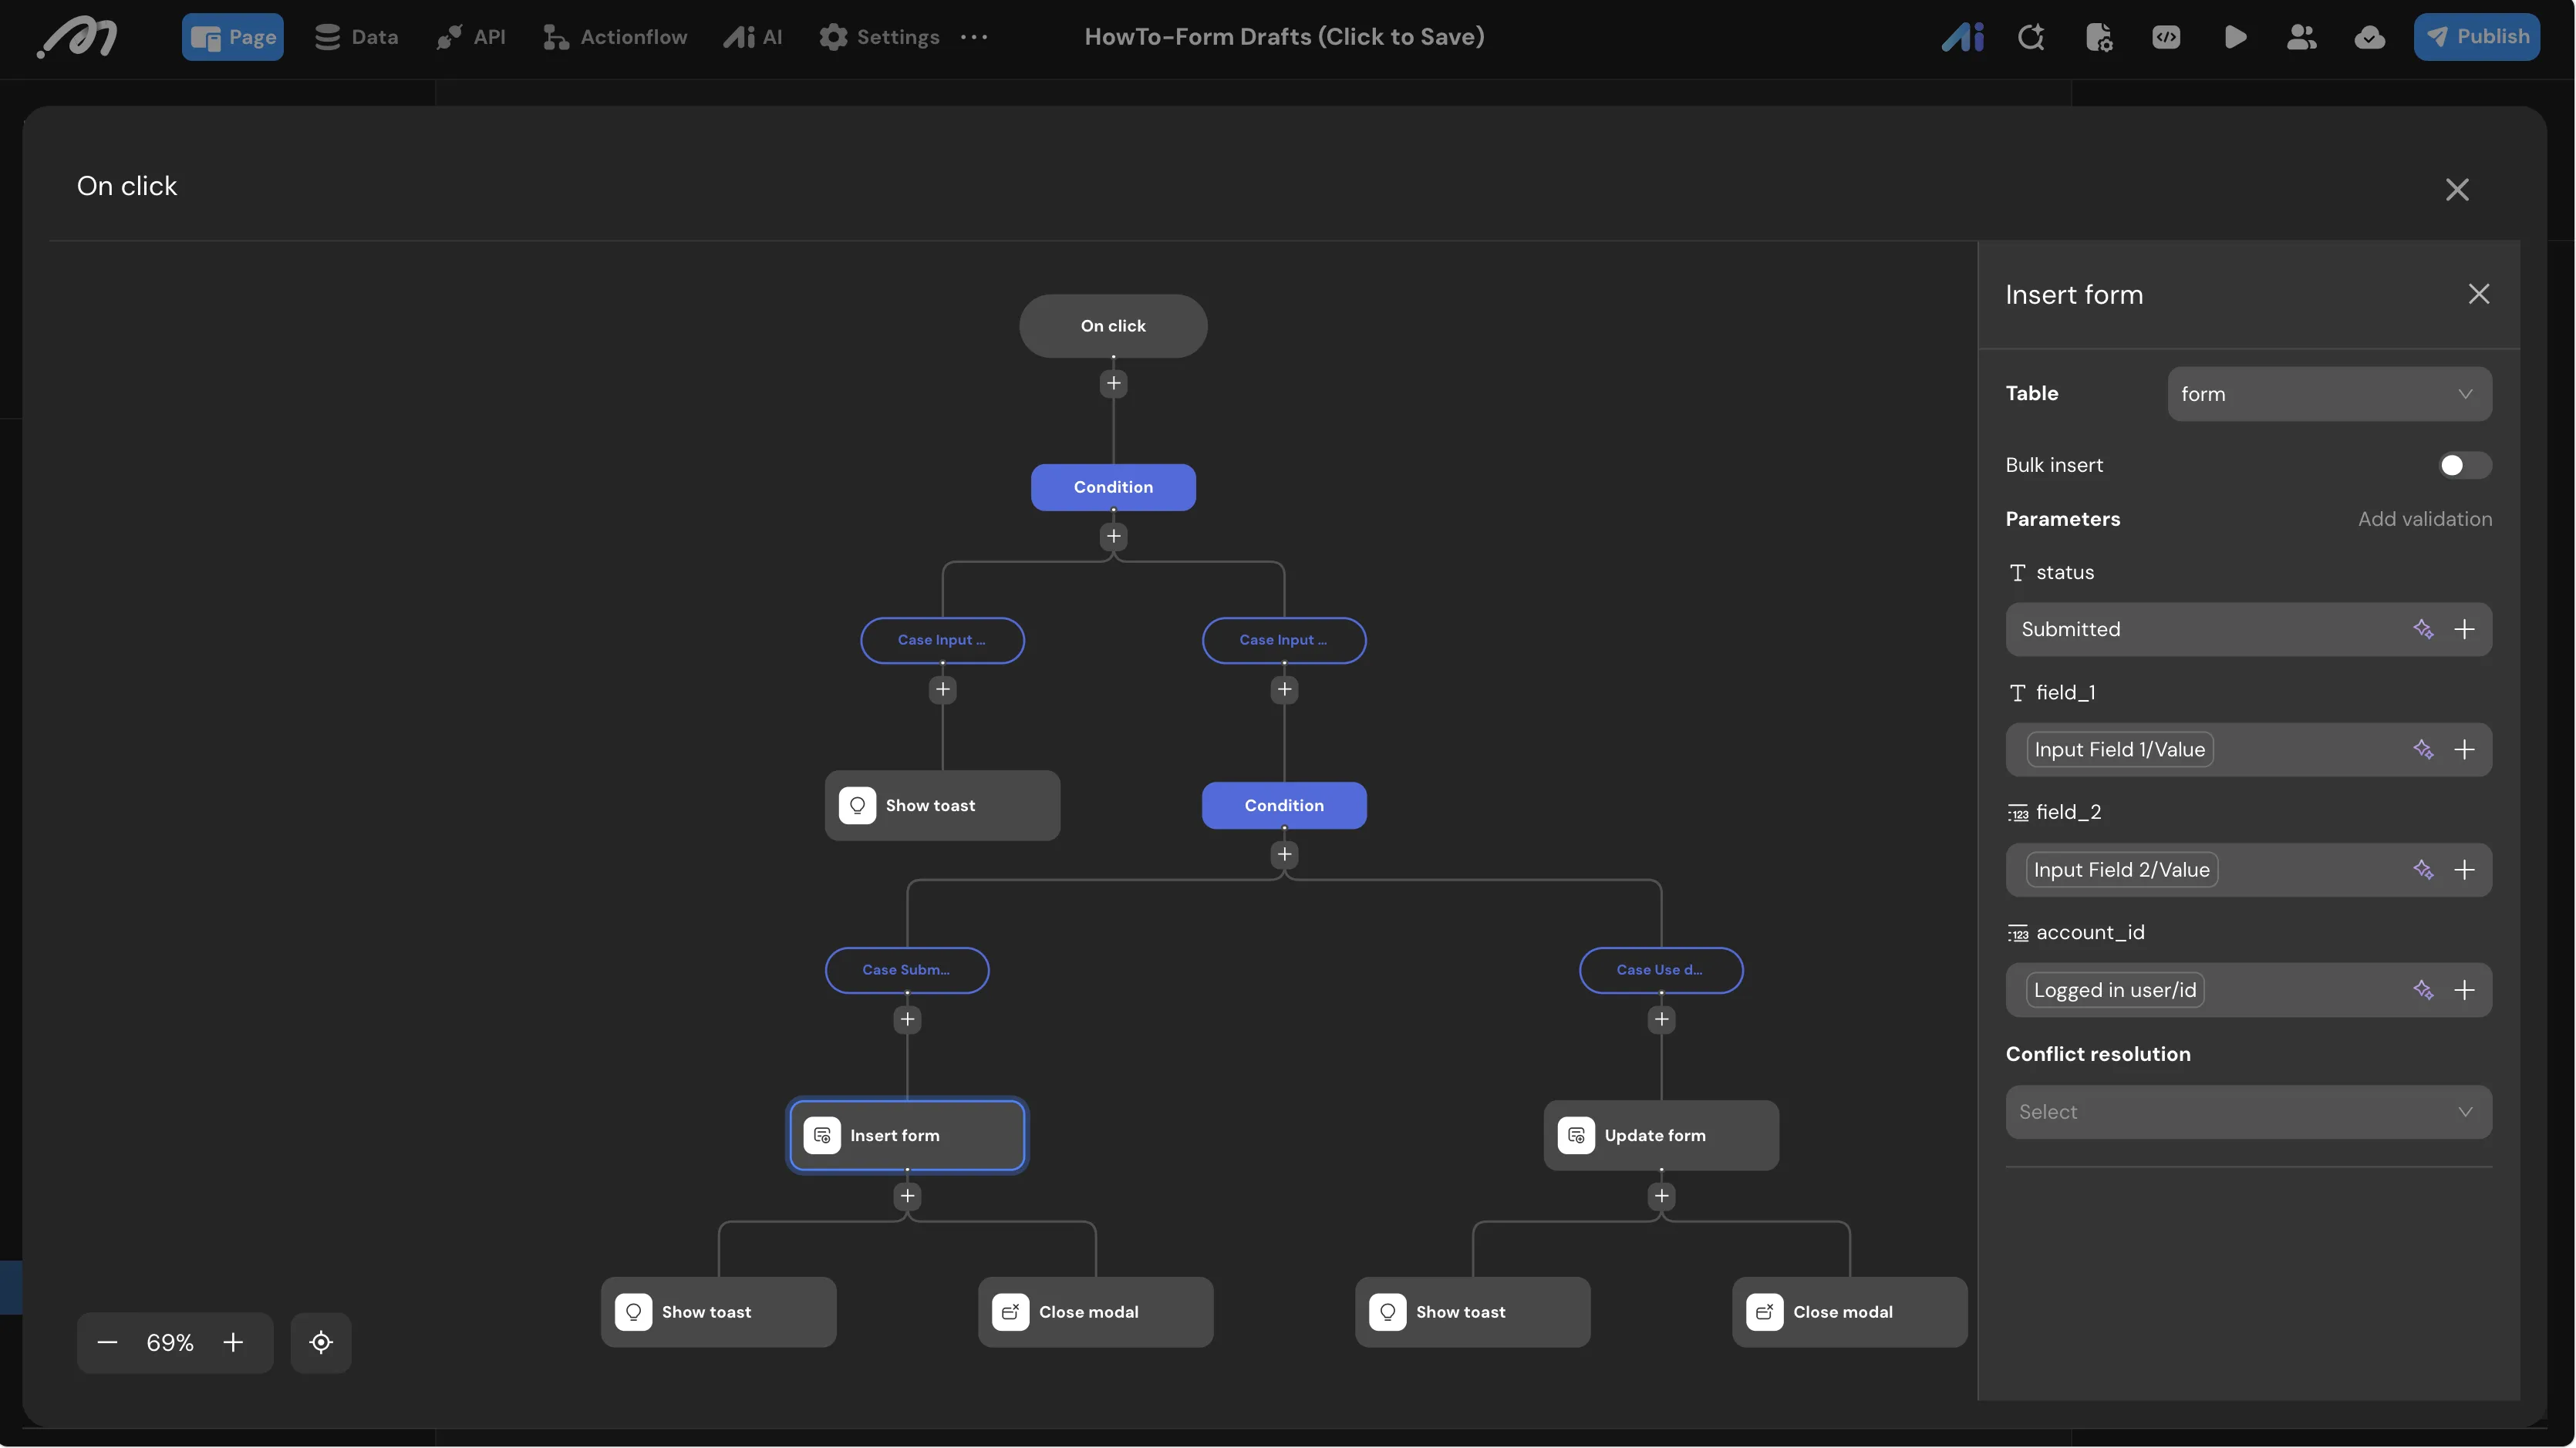
- Path 2: Update Existing Draft to Submitted (
form_id != -1):- Add an Update form node targeting the
formtable. - Query criteria:
idEqual toModal Fill Form/Variable/form_id. - Parameters: Set
statustoSubmitted. Sync business fields with current input values (Input Field 1/ValueandInput Field 2/Value). - Append a success toast (
Submission successful) and close the modal.
- Add an Update form node targeting the
Delete Confirmation Modal
To prevent accidental deletion, a separate confirmation modal is used to pass the user’s decision back to the calling Actionflow.
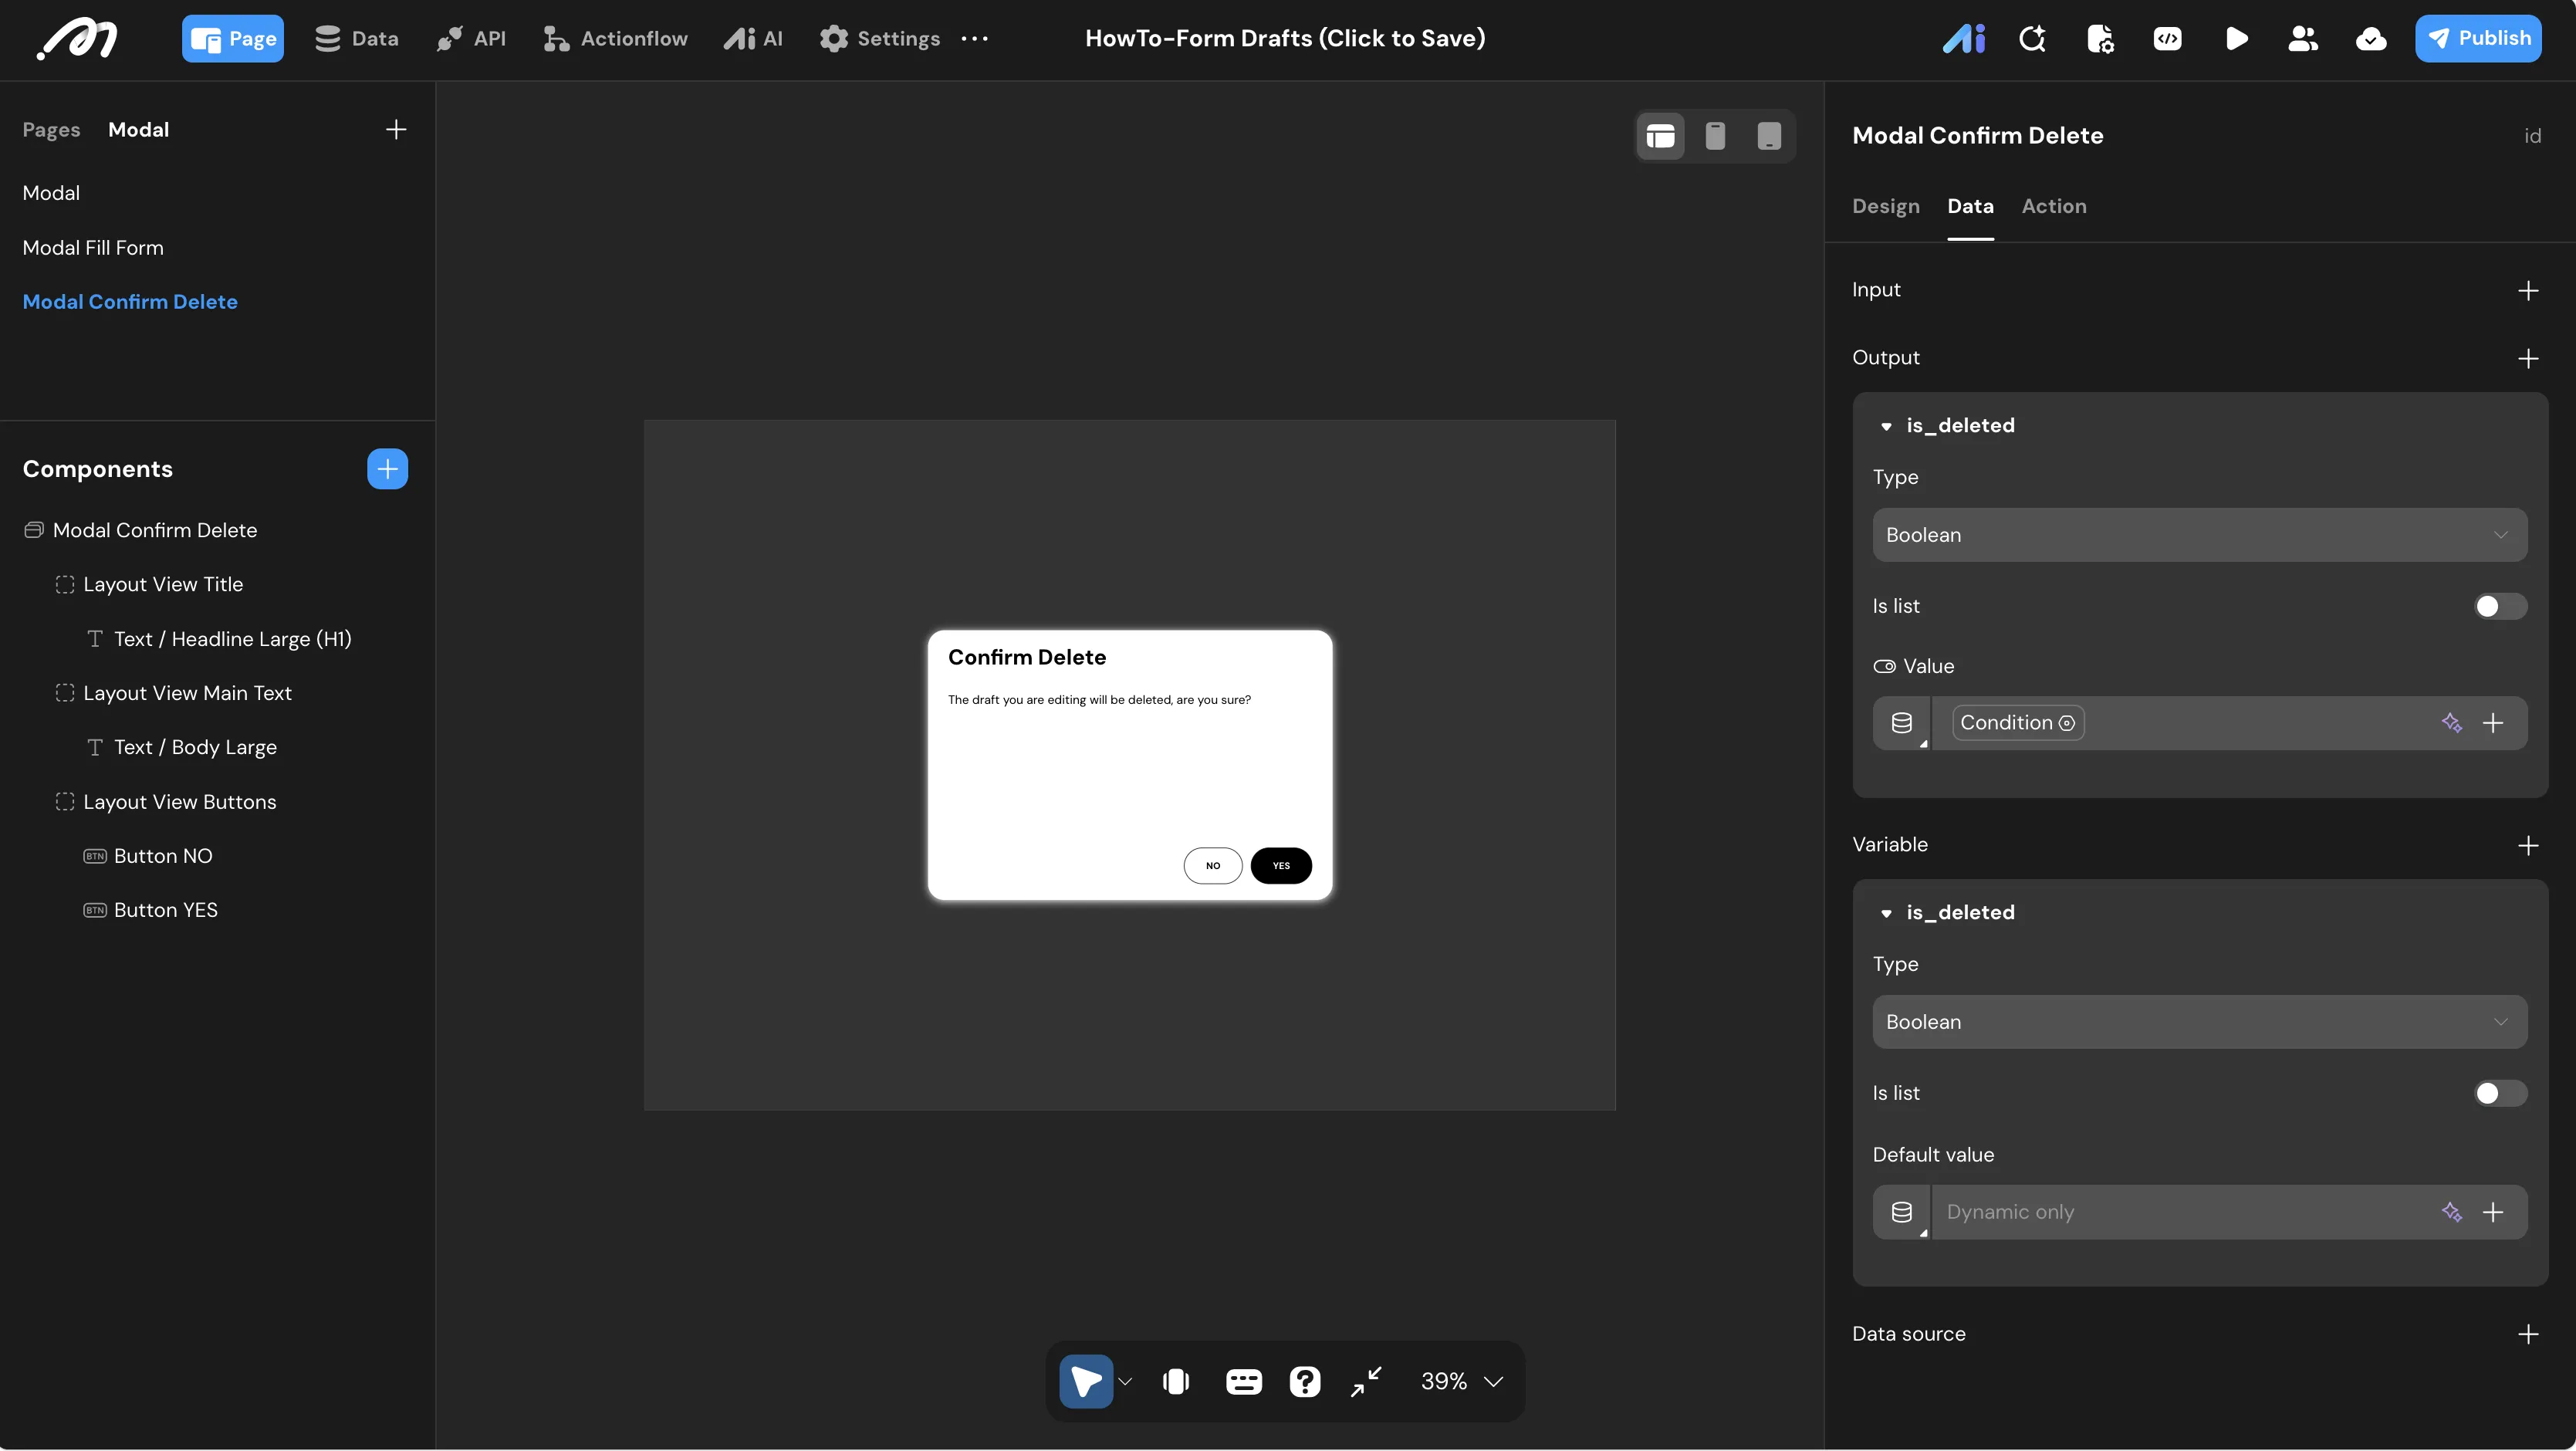
- Create a new modal named
Modal Confirm Delete. Go to the Data tab in the right sidebar and create:- An Output parameter named
is_deleted(Boolean) — this will be returned to the caller. - A local Variable also named
is_deleted(Boolean) — this tracks which button the user clicks inside the modal.
- An Output parameter named
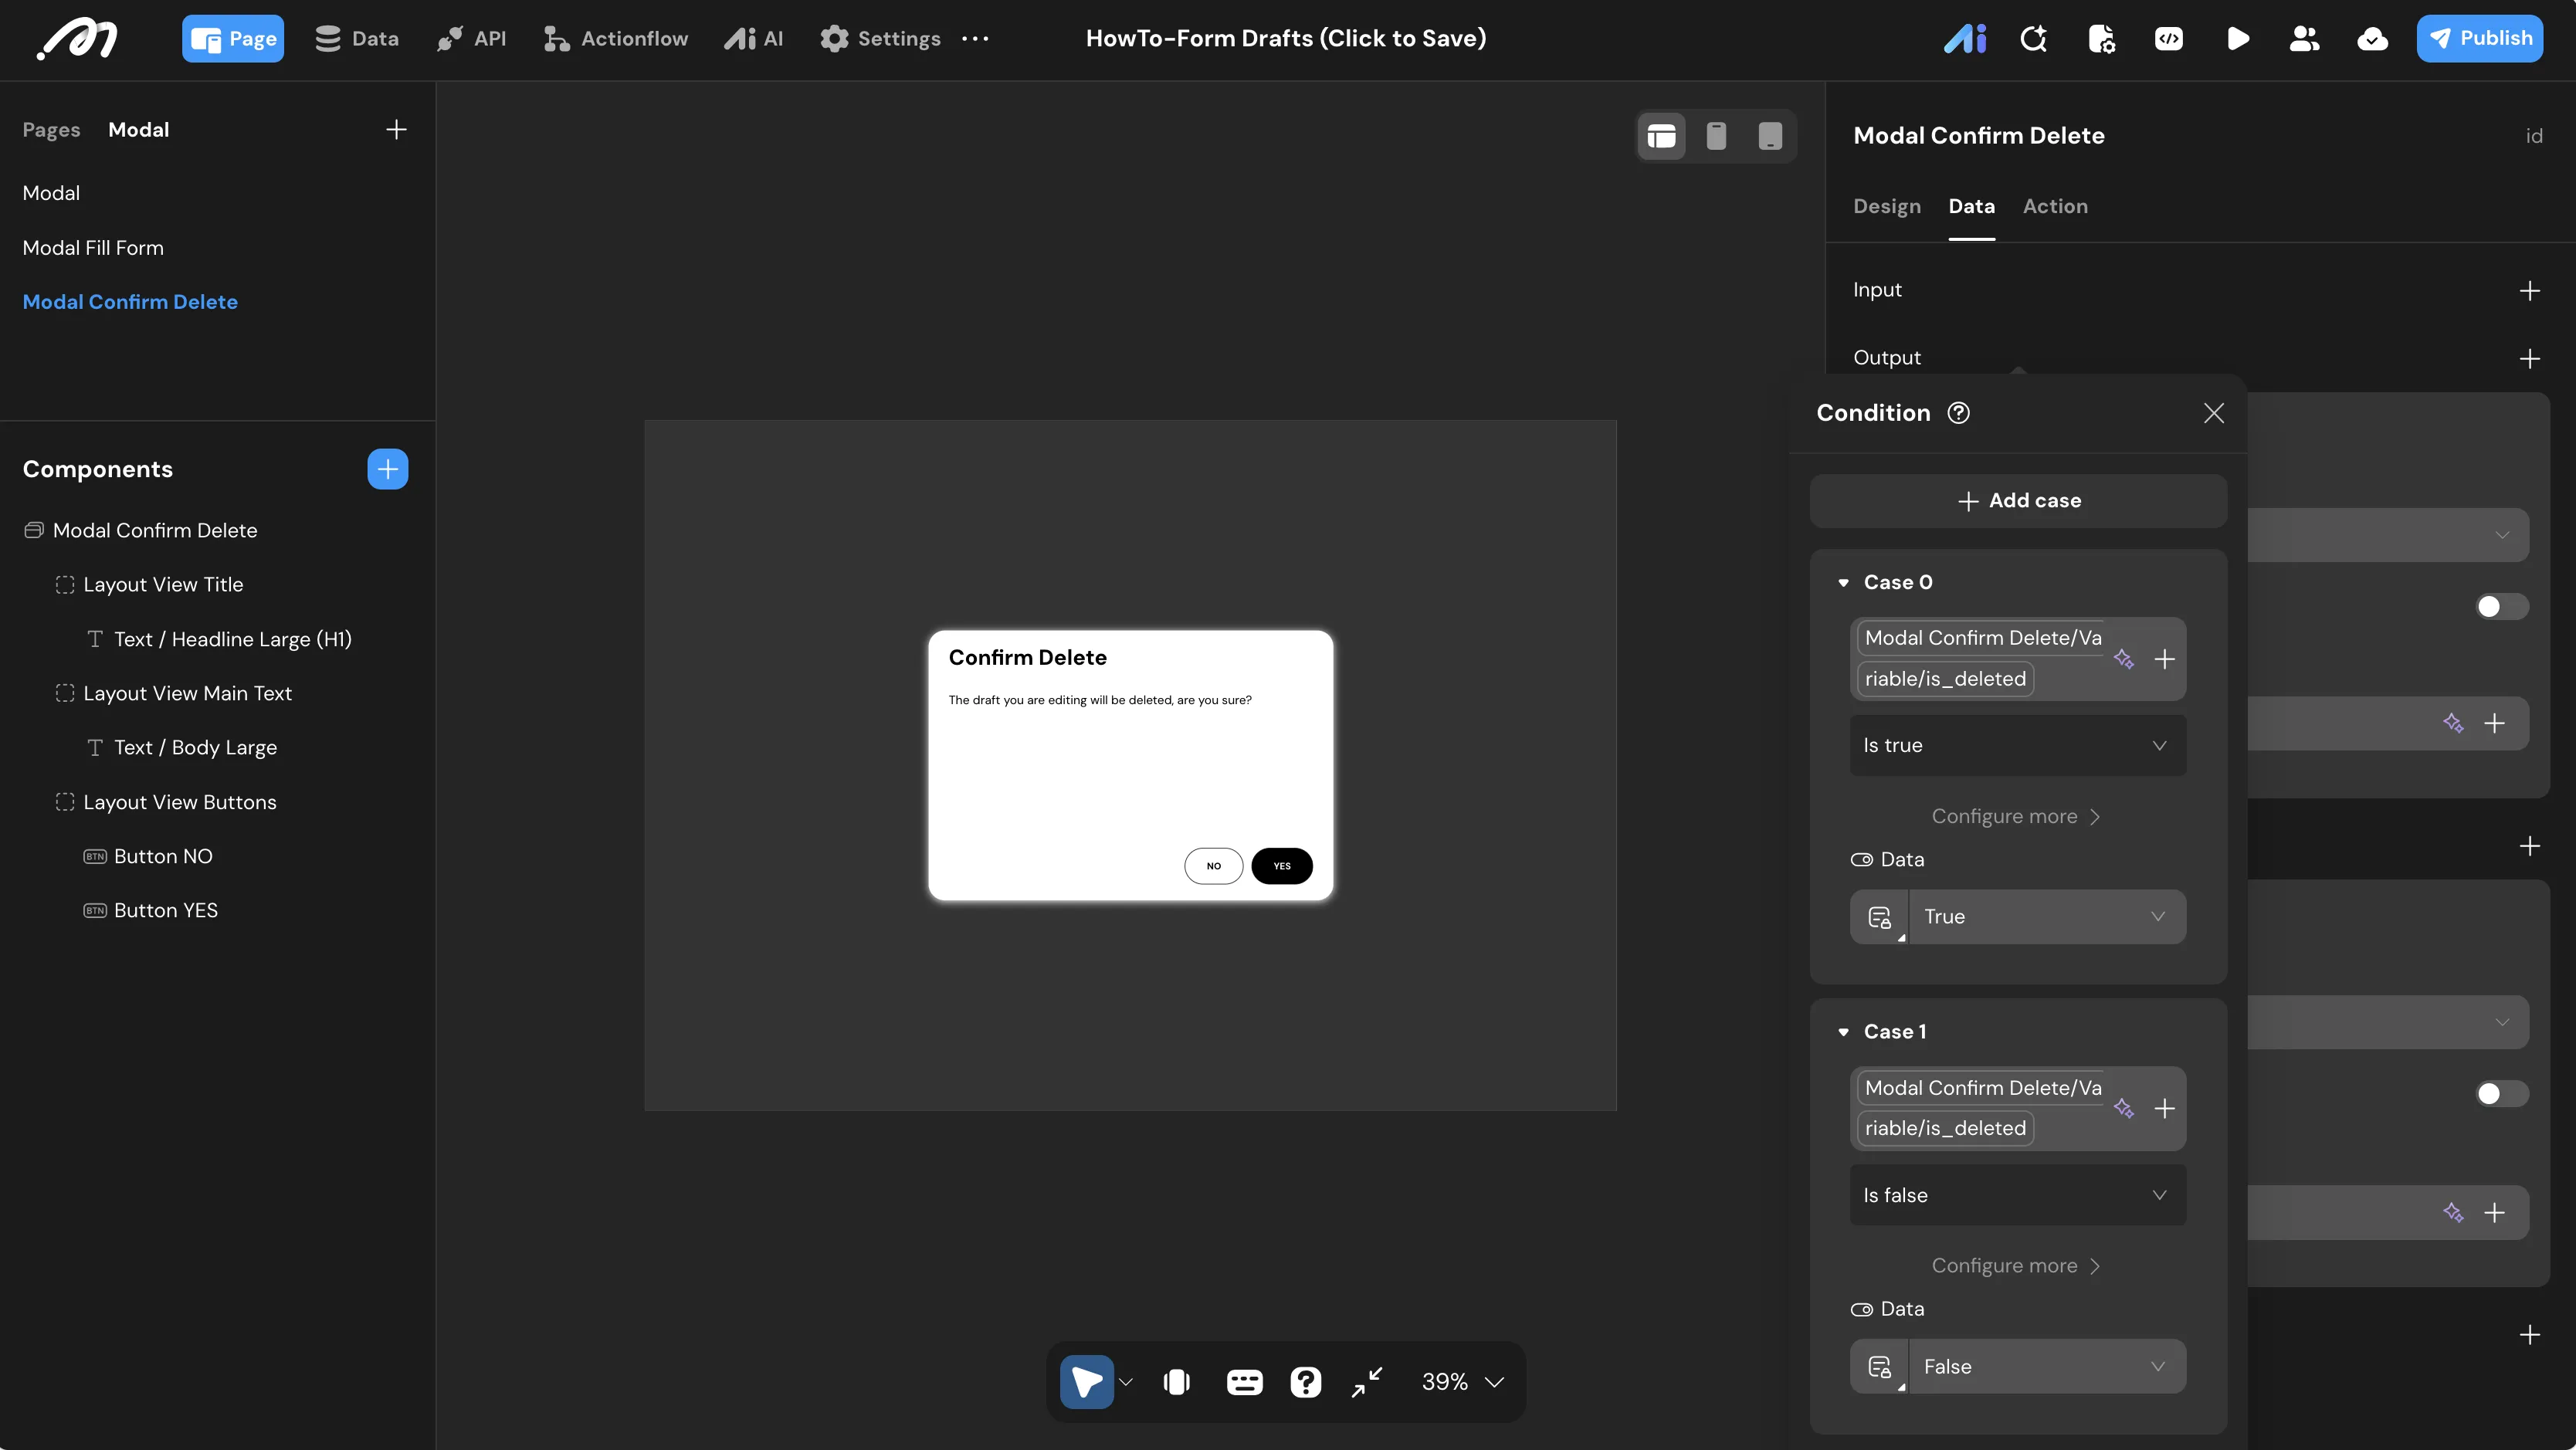
- Select the modal root, go to the Outputs panel, and configure a Condition tree:
- Case 0: If local variable
is_deletedIs true, passTrueto the Output. - Case 1: If local variable
is_deletedIs false, passFalseto the Output.
- Case 0: If local variable
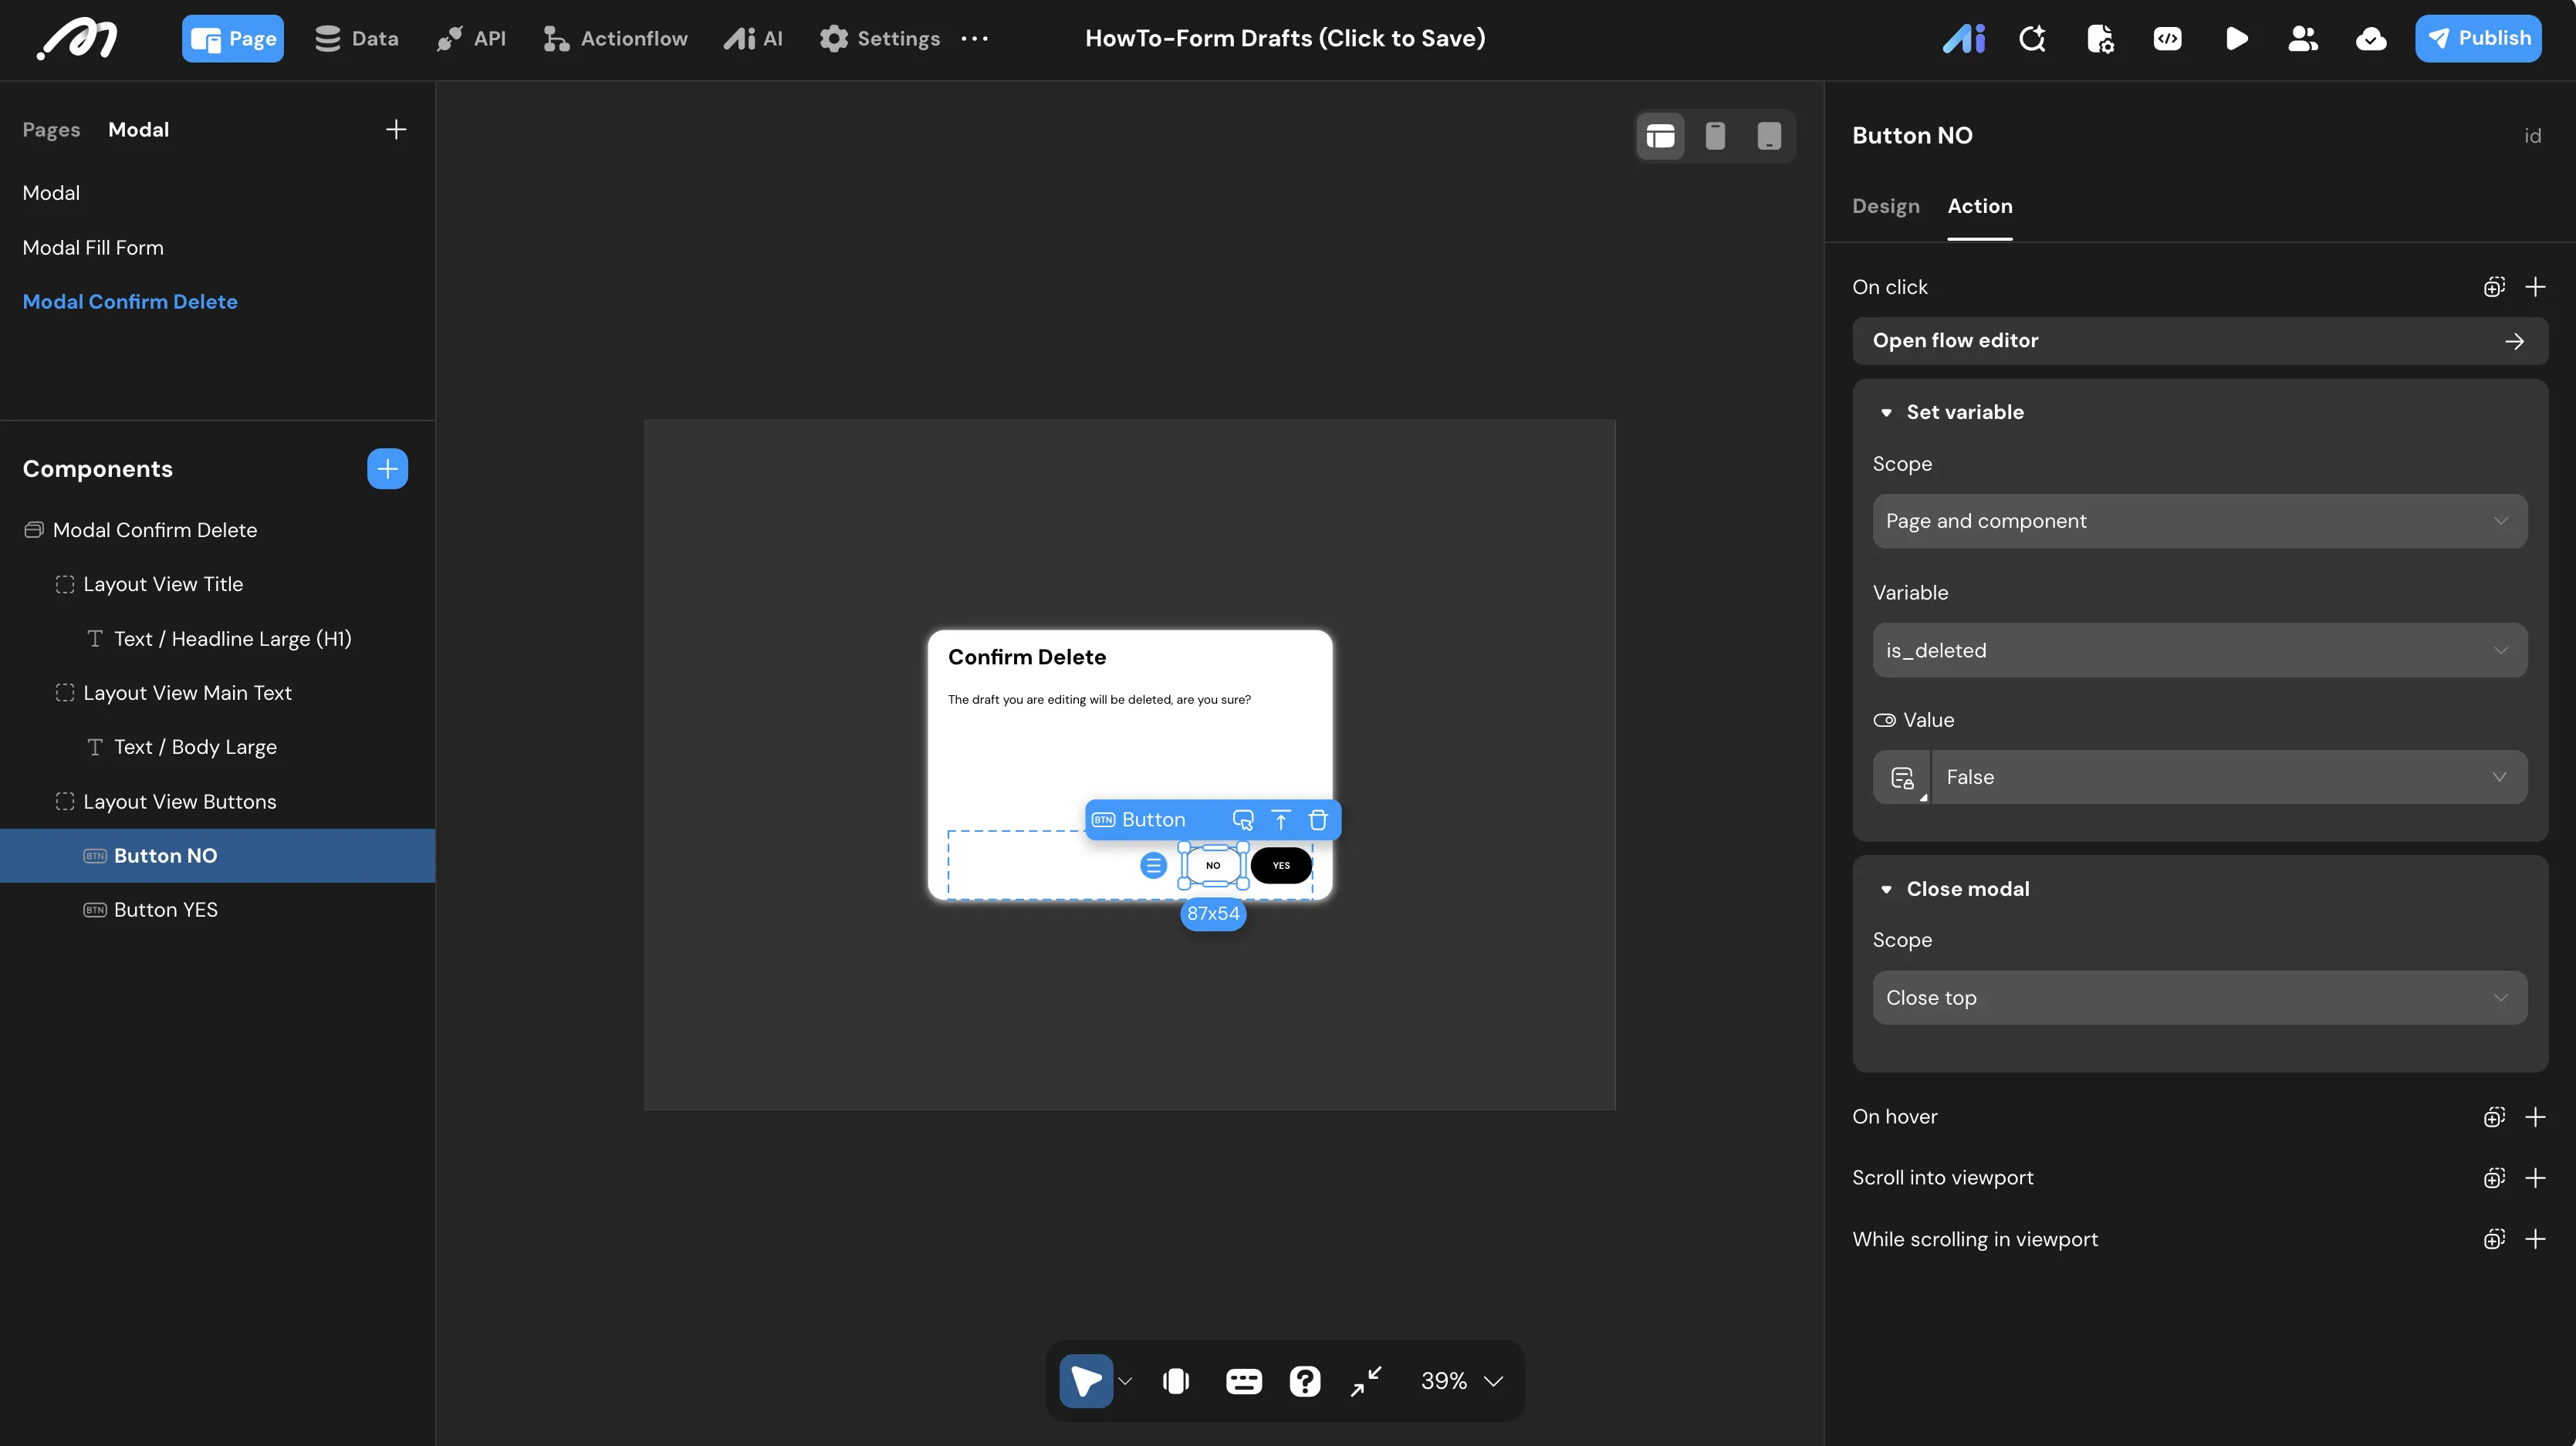
- Select
Button NO. On itsOnClickevent, add a Set variable node to setis_deletedtoFalse, followed by a Close modal (Close top) node.
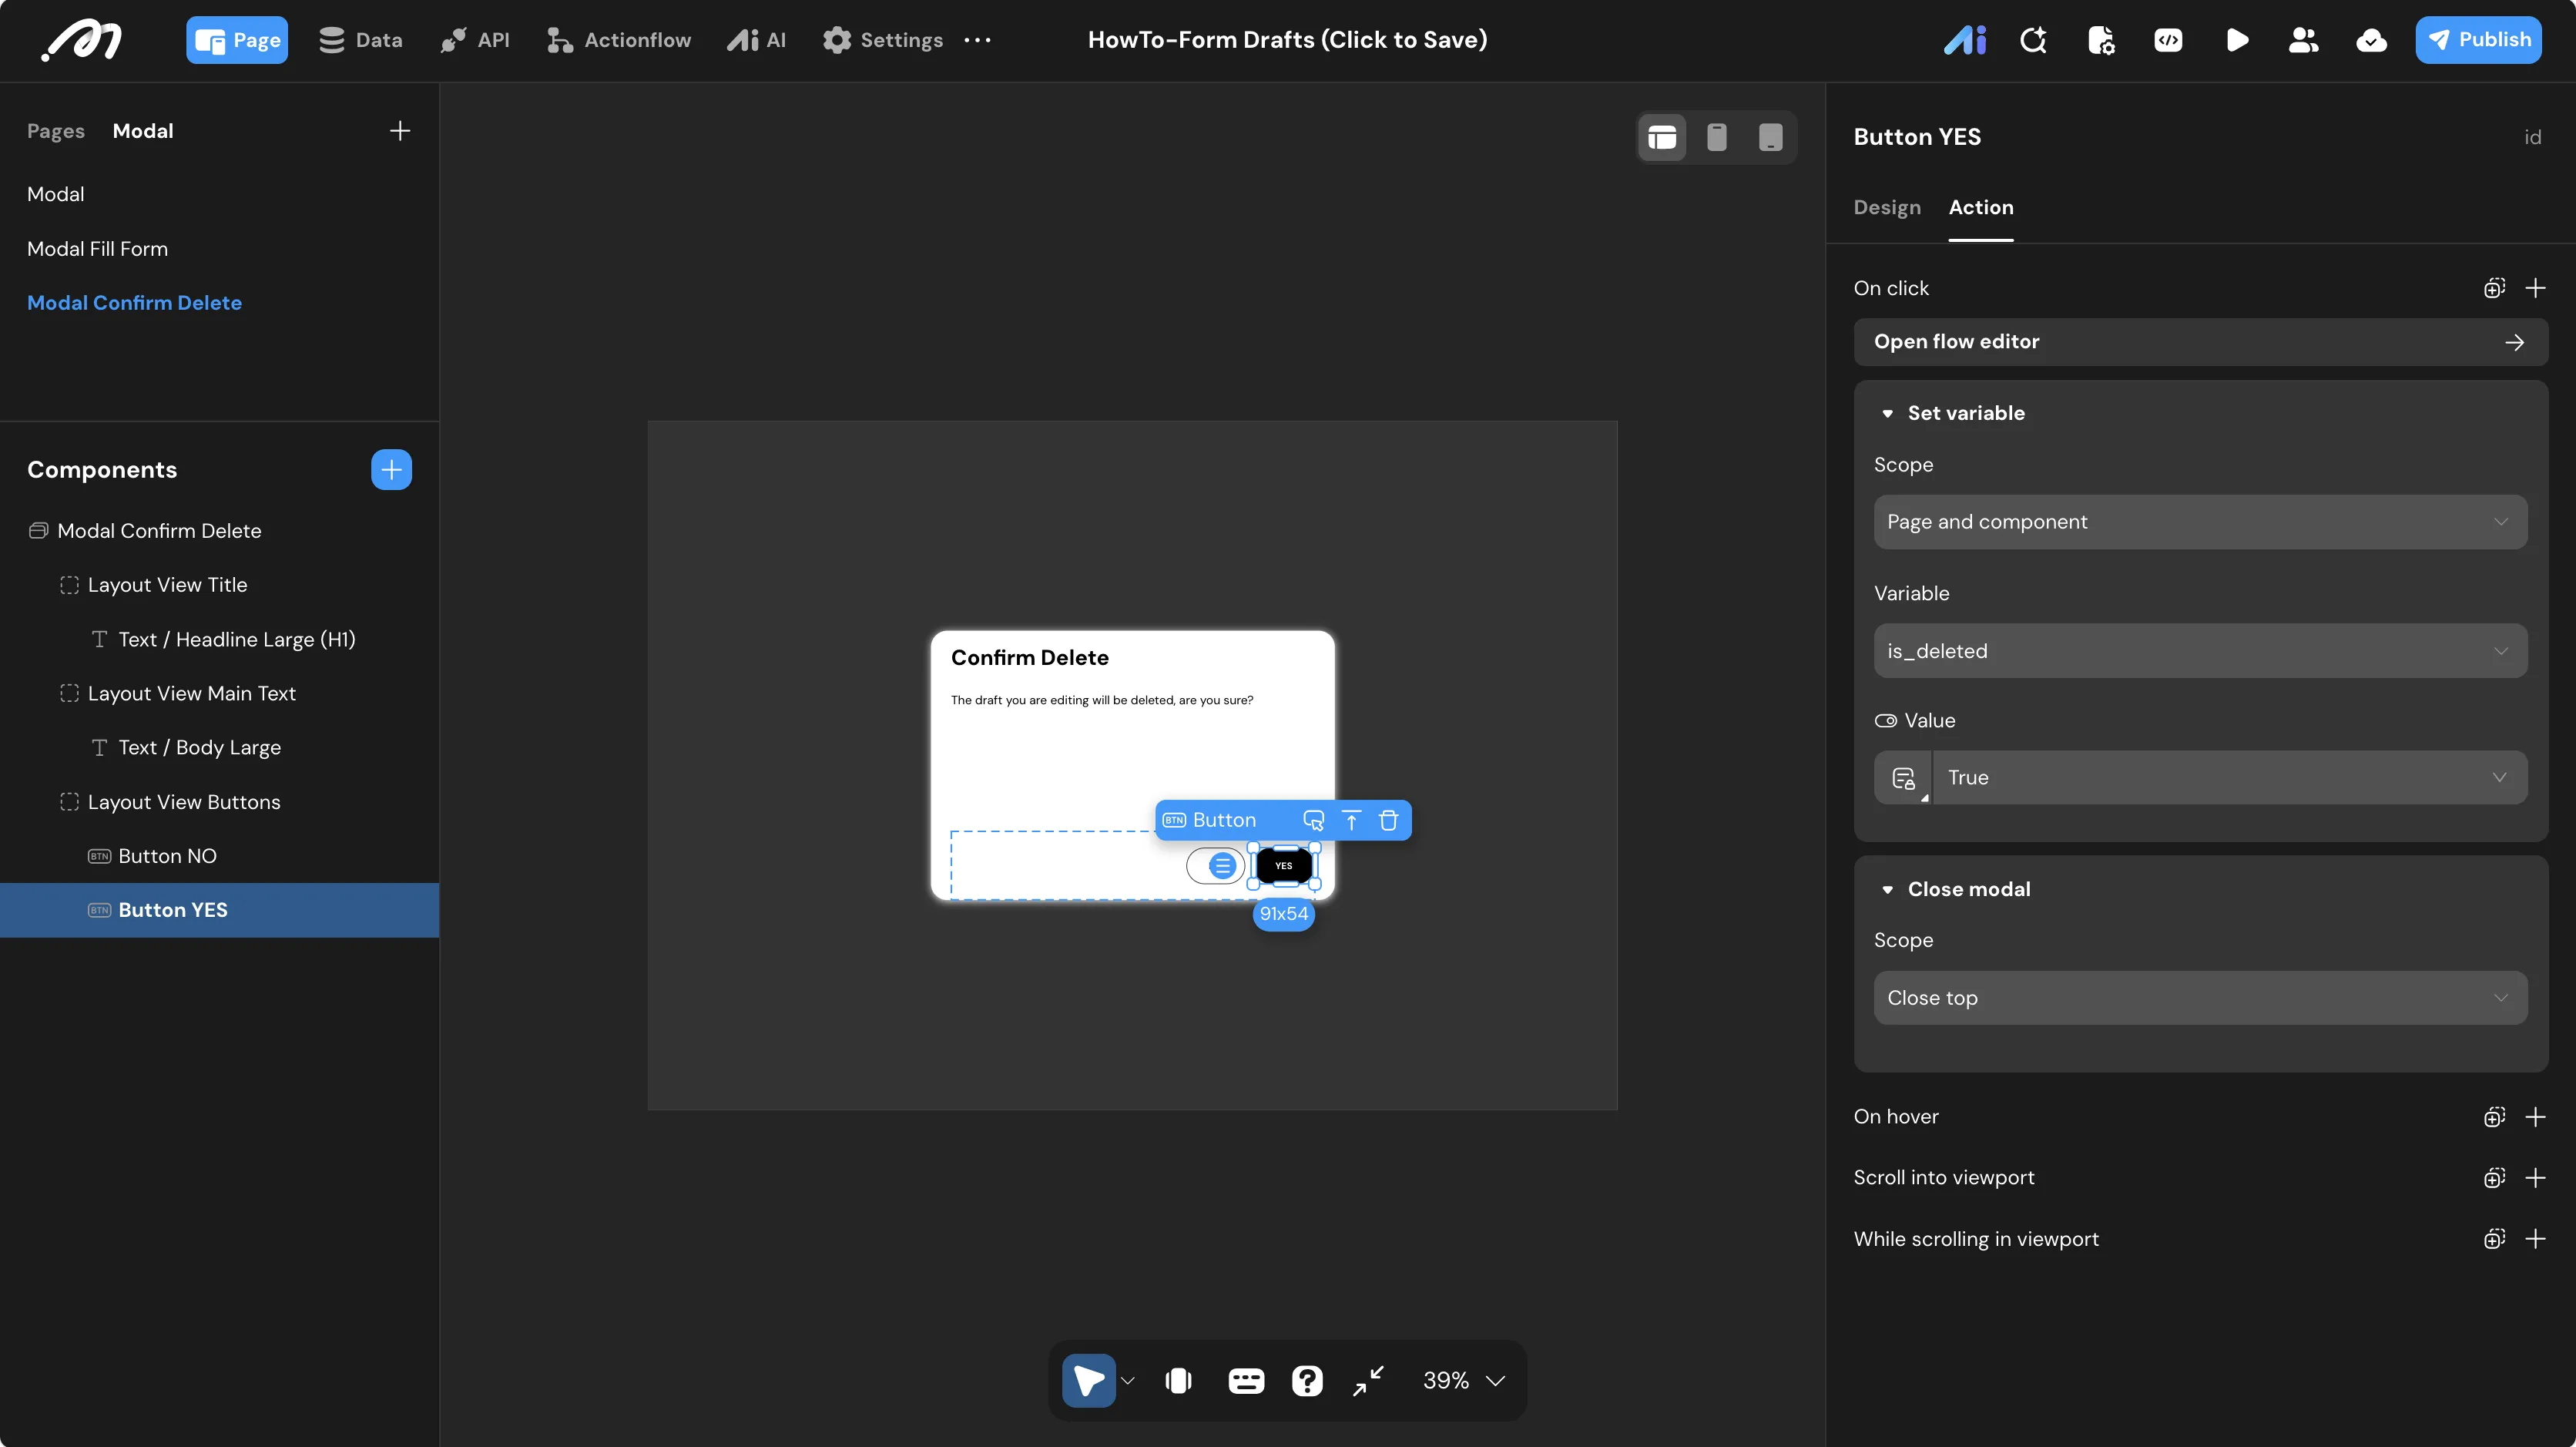
- Select
Button YES. On itsOnClickevent, add a Set variable node to setis_deletedtoTrue, followed by a Close modal (Close top) node.
Record Deletion
The deletion logic checks whether the draft being deleted is currently loaded in the form, and shows a confirmation modal only if it is.
- Select the
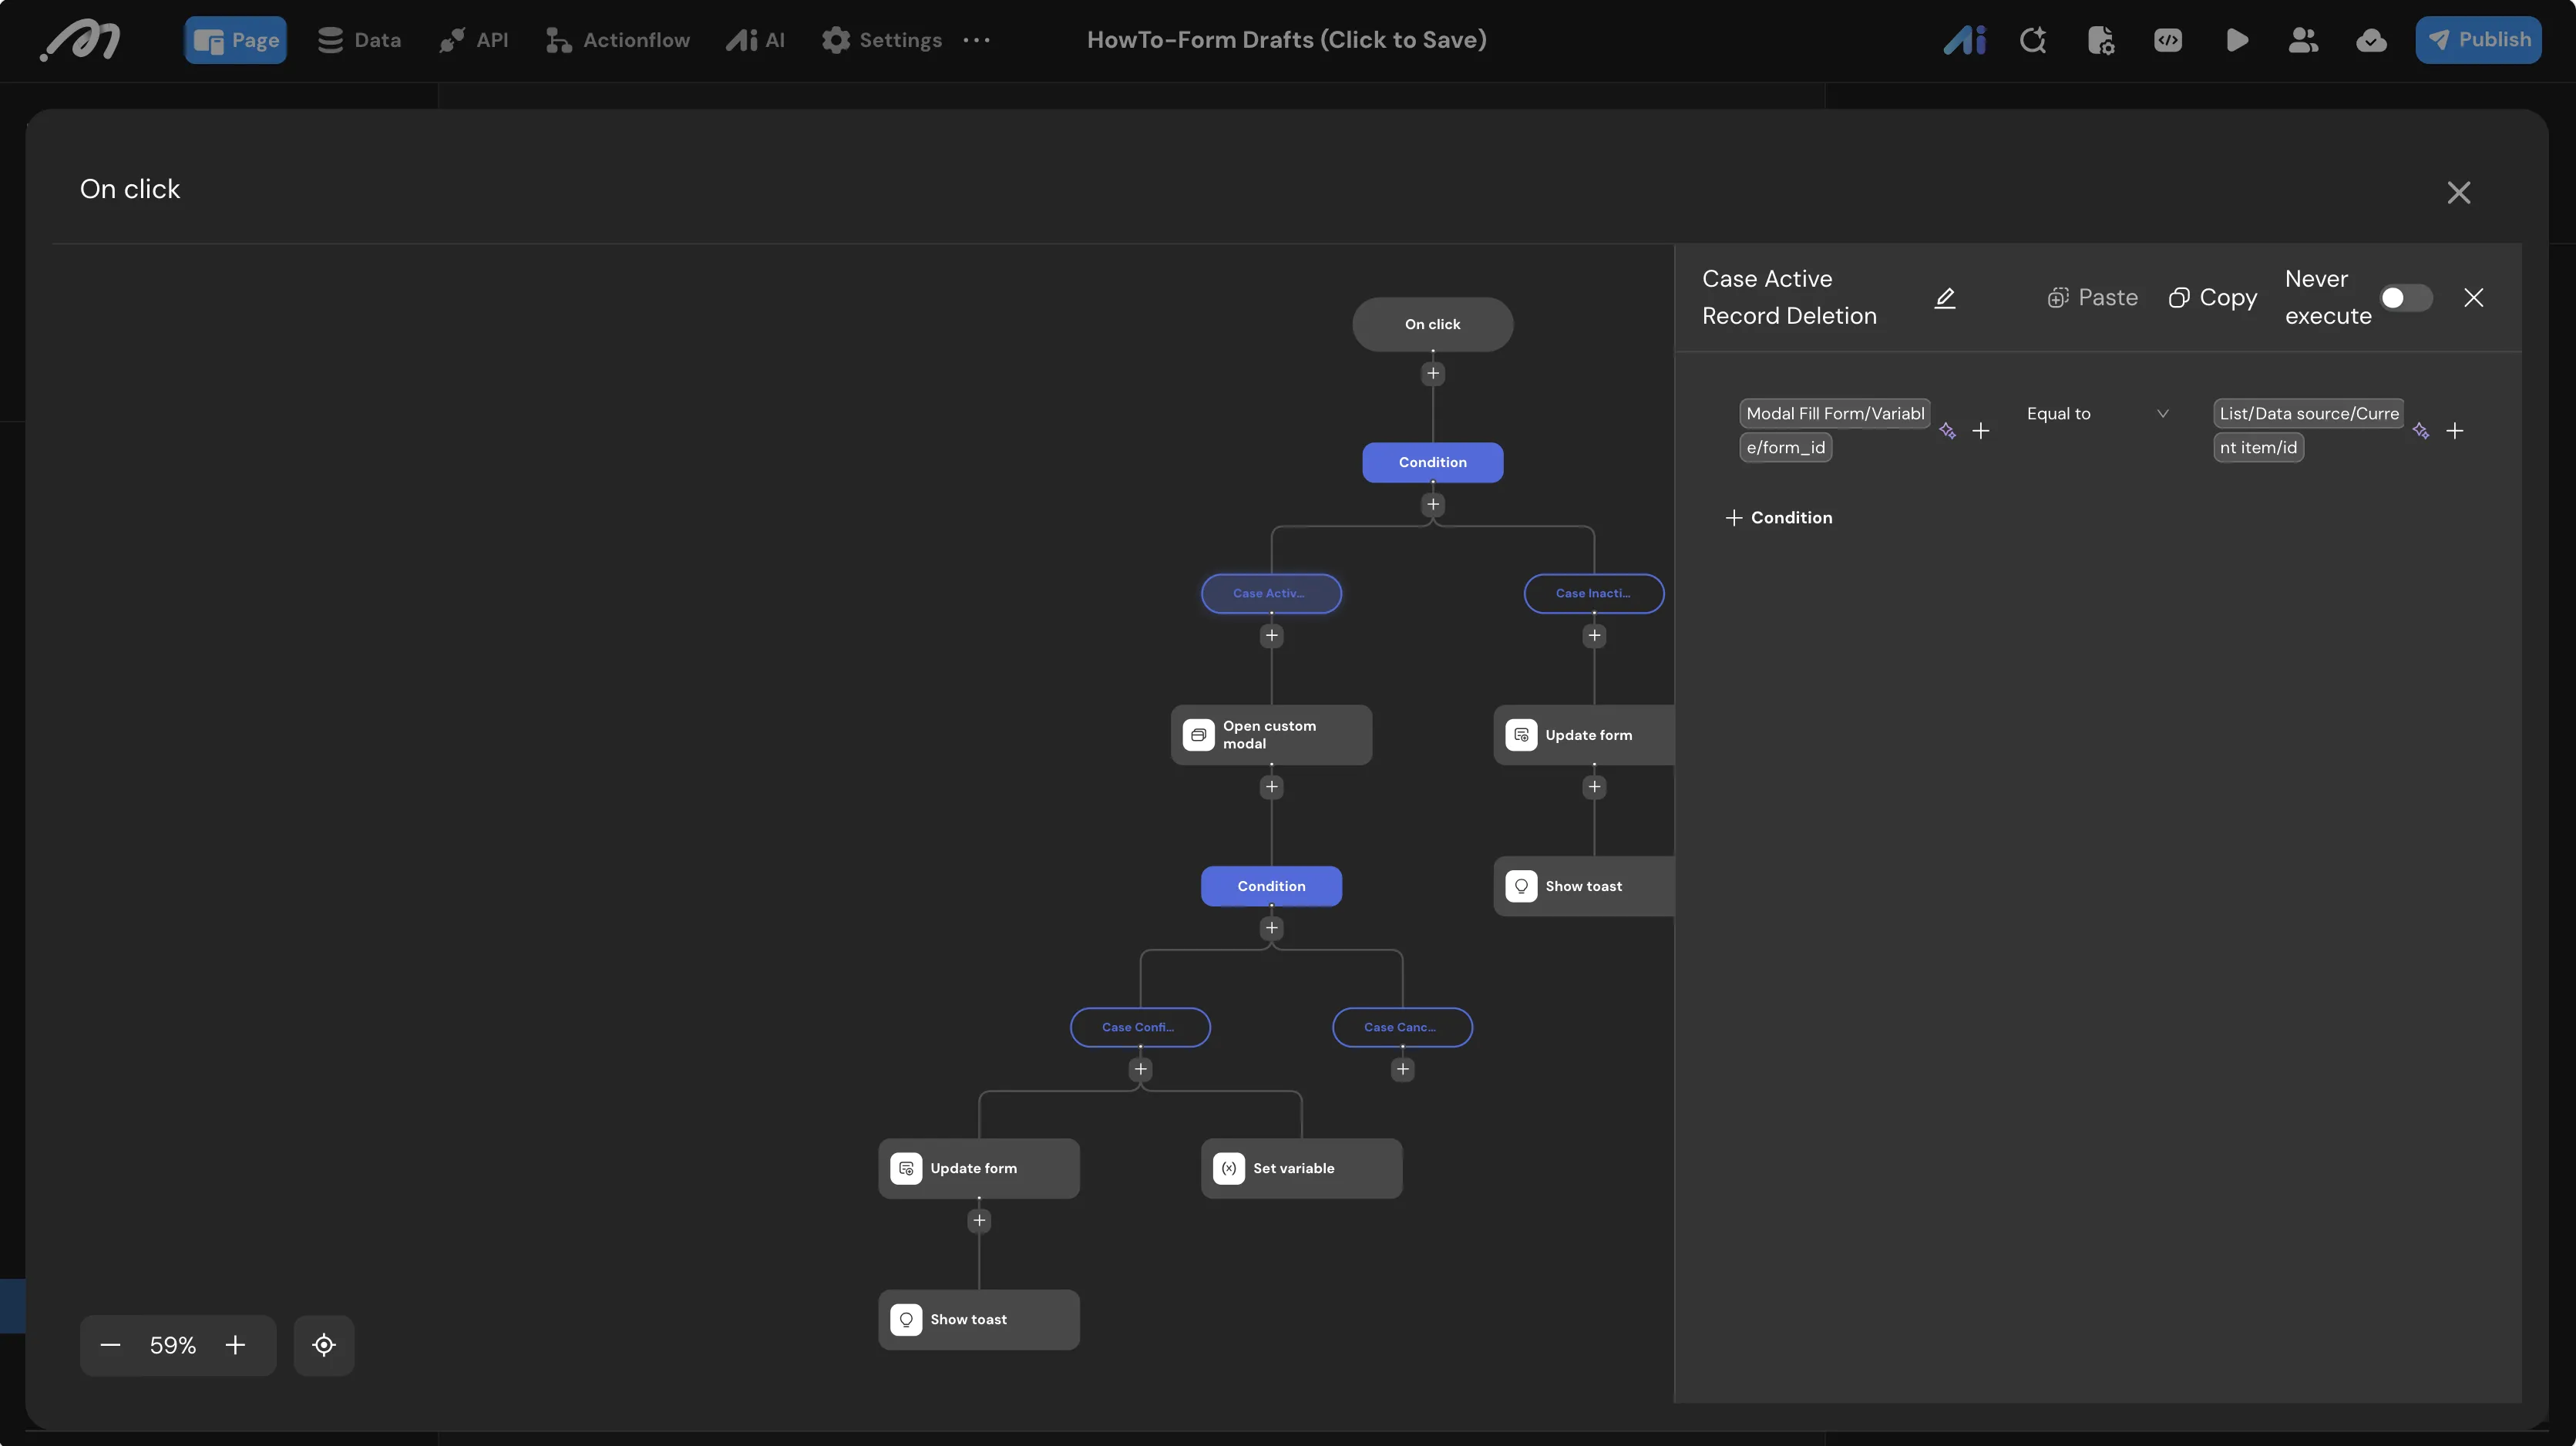
Text Deletecomponent inside the list item row and open itsOnClickevent flow. - Add a Condition node at the start:
- Case: Active Draft — Test if
Modal Fill Form/Variable/form_idEqual toList/Data source/Current item/id.
- Case: Active Draft — Test if
- Path 1: Delete the draft currently open in the form (requires confirmation):
- Add an Open custom modal node targeting
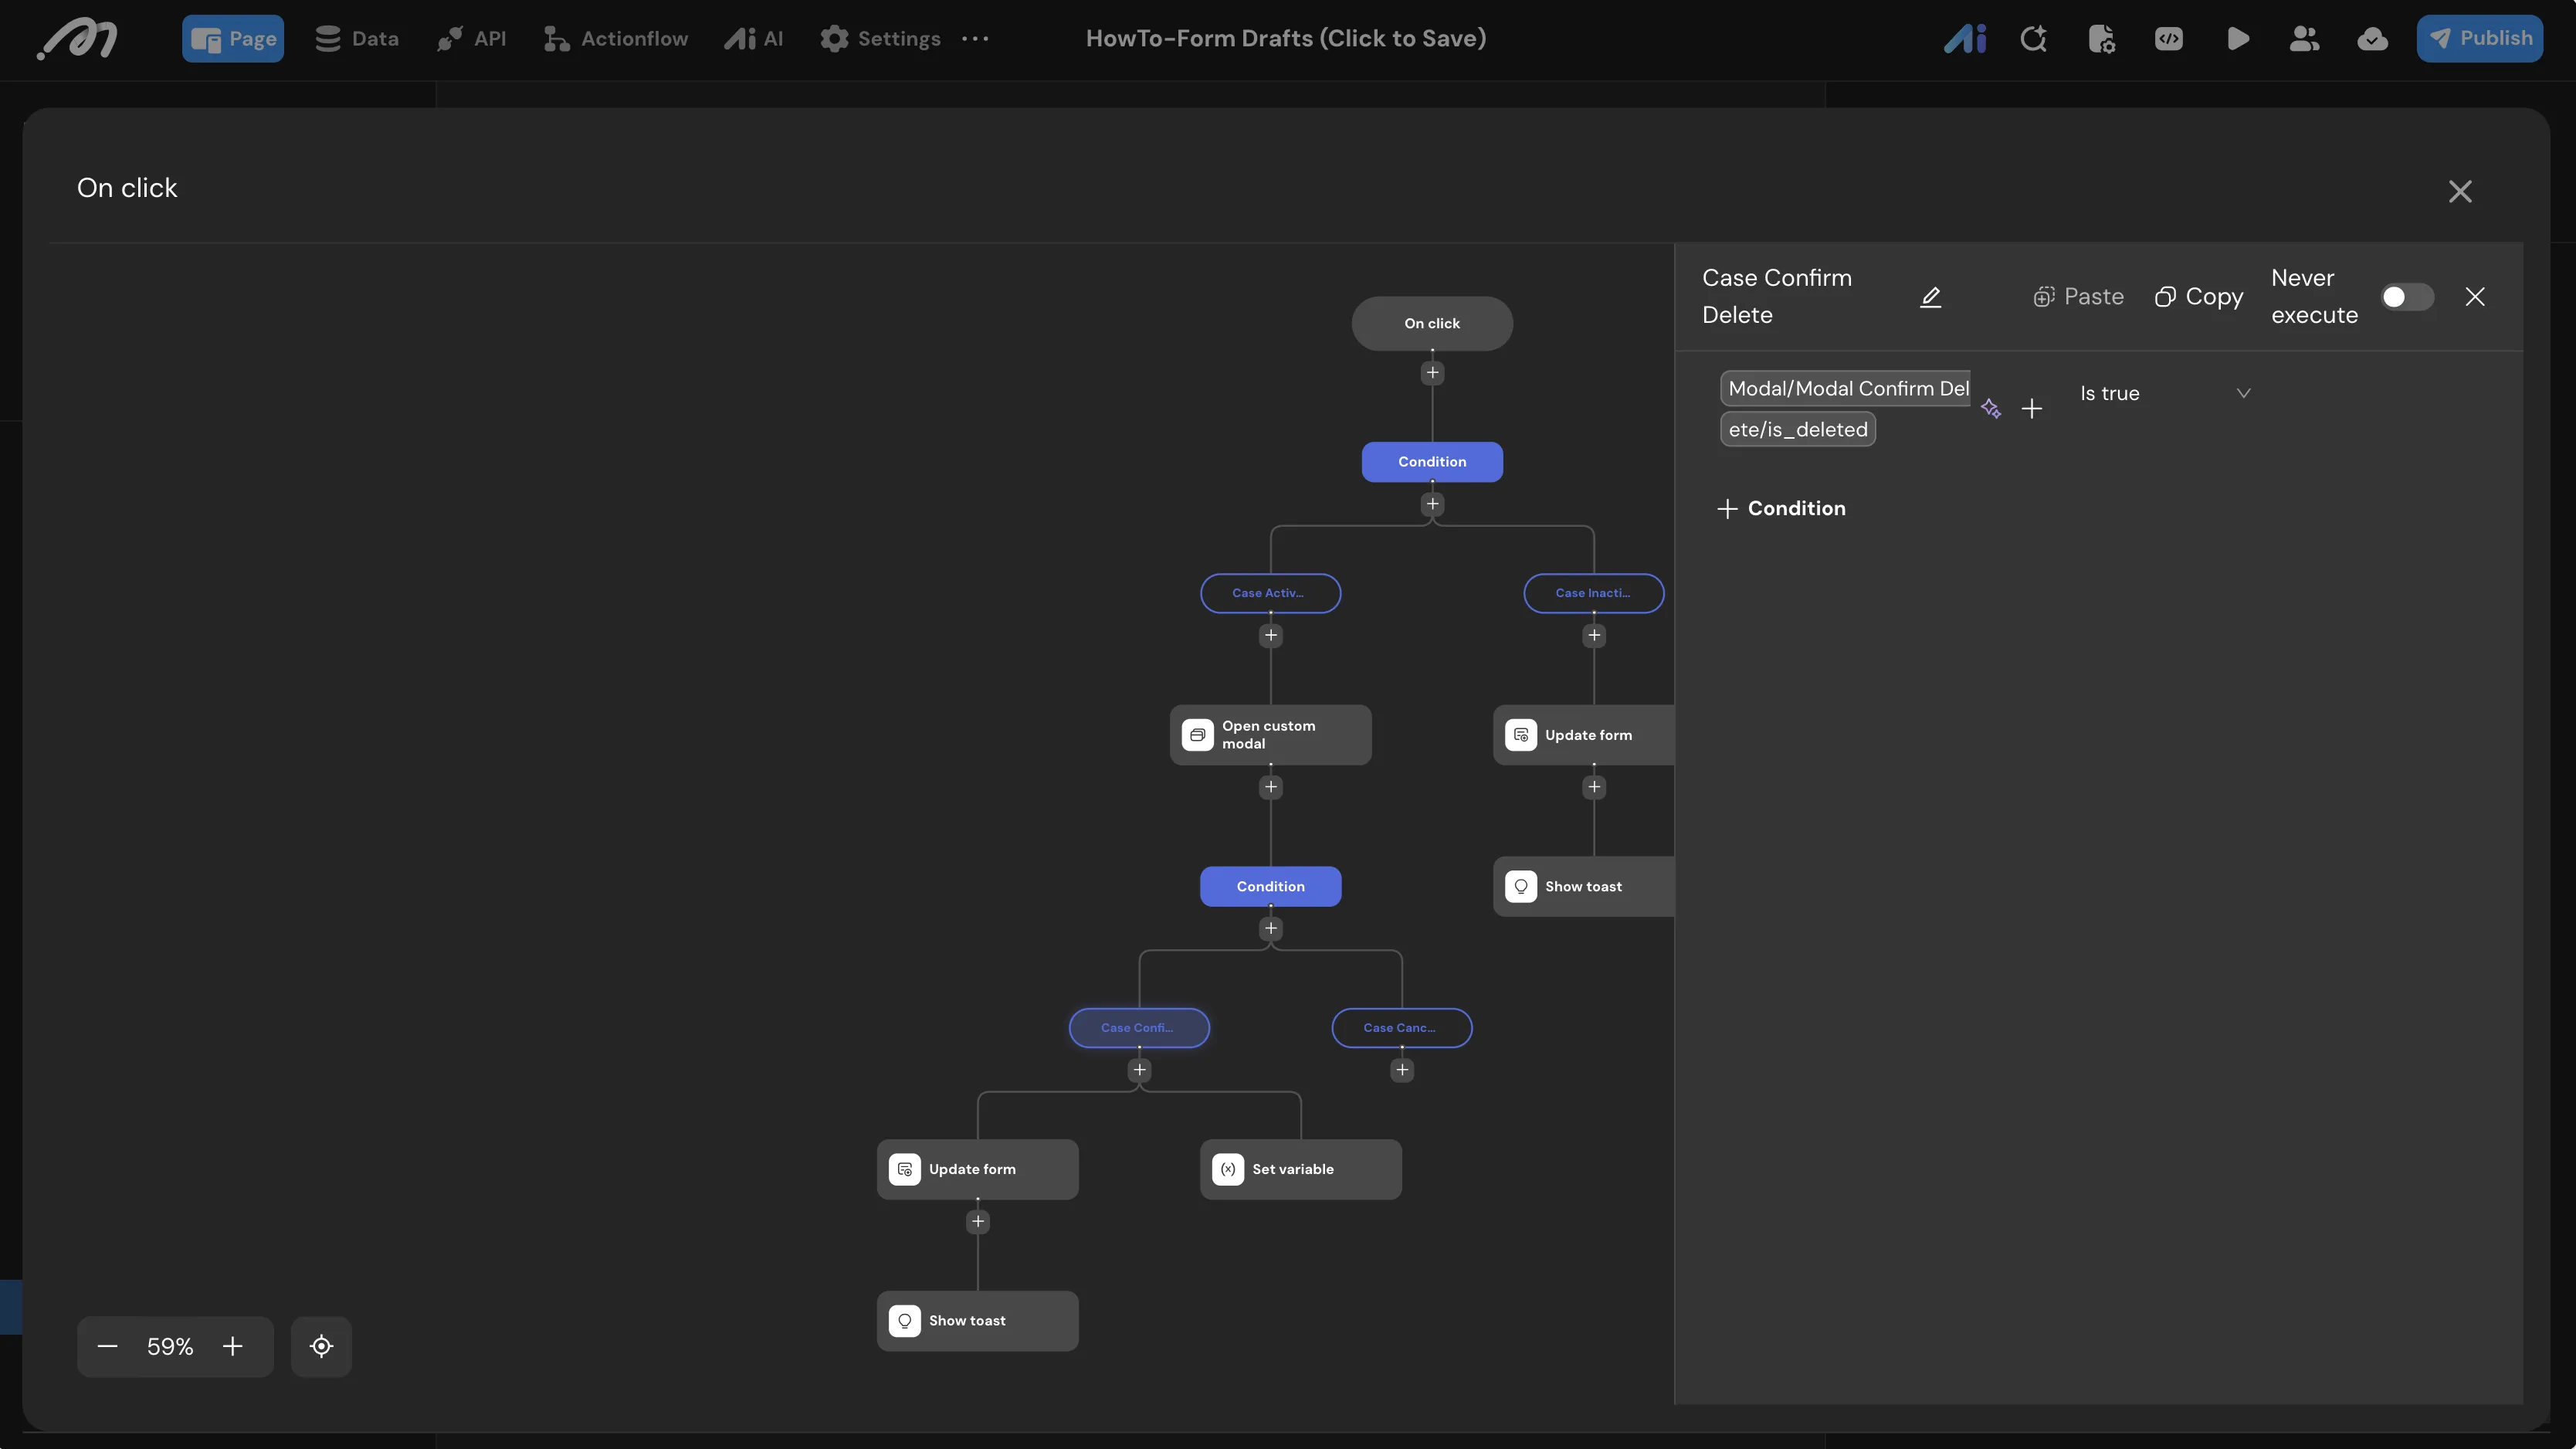
Modal Confirm Delete. - In the
On Modal Closedcallback, add a Condition node. - Case: Confirm Delete — Check if the output variable
Modal/Modal Confirm Delete/is_deletedisIs true.
- Add an Open custom modal node targeting
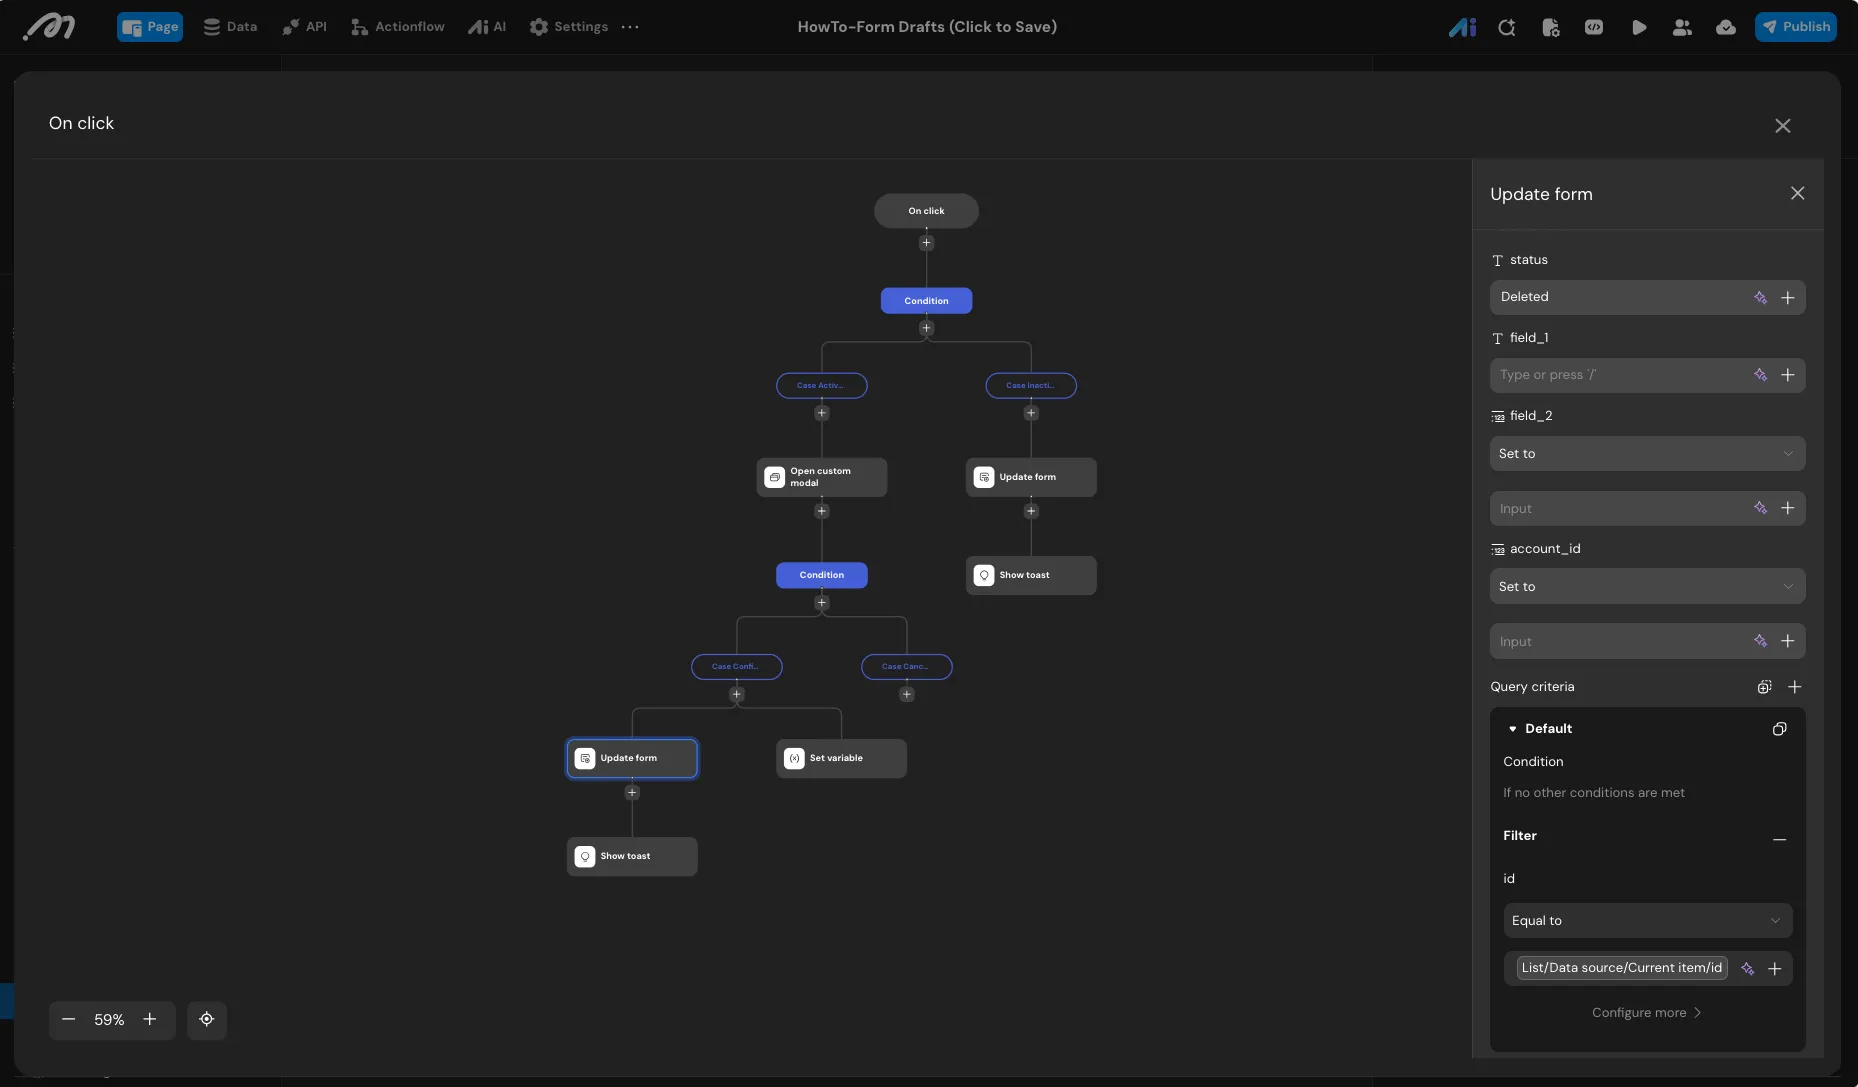
- If true, add an Update form node. Query criteria:
idEqual toList/Data source/Current item/id. SetstatustoDeleted.
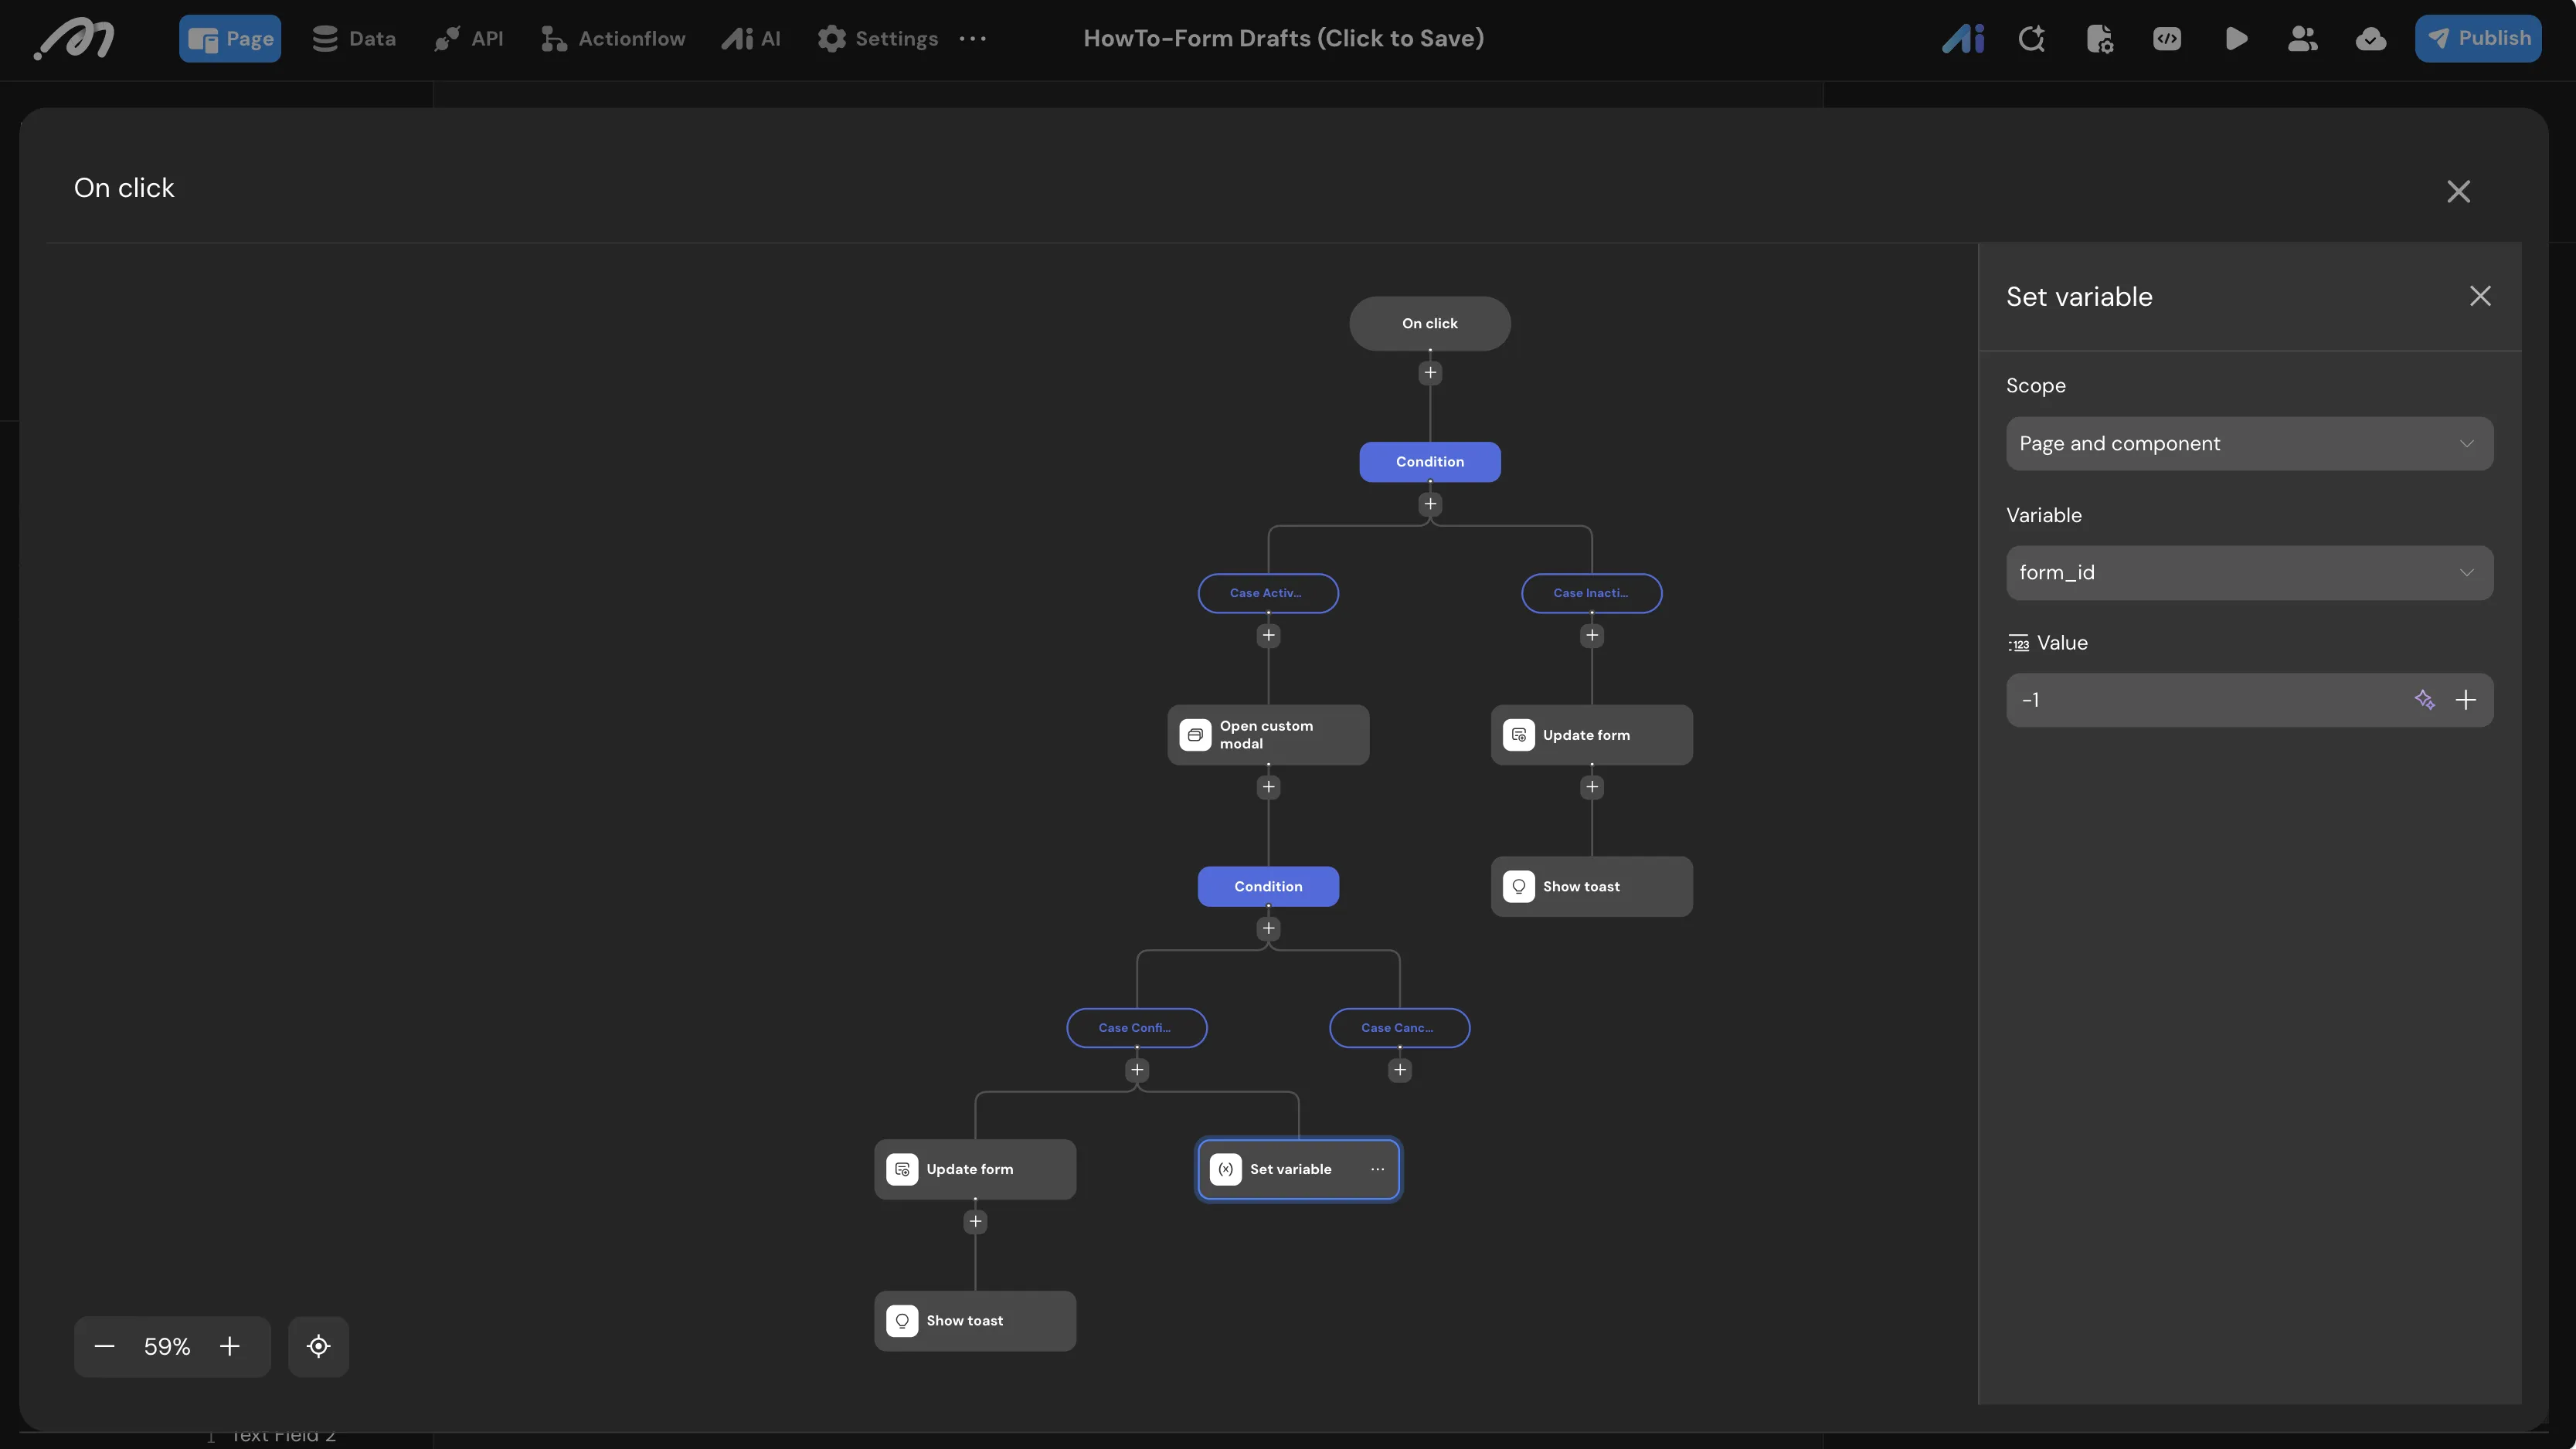
- Add a Set variable node. Scope:
Page and component. Setform_idback to-1to reset the form to Create Mode. - Add a success toast:
Draft successfully deleted.
- Path 2: Delete a draft that is not currently open (no confirmation):
- In the
Case: Inactive Draftbranch, add an immediate Update form node. Query criteria:idEqual toList/Data source/Current item/id. SetstatustoDeleted. - Add a success toast:
Draft successfully deleted.
- In the
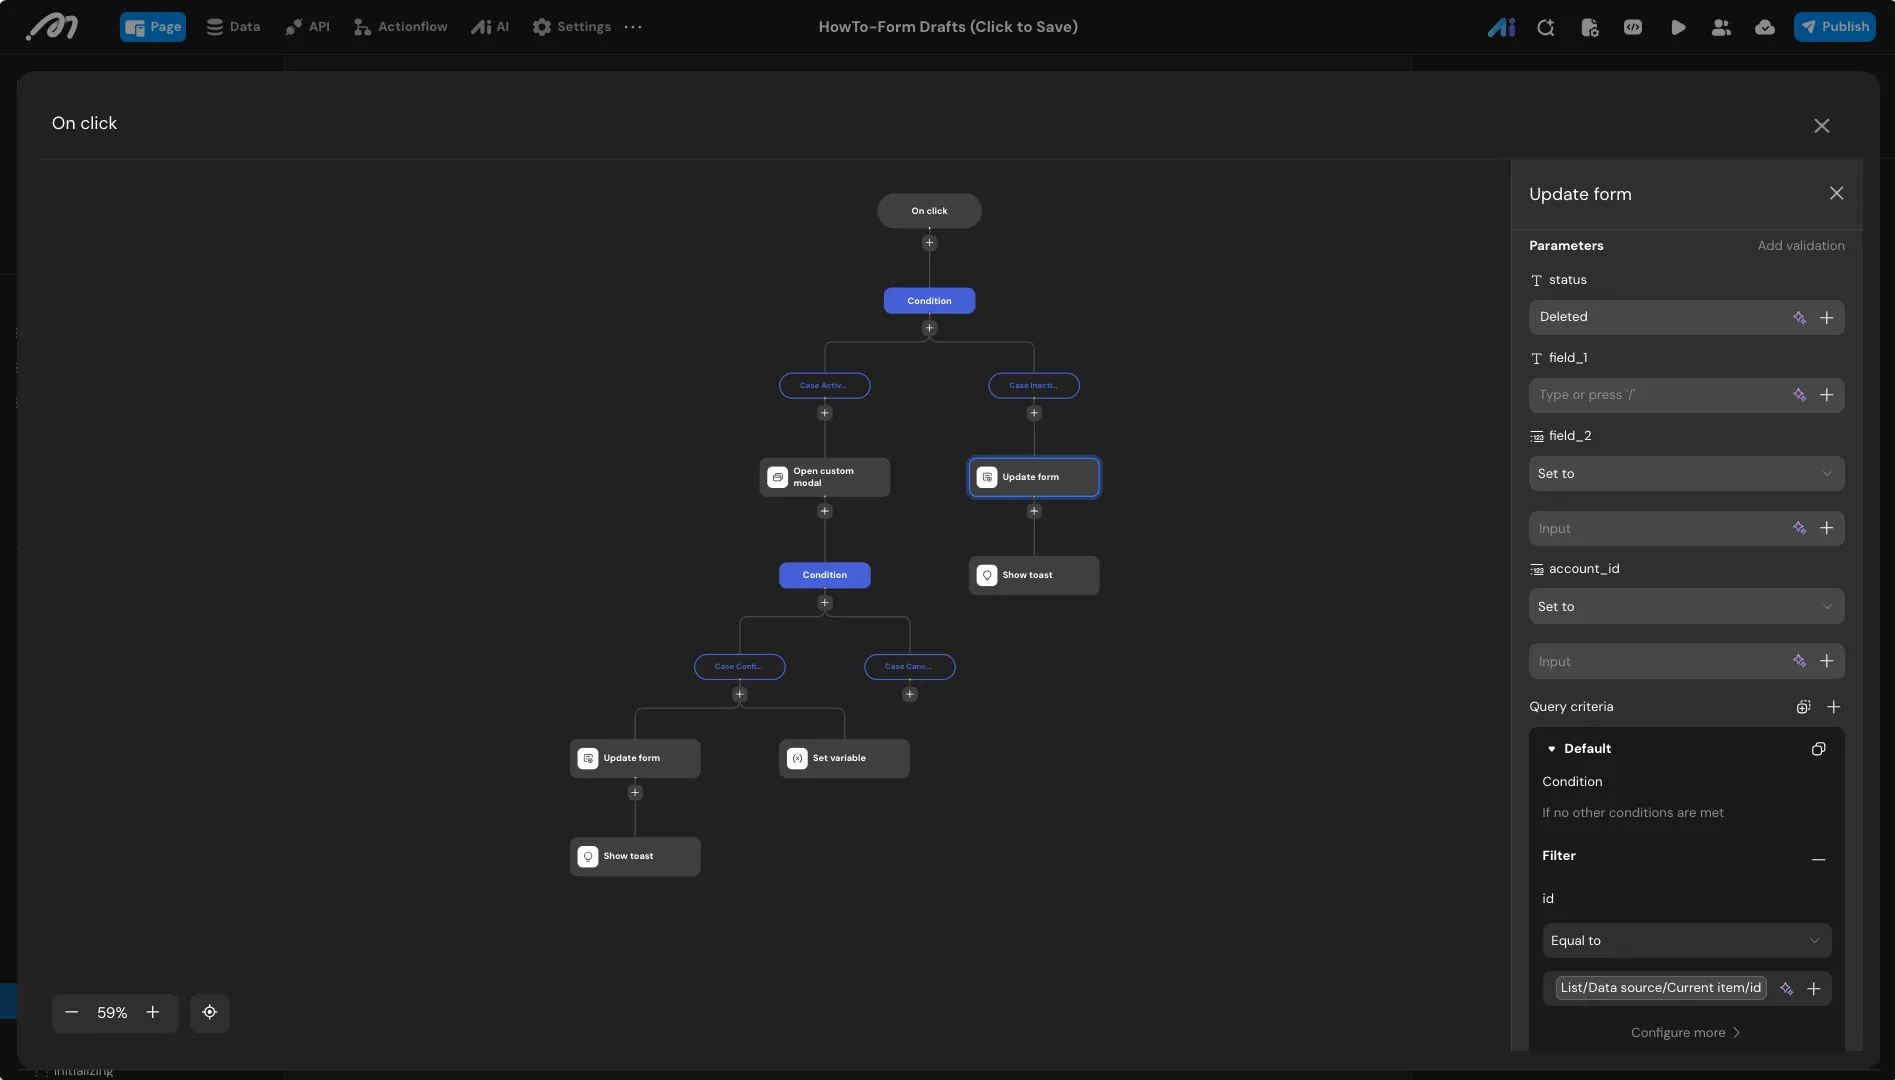
The draft is soft-deleted (status = Deleted) and remains in the database. The list uses Subscription, so the UI updates automatically when the record changes.
Loading a Draft into the Form
The “Apply” link loads a draft’s data back into the form inputs and sets the form_id variable so the user can continue editing.
- Select the
Text Applylink inside the list row template. - Under its
OnClickevent, add a Set variable node. Targetform_idand set its value toList/Data source/Current item/id. - Add two Set input value nodes to load data back into the UI fields:
- Target
Input Field 1and set its value toList/Data source/Current item/field_1. - Target
Input Field 2and set its value toList/Data source/Current item/field_2.
- Target
Verification
Step 1: Login Required Test
- Click the Preview icon in the top navigation bar to open the development sandbox.
- Use the simulator toolbar at the base of the screen and click Restore user to logged out state to clear the session.
- Click the main page Create button.
- Expected Result: The form modal stays closed. A warning toast appears:
Please log in first. - Now log in using the Login simulation panel on the lower action bar — select the simulated user role
Logged-in User.
Step 2: Create a New Draft
- Click the Create button again.
- Expected Result:
Modal Fill Formopens withform_id = -1. - Enter text in
Input Field 1and a number inInput Field 2. - Click Save as Draft.
- Expected Result: A success toast appears:
Draft saved successfully. The draft list updates and a new record appears. Theform_idis now set to the new record’s ID (e.g.,1).
Step 3: Save a Second Draft
- Change the values in the input fields.
- Click Save as Draft again.
- Expand the draft list by clicking the Drafts toggle.
- Expected Result: The draft list now shows two items. The count reads:
Current number of drafts: 2.
Step 4: Load a Draft, Then Delete It
- Click the Apply link on the first draft row (ID
1). - Expected Result: The input fields are populated with the values from draft
1. - Click the Delete link on the same row.
- Expected Result: Because this draft is currently open in the form, the
Modal Confirm Deleteconfirmation dialog appears. - Click YES.
- Expected Result: The modal closes. The
form_idresets to-1. The draft no longer appears in the list. The draft count decreases by one.
Step 5: Delete a Draft That Is Not Currently Open (If you have multiple drafts)
- Create a new draft (any values) and save it. Note its ID.
- Click Apply on a different draft (not the one you just created) to load it into the form.
- In the draft list, click Delete on the draft you just created (the one that is not currently loaded).
- Expected Result: The draft is deleted immediately (no confirmation dialog). The
form_idremains unchanged (still pointing to the draft you loaded). The list updates and the count decreases.
Step 6: Switch Between Drafts (If you have multiple drafts)
- Create two drafts (Draft A and Draft B).
- Click Apply on Draft A. Verify that
form_idbecomes A’s ID and the inputs are populated with A’s values. - Without saving or deleting, click Apply on Draft B.
- Expected Result: The inputs now show B’s values. The
form_idhas switched to B’s ID. Draft A remains in the list unchanged.