Data
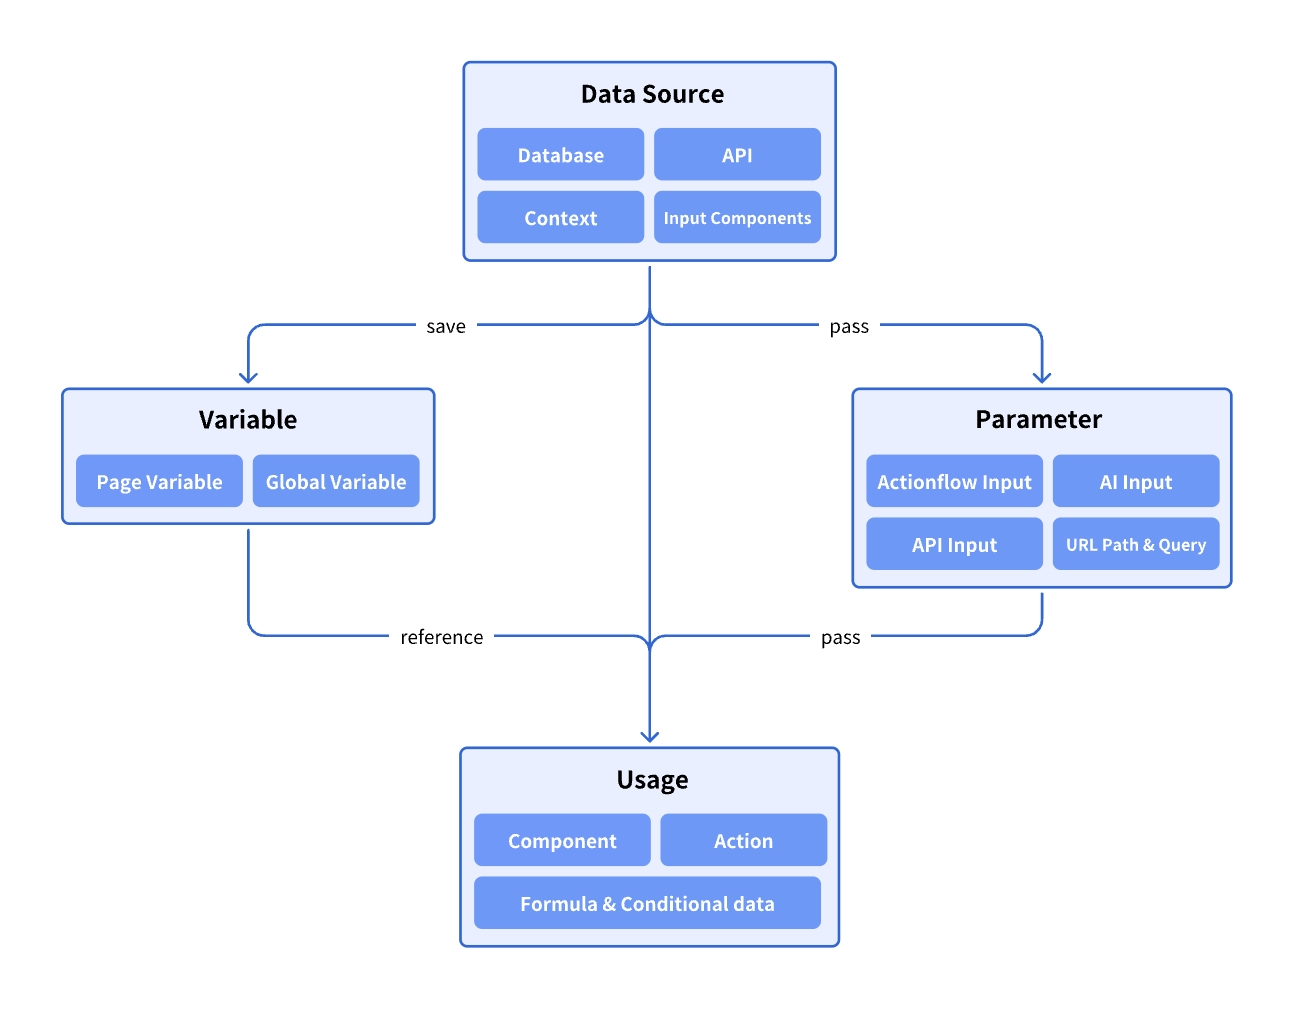
Data is the core asset of an application. Application development is essentially about managing and processing data. Momen provides flexible and powerful data management and utilization capabilities, structured as follows:
Data Sources
Momen supports a variety of data sources, including built-in databases, APIs, and more:
- Data Model and Database: Momen provides a robust relational database with flexibility and high performance. See details: Data Model and Database
- API: External data sources are typically accessed via APIs. See details: API
- Environmental Data: Data provided by the runtime environment, including:
- Null Types: Null, Empty Text, Empty Array
- Time Types: Current time, date, and datetime
- User Types: Logged-in user data (automatically retrieved from the database, can be refreshed using the “Refresh Login User Data” action), login status (boolean), user agent (browser/OS info)
- Contextual Data: Includes:
- Action Result Data: Many actions generate result data, which can be referenced by subsequent actions. For example, after calling the database “add data” action, the result is returned; after calling an API action, the response data is returned.
- List Item Data: When a List View or Select View is bound to a data source, each list item has its own data, which can be used for display, user interaction, etc.
- Input Components: Momen provides various input components usable as data sources, such as Input, Data Selector, Image Picker, and Select View. See the relevant component documentation for details.
Data Usage
The following examples illustrate data usage by implementing features such as adding articles, displaying content, liking, and message notifications in a blog website.
Adding Blog Articles
This feature involves the Database and Input Components.
First, create a “Blog” table in the Data model to store articles, including fields such as:
- show_at (Publication date)
- title
- sub_title
- cover_image
- content
- authors_author (Author’s account ID)
- like_count
- …
.png)
Create a blog upload page and add input fields, an Image Picker, a rich text Editor, and a Date & Time Picker to collect user input for the article title, subtitle, cover, content, and publish date. Add a button to save the article to the database.
Bind the “Insert Blog” action to the button. Bind values to each field, and in the “inputs” category of the Data Selector menu, select the components you just added.
.png)
Displaying Article List
This feature involves Database and List Item Data.
Add a List component to the page, select the “Blog” table as the data source, enable Load more, set the limit to 3, and sort by show_at in descending order.
.png)
Components within list items also need to bind data. The data selection path is: In-component data → blog_list (List component name) → item. “Item” represents the data for each entry, and you can select the corresponding field within it.
.png)
Displaying Article Details
This feature involves Page Parameter, List Item Data, and Page Data Source.
When a user clicks an item in the article list, it navigates to the blog detail page, passing the blog’s ID via a page parameter. In the detail page’s data source, use this ID as a filter to retrieve the corresponding article.
Create a blog detail page and add a page query parameter (see details: Parameter ), named “blog*id”. On the blog list page, add the “Go To Blog Detail” action to the list item, and set the value of post_id to the ID of the list item data.
.png)
Figure: Configure navigation to blog detail page*
.png)
Figure: Set page parameter for blog detail_
Add a data source to the detail page, select “Blog” as the table, set the limit to 1, and the filter to “ID equals Query/blog_id”. This enables data transfer between pages during navigation.
.png)
On the detail page, add text, images, and other components, bind them to the page data source, and display the article.
.png)
Article Liking and Message Notification
This feature involves List Item Data and Action Result Data.
Users can like articles, and after liking, a message notification is automatically sent to the author.
The like_count field in the blog table represents the number of likes. Create a notification table to store message notifications, where the message field is the content, sender is the sender’s account ID, and receiver is the receiver’s account ID.
.png)
On the page, add a like button in the article list item and bind the “Update Blog” action to increase the like count. When updating, you need to know which article is being updated; the current item data contains the article being clicked. Add a filter: ID equals list item data’s ID, ensuring only the current article is updated.
Always check and confirm filter conditions when updating or deleting data to avoid affecting all records.
.png)
After liking, send a notification to the author by adding an “Insert Notification” action onSuccess of “Update Blog”. The message content can be: The article ${article title} received new likes, bringing the total to: ${like count}.
The article title comes from the list item data. After “Insert Blog” succeeds, the latest updated data is returned, so the latest like count can be obtained from the action result data.
.png)
Notes
- In addition to directly referencing data, you can use variables for data storage and reference (See details: Variable)
- There are two types of database data requests:
- Query: Retrieves data once when the page loads (suitable for most scenarios)
- Subscription: Retrieves data once on page load and automatically pushes updates when the database data changes (suitable for scenarios like real-time chat)
- Data limit refers to the maximum number of records to retrieve, from 1 to unlimited.
- If set to 1, a single record is returned.
- If greater than 1, an array is returned. To retrieve a specific record, use the GET_ITEM formula (See details: Formula)
- Data filtering can be configured with multiple conditions:
- Condition: The filter criteria; only records meeting the criteria are returned
- Filter: Extracts data from the database that meets the filter condition
- Sort: Sort by a specific field. If vector storage is enabled, vector sorting is available (See details: Database)
- Distinct: Remove duplicate records; multiple deduplication fields can be selected