Payment
Introduction
This guide explains how to enable and use Stripe payment features in your Momen project.
It covers account setup, configuration, payment actions, event handling, and best practices to ensure a secure and professional payment experience.
Preparation
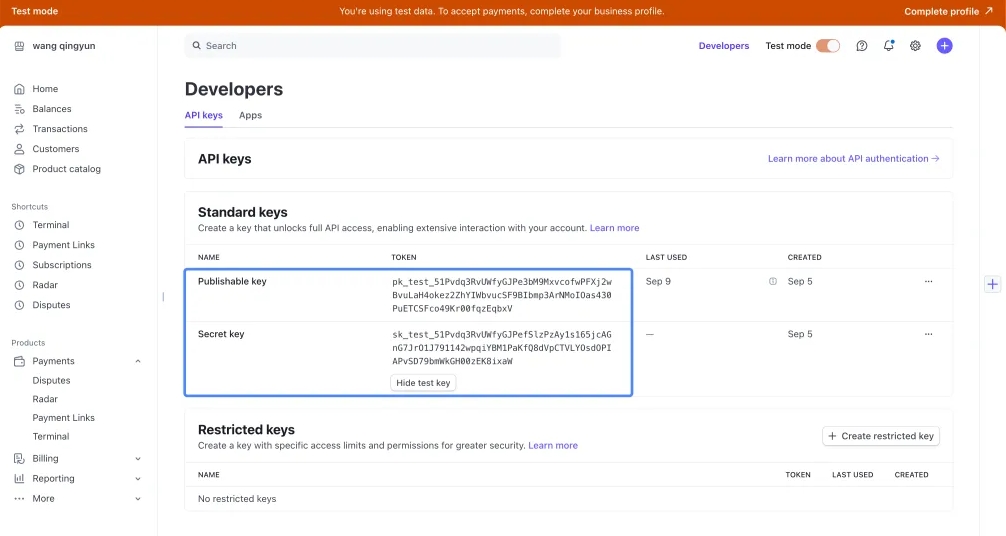
Set Up a Stripe Account
- Sign up for or log in to your Stripe account .
- Retrieve your Publishable Key and Secret Key from the Stripe Dashboard.
Upgrade Your Project
- Ensure your project is on the Pro plan or above to access payment features.
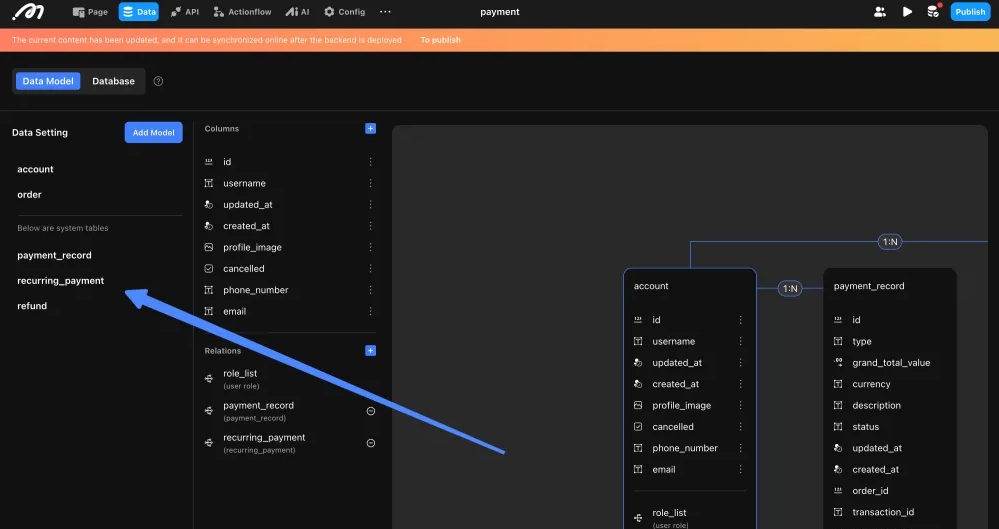
Create an Order Table
Before enabling payments, create an Order Table in your project to store essential order details, such as:
| Field | Example | Description |
|---|---|---|
price | 99.99 | Order amount (in dollars) |
userId | user_123 | User identifier |
status | pending | Order status |
Warning: Once the order table is linked to payment features, it cannot be unlinked, replaced, or deleted.
About the “Clear and Close” Action
Using the “Clear and Close” option in the payment settings will permanently disable payments. This operation is highly destructive and irreversible. Proceed with extreme caution, as it triggers the following system-wide changes:
- Wipes sensitive configurations: Permanently erases all payment channel credentials, such as Stripe public key.
- Destroys payment data models: Forcibly drops the system-generated payment_record, recurring_payment, and refund tables, severing all associated data relationships. Upon the next backend deployment, all historical transaction records in the production database will be irrecoverably deleted.
- Removes Actionflows and webhooks: Deletes all default payment Actionflows and webhook triggers. Any custom logic in your project that relies on payment actions will instantly break.
Note: Re-enabling payments in the future will generate a fresh set of data tables, action flows, and webhooks. It is impossible to restore or relink to the deleted historical data.
Activating Stripe Payment
Enable Payment Module
- Go to Settings → Payment and activate the payment module.
Upon activation, the system will automatically:
- Create three backend tables:
payment_record: Stores one-time payment records.recurring_payment: Manages subscription billing.refund: Tracks refund transactions.
- Generate four system Actionflows:
StripePayment: After a successful one-time paymentStripeRefund: After a successful refundStripeRecurringPaymentManagement: When starting or canceling a subscriptionStripeRecurringPaymentDeduction: When Stripe automatically charges for subscription renewal
| Configuration | Configuration |
|---|---|
 | 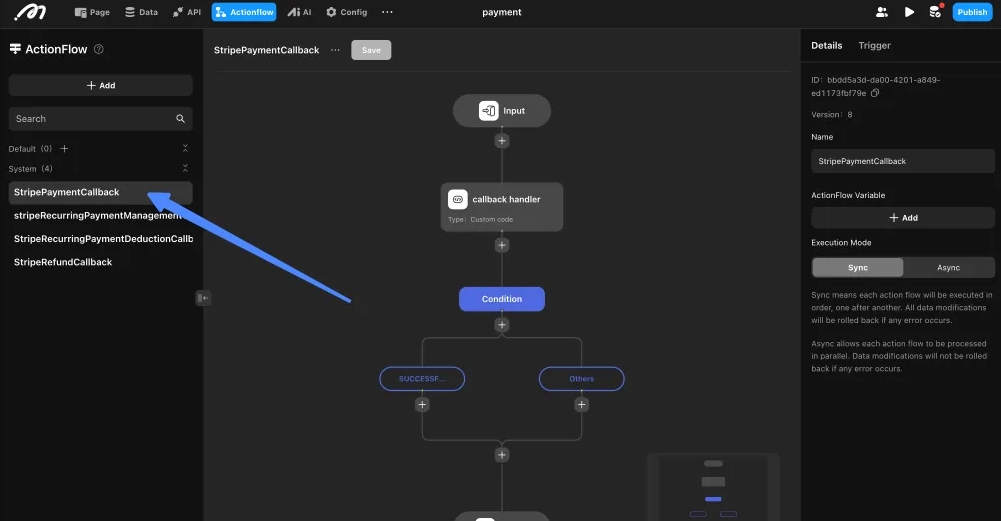 |
These system-generated Actionflows securely handle backend payment event processing.
Configure Stripe Credentials
Navigate to Settings → Payment → Stripe.
- Enter the keys from your Stripe account:
| Field | Location in Stripe Dashboard |
|---|---|
| Publishable Key | API Keys section |
| Secret Key | API Keys section |
- Enter your brand name, brand logo, and brand slogan.
Configure Stripe Webhooks
Follow these guidelines to ensure your Stripe Webhook integration is set up correctly and reliably.
1. The Auto-Generated ‘Payment Success’ Webhook
When you first set up Stripe payments, our platform automatically creates a webhook endpoint in your Stripe account. This webhook is designed exclusively to handle successful payments.
Stripe allows a maximum of 16 webhooks. Since the Momen payment feature needs to create four webhooks, please ensure you have 12 or fewer before activation.
- Key Rule: Do not modify this auto-generated webhook. Specifically, do not add other events to it from your Stripe dashboard.
- Reason: This webhook is linked to a single actionflow that executes “after a payment succeeds”. If you add other events like
charge.failed, it will incorrectly trigger your “payment success” logic for failed payments, leading to critical errors.
2. Listening for Other Payment Events
To handle events other than payment success (e.g., charge.failed, charge.refunded), you must create a new, dedicated webhook for each scenario.
Here is the correct procedure:
-
Create new actionflow and webhook trigger in Momen
- Create an actionflow and set up the webhook trigger.
- Design the logic for the specific event (e.g., for a
charge.failedevent, add an action to send a notification email). - Once created, copy the webhook URL generated for this actionflow.
-
Create a New Webhook Endpoint in Stripe
- Log in to your Stripe Dashboard and go to Developers > Webhooks.
- Click “Add endpoint” to create a new one.
- Paste the webhook URL from our platform into the “Endpoint URL” field.
- Under “Events to send,” select only the specific event this workflow is designed to handle (e.g.,
charge.failed). - Save and activate the endpoint.
By creating a separate Webhook trigger(Momen) + Webhook Endpoint(Stripe) pair for each event, you ensure your payment logic remains clear, organized, and error-free.
Using Payment Actions
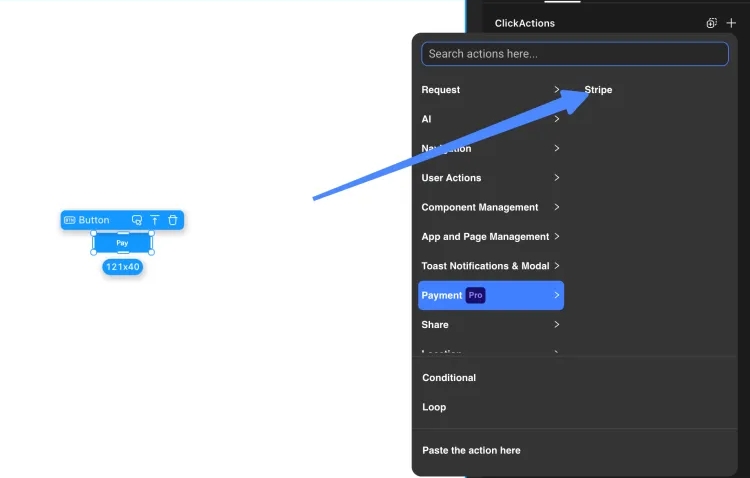
One-Time Payment
Use the Stripe Payment Action to charge users for a single transaction.
| Parameter | Type | Description |
|---|---|---|
orderId | Integer | The ID from the order table |
currency | String | Currency code (e.g., USD) |
amount | Decimal | Charge amount (in the smallest currency unit, e.g., cents for USD) |
Note: To charge $10.00 USD, enter
1000as Stripe expects the amount in cents.
Refund Payment
Use the Stripe Refund Action to process a refund.
| Parameter | Type | Description |
|---|---|---|
paymentId | Integer | The ID from the payment table |
refundAmount | Decimal | Amount to refund (must not exceed the original payment amount) |
Configure Refund Action Permissions
Refund actions are closed to all users by default. To prevent financial losses, it is recommended not to grant refund permissions to regular users. Instead, create an admin-like role and grant refund permissions to that role.
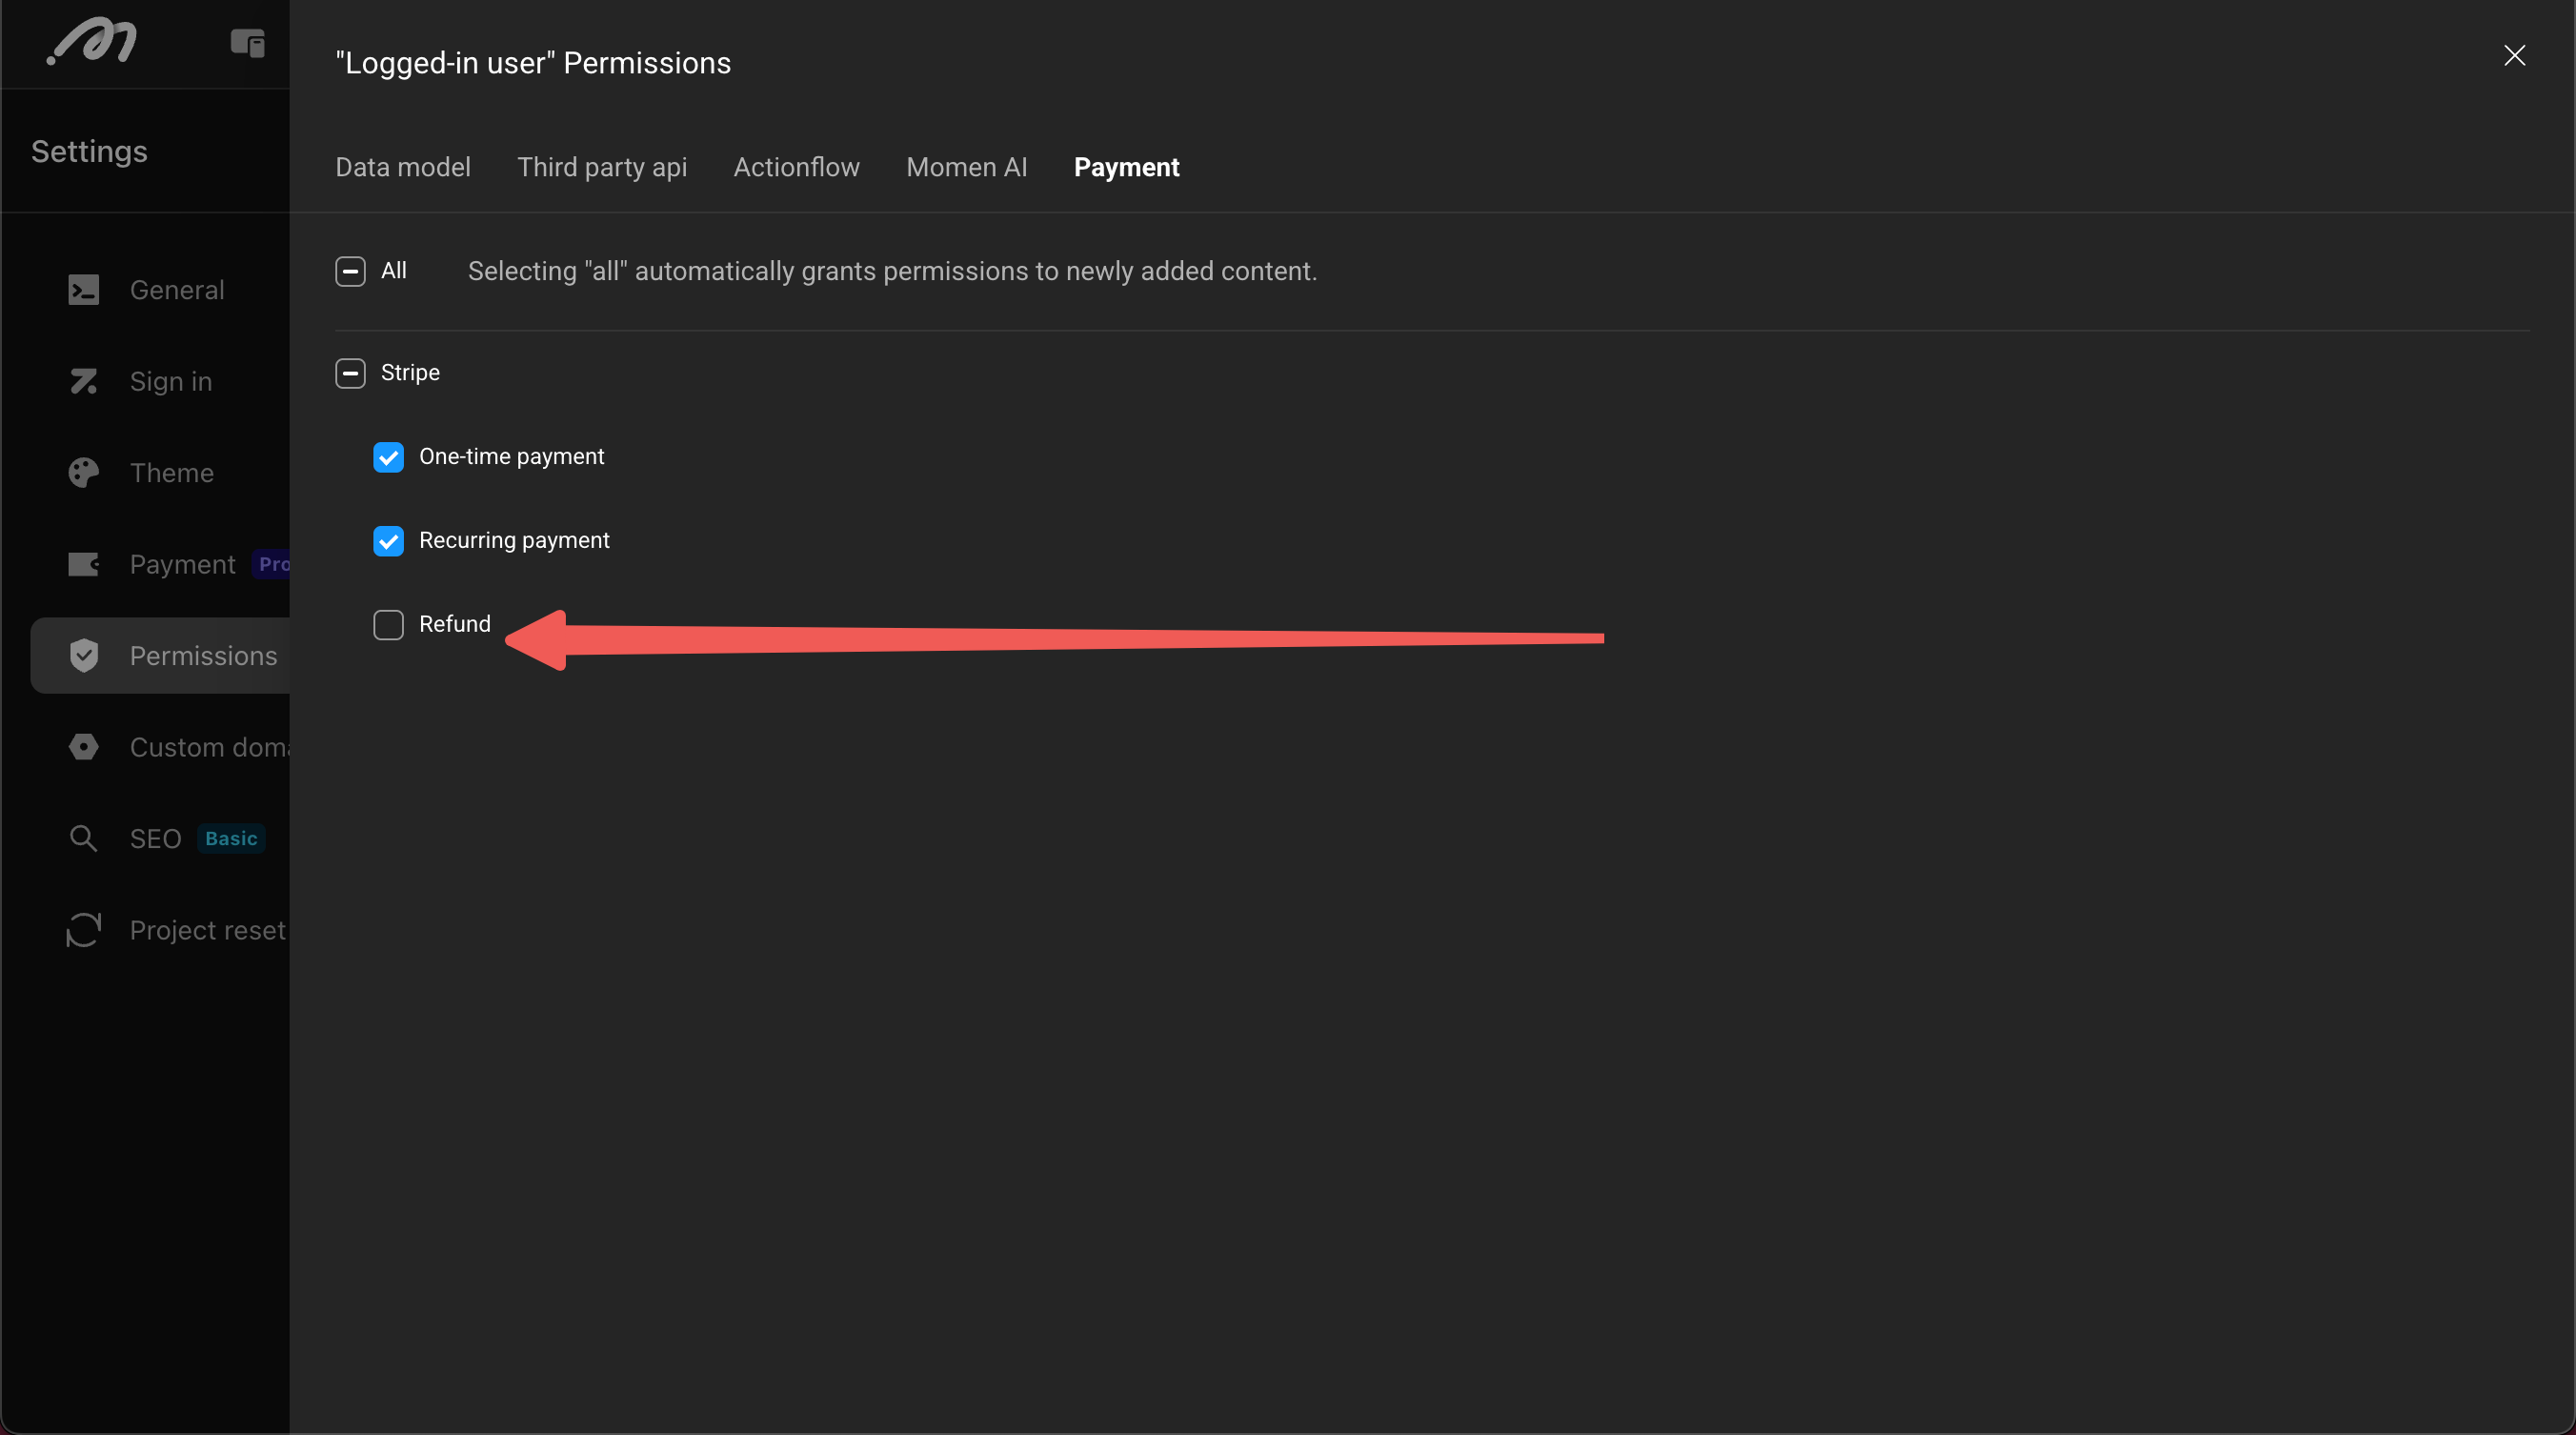
Important: Restrict refund permissions to admin users to minimize financial risk.
Recurring Subscription Payments
Before starting recurring payments:
- Create a Recurring Price object in Stripe and obtain its Price ID.
| Parameter | Type | Description |
|---|---|---|
orderId | Integer | The ID from the order table |
priceId | String | The Stripe-generated Price ID |
Recurring actions support:
- Starting a subscription
- Canceling an existing subscription
Handling Payment Events via Actionflows
Stripe automatically triggers backend Actionflows for different payment events.
These Actionflows allow you to parse event data, validate results, and implement custom business logic securely.
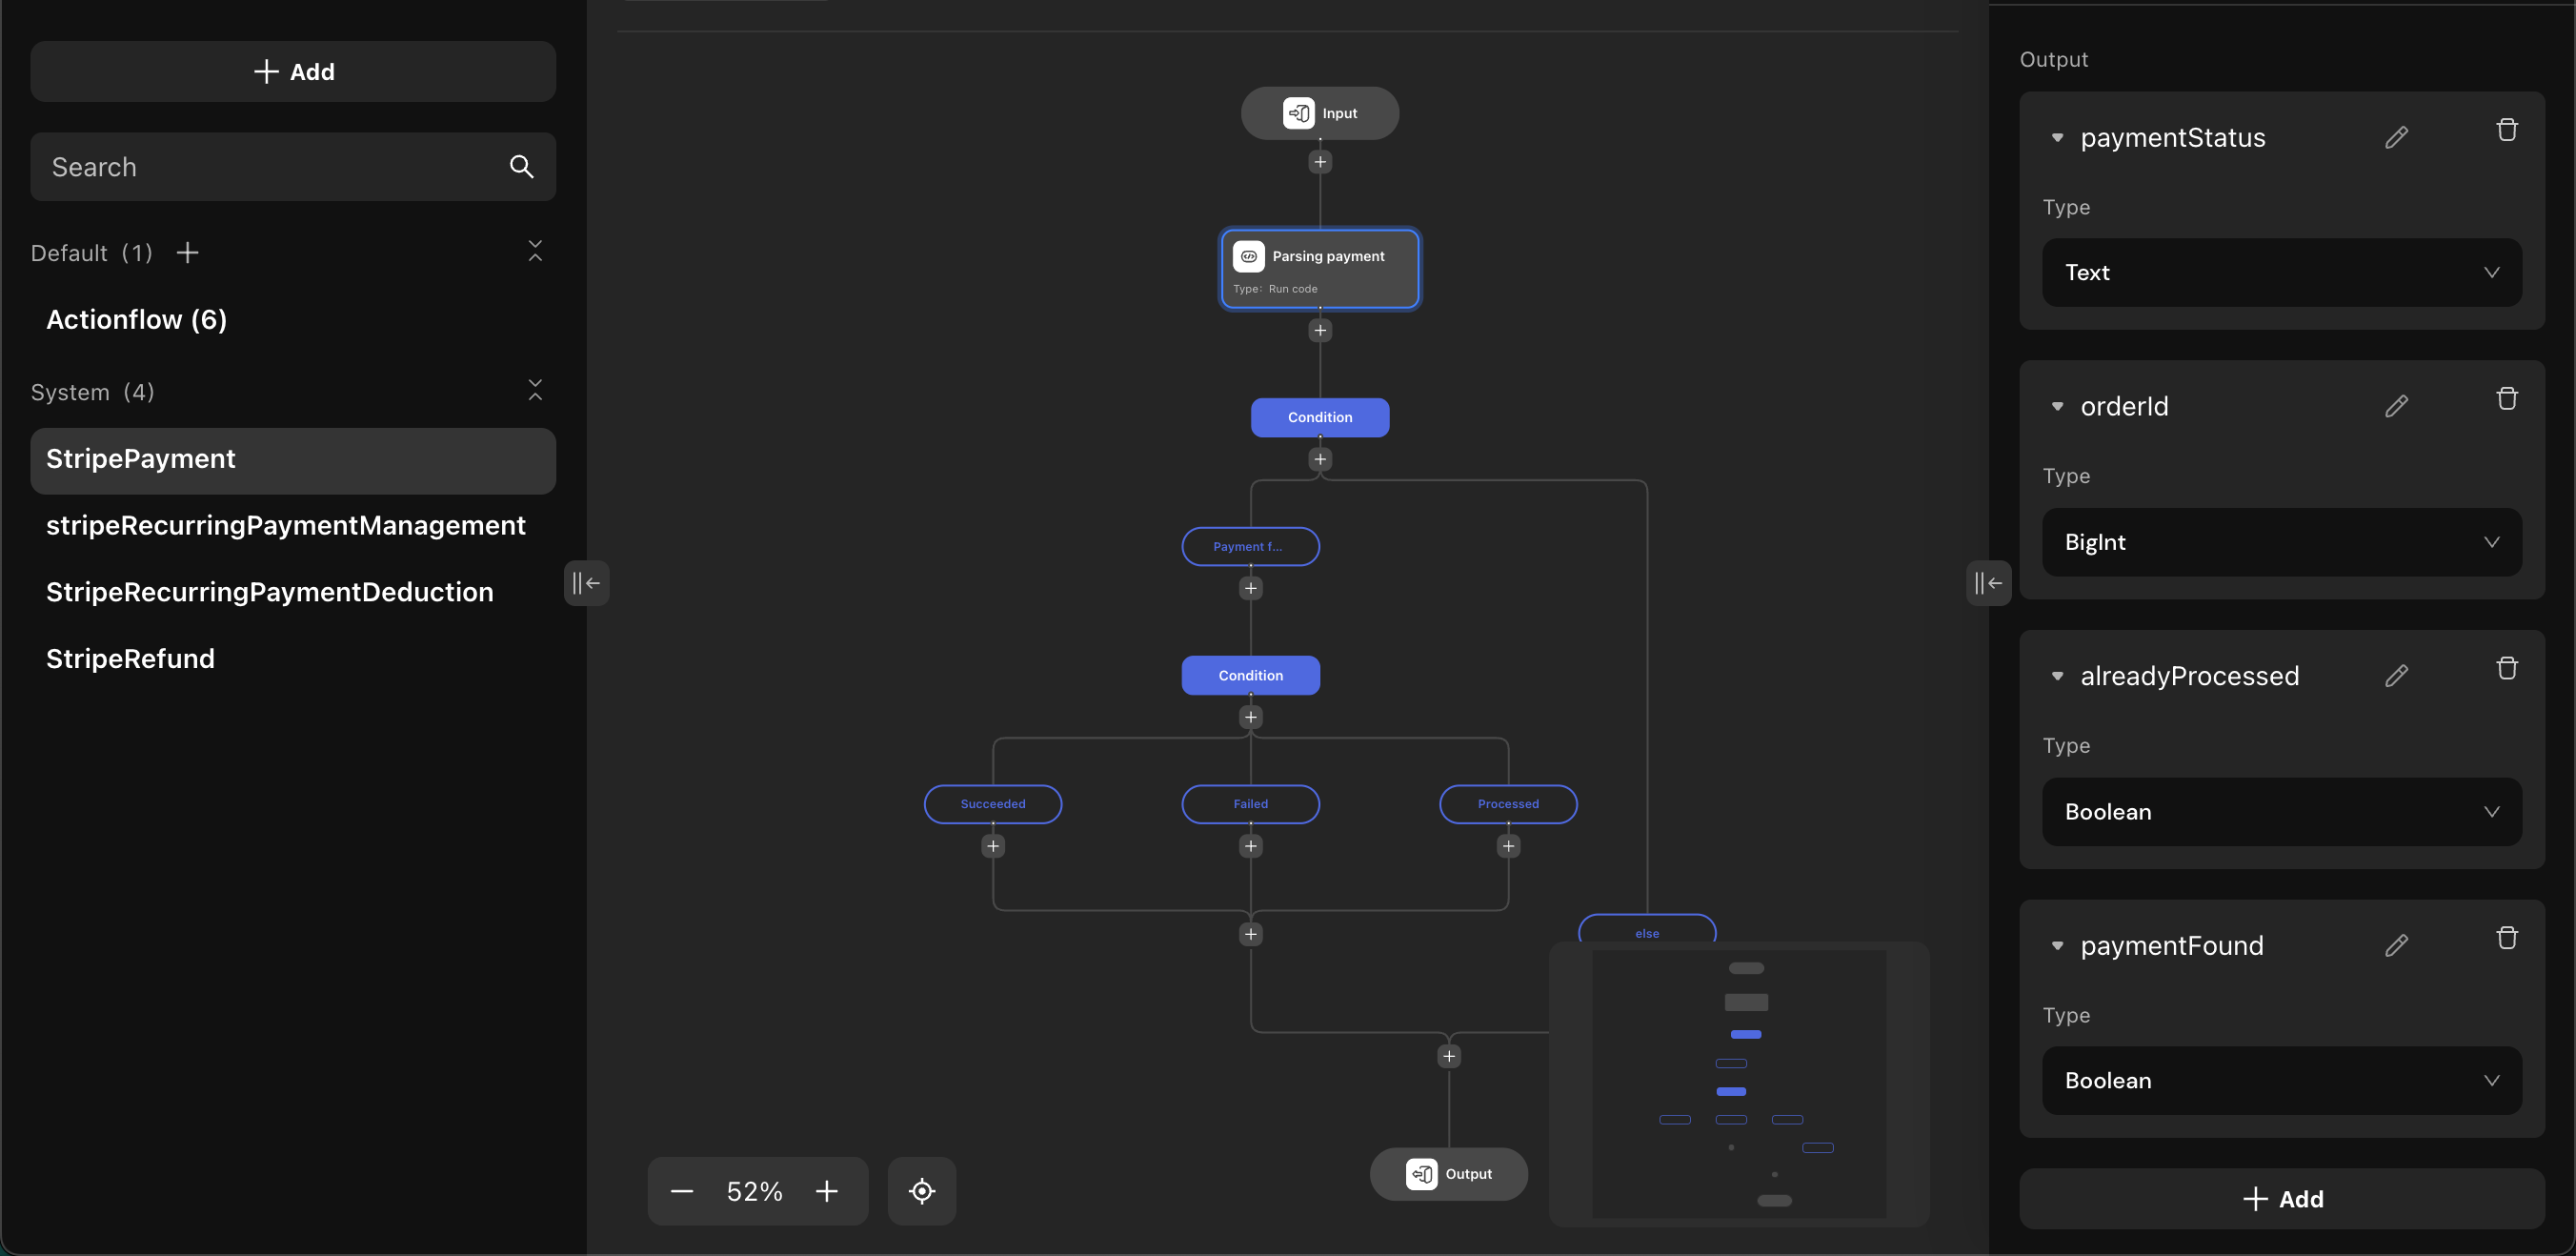
Stripe Payment Actionflow
- Trigger: After a successful one-time payment
- System actions:
- Parse payment data (e.g.,
orderId,paymentStatus) - Detect duplicate webhooks using
alreadyProcessed(false = first trigger, true = processed)
- Parse payment data (e.g.,
- Field notes:
orderId: TheorderIdprovided when invoking the payment action; use it to locate and update the corresponding order recordpaymentStatus:SUCCESSFULfor a successful payment,FAILEDfor a failed onealreadyProcessed: Only treat a payment as failed/succeeded when the corresponding status is returned andalreadyProcessedisfalse
- Custom logic examples:
- Update order status to
paid - Grant access to purchased services
- Send confirmation emails or notifications
- Update order status to
Stripe Refund Actionflow
- Trigger: After a successful refund
- System actions:
- Parse refund data
- Detect duplicate webhooks using
alreadyProcessed(false = first trigger, true = processed)
- Field notes:
orderId: TheorderIdprovided when invoking the payment action; use it to locate and update the corresponding order recordalreadyProcessed: Only process refund logic whenalreadyProcessedisfalse
- Custom logic examples:
- Update order status to
refunded - Adjust user benefits or subscriptions
- Notify the user about the refund
- Update order status to
Stripe Recurring Payment Management Actionflow
- Trigger: When starting or canceling a subscription
- System actions:
- Update the Recurring Payment Table
- Field notes:
status: The current status of the recurring payment. Possible values includeINCOMPLETE,INCOMPLETE_EXPIRED,ACTIVE,PAST_DUE,CANCELED,TRIALING, andUNPAID. Use these to control your logic as needed. See Stripe documentation for details.
- Custom logic examples:
- Activate or deactivate subscription-based features
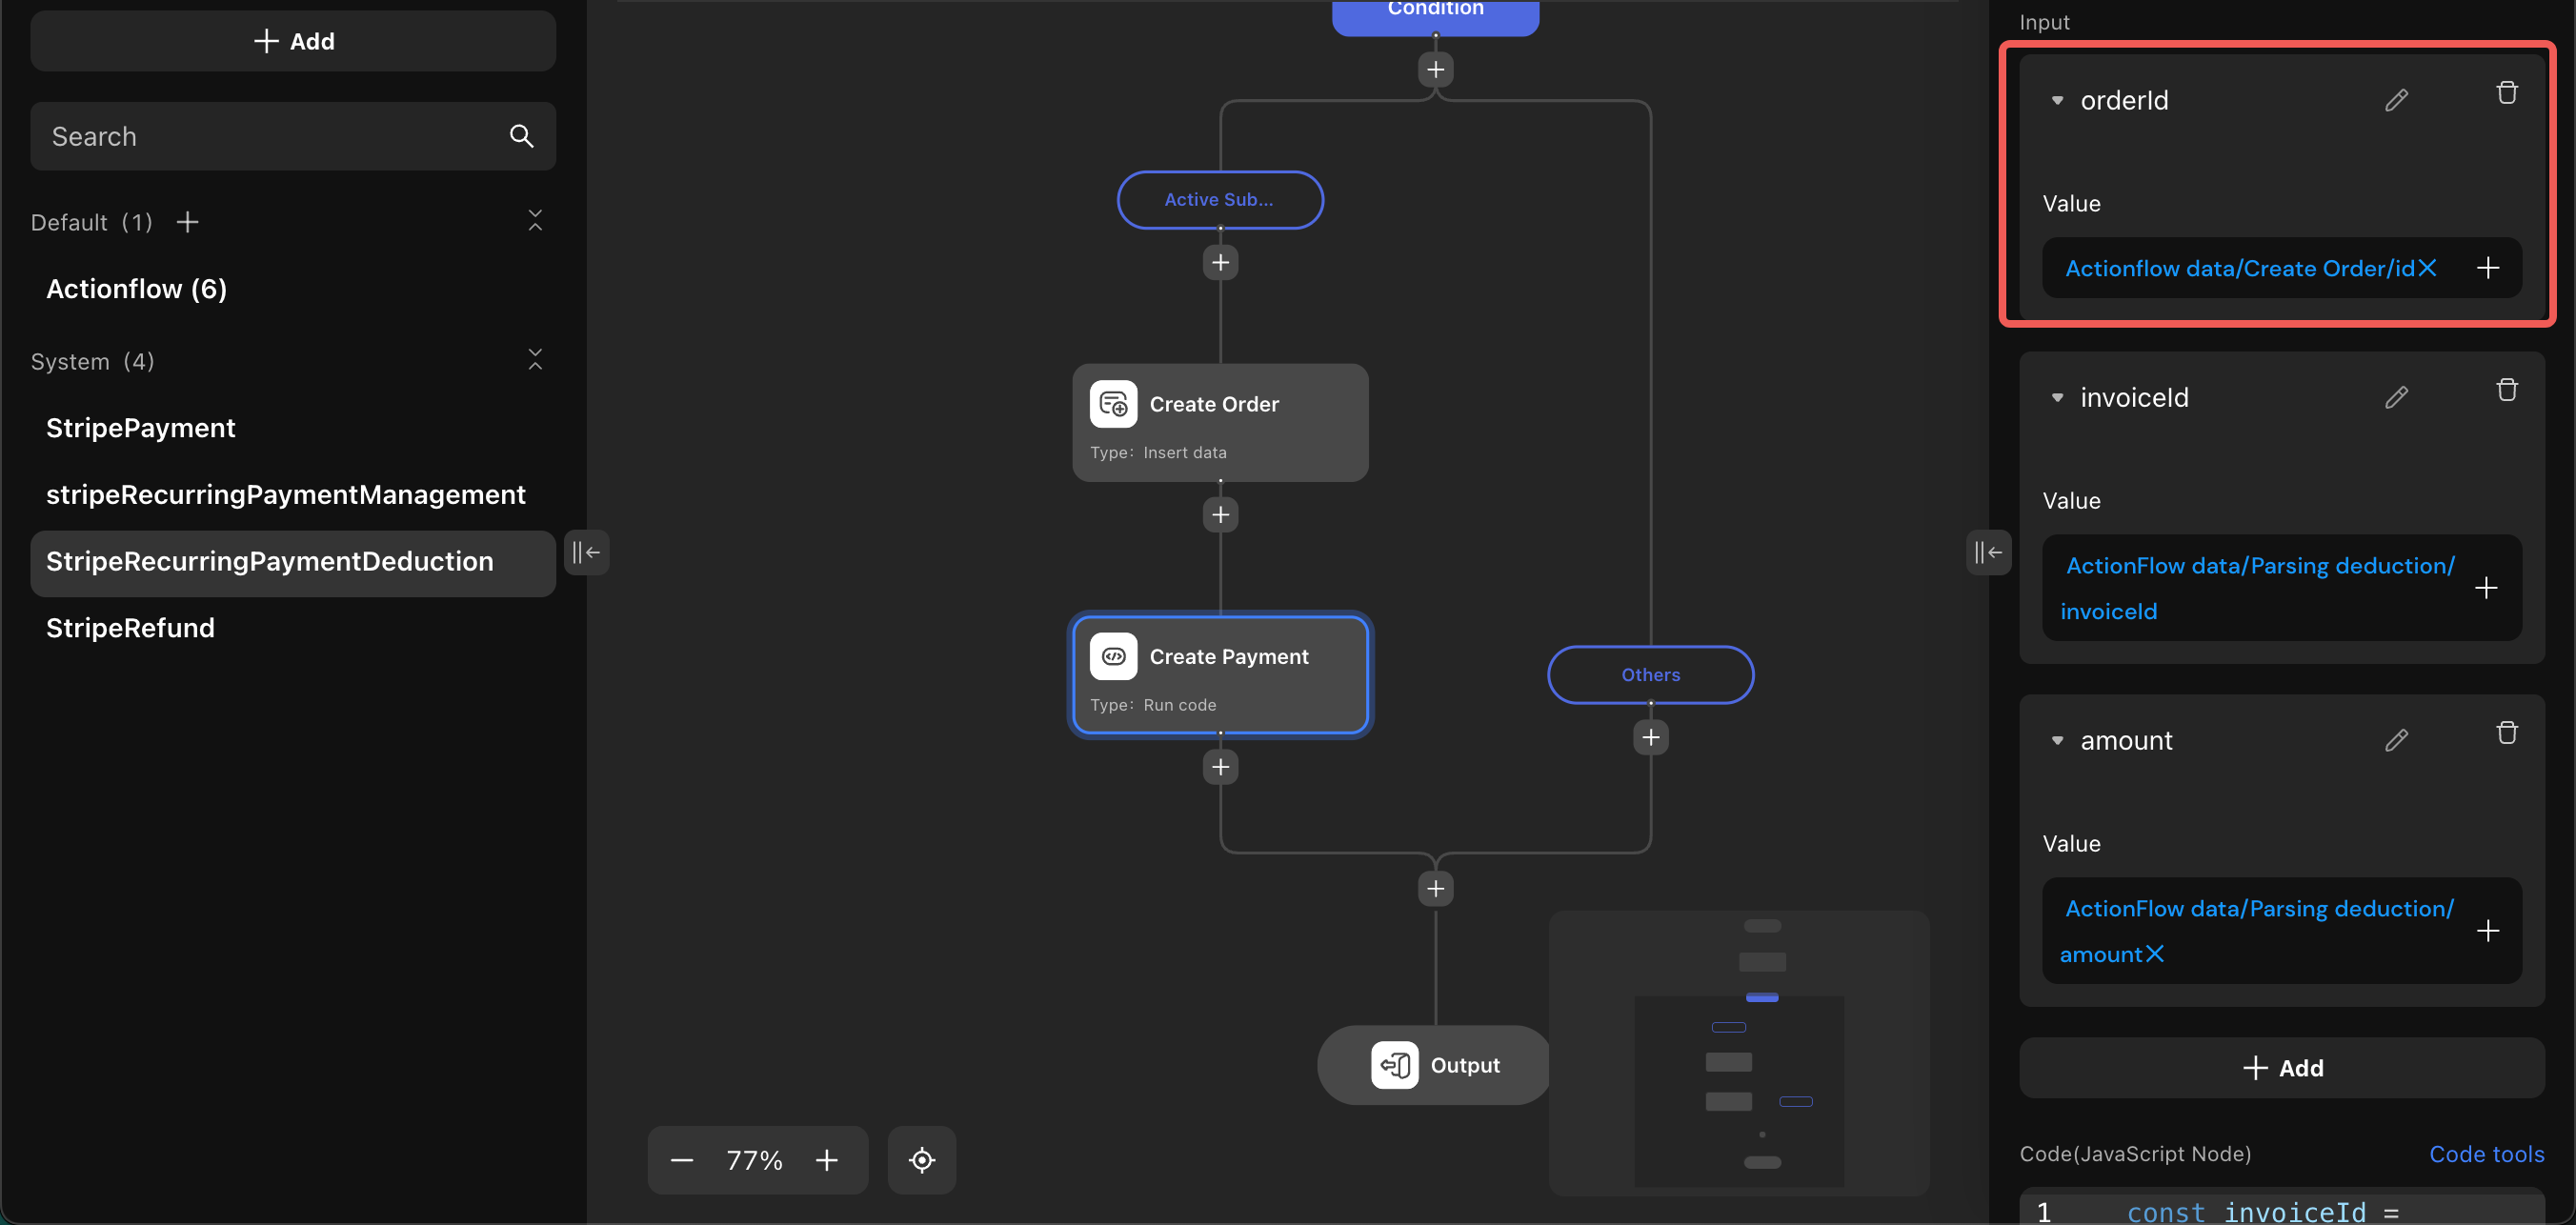
Stripe Recurring Payment Deduction Actionflow
- Trigger: When Stripe automatically charges for subscription renewal
- System actions:
- Insert a new order record
- Custom logic examples:
- For active subscriptions, add a node to create a new order and pass the generated order ID to the
orderIdinput of the payment creation node.
- For active subscriptions, add a node to create a new order and pass the generated order ID to the
Retrieving Payment and Refund Status (Frontend)
Payment operations are asynchronous.
To display real-time results:
The refund table only has basic query permissions enabled by default. If you need to aggregate data (such as count, sums, etc.), please enable it in the data table’s permission configuration.
- Subscribe to the
PaymentorRefundtables using a list component. - Listen for real-time updates to refresh the frontend dynamically.
Best Practices
- Validate input parameters before initiating payments.
- Cross-check the order amount and payment amount after a payment succeeds.
- Handle duplicate webhooks using
webhookProcessed. - Restrict sensitive operations like refunds to admin users.
- Monitor your Stripe account for unusual activity.
Troubleshooting Common Issues
| Problem | Cause | Solution |
|---|---|---|
| Incorrect charge amount | Amount not in smallest currency unit | Always multiply by 100 for currencies like USD |
| Payment not reflected in order | Missing or misconfigured webhook trigger | Ensure webhook trigger and Actionflows are properly set up |
| Refund not updating order | Refund webhook trigger not processed | Check the refund webhook and Actionflow |
Conclusion
By following this guide, you can seamlessly integrate Stripe payments into your project, providing users with a secure, scalable, and professional checkout experience.
Reminder: Always rely on secure backend Actionflows for critical payment processes, rather than frontend assumptions.