Custom Code
Custom code enables you to implement complex or specialized business logic using JavaScript (JS). This feature is recommended only when no-code solutions cannot meet your requirements and is intended for users with JavaScript programming experience.
Basic Usage Guide
Adding a Custom Code Node
After adding a code block, you can rename it and write JavaScript code directly in the code editor on the right. For a larger editing workspace, click the expand button in the upper right corner.
Changes to custom code take effect immediately in production after backend syncing. To avoid risks, it is recommended to first clone your project and thoroughly test custom code there.
Accessing Input Parameters
To use data from previous nodes in your code block, first declare the required input parameters in the custom code node. You can then access these values using the built-in Momen function context.getArg("input parameter name").
.jpeg)
Returning Output Values
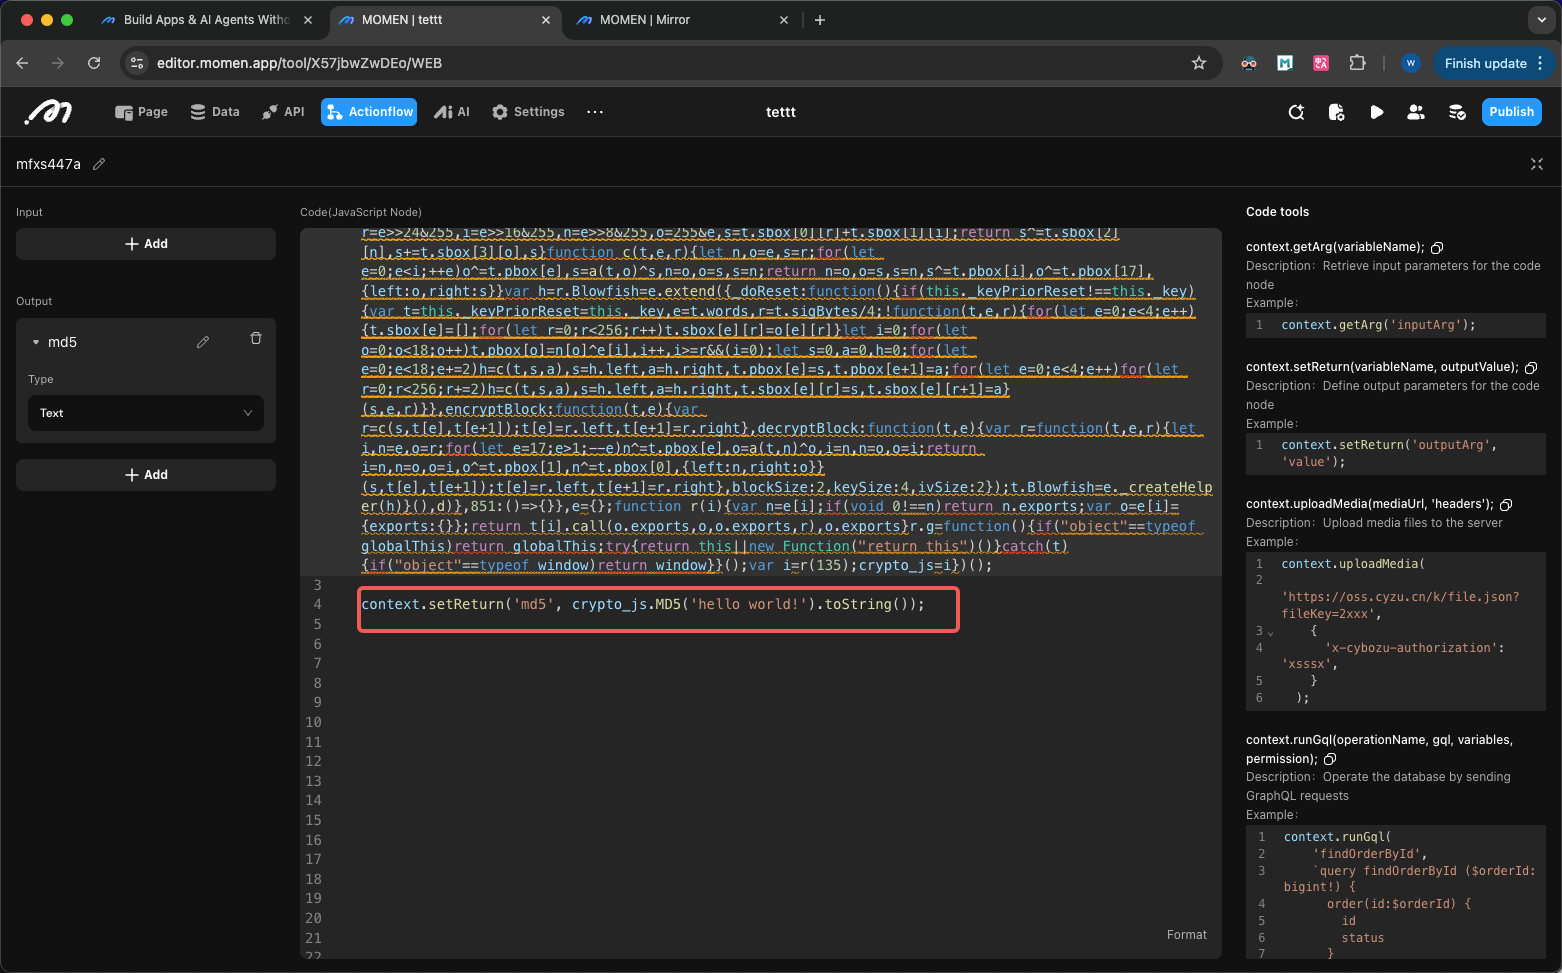
To pass code block results to downstream nodes, configure an output parameter in the code block and use the context.setReturn('outputName', outputValue) function within your code.
.png)
JavaScript Syntax Support and Limitations
Environment Limitations
Custom code blocks support modern JavaScript syntax with the following limitations:
-
Node.js environment methods are not supported:
- You cannot use
require()orimportto load modules. To use third-party libraries, refer to Third-party Libraries . - You cannot use
fetch,XMLHttpRequest, or other libraries to make network requests. Instead, call pre-configured APIs to access external services, or use GraphQL to interact with your project’s backend. For details, see the next section “Built-in Methods” forcallThirdPartyApiandrunGql. - File system access is not permitted; the
fsmodule cannot be used to read or write files on the server.
- You cannot use
-
Browser-specific APIs are unavailable: This includes
window,document,alert,localStorage,setTimeout, and similar APIs. -
Async/await asynchronous operations are not supported.
-
The
try...catchsyntax is not supported. -
console.logis not available for logging. Usecontext.loginstead and review logs in the log service.
Built-in Methods
The system provides built-in utility methods, all located in the context object.
getArg: Retrieve input parameters
const value = context.getArg('input parameter name');setReturn: Set output parameters
context.setReturn('output parameter name', parameter value);runGql: Execute database operations through GraphQL requests
// 1. Define gql statement
const gql = `query findBlogById ($blogId: bigint!){
  blog(where: {id:{_eq: $blogId}}) {
    id
    title
    content
  }
}`

// 2. Run gql
const result = context.runGql(
'findBlogById', // Operation name, must match the operation name defined in the gql statement
gql, // gql statement
{ blogId: 1 }, // Input parameters
{ role: 'admin' } // Permission role, recommended to be fixed as admin
)callThirdPartyApi: Invoke configured API
context.callThirdPartyApi(
  'SCAB61VCBS989410A3', // API ID
  { body: { key: 'key', appkey: 'key', sign: 'sign' } } // API input parameters
);callActionFlow: Invoke other actionflows synchronously
context.callActionFlow(
  'f400ac9bc203', // Actionflow ID
  null, // Actionflow version, use latest version when null
{ orderId: 1 }); // Actionflow input parameterscreateActionFlowTask: Invoke other actionflows asynchronously
context.createActionFlowTask(
  'f400ac9bc203', // Actionflow ID
  null, // Actionflow version, use latest version when null
  { orderId: 1 } // Actionflow input parameters
);getSsoAccountId: Retrieve user ID logged in through SSO
context.getSsoAccountId();getSsoUserInfo: Retrieve user information logged in through SSO
// Returns user information json
context.getSsoUserInfo();uploadMedia: Upload image to server
context.uploadMedia(
  'https://oss.cyzu.cn/k/file.json?fileKey=2xxx', // Image address
  { 'X-cybozu-authorization': 'xsssx' } // Required headers for request, fill {} when empty
);
// Return value: {mediaType:"IMAGE", id:1020000000000003}
Example of updating the uploaded image to a table:
const url = '' //  url of the image
const headers = {}
const media = context.uploadMedia(url, headers)

const imageID = media.id
const gql = `mutation update_image($imageID: bigint,$xx_id:bigint){
    update_tableName(
      _set:{imageField_id:$imageID}
      where:{id:{_eq:$xx_id}})
      {
     returning{id}
    }
}`
context.runGql('update_image', gql, { imageID, xx_id }, { role: 'admin' });
Advanced: Database Operations
Momen’s interface is based on GraphQL, and you can use the runGql method in code blocks to perform database operations.
GraphQL is an API query language. This section does not cover GraphQL basics. If needed, refer to Learning GraphQL
Get GraphQL Schema
Schema is the blueprint of GraphQL API, containing all request structure types, request parameters, etc. This step requires API debugging tools such as Postman , Altair , etc. The following uses Postman as an example.
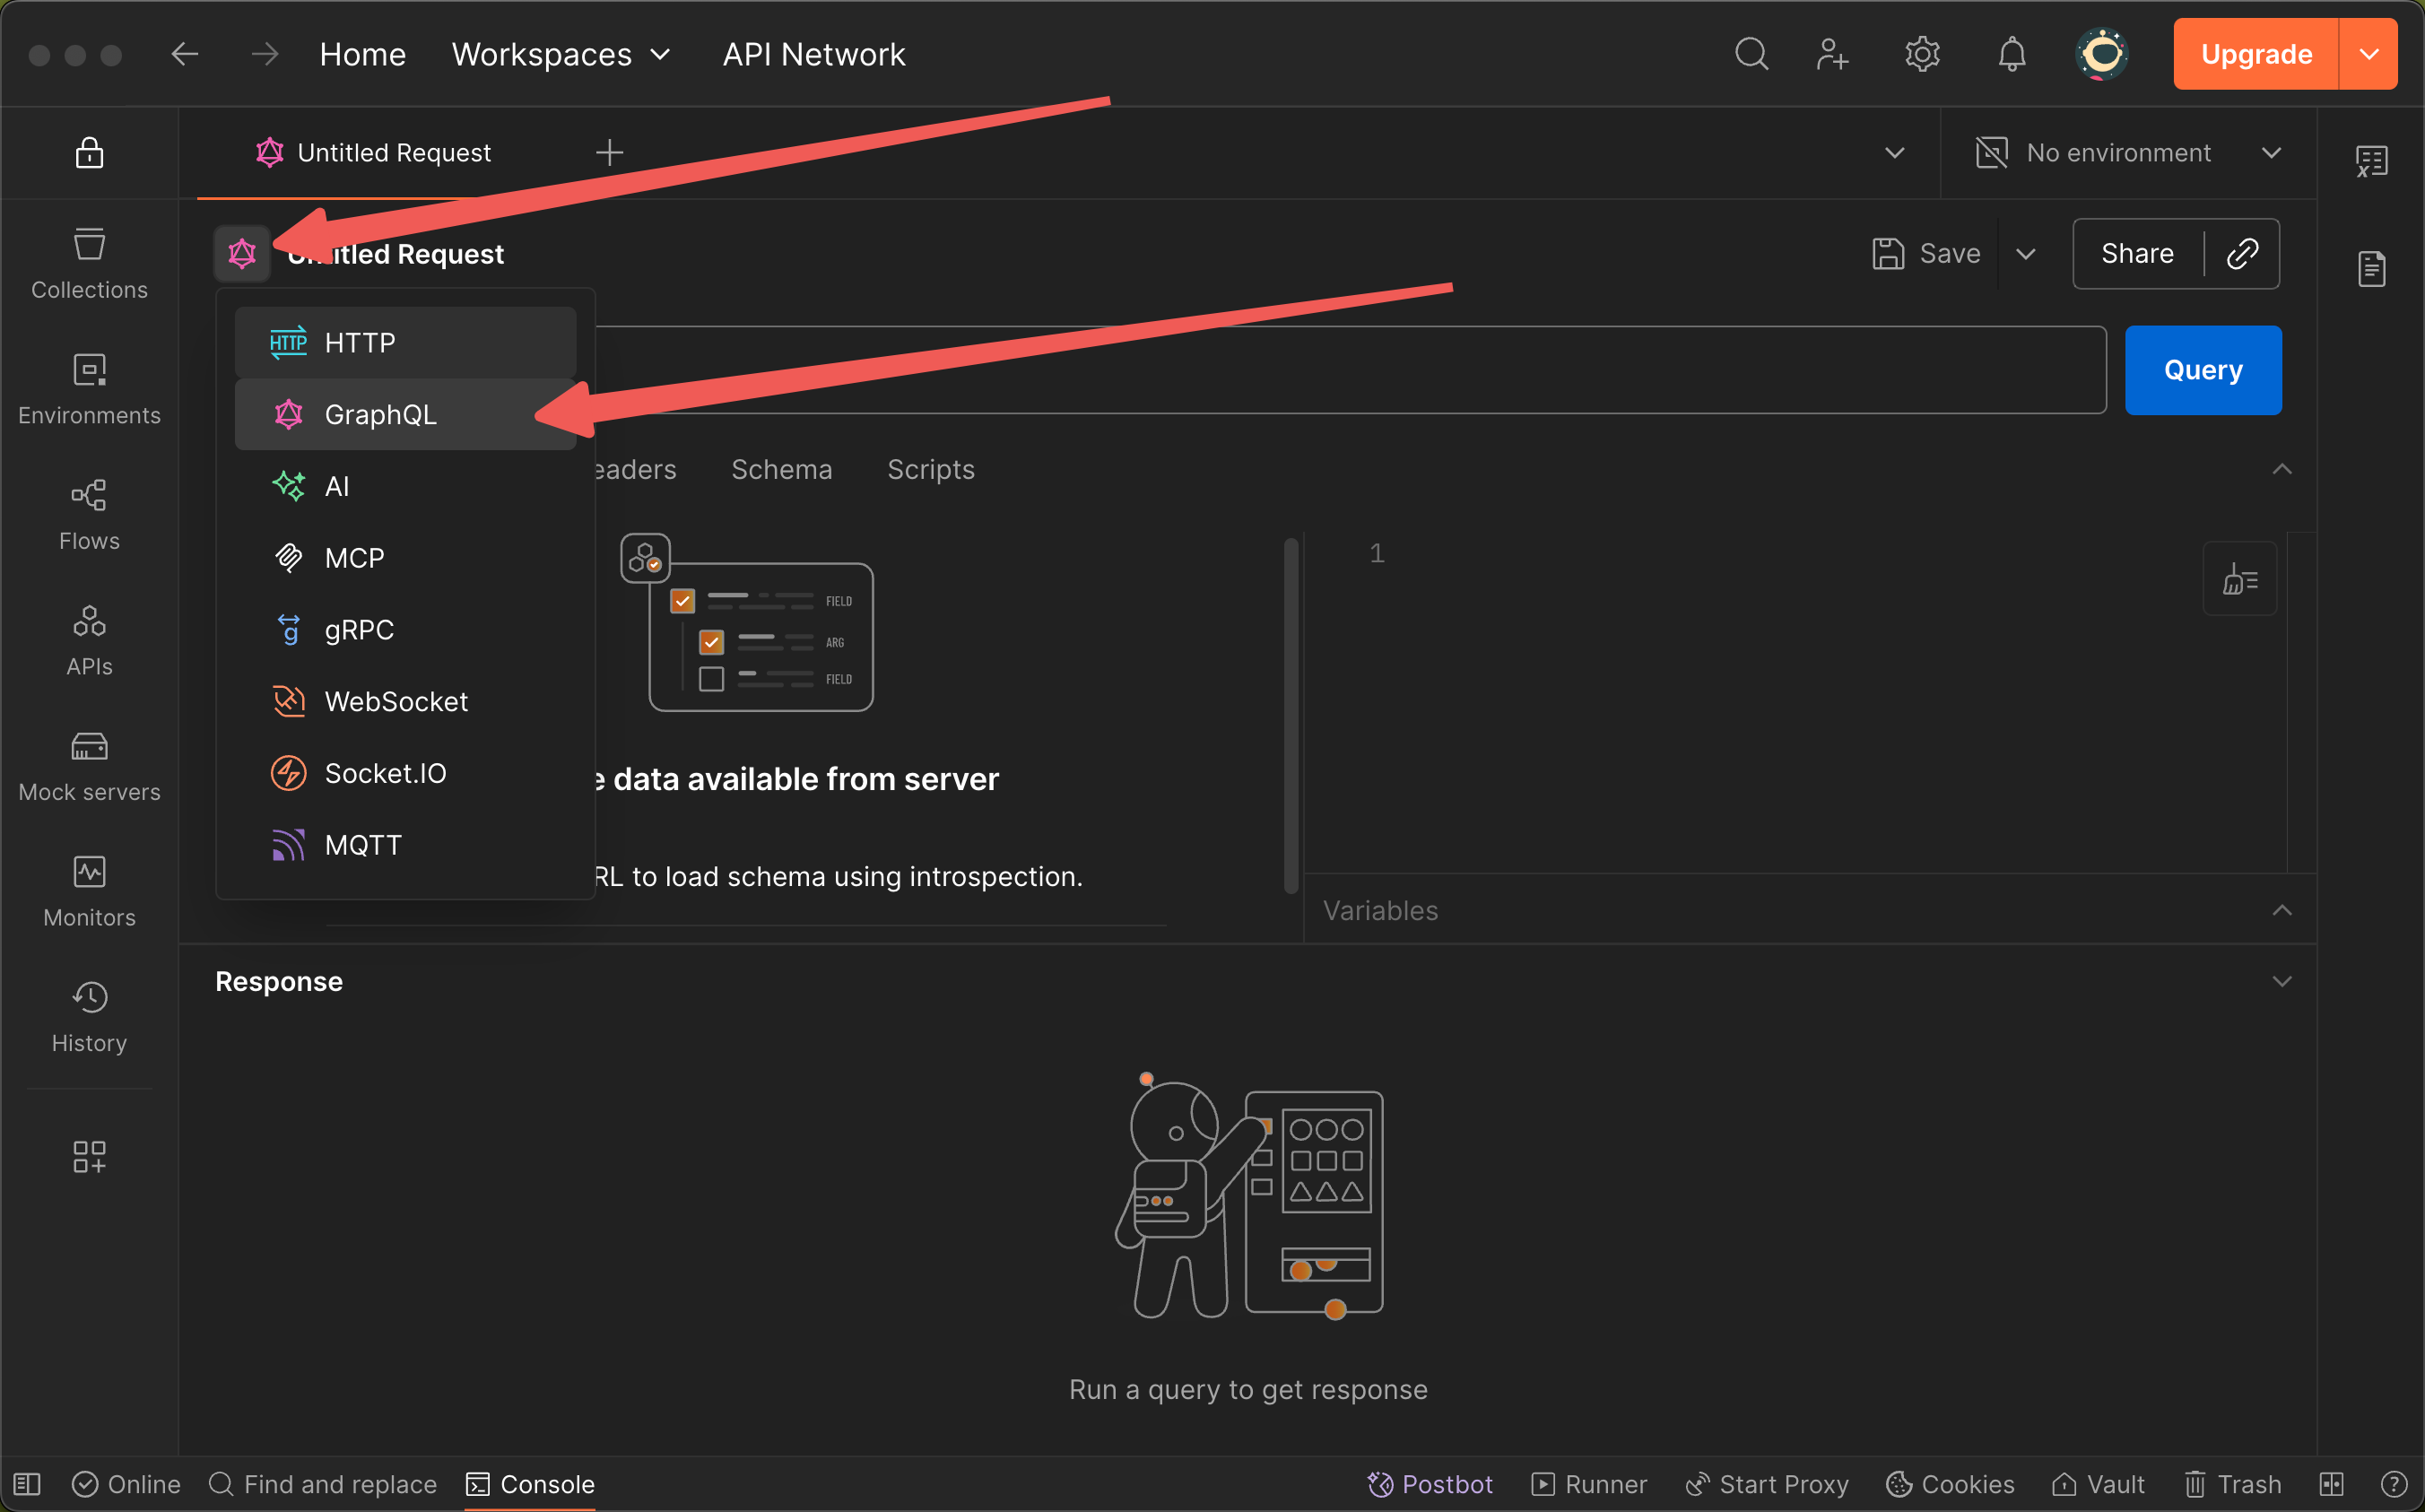
Create a new request in Postman, click the type icon in the upper left corner, and select the “GraphQL” category.
After creation, fill in the backend address of the project. You can enter the database, press F12 to enter the console to view all requests, and the request named “graphql-v2” is the GraphQL request sent to the project backend.
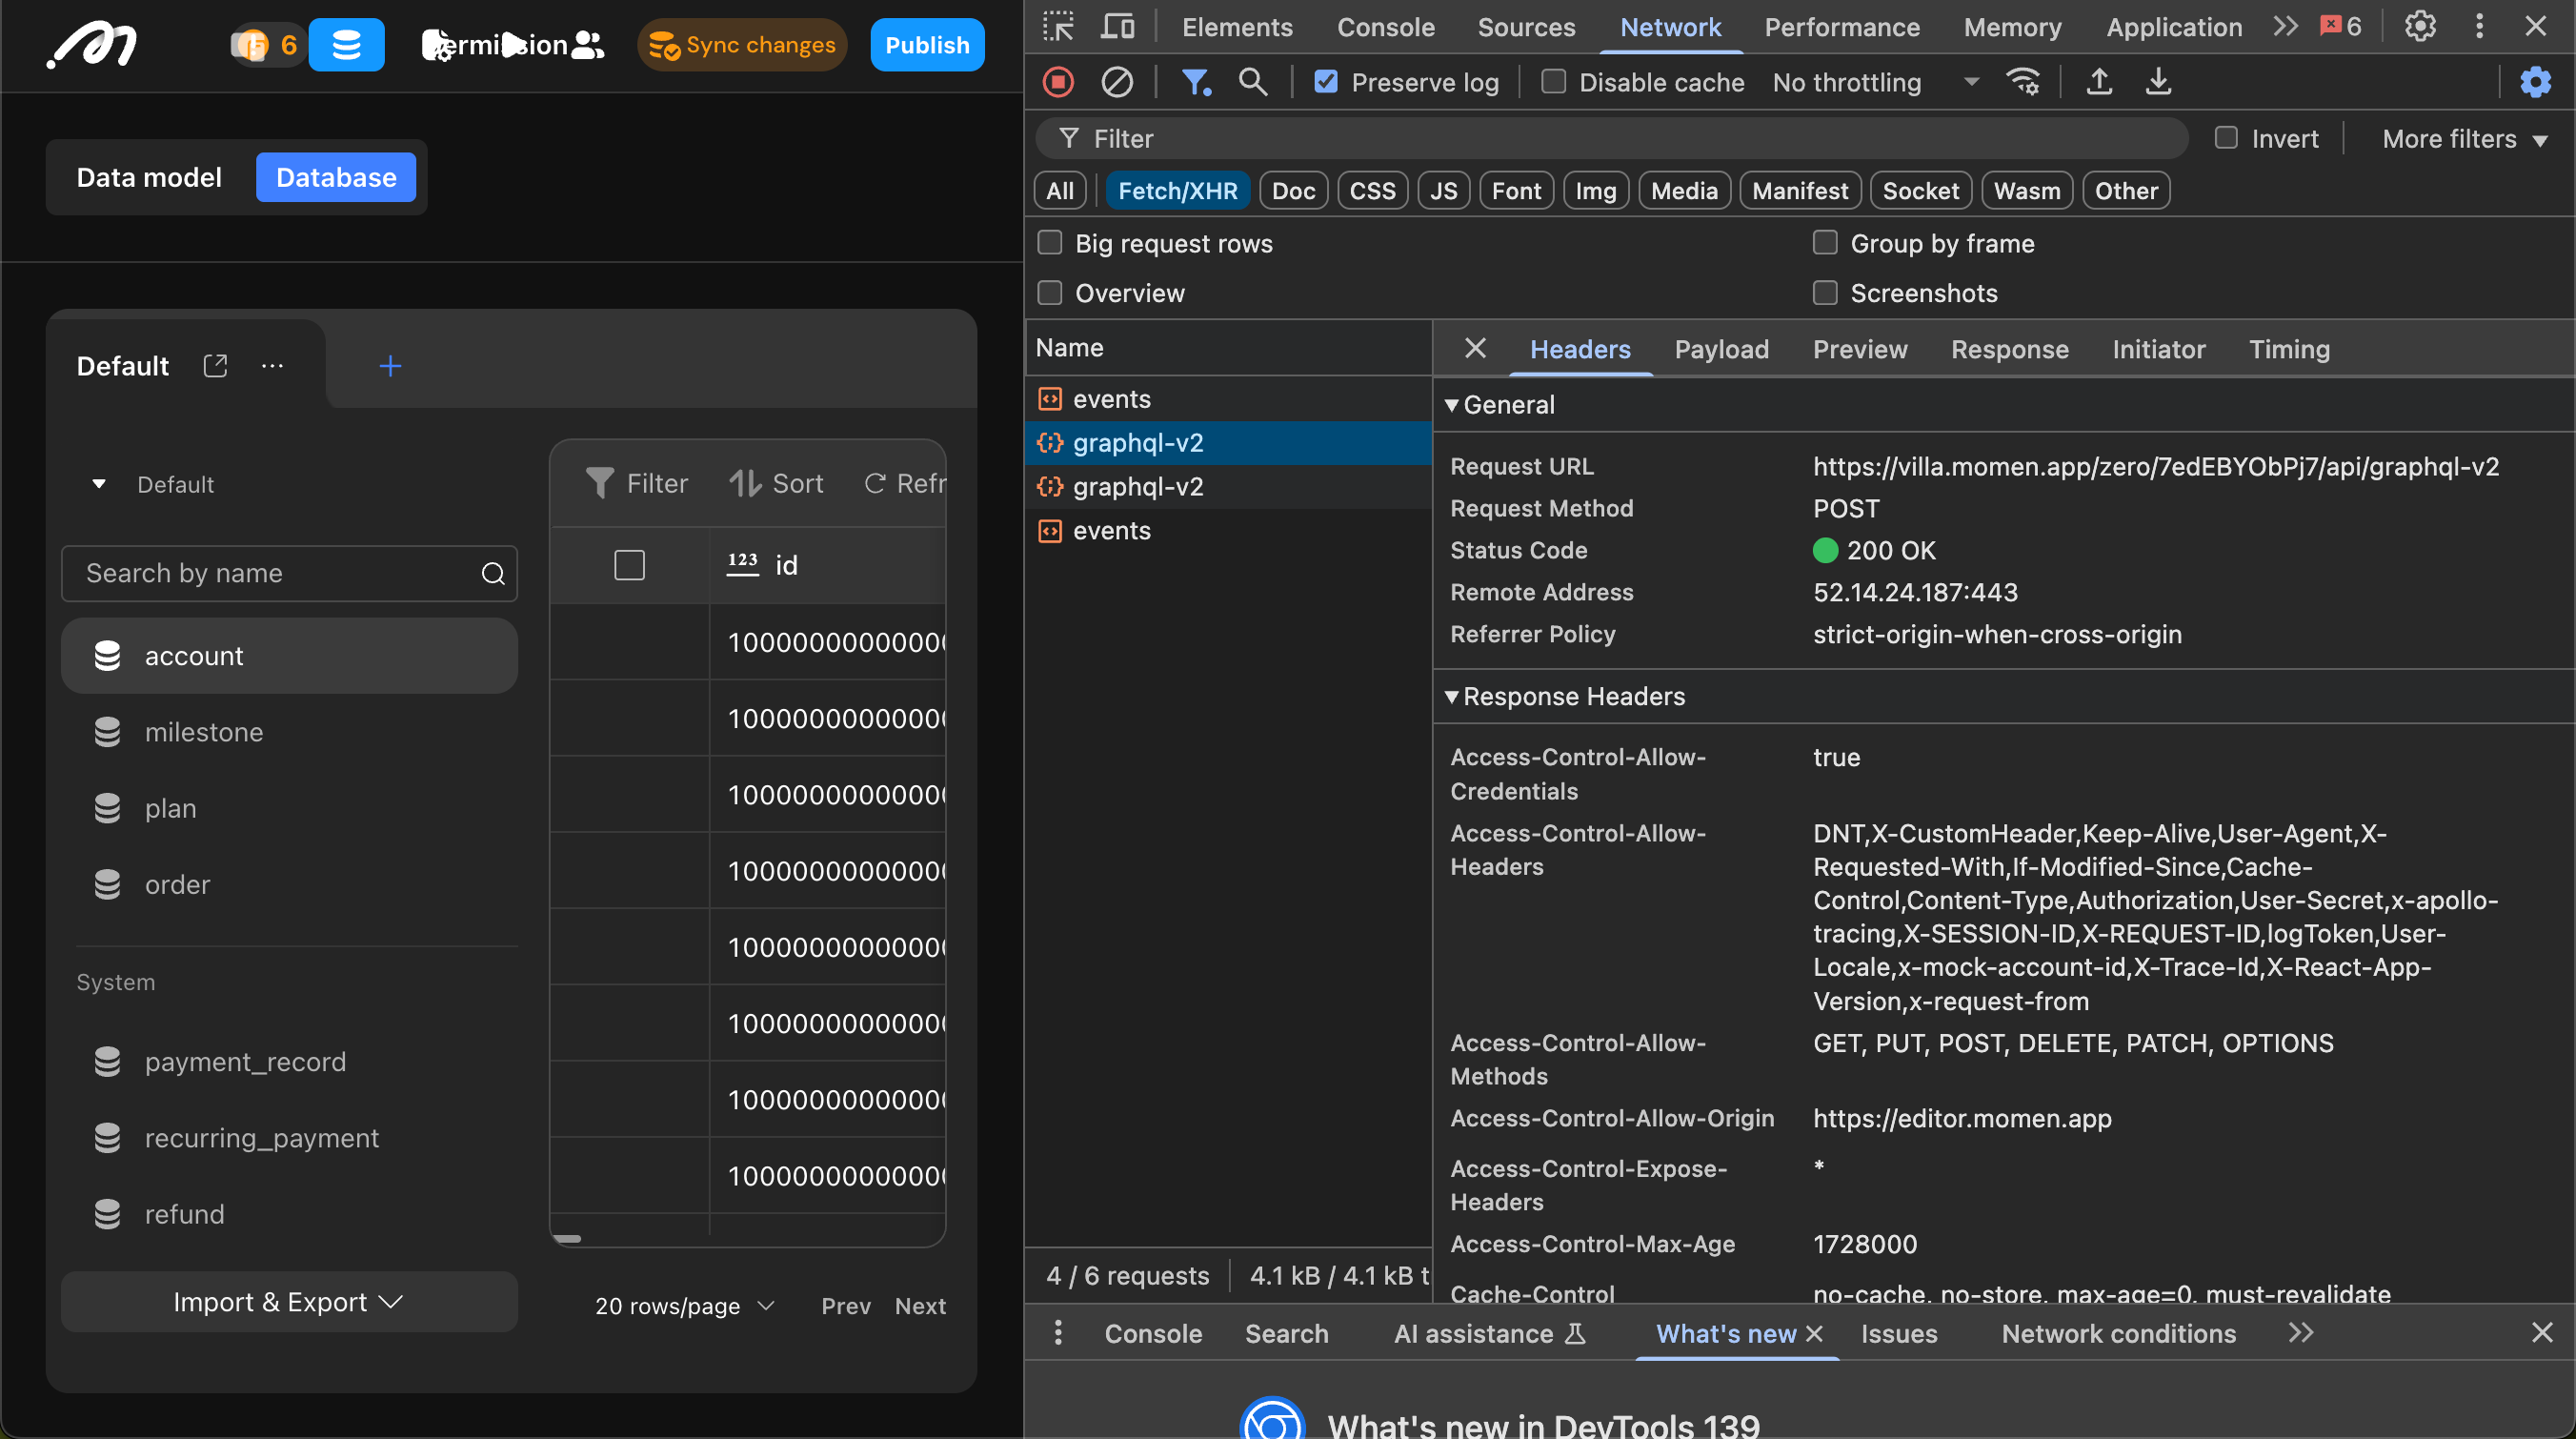
Copy the URL of the request into Postman, and it will automatically retrieve the GraphQL schema of the project.

Get GraphQL Statement
On the left side of the interface, you can see the structure of the interface. After selecting the required fields, the corresponding GraphQL statement will be displayed on the right. For example, in a blog website, articles are stored in the “blog” table. If you need to retrieve the title and content of blogs created before September 24, 2025, follow these steps.
First, select the blog table on the left. Add filter conditions, select “where” -> “created_at” -> “_lt” (meaning less than) in sequence, and enter the value “2025-09-24T00:00:00.000+08:00”.
Then, add return fields, select “title” and “content” in sequence on the left.
Finally, click the “Query” button to send the request.
If dynamic queries are needed, add variables in the “Variables” section on the right.
Field description:
- where: filter conditions
- order_by: sort fields
- distinct_on: deduplication fields
- limit: limit the number of returns, indicating the maximum number of data records to return
- offset: offset, indicating from which item to start returning
- id, title, content, etc.: fields in the table
Run GraphQL in Code Blocks
After debugging successfully in Postman, copy the GraphQL statement to the code block:
// 1. Define gql statement
const gql = `query findBlogById ($blogId: bigint!){
    blog(where: {id:{_eq: $blogId}}) {
      title
      content
    }
  }`

// 2. Run gql
 const result = context.runGql(
  'findBlogById',
  gql,
  { blogId: 1 },
  { role: 'admin' }
)

// 3. Extract data from results
const status = result.blog[0].status;
Code Explanation
- Define gql statement. String type, containing the following content:
-
Operation type: Specify the operation type at the beginning of the statement, such as query (query data), mutation (modify data) or subscription (subscribe to data changes).
-
Operation name: Assign a name to the operation, such as
findBlogById. This name is useful in debugging and logging, and is also the first parameter of the context.runGql function. -
Variable definition: In the parentheses () after the operation name, define the variables required for the query. Each variable starts with $, followed by the variable name and type, such as
($blogId: bigint!). -
Query body: In the curly braces , specify which table or view to query data from (e.g.,
blog) and list the specific fields you want returned (such asid,title,content, etc.).
- Run gql
Execute the gql statement by calling the context.runGql( operationName , gql , variables , permission ) function. This function accepts four parameters:
operationName: Operation name. Must exactly match the operation name defined in the gql statement (i.e., the name after the query or mutation keyword). In this example, it’s findBlogById.
gql: The gql statement defined in the previous step.
variables: Variables object. This is an object used to pass the variables defined in the GraphQL statement. The object’s key names need to match the variable names in the gql statement (without the $ symbol), and the values are the specific data you want to pass in. For example, { blogId: 1 } will pass the value 1 to the $blogId variable in GraphQL. If the gql statement doesn’t define variables, pass an empty object.
permission: Permission role. An object used to specify the permission role for this operation. This is crucial when you need to execute operations with specific user roles (such as administrator). In the example, { role: 'admin' } means running this query with “admin” administrator role permissions.
- Extract data from results
Different operation types have different return data structures. Determine based on the return value when debugging in Postman.
After the context.runGql function executes successfully, it returns an object containing the query results. The structure of this object corresponds to the structure you defined in the gql query body.
For example, when debugging in Postman, the return value is:
{
  "blog": [
    {
      "title": "title",
      "content": "content"
    }
  ]
}
This object will be assigned to the result variable. Based on the object’s data structure, use result.blog[0].title to extract the desired content.
Advanced: Integrating Third-party Libraries
Since require() or import to load modules is not supported, if you need to use a third-party library (libraries that depend on Node.js or browser-specific APIs are not supported), you must bundle it locally using Webpack . After bundling, copy the entire generated code into your code block.
The following examples use Apple macOS as the operating system. Please modify the commands as needed for your own environment.
Create Folder
cd /tmp
mkdir webpack-demo
cd webpack-demo
Initialize npm environment:
npm init -yInstall webpack-cli
npm i -g webpack-cli Install Required Package
Using crypto-js as an example:
npm i -s crypto-jsConfigure webpack.config.js
vim webpack.config.js Configuration structure as follows:
module.exports = {
  entry: './node_modules/${moduleName}/${moduleName.js}',
  output: {
    filename: '${moduleName.js}',
    library: '${moduleName}',
    libraryTarget: 'var'
  }
}
Some third-party libraries have names that include hyphens (”-”), such as crypto-js in this example. Since Webpack does not support filenames containing hyphens, adjust the names accordingly.
First, replace all hyphens with underscores (”_”) in both the folder and JavaScript file names within the node_modules directory.
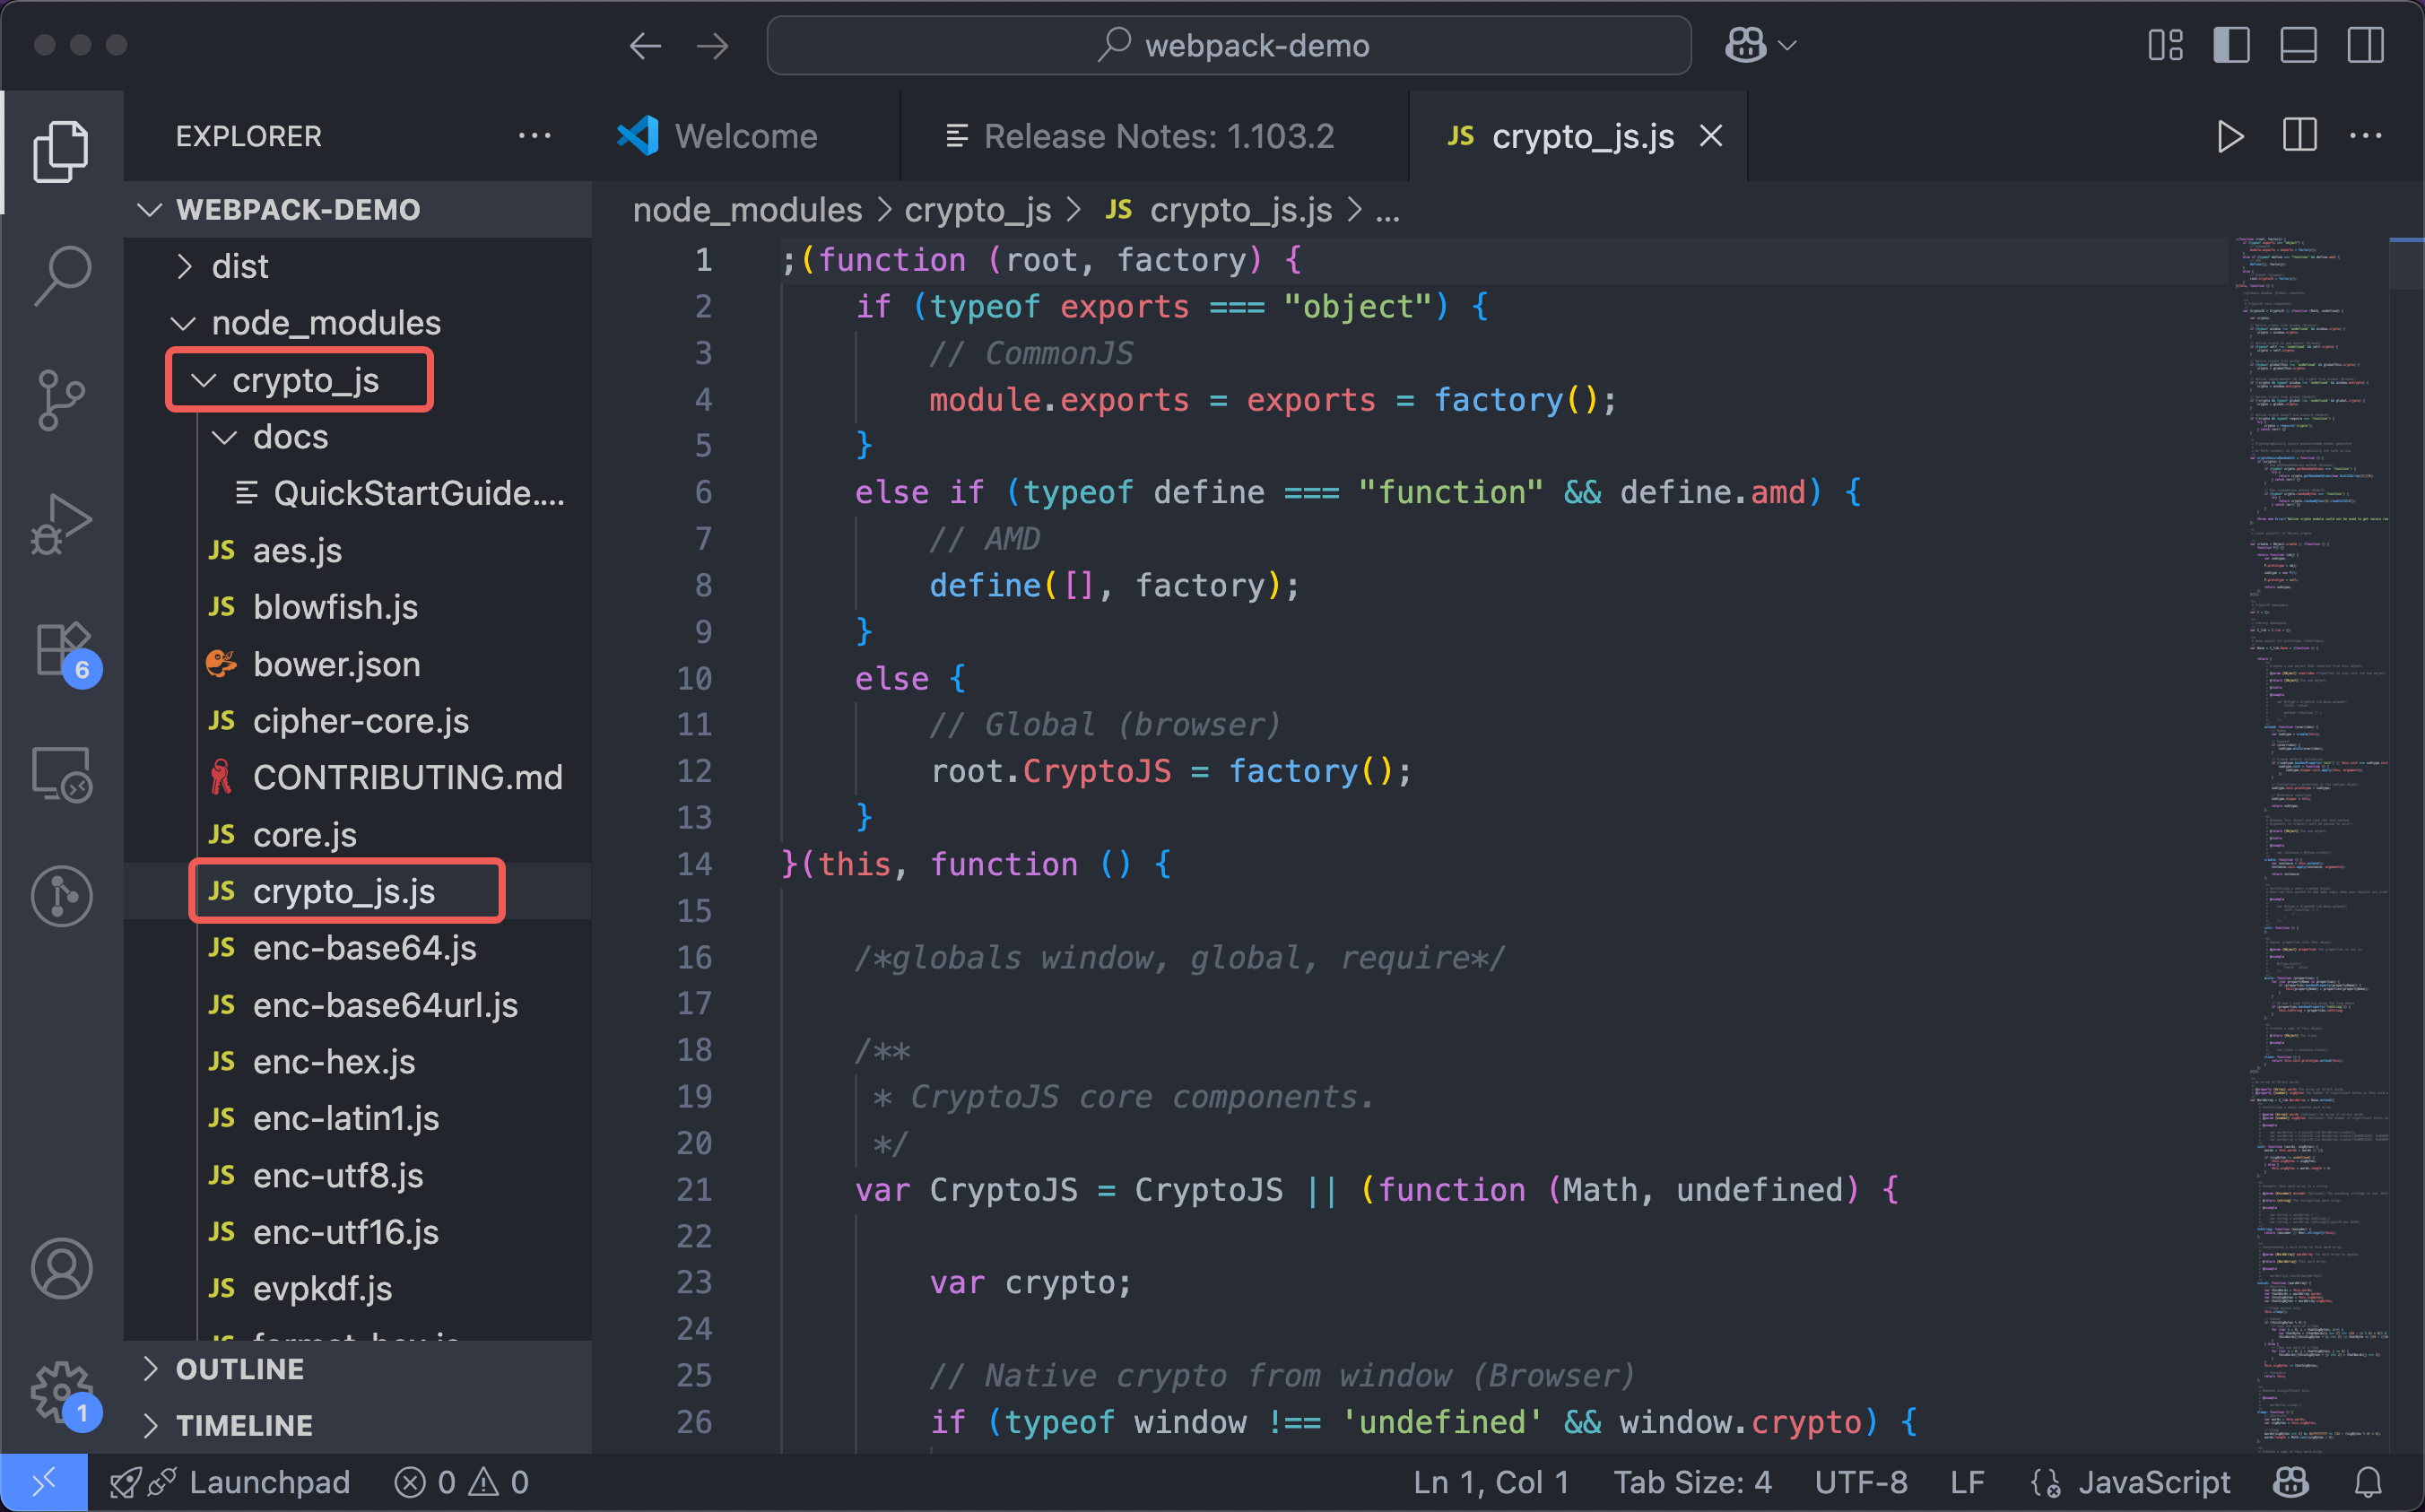
Next, update your webpack.config.js configuration as follows:
module.exports = {
  entry: './node_modules/crypto_js/crypto_js.js',
  output: {
    filename: 'crypto_js.js',
    library: 'crypto_js',
    libraryTarget: 'var'
  }
}
Package
Next, use the following command to start packaging:
npx webpack-cli -c webpack.config.js After packaging is complete, a dist folder will be generated in the current directory, containing a ${moduleName}.js file.
Copy to Code Block
Copy all the code in the file to the code block to complete the third-party library import.
Using Third-party Libraries
Once packaging is complete, utilize the methods provided by the third-party library.
In your packaging configuration, the library field specifies the global variable name for the imported library—in this example, crypto_js. Use code completion features in editors such as VS Code to explore the available methods and APIs within the library.

Then use it in the code block.